linuxеўһеҠ ж №зӣ®еҪ•зЈҒзӣҳз©әй—ҙзҡ„ж–№жі•
иҝҷзҜҮж–Үз« дё»иҰҒд»Ӣз»ҚвҖңlinuxеўһеҠ ж №зӣ®еҪ•зЈҒзӣҳз©әй—ҙзҡ„ж–№жі•вҖқпјҢеңЁж—Ҙеёёж“ҚдҪңдёӯпјҢзӣёдҝЎеҫҲеӨҡдәәеңЁlinuxеўһеҠ ж №зӣ®еҪ•зЈҒзӣҳз©әй—ҙзҡ„ж–№жі•й—®йўҳдёҠеӯҳеңЁз–‘жғ‘пјҢе°Ҹзј–жҹҘйҳ…дәҶеҗ„ејҸиө„ж–ҷпјҢж•ҙзҗҶеҮәз®ҖеҚ•еҘҪз”Ёзҡ„ж“ҚдҪңж–№жі•пјҢеёҢжңӣеҜ№еӨ§е®¶и§Јзӯ”вҖқlinuxеўһеҠ ж №зӣ®еҪ•зЈҒзӣҳз©әй—ҙзҡ„ж–№жі•вҖқзҡ„з–‘жғ‘жңүжүҖеё®еҠ©пјҒжҺҘдёӢжқҘпјҢиҜ·и·ҹзқҖе°Ҹзј–дёҖиө·жқҘеӯҰд№ еҗ§пјҒ
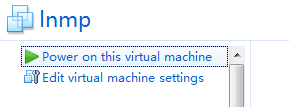
дёҖгҖҒе…ій—ӯдҪ зҡ„иҷҡжӢҹжңәзі»з»ҹпјҢжүҫеҲ°еҰӮдёӢеҶ…е®№пјҡйҖүжӢ©"Edit Virtual mache settingsвҖқ
зӮ№еҮ»"ExpandвҖң
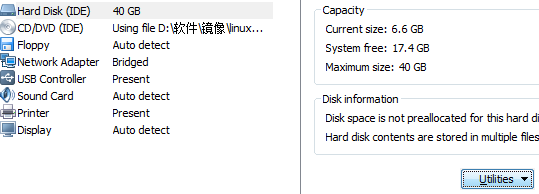
жү©еӨ§иҷҡжӢҹжңәзҡ„з©әй—ҙдёә"40G"(ж №жҚ®дёӘдәәйңҖиҰҒеЎ«еҶҷз©әй—ҙеӨ§е°Ҹ)гҖӮдҪҶжҳҜlinuxдёӢйқўе№¶дёҚеҸҜи§ҒгҖӮ
дәҢгҖҒдҪҝз”ЁlinuxдёӢзҡ„fdiskе·Ҙе…·иҝӣиЎҢеҲҶеҢәгҖӮ
з”Ёrootз”ЁжҲ·зҷ»еҪ•еҲ°дҪ зҡ„linuxзі»з»ҹпјҢжҹҘзңӢдҪ зі»з»ҹзҡ„еҲҶеҢә
#fdisk -l
дјҡеҮәзҺ°д»ҘдёӢзҡ„дҝЎжҒҜпјҡ
Device Boot Start End Blocks Id System
/dev/sda1 * 1 64 512000 83 Linux
/dev/sda2 64 2611 20458496 8e Linux LVM
Disk /dev/mapper/vg_zxw-lv_root: 18.8 GB, 18832424960 bytes
255 heads, 63 sectors/track, 2289 cylinders
Units = cylinders of 16065 * 512 = 8225280 bytes
Sector size (logical/physical): 512 bytes / 512 bytes
I/O size (minimum/optimal): 512 bytes / 512 bytes
Disk identifier: 0x00000000
Disk /dev/mapper/vg_zxw-lv_root doesn't contain a valid partition table
Disk /dev/mapper/vg_zxw-lv_swap: 2113 MB, 2113929216 bytes
255 heads, 63 sectors/track, 257 cylinders
Units = cylinders of 16065 * 512 = 8225280 bytes
Sector size (logical/physical): 512 bytes / 512 bytes
I/O size (minimum/optimal): 512 bytes / 512 bytes
Disk identifier: 0x00000000
Disk /dev/mapper/vg_zxw-lv_swap doesn't contain a valid partition table
ж №жҚ®жҸҗзӨәдҝЎжҒҜеҸҜд»ҘеҲӨж–ӯеҮәжӯӨзі»з»ҹзҡ„зЈҒзӣҳжҺҘеҸЈдёәSCSIпјҢеҜ№еә”вҖңsdaвҖқеҰӮжһңдёҠйқўзҡ„зәўиүІеӯ—дҪ“жҳҜвҖңhdaвҖқпјҢйӮЈд№ҲжӯӨзі»з»ҹзҡ„зЈҒзӣҳжҺҘеҸЈдёәIDEеҜ№еә”вҖңhdaвҖқжүҖд»ҘжҲ‘еҒҡдёҖдёӢж“ҚдҪңпјҡ
#fdisk /dev/sda/
WARNING: DOS-compatible mode is deprecated. It's strongly recommended to
switch off the mode (command 'c') and change display units to
sectors (command 'u').
Command (m for help):m //вҖң еҲ—еҮәfdiskзҡ„её®еҠ©вҖқ
Command action
a toggle a bootable flag
b edit bsd disklabel
c toggle the dos compatibility flag
d delete a partition
l list known partition types
m print this menu
n add a new partition
o create a new empty DOS partition table
p print the partition table
q quit without saving changes
s create a new empty Sun disklabel
t change a partition's system id
u change display/entry units
v verify the partition table
w write table to disk and exit
x extra functionality (experts only)
Command (m for help):n //вҖқ е‘Ҫд»Өnз”ЁдәҺж·»еҠ ж–°еҲҶеҢә"
Command action
e extended
p primary partition (1-4)
p //" йҖүжӢ©еҲӣе»әдё»еҲҶеҢә"жӯӨж—¶пјҢ
Partition number (1-4):3 //fdiskдјҡи®©дҪ йҖүжӢ©дё»еҲҶеҢәзҡ„зј–еҸ·пјҢеҰӮжһңе·Із»ҸжңүдәҶдё»еҲҶеҢәsda1пјҢsda2пјҢйӮЈд№Ҳзј–еҸ·е°ұйҖү3пјҢеҚіиҰҒеҲӣе»әзҡ„иҜҘеҲҶеҢәдёәsda3.
First cylinder (2611-3916, default 2611): //жӯӨж—¶пјҢfdiskеҸҲдјҡи®©дҪ йҖүжӢ©иҜҘеҲҶеҢәзҡ„ејҖе§ӢеҖјиҝҷдёӘе°ұжҳҜеҲҶеҢәзҡ„Start еҖјпјҲstart cylinderпјүпјӣиҝҷйҮҢжңҖеҘҪзӣҙжҺҘжҢүеӣһиҪҰпјҢ
Using default value 2611
Last cylinder, +cylinders or +size{K,M,G} (2611-3916, default 3916): //жӯӨж—¶пјҢfdiskеҸҲдјҡи®©дҪ йҖүжӢ©иҜҘеҲҶеҢәзҡ„ејҖе§ӢеҖјиҝҷдёӘе°ұжҳҜеҲҶеҢәзҡ„End еҖјиҝҷйҮҢжңҖеҘҪзӣҙжҺҘжҢүеӣһиҪҰпјҢ
Using default value 3916
Command (m for help): w //w "дҝқеӯҳжүҖжңү并йҖҖеҮәпјҢеҲҶеҢәеҲ’еҲҶе®ҢжҜ•"
The partition table has been altered!
Calling ioctl() to re-read partition table.
WARNING: Re-reading the partition table failed with error 16: Device or resource busy.
The kernel still uses the old table. The new table will be used at
the next reboot or after you run partprobe(8) or kpartx(8)
Syncing disks.
дёүгҖҒжҲ‘们зҡ„ж–°е»әеҲҶеҢә/dev/sda3пјҢеҚҙдёҚжҳҜLVMзҡ„гҖӮжүҖд»ҘпјҢжҺҘдёӢжқҘдҪҝз”Ёfdiskе°Ҷе…¶ж”№жҲҗLVMзҡ„гҖӮ
#fdisk /dev/sda
Command (m for help): m
Command (m for help): t //ж”№еҸҳеҲҶеҢәзі»з»ҹid
Partition number (1-4): 3 //жҢҮе®ҡеҲҶеҢәеҸ·
Hex code (type L to list codes): 8e //жҢҮе®ҡиҰҒж”№жҲҗзҡ„idеҸ·пјҢ8eд»ЈиЎЁLVMгҖӮ
Command (m for help): w
еӣӣгҖҒйҮҚеҗҜзі»з»ҹеҗҺпјҢзҷ»йҷҶзі»з»ҹгҖӮпјҲдёҖе®ҡиҰҒйҮҚеҗҜзі»з»ҹпјҢеҗҰеҲҷж— жі•жү©е……ж–°еҲҶеҢәпјү
дә”гҖҒж јејҸеҢ–иҜҘж–°ж·»еҠ зҡ„еҲҶеҢәпјҡ
#fdisk -l
Device Boot Start End Blocks Id System
/dev/sda1 * 1 64 512000 83 Linux
/dev/sda2 64 2611 20458496 8e Linux LVM
/dev/sda3 2611 3916 10483750 8e Linux LVM
дҪ дјҡеҸ‘зҺ°еӨҡдәҶдёҖеқ—еҲҶеҢәгҖӮ
#mkfs -t ext3 /dev/sda3 //еңЁзЎ¬зӣҳеҲҶеҢәвҖң/dev/sda3вҖқдёҠеҲӣе»әвҖңext3вҖқж–Ү件系з»ҹгҖӮ
жӯӨж—¶жҲ‘们е°ұеҸҜд»ҘдҪҝз”ЁиҜҘж–°еўһеҲҶеҢәе•Ұпјҡ
е…ӯгҖҒжү©е……ж–°еҲҶеҢә
#lvs
#pvcreate /dev/sda3 //pvcreateжҢҮд»Өз”ЁдәҺе°Ҷзү©зҗҶзЎ¬зӣҳеҲҶеҢәеҲқе§ӢеҢ–дёәзү©зҗҶеҚ·пјҢд»Ҙдҫҝиў«LVMдҪҝз”ЁгҖӮиҰҒеҲӣе»әзү©зҗҶеҚ·еҝ…йЎ»йҰ–е…ҲеҜ№зЎ¬зӣҳиҝӣиЎҢеҲҶеҢәпјҢ并且е°ҶзЎ¬зӣҳеҲҶеҢәзҡ„зұ»еһӢи®ҫзҪ®дёәвҖң8eвҖқеҗҺпјҢжүҚиғҪдҪҝз”ЁpvcreatжҢҮд»Өе°ҶеҲҶеҢәеҲқе§ӢеҢ–дёәзү©зҗҶеҚ·гҖӮ
Physical volume "/dev/sda3" successfully created
#vgextend VolGroup00 /dev/sda3 пјҲе…¶дёӯжҳҜеҪ“еүҚйңҖиҰҒжү©е……зҡ„lvmз»„еҗҚпјҢеҸҜд»ҘйҖҡиҝҮdf -hжҹҘзңӢпјҢдҫӢеҰӮжҲ‘зҡ„жҳҜпјҡ /dev/mapper/VolGroup00-LogVol00пјү //vgextendжҢҮд»Өз”ЁдәҺеҠЁжҖҒзҡ„жү©еұ•еҚ·з»„пјҢе®ғйҖҡиҝҮеҗ‘еҚ·з»„дёӯж·»еҠ зү©зҗҶеҚ·жқҘеўһеҠ еҚ·з»„зҡ„е®№йҮҸгҖӮ
#vgdisplay //з”ЁдәҺжҳҫзӨәLNMеҚ·з»„зҡ„е…ғж•°жҚ®дҝЎжҒҜгҖӮ
--- Volume group ---
VG Name vg_zxw
System ID
Format lvm2
Metadata Areas 1
Metadata Sequence No 3
VG Access read/write
VG Status resizable
MAX LV 0
Cur LV 2
Open LV 2
Max PV 0
Cur PV 1
Act PV 1
VG Size 19.51 GiB
PE Size 4.00 MiB
Total PE 4994
Alloc PE / Size 4994 / 19.51 GiB
Free PE / Size 4994 / 10.01GB
VG UUID sqBgTs-iA8x-tCXZ-KYxK-SyWS-TfXQ-uBsLaR
(дё»иҰҒжҹҘзңӢFree PE / Size 4994 / 10.01GBпјҢиҜҙжҳҺжҲ‘们жңҖеӨҡеҸҜд»Ҙжңү10.01GBзҡ„жү©е……з©әй—ҙгҖӮжҲ‘дёҖиҲ¬йҖүжӢ©е°ҸдәҺ10.01GB)
# lvextend -L+9.8G /dev/VolGroup00/LogVol00 /dev/sda3
Logical volume LogVol00 successfully resized
#e2fsck -a /dev/VolGroup00/LogVol00 //дҪҝз”Ёe2fsckжҢҮд»ӨжЈҖжҹҘж–Ү件系з»ҹй”ҷиҜҜгҖӮд№ҹеҸҜз”ЁвҖңfsck -t ext2 -V /dev/sda3/жЈҖжҹҘext2ж–Ү件系з»ҹгҖӮ
(еҒҡfsckпјҢжЈҖжҹҘж–Ү件系з»ҹ)
#resize2fs /dev/VolGroup00/LogVol00 //resize2fsжҢҮд»Өиў«з”ЁжқҘеўһеӨ§жҲ–иҖ…收缩жңӘеҠ иҪҪзҡ„вҖңext2/ext3вҖқж–Ү件系з»ҹзҡ„еӨ§е°ҸгҖӮ
#df -h //жҹҘзңӢдёҖдёӢдҪ зҡ„зі»з»ҹзЈҒзӣҳз©әй—ҙ"/"зӣ®еҪ•еҸҳжҲҗдәҶ40GB
okпјҢиҝҷж ·е°ұеӨ§еҠҹе‘ҠжҲҗдәҶгҖӮ
еҲ°жӯӨпјҢе…ідәҺвҖңlinuxеўһеҠ ж №зӣ®еҪ•зЈҒзӣҳз©әй—ҙзҡ„ж–№жі•вҖқзҡ„еӯҰд№ е°ұз»“жқҹдәҶпјҢеёҢжңӣиғҪеӨҹи§ЈеҶіеӨ§е®¶зҡ„з–‘жғ‘гҖӮзҗҶи®әдёҺе®һи·өзҡ„жҗӯй…ҚиғҪжӣҙеҘҪзҡ„её®еҠ©еӨ§е®¶еӯҰд№ пјҢеҝ«еҺ»иҜ•иҜ•еҗ§пјҒиӢҘжғіз»§з»ӯеӯҰд№ жӣҙеӨҡзӣёе…ізҹҘиҜҶпјҢиҜ·з»§з»ӯе…іжіЁдәҝйҖҹдә‘зҪ‘з«ҷпјҢе°Ҹзј–дјҡ继з»ӯеҠӘеҠӣдёәеӨ§е®¶еёҰжқҘжӣҙеӨҡе®һз”Ёзҡ„ж–Үз« пјҒ


