Vue+SpringBoot+Shiroи·Ёеҹҹй—®йўҳзҡ„и§ЈеҶіж–№жі•
иҝҷзҜҮж–Үз« е°ҶдёәеӨ§е®¶иҜҰз»Ҷи®Іи§Јжңүе…іVue+SpringBoot+Shiroи·Ёеҹҹй—®йўҳзҡ„и§ЈеҶіж–№жі•пјҢе°Ҹзј–и§үеҫ—жҢәе®һз”Ёзҡ„пјҢеӣ жӯӨеҲҶдә«з»ҷеӨ§е®¶еҒҡдёӘеҸӮиҖғпјҢеёҢжңӣеӨ§е®¶йҳ…иҜ»е®ҢиҝҷзҜҮж–Үз« еҗҺеҸҜд»ҘжңүжүҖ收иҺ·гҖӮ
дёҖгҖҒй…ҚзҪ®VueеүҚз«Ҝ
еңЁconfigдёӢindex.jsдёӯй…ҚзҪ®д»ЈзҗҶдҝЎжҒҜ
жіЁж„ҸпјҡиҝҷйҮҢзҡ„и·Ёеҹҹй…ҚзҪ®еҸӘеңЁејҖеҸ‘зҺҜеўғдёӯжңүж•ҲпјҢжү“еҢ…йғЁзҪІеҗҺпјҢиҝҷдёӘи·Ёеҹҹе°ұдёҚиө·дҪңз”ЁдәҶпјҢжң¬дәәд№ҹжҳҜиҝҷйҮҢеҚЎдәҶеҘҪд№…пјҢVueеүҚз«Ҝжү“еҢ…еҗҺпјҢжңҖеҘҪйғЁзҪІеҲ°nginxдёҠпјҢз”ЁnginxеҸҜд»ҘзӣҙжҺҘи§ЈеҶіи·Ёеҹҹй—®йўҳ
1гҖҒејҖеҸ‘и·Ёеҹҹй…ҚзҪ®
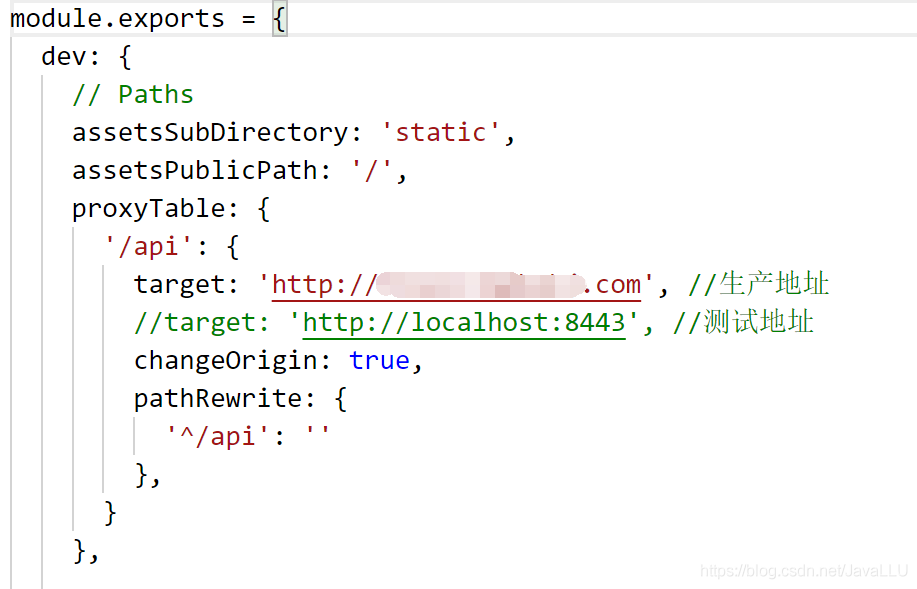
proxyTable: {
'/api': {
target: 'http://xxxx.com', //ең°еқҖ
changeOrigin: true,
pathRewrite: {
'^/api': ''
},
}
},еңЁmain.jsдёӯй…ҚзҪ®Ajaxд»ЈзҗҶиҜ·жұӮ

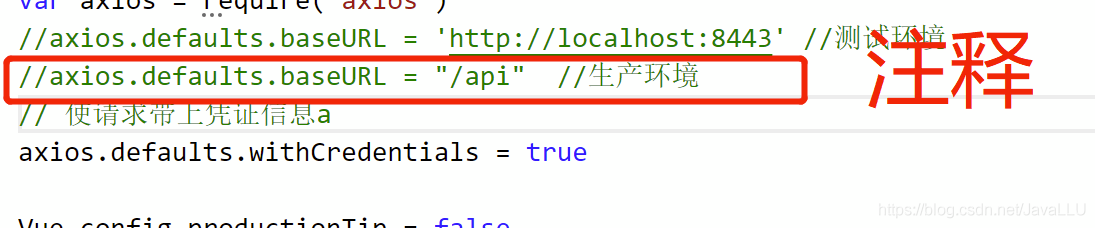
var axios = require('axios')
axios.defaults.baseURL = '/api' //зҺҜеўғ然еҗҺе°ұжҳҜжҲ‘们еҶҷиҜ·жұӮж–№жі•зҡ„ж—¶еҖҷеңЁж–№жі•еүҚеҠ дёҠвҖң/apiвҖқ,иҝҷдёӘжҳҜж №жҚ®дҪ зҡ„й…ҚзҪ®еҗҚпјҢй…Қзҡ„е•ҘеҗҚе°ұеҶҷе•Ҙ
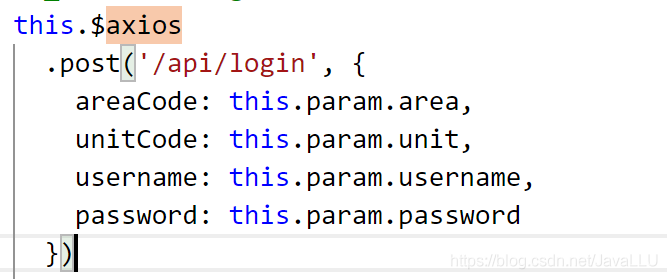
иҝҷж ·жҲ‘们еүҚз«ҜVueејҖеҸ‘и·Ёеҹҹе°ұй…ҚзҪ®е®ҢдәҶ
2гҖҒз”ҹдә§и·Ёеҹҹй…ҚзҪ®
йҰ–е…ҲжҲ‘们зңӢдёҖдёӢд»Јз Ғй…ҚзҪ®
еңЁзҪ‘дёҠзңӢдәҶеӨ§йҮҸзҡ„ж–Үз« иө„ж–ҷпјҢиҜҙжҳҜдҝ®ж”№иҝҷдёӘпјҢдҝ®ж”№йӮЈдёӘпјҢдәӢе®һеҚҙжҳҜ然并еҚөгҖӮгҖӮгҖӮгҖӮ
е…¶е®һжҲ‘们еҸӘйңҖиҰҒеңЁconfigдёӢзҡ„index.jsдёӯй…ҚзҪ®еҘҪд»ЈзҗҶдҝЎжҒҜ
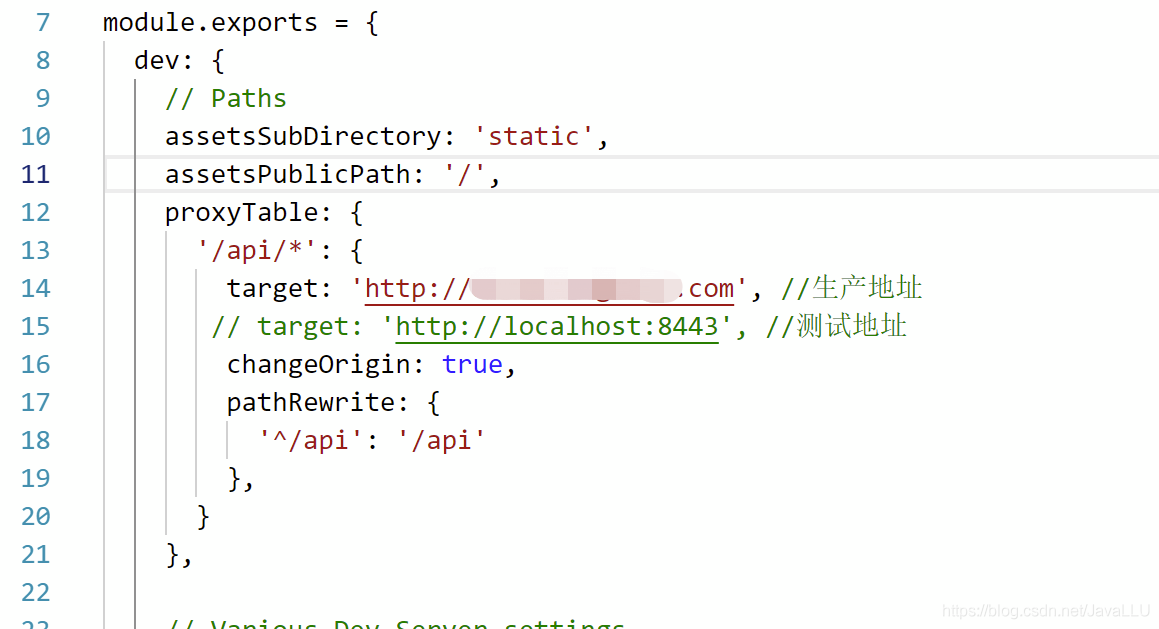
proxyTable: {
'/api/*': {
target: 'http://еҹҹеҗҚ', //з”ҹдә§ең°еқҖдёҖе®ҡиҰҒеҠ http
changeOrigin: true,
pathRewrite: {
'^/api': '/api'
},
}
},дёҠйқўжҲ‘们еңЁй…ҚзҪ®жң¬ең°и·Ёеҹҹзҡ„ж—¶еҖҷи®ҫзҪ®дәҶaxiosй»ҳи®Өзҡ„иҜ·жұӮи·Ҝеҫ„пјҢз”ҹдә§жү“еҢ…дёҚйңҖиҰҒй…ҚзҪ®
иҝҷж ·жҲ‘们代з ҒиҝҷйҮҢе°ұй…ҚзҪ®е®ҢдәҶпјҢе…¶д»–зҡ„йғҪдёҚиҰҒеҠЁпјҢ然еҗҺnpm run build жү“еҢ…е°ұеҸҜд»ҘдәҶ
еү©дёӢзҡ„дәӢжғ…е°ұдәӨз»ҷnginxе°ұеҸҜд»ҘдәҶпјҢжҲ‘жҳҜеңЁwindowsжңҚеҠЎдёҠйғЁзҪІзҡ„nginx,иҝҷдёӘе®үиЈ…жӯҘйӘӨзҪ‘дёҠдёҖеӨ§е ҶпјҢиҝҷйҮҢе°ұдёҚиҜҙдәҶ
жҲ‘们е®үиЈ…еҘҪnginxеҗҺпјҢйңҖиҰҒиҝӣиЎҢдёҖдәӣй…ҚзҪ®
1гҖҒеҲ йҷӨnginxдёӢhtmlзӣ®еҪ•йҮҢзҡ„еҶ…е®№
2гҖҒе°ҶжҲ‘们Vueжү“еҘҪзҡ„еҢ…distеӨҚеҲ¶еҲ°nginxзҡ„htmlзӣ®еҪ•дёӢ,
3гҖҒй…ҚзҪ®nginxдёӢconfigзӣ®еҪ•дёӢnginx.conf,й…ҚзҪ®еҶ…е®№еҰӮдёӢпјҡ

иҝҷйҮҢиҜҙжҳҺдёҖдёӢпјҡnginxеә”з”Ёзҡ„ж–Ү件зӣ®еҪ•еҗҚж”№дёҖдёӢпјҢжҲ‘们зӣҙжҺҘе®үиЈ…е®ҢйғҪжҳҜnginx-1.xx,зұ»дјјиҝҷж ·зҡ„зӣ®еҪ•пјҢжҲ‘们еңЁй…ҚзҪ®дёҠеӣҫдёӯзҡ„rootи·Ҝеҫ„ж—¶пјҢ/nеҸҜиғҪдјҡжңүзј–иҜ‘й—®йўҳпјҢжҲ‘иҝҷйҮҢжҳҜж”№жҲҗдәҶProNginx,еӨ§е®¶еҸҜд»Ҙж”№дёәиҮӘе·ұе–ңж¬ўзҡ„еҗҚ
иҝҷжҳҜжҲ‘nginxзҡ„жүҖжңүй…ҚзҪ®
#user nobody;
worker_processes 1;
#error_log logs/error.log;
#error_log logs/error.log notice;
#error_log logs/error.log info;
#pid logs/nginx.pid;
events {
worker_connections 1024;
}
http {
include mime.types;
default_type application/octet-stream;
#log_format main '$remote_addr - $remote_user [$time_local] "$request" '
# '$status $body_bytes_sent "$http_referer" '
# '"$http_user_agent" "$http_x_forwarded_for"';
#access_log logs/access.log main;
sendfile on;
#tcp_nopush on;
#keepalive_timeout 0;
keepalive_timeout 65;
#gzip on;
server {
listen 80;
server_name еүҚеҸ°жңҚеҠЎеҹҹеҗҚ/IP;
root D:/HWKJ/ProNginx/ProNginx/html/dist/;
location / {
index index.php index.html index.htm;
try_files $uri $uri/ /index.html;
}
location /api/ {
#rewrite ^.+api/?(.*)$ /$1 break;
#include uwsgi_params;
proxy_pass http://xxxеҗҺеҸ°xxxx/api/;
# и§ЈеҶіspringbootдёӯиҺ·еҸ–иҝңзЁӢipзҡ„й—®йўҳ
}
}
}й…ҚзҪ®е®ҢеҗҺжҲ‘们еҗҜеҠЁnginxпјҢд»ҘдёӢжҳҜnginxдёҖдәӣж“ҚдҪңе‘Ҫд»Ө
start nginx //еҗҜеҠЁ
nginx -s stop // stopжҳҜеҝ«йҖҹеҒңжӯўnginxпјҢеҸҜиғҪ并дёҚдҝқеӯҳзӣёе…ідҝЎжҒҜ
nginx -s quit // quitжҳҜе®Ңж•ҙжңүеәҸзҡ„еҒңжӯўnginxпјҢ并дҝқеӯҳзӣёе…ідҝЎжҒҜ
nginx -s reload // еҪ“й…ҚзҪ®дҝЎжҒҜдҝ®ж”№пјҢйңҖиҰҒйҮҚж–°иҪҪе…Ҙиҝҷдәӣй…ҚзҪ®ж—¶дҪҝз”ЁжӯӨе‘Ҫд»Ө
nginx -s reopen // йҮҚж–°жү“ејҖж—Ҙеҝ—ж–Ү件
nginx -v // жҹҘзңӢNginxзүҲжң¬
иҝҷж ·жҲ‘们еүҚз«ҜVueз”ҹдә§и·Ёеҹҹе°ұй…ҚзҪ®е®ҢдәҶ
дёӢйқўжҲ‘们й…ҚзҪ®spring bootеҗҺеҸ°
дәҢгҖҒй…ҚзҪ®spring boot
еҰӮжһңиҜҙдҪ жҳҜеҚ•еҸӘжңүspring bootйӮЈд№ҲдҪ й…ҚзҪ®дёҖдёӢдҝЎжҒҜеҚіеҸҜ
import org.springframework.boot.SpringBootConfiguration;
import org.springframework.boot.web.servlet.FilterRegistrationBean;
import org.springframework.context.annotation.Bean;
import org.springframework.context.annotation.Configuration;
import org.springframework.web.cors.CorsConfiguration;
import org.springframework.web.cors.UrlBasedCorsConfigurationSource;
import org.springframework.web.filter.CorsFilter;
import org.springframework.web.servlet.config.annotation.*;
/**
*/
@Configuration
public class MyWebConfigurer implements WebMvcConfigurer {
@Override
public void addCorsMappings(CorsRegistry registry) {
registry.addMapping("/**") // е…Ғи®ёи·Ёеҹҹи®ҝй—®зҡ„и·Ҝеҫ„
.allowCredentials(true) // жҳҜеҗҰеҸ‘йҖҒcookie
.allowedOriginPatterns("*") // е…Ғи®ёи·Ёеҹҹи®ҝй—®зҡ„жәҗ
.allowedMethods("POST", "GET", "PUT", "OPTIONS", "DELETE") // е…Ғи®ёиҜ·жұӮж–№жі•
.allowedHeaders("*") // е…Ғи®ёеӨҙйғЁи®ҫзҪ®
.maxAge(168000) ; // йў„жЈҖй—ҙйҡ”ж—¶й—ҙ
}
}еҰӮжһңдҪ зҡ„spring bootеҗҺеҸ°ж•ҙеҗҲдәҶshiro,йӮЈдёҠйқўзҡ„й…ҚзҪ®еҜ№иө°shiroзҡ„иҜ·жұӮдёҚдјҡз”ҹж•ҲпјҢжөҸи§ҲеҷЁиҝҳжҳҜдјҡжҸҗзӨәи·ЁеҹҹпјҢеӣ жӯӨжҲ‘们用дёӢеҲ—ж–№жі•и®ҫзҪ®е…Ғи®ёи·Ёеҹҹи®ҝй—®
import org.springframework.boot.SpringBootConfiguration;
import org.springframework.boot.web.servlet.FilterRegistrationBean;
import org.springframework.context.annotation.Bean;
import org.springframework.context.annotation.Configuration;
import org.springframework.web.cors.CorsConfiguration;
import org.springframework.web.cors.UrlBasedCorsConfigurationSource;
import org.springframework.web.filter.CorsFilter;
import org.springframework.web.servlet.config.annotation.*;
/**
*/
@Configuration
public class MyWebConfigurer implements WebMvcConfigurer {
@Bean
public FilterRegistrationBean corsFilter() {
final UrlBasedCorsConfigurationSource source = new UrlBasedCorsConfigurationSource();
final CorsConfiguration config = new CorsConfiguration();
// е…Ғи®ёcookiesи·Ёеҹҹ
config.setAllowCredentials(true);
// #е…Ғи®ёеҗ‘иҜҘжңҚеҠЎеҷЁжҸҗдәӨиҜ·жұӮзҡ„URIпјҢ*иЎЁзӨәе…ЁйғЁе…Ғи®ёпјҢеңЁSpringMVCдёӯпјҢеҰӮжһңи®ҫжҲҗ*пјҢдјҡиҮӘеҠЁиҪ¬жҲҗеҪ“еүҚиҜ·жұӮеӨҙдёӯзҡ„Origin
config.addAllowedOriginPattern("*");
// #е…Ғи®ёи®ҝй—®зҡ„еӨҙдҝЎжҒҜ,*иЎЁзӨәе…ЁйғЁ
config.addAllowedHeader("*");
// йў„жЈҖиҜ·жұӮзҡ„зј“еӯҳж—¶й—ҙпјҲз§’пјүпјҢеҚіеңЁиҝҷдёӘж—¶й—ҙж®өйҮҢпјҢеҜ№дәҺзӣёеҗҢзҡ„и·ЁеҹҹиҜ·жұӮдёҚдјҡеҶҚйў„жЈҖдәҶ
config.setMaxAge(18000L);
// е…Ғи®ёжҸҗдәӨиҜ·жұӮзҡ„ж–№жі•пјҢ*иЎЁзӨәе…ЁйғЁе…Ғи®ё
config.addAllowedMethod("OPTIONS");
config.addAllowedMethod("HEAD");
config.addAllowedMethod("GET");
config.addAllowedMethod("PUT");
config.addAllowedMethod("POST");
config.addAllowedMethod("DELETE");
config.addAllowedMethod("PATCH");
source.registerCorsConfiguration("/**", config);
FilterRegistrationBean bean = new FilterRegistrationBean(new CorsFilter(source));
// и®ҫзҪ®зӣ‘еҗ¬еҷЁзҡ„дјҳе…Ҳзә§
bean.setOrder(0);
return bean;
}
}е…ідәҺвҖңVue+SpringBoot+Shiroи·Ёеҹҹй—®йўҳзҡ„и§ЈеҶіж–№жі•вҖқиҝҷзҜҮж–Үз« е°ұеҲҶдә«еҲ°иҝҷйҮҢдәҶпјҢеёҢжңӣд»ҘдёҠеҶ…е®№еҸҜд»ҘеҜ№еӨ§е®¶жңүдёҖе®ҡзҡ„её®еҠ©пјҢдҪҝеҗ„дҪҚеҸҜд»ҘеӯҰеҲ°жӣҙеӨҡзҹҘиҜҶпјҢеҰӮжһңи§үеҫ—ж–Үз« дёҚй”ҷпјҢиҜ·жҠҠе®ғеҲҶдә«еҮәеҺ»и®©жӣҙеӨҡзҡ„дәәзңӢеҲ°гҖӮ


