Linux网络管理(7)centos7中team组的实现
在linux 中,centos7之前都是使用bond机制来实现多网络绑定同一个IP地址,来对网络提供访问,并按不同的模式来负载均衡或者轮回接替管理处理数据。而到了contos7之后,提供了一种强大的工具,nmcli工具命令,使用此工具,将会根据命令参数的配置来重新生成特定的配置文件来供网络接口使用,方便而又灵活。在linux不再使用 bond机制定义,而是使用网路组 team 机制,把 team组当作一个设备。下面通过案例说。
主备模式team组案例:
环境查看:
这里在VM虚拟机中操作linux系统
#这里使用了3.10的linux内核
[root@mzf ~]# uname -r
3.10.0-327.el7.x86_64
#使用CentOS 7.2 发行版
[root@mzf ~]# cat /etc/redhat-release
CentOS Linux release 7.2.1511 (Core)
查看网卡:
[root@mzf ~]# ip -o link show up | awk -F': ' '{print $2}'
lo
eth0
eth2
[root@mzf ~]# ip link show up

说明:这里除去lo本地网络回环设备,本机有两块启用的网卡:eth0、eth2。
创建 team网络组:
#创建一个team设备,名称为team0,且使用主备模式:
[root@mzf ~]# nmcli connection add con-name team0 type team ifname team0 config '{"runer":{"name":"activebackup"}}'
Connection 'team0' (b9f8fdcc-8682-4b2e-bdc1-3eda2aef70d3) successfully added.
#设置team0组的IP、网关等信息:
1、设置到ip地址获取方式时,可以输入一个不存在的命令,来获取帮助信息
[root@mzf ~]# nmcli connection modify team0 ipv4.addresses 10.1.250.111/16 ipv4.gateway 10.1.0.1 ipv4.method help
Error: failed to modify ipv4.method: 'help' not among [auto, link-local, manual, shared, disabled].
2、通过上面我们发现了5中,其中manual就是静态IP地址,因此设置 method为manual
[root@mzf ~]# nmcli connection modify team0 ipv4.addresses 10.1.250.111/16 ipv4.gateway 10.1.0.1 ipv4.method manual
3、查看team0设备连接是否已经创建
[root@mzf ~]# nmcli connection show
NAME         UUID                                  TYPE            DEVICE
System eth0  5fb06bd0-0bb0-7ffb-45f1-d6edd65f3e03  802-3-ethernet    eth0
team0        b9f8fdcc-8682-4b2e-bdc1-3eda2aef70d3  team              team0
System eth2  9c92fad9-6ecb-3e6c-eb4d-8a47c6f50c04   802-3-ethernet   eth2
说明:team0为刚才创建的设备,team为表示为网络组设备,其它表示两张网卡的配置被nmcli工具识别。
4、查看检查team0的ip获取模式:
[root@mzf ~]# nmcli connection show team0 | grep -A 4 '^ipv4\.method'
ipv4.method:                     manual     #这里表示使用静态IP获取
ipv4.dns:                                   #创建时并未指定DNS
ipv4.dns-search:
ipv4.addresses:                  10.1.250.111/16  #刚才设置的IP 地址
ipv4.gateway:                    10.1.0.1         #指定的网关
5、查看配置文件是否自动生成
[root@mzf network-scripts]# ls -l /etc/sysconfig/network-scripts/ifcfg-team0
-rw-r--r--. 1 root root 349 Sep  7 00:50 /etc/sysconfig/network-scripts/ifcfg-team0
解析:此配置文件记录了team0设备的一些了信息,格式与以往的以太网网卡配置信息格式相同。
将指定以太网网卡设备加入team0组成网路组
#将eth0设备加入team0网路组,并设置从设备名为team0-eth0
[root@mzf network-scripts]# nmcli connection add con-name team0-eth0 type team-slave autoconnect no
ifname eth0 master team0
Connection 'team0-eth0' (5e3d9d5c-934c-448f-8fc6-ab3b4371e812) successfully added.
#将eth2设备加入team0网路组,并设置从设备名为team0-eth2
[root@mzf network-scripts]# nmcli connection add con-name team0-eth2 type team-slave autoconnect no ifname eth2 master team0
Connection 'team0-eth2' (bbb9bfe0-55df-4fe4-9d13-27535a4bb206) successfully added.
#查看网络组子网卡配置文件是否自动生成
[root@mzf network-scripts]# ls -l /etc/sysconfig/network-scripts/ifcfg-team0*
-rw-r--r--. 1 root root 349 Sep  7 00:50 /etc/sysconfig/network-scripts/ifcfg-team0
-rw-r--r--. 1 root root 118 Sep  7 01:03 /etc/sysconfig/network-scripts/ifcfg-team0-eth0
-rw-r--r--. 1 root root 118 Sep  7 01:04 /etc/sysconfig/network-scripts/ifcfg-team0-eth2
#再次查看设备连接列表
[root@mzf network-scripts]# nmcli connection show
NAME         UUID                                  TYPE            DEVICE
team0-eth2   bbb9bfe0-55df-4fe4-9d13-27535a4bb206  802-3-ethernet  --
System eth0  5fb06bd0-0bb0-7ffb-45f1-d6edd65f3e03  802-3-ethernet  eth0
team0-eth0   5e3d9d5c-934c-448f-8fc6-ab3b4371e812  802-3-ethernet  --
team0        b9f8fdcc-8682-4b2e-bdc1-3eda2aef70d3  team         team0
System eth2  9c92fad9-6ecb-3e6c-eb4d-8a47c6f50c04  802-3-ethernet  eth2
解析:这里发现好像eth0、eth2并未成功绑定到team0组中,这是因为,nmcli工具定义的机制,同一设备只能绑定在同一个配置中,也就是读取指定配置文件(ifcfg-eth0、ifcfg-eth2)中配置。因此这时,可以断开eth0、eth2原本的链接配置。
激活team0网络组成员
#断开原本的eth0链接
[root@mzf network-scripts]# nmcli device disconnect eth0
#启用team0-eth0网络组设备
[root@mzf network-scripts]# nmcli connection up team0-eth0
 #断开原本的eth2链接
[root@mzf network-scripts]# nmcli device disconnect eth2
#启用team0-eth2网络组设备
[root@mzf network-scripts]# nmcli connection up team0-eth2
 #再次查看链接

解析:此时eth2和eth0都已经本识别成了team0中的成员设备了,而以前的默认网卡配置以及与网卡失去了绑定关系。
确定网络的连通性
#查看team0设备Ip地址
ip addr show
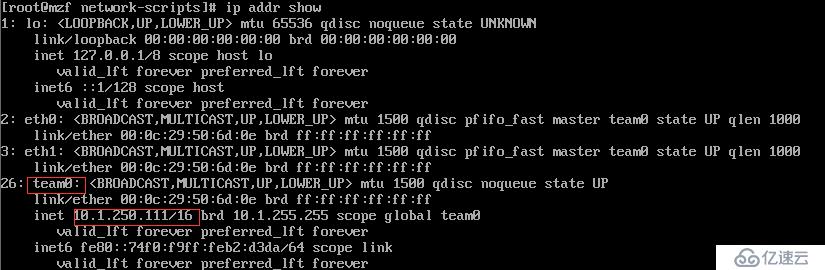
解析:这里了eth0和eth2已经绑定在一起,共同成为team0网络组的子成员,共同使用10.1.250.111地址。
#查看team0路由表及网关

解析:这里因为两张网卡被识别成了team0网络组设备,因此,路由表中也只是记录单个设备,无论发生数据来时接收数据,都是通过网络组中的路由表来识别。
主备模式的测试:
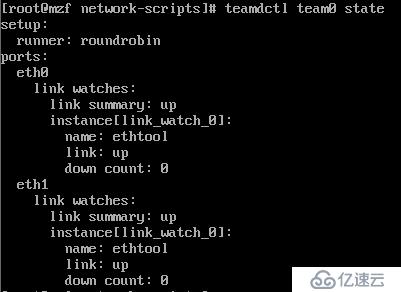
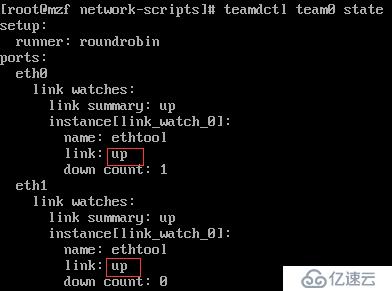
#查看team0当前使用状态
[root@mzf ~]# teamctl team0 state
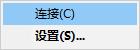
#断开 eth0这里使用虚拟机,因此点右下角的对应网卡”断开“即可,断开后图片变灰色

#再次查看状态
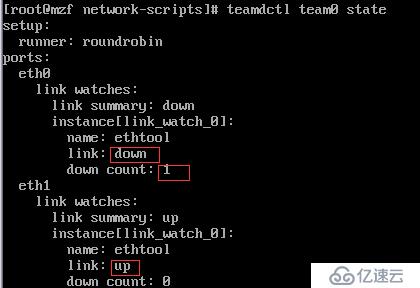
解析:原本都是up状态,而现在,eth2在启用,而eth0已经为断开状态,且显示了断开次数为1次。
#再次启用eth0
#再次查看team0状态
解析:现在已经都是启用状态了,当然,如果都断开,那么 team0就相当于没有了活动状态成员,也就失去了意义。
免责声明:本站发布的内容(图片、视频和文字)以原创、转载和分享为主,文章观点不代表本网站立场,如果涉及侵权请联系站长邮箱:is@yisu.com进行举报,并提供相关证据,一经查实,将立刻删除涉嫌侵权内容。


