дҪҝз”ЁLet's Encryptе®ўжҲ·з«Ҝе…Қиҙ№з”іиҜ·SSLиҜҒд№Ұ
MozillaгҖҒжҖқ科гҖҒAkamaiгҖҒIdenTrustгҖҒEFF е’ҢеҜҶжӯҮж №еӨ§еӯҰз ”з©¶дәәе‘ҳиҒ”еҗҲе®ЈеёғдәҶ LetвҖҷs Encrypt CA йЎ№
зӣ®пјҢи®ЎеҲ’дёәзҪ‘з«ҷжҸҗдҫӣе…Қиҙ№зҡ„еҹәжң¬ SSL иҜҒд№ҰпјҢд»ҘеҠ йҖҹдә’иҒ”зҪ‘д»Һ HTTP еҗ‘ HTTPS иҝҮжёЎгҖӮLetвҖҷs Encrypt CA е°Ҷз”ұйқһиөўеҲ©з»„з»Ү
Internet Security Research Group (ISRG) иҝҗиҗҘпјҢд»ҠеӨ©12жңҲ4ж—ҘеҮҢжҷЁйЎ№зӣ®жӯЈејҸиҝӣе…Ҙе…¬жөӢйҳ¶ж®өпјҢйҒӮиө¶зҙ§иҝӣиЎҢз”іиҜ·иҜ•з”ЁдёҖдёӢгҖӮ
д№ӢеүҚжҲ‘з”іиҜ·иҜҒд№ҰйғҪжҳҜз”ЁBSж–№ејҸпјҢиҝҷж¬ЎжҳҜCSж–№ејҸпјҢж„ҹи§үжҢәж–°йІңгҖӮ
жҲ‘зҡ„жңҚеҠЎеҷЁзҺҜеўғ centos6.6
иҰҒе®үиЈ…python2.7пјҢ2.6еңЁз”іиҜ·ж—¶дјҡжҠҘй”ҷ
дёӢиҪҪең°еқҖ https://www.python.org/downloads/release/python-2710/
wget
tar zxf Python-2.7.10.tgz
cd Python-2.7.10
./configure
make && make install
#жҠҠзі»з»ҹpythonе‘Ҫд»ӨжҢҮеҲ°ж–°зүҲжң¬
which python
/usr/local/bin/python
rm /usr/local/bin/python
ln -s /usr/local/bin/python2.7 /usr/local/bin/python
2.дёӢиҪҪletsencryptе®ўжҲ·з«Ҝ
yum install -y git
git clone https://github.com/letsencrypt/letsencrypt.git
cd letsencrypt
./letsencrypt-auto --help
Updating letsencrypt and virtual environment dependencies.......
Running with virtualenv: /root/.local/share/letsencrypt/bin/letsencrypt --help

  letsencrypt [SUBCOMMAND] [options] [-d domain] [-d domain] ...

The Let's Encrypt agent can obtain and install HTTPS/TLS/SSL certificates.  By
default, it will attempt to use a webserver both for obtaining and installing
the cert. Major SUBCOMMANDS are:

  (default) run        Obtain & install a cert in your current webserver
  certonly             Obtain cert, but do not install it (aka "auth")
  install              Install a previously obtained cert in a server
  revoke               Revoke a previously obtained certificate
  rollback             Rollback server configuration changes made during install
  config_changes       Show changes made to server config during installation
  plugins              Display information about installed plugins

Choice of server plugins for obtaining and installing cert:

  --apache          Use the Apache plugin for authentication & installation
  --standalone      Run a standalone webserver for authentication
  (nginx support is experimental, buggy, and not installed by default)
  --webroot         Place files in a server's webroot folder for authentication

OR use different plugins to obtain (authenticate) the cert and then install it:

  --authenticator standalone --installer apache

More detailed help:

  -h, --help [topic]    print this message, or detailed help on a topic;
                        the available topics are:

   all, automation, paths, security, testing, or any of the subcommands or
   plugins (certonly, install, nginx, apache, standalone, webroot, etc)
3.е®ўжҲ·з«ҜеҸҜд»ҘдёәдҪ жҸҗдҫӣз”іиҜ·+е…ЁиҮӘеҠЁе®үиЈ…apache/nginxзӯүдёҖжқЎйҫҷжңҚеҠЎпјҢиҝҷйҮҢжҲ‘йҖүжӢ©DIYпјҢеҸӘз”іиҜ·пјҢдёҚз”Ёйә»зғҰе®ўжҲ·з«ҜдәҶпјҢжү§иЎҢд»ҘдёӢе‘Ҫд»Ө
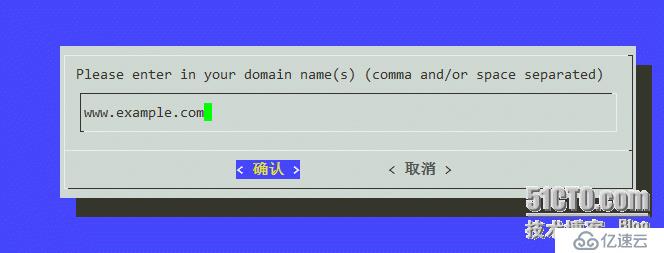
./letsencrypt-auto certonly --manual
иҫ“е…ҘдҪ зҡ„еҹҹеҗҚ
жҸҗзӨәжҳҜеҗҰеҗҢж„Ҹ他们记еҪ•дҪ иҝҷж¬ЎиҜ·жұӮзҡ„ipең°еқҖпјҢеҗҢж„Ҹ
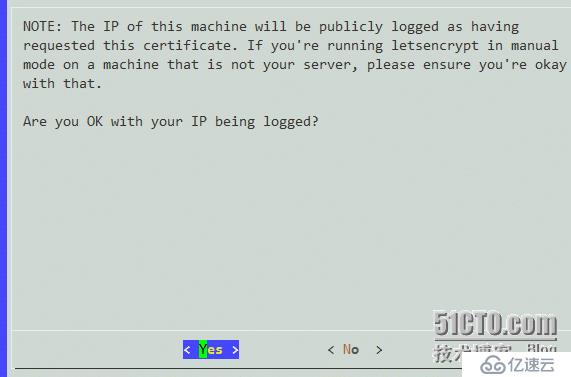
иҝҷдёҖжӯҘжҳҜйӘҢиҜҒеҹҹеҗҚжүҖжңүжқғпјҢеҫҲе…ій”®
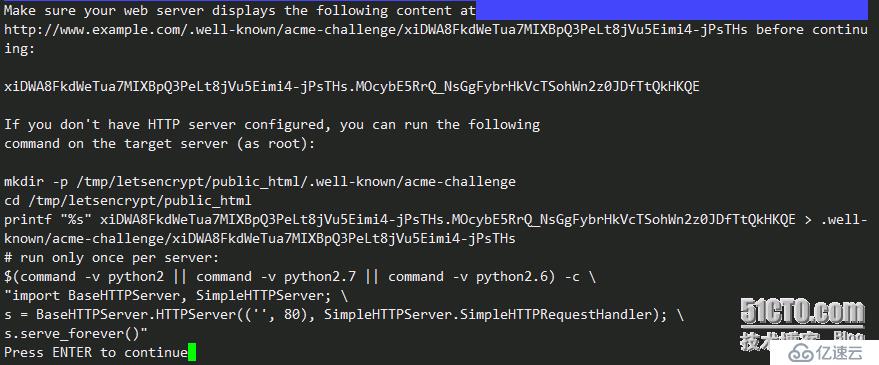
иҝҷдёҖжӯҘзҡ„ж„ҸжҖқжҳҜпјҢе®ўжҲ·з«Ҝе°Ҷи®ҝй—®http://www.example.com/.well-known/acme-challenge/xiDWA8FkdWeTua7MIXBpQ3PeLt8jVu5Eimi4-jPsTHs зңӢзңӢиҫ“еҮәжҳҜдёҚжҳҜ xiDWA8FkdWeTua7MIXBpQ3PeLt8jVu5Eimi4-jPsTHs.MOcybE5RrQ_NsGgFybrHkVcTSohWn2z0JDfTtQkHKQE
жҲ‘жҳҜжҸҗеүҚиЈ…дәҶnginxжңҚеҠЎеҷЁпјҢйӮЈд№ҲеҸӘйңҖиҰҒеңЁжҲ‘зҡ„зҪ‘з«ҷж №зӣ®еҪ•дёӢеҲӣе»әзӣ®еҪ•е’ҢеҜ№еә”еҶ…е®№зҡ„ж–Ү件пјҢеңЁе…¬зҪ‘иғҪи®ҝй—®еҫ—еҲ°е°ұеҸҜд»ҘдәҶгҖӮ
cd /wwwroot/
mkdir -p ./.well-known/acme-challenge/
echo xiDWA8FkdWeTua7MIXBpQ3PeLt8jVu5Eimi4-jPsTHs.MOcybE5RrQ_NsGgFybrHkVcTSohWn2z0JDfTtQkHKQE>./.well-known/acme-challenge/xiDWA8FkdWeTua7MIXBpQ3PeLt8jVu5Eimi4-jPsTHs
иҜ•иҜ•иҺ·еҸ–дёҖдёӢиҫ“еҮәжӯЈеёёдәҶжІЎ
curl
иӢҘжӯЈеёёпјҢжҢүеӣһиҪҰгҖӮпјҲеҰӮжһңиҝҳжІЎиЈ…webжңҚеҠЎеҷЁзҡ„иҜқеҸҜд»ҘжҢүз…§жҸҗзӨәжү§иЎҢ#run only once per serverдёӢйқўзҡ„е‘Ҫд»Өпјү
4.иҜҒд№ҰиҺ·еҸ–жҲҗеҠҹ
IMPORTANT NOTES:
 - Congratulations! Your certificate and chain have been saved at
   /etc/letsencrypt/live/example.com/fullchain.pem. Your cert will
   expire on 2016-03-03. To obtain a new version of the certificate in
   the future, simply run Let's Encrypt again.
 - If like Let's Encrypt, please consider supporting our work by:

   Donating to ISRG / Let's Encrypt:   https://letsencrypt.org/donate
   Donating to EFF:                    https://eff.org/donate-le
еҗҺйқўеҶҚеҸ‘дёҖзҜҮеҚҡж–Үи®Іиҝ°еҰӮдҪ•дҪҝз”ЁиҝҷдёӘиҜҒд№ҰгҖӮ


