小编给大家分享一下C++如何实现基于灰度图上色GrayToColorFromOthe,相信大部分人都还不怎么了解,因此分享这篇文章给大家参考一下,希望大家阅读完这篇文章后大有收获,下面让我们一起去了解一下吧!
之前有提到给灰度图上色的需求,在此基础上,还有一种需求,就是基于另一张参考灰度图的色板来给当前的灰度图上色,比如参考灰度图的数值区间为-10到10,颜色从蓝到绿再到红,而当前的灰度图的数据区间为-1到1,若基于参考灰度图的色板确定数据对应的颜色,则当前灰度图的颜色应该在绿色左右波动。
下方为具体实现函数和测试代码。
/**
 * @brief GrayToColorFromOther             灰度图上色,基于参考灰度图的色板
 * @param phase1                           输入的灰色图像,通道为1,提供色板
 * @param phase2                           输入的灰色图像,通道为1,基于phase1的色板绘色
 * @return                                 上色后的图像
 */
cv::Mat GrayToColorFromOther(cv::Mat &phase1, cv::Mat &phase2)
{
	CV_Assert(phase1.channels() == 1);
	CV_Assert(phase2.channels() == 1);
	if (phase1.empty() || phase2.empty())
	{
		cv::Mat result = cv::Mat::zeros(100, 100, CV_8UC3);
		return result;
	}
	cv::Mat temp, result, mask;
	double max1, min1;
	int row = phase2.rows;
	int col = phase2.cols;
	// 确定参考灰度图的数据范围
	cv::minMaxIdx(phase1, &min1, &max1, nullptr, nullptr, phase1 == phase1);
	// 将当前灰度图以参考灰度图的数据范围作标准,进行数据变换
	temp = phase2.clone();
	for (int i = 0; i < row; ++i)
	{
		float *t2 = temp.ptr<float>(i);
		for (int j = 0; j < col; ++j)
		{
			t2[j] = 255.0f*(phase2.at<float>(i, j) - min1) / (max1 - min1);
		}
	}
	temp.convertTo(temp, CV_8UC1);
	// 创建掩膜,目的是为了隔离nan值的干扰
	mask = cv::Mat::zeros(phase2.size(), CV_8UC1);
	mask.setTo(255, phase2 == phase2);

	// 初始化三通道颜色图
	cv::Mat color1, color2, color3;
	color1 = cv::Mat::zeros(temp.size(), temp.type());
	color2 = cv::Mat::zeros(temp.size(), temp.type());
	color3 = cv::Mat::zeros(temp.size(), temp.type());

	// 基于灰度图的灰度层级,给其上色,最底的灰度值0为蓝色(255,0,0),最高的灰度值255为红色(0,0,255),中间的灰度值127为绿色(0,255,0)
	for (int i = 0; i < row; ++i)
	{
		uchar *c1 = color1.ptr<uchar>(i);
		uchar *c2 = color2.ptr<uchar>(i);
		uchar *c3 = color3.ptr<uchar>(i);
		uchar *r = temp.ptr<uchar>(i);
		uchar *m = mask.ptr<uchar>(i);
		for (int j = 0; j < col; ++j)
		{
			if (m[j] == 255)
			{
				if (r[j] > (3 * 255 / 4) && r[j] <= 255)
				{
					c1[j] = 255;
					c2[j] = 4 * (255 - r[j]);
					c3[j] = 0;
				}
				else if (r[j] <= (3 * 255 / 4) && r[j] > (255 / 2))
				{
					c1[j] = 255 - 4 * (3 * 255 / 4 - r[j]);
					c2[j] = 255;
					c3[j] = 0;
				}
				else if (r[j] <= (255 / 2) && r[j] > (255 / 4))
				{
					c1[j] = 0;
					c2[j] = 255;
					c3[j] = 4 * (255 / 2 - r[j]);
				}
				else if (r[j] <= (255 / 4) && r[j] >= 0)
				{
					c1[j] = 0;
					c2[j] = 255 - 4 * (255 / 4 - r[j]);
					c3[j] = 255;
				}
				else {
					c1[j] = 0;
					c2[j] = 0;
					c3[j] = 0;
				}
			}
		}
	}

	// 三通道合并,得到颜色图
	vector<cv::Mat> images;
	images.push_back(color3);
	images.push_back(color2);
	images.push_back(color1);
	cv::merge(images, result);

	return result;
}#include<iostream>
#include<opencv2/opencv.hpp>
#include<ctime>
using namespace std;
using namespace cv;
void UnitPolar(int squaresize, cv::Mat& mag,cv::Mat& ang);
void UnitCart(int squaresize, cv::Mat& x, cv::Mat& y);
cv::Mat GrayToColor(cv::Mat &phase);
cv::Mat GrayToColorFromOther(cv::Mat &phase1, cv::Mat &phase2);
int main(void)
{
cv::Mat mag, ang,result,result2;
UnitPolar(2001, mag, ang);
mag.at<float>(10, 10) = nan("");
cv::Mat mag2 = mag / 2;
result = GrayToColor(mag);
result2= GrayToColorFromOther(mag,mag2);
system("pause");
return 0;
}
void UnitPolar(int squaresize, cv::Mat& mag,cv::Mat& ang) {
cv::Mat x;
cv::Mat y;
UnitCart(squaresize, x, y); //产生指定范围内的指定数量点数,相邻数据跨度相同
// OpenCV自带的转换有精度限制,导致结果有一定差异性
//cv::cartToPolar(x, y, mag, ang, false); //坐标转换
mag = cv::Mat(x.size(), x.type());
ang = cv::Mat(x.size(), x.type());
int row = mag.rows;
int col = mag.cols;
float *m, *a, *xx, *yy;
for (int i = 0; i < row; ++i)
{
m = mag.ptr<float>(i);
a = ang.ptr<float>(i);
xx = x.ptr<float>(i);
yy = y.ptr<float>(i);
for (int j = 0; j < col; ++j)
{
m[j] = sqrt(xx[j] * xx[j] + yy[j] * yy[j]);
a[j] = atan2(yy[j], xx[j]);
}
}
}
void UnitCart(int squaresize, cv::Mat& x, cv::Mat& y) {
CV_Assert(squaresize % 2 == 1);
x.create(squaresize, squaresize, CV_32FC1);
y.create(squaresize, squaresize, CV_32FC1);
//设置边界
x.col(0).setTo(-1.0);
x.col(squaresize - 1).setTo(1.0f);
y.row(0).setTo(1.0);
y.row(squaresize - 1).setTo(-1.0f);
float delta = 2.0f / (squaresize - 1.0f); //两个元素的间隔
//计算其他位置的值
for (int i = 1; i < squaresize - 1; ++i) {
x.col(i) = -1.0f + i * delta;
y.row(i) = 1.0f - i * delta;
}
}
/**
* @brief GrayToColor 灰度图上色
* @param phase 输入的灰色图像,通道为1
* @return 上色后的图像
*/
cv::Mat GrayToColor(cv::Mat &phase)
{
CV_Assert(phase.channels() == 1);
cv::Mat temp, result, mask;
// 将灰度图重新归一化至0-255
cv::normalize(phase, temp, 255, 0, cv::NORM_MINMAX);
temp.convertTo(temp, CV_8UC1);
// 创建掩膜,目的是为了隔离nan值的干扰
mask = cv::Mat::zeros(phase.size(), CV_8UC1);
mask.setTo(255, phase == phase);
// 初始化三通道颜色图
cv::Mat color1, color2, color3;
color1 = cv::Mat::zeros(temp.size(), temp.type());
color2 = cv::Mat::zeros(temp.size(), temp.type());
color3 = cv::Mat::zeros(temp.size(), temp.type());
int row = phase.rows;
int col = phase.cols;
// 基于灰度图的灰度层级,给其上色,最底的灰度值0为蓝色(255,0,0),最高的灰度值255为红色(0,0,255),中间的灰度值127为绿色(0,255,0)
// 不要惊讶蓝色为什么是(255,0,0),因为OpenCV中是BGR而不是RGB
for (int i = 0; i < row; ++i)
{
uchar *c1 = color1.ptr<uchar>(i);
uchar *c2 = color2.ptr<uchar>(i);
uchar *c3 = color3.ptr<uchar>(i);
uchar *r = temp.ptr<uchar>(i);
uchar *m = mask.ptr<uchar>(i);
for (int j = 0; j < col; ++j)
{
if (m[j] == 255)
{
if (r[j] > (3 * 255 / 4) && r[j] <= 255)
{
c1[j] = 255;
c2[j] = 4 * (255 - r[j]);
c3[j] = 0;
}
else if (r[j] <= (3 * 255 / 4) && r[j] > (255 / 2))
{
c1[j] = 255 - 4 * (3 * 255 / 4 - r[j]);
c2[j] = 255;
c3[j] = 0;
}
else if (r[j] <= (255 / 2) && r[j] > (255 / 4))
{
c1[j] = 0;
c2[j] = 255;
c3[j] = 4 * (255 / 2 - r[j]);
}
else if (r[j] <= (255 / 4) && r[j] >= 0)
{
c1[j] = 0;
c2[j] = 255 - 4 * (255 / 4 - r[j]);
c3[j] = 255;
}
else {
c1[j] = 0;
c2[j] = 0;
c3[j] = 0;
}
}
}
}
// 三通道合并,得到颜色图
vector<cv::Mat> images;
images.push_back(color3);
images.push_back(color2);
images.push_back(color1);
cv::merge(images, result);
return result;
}
/**
* @brief GrayToColorFromOther 灰度图上色,基于参考灰度图的色板
* @param phase1 输入的灰色图像,通道为1,提供色板
* @param phase2 输入的灰色图像,通道为1,基于phase1的色板绘色
* @return 上色后的图像
*/
cv::Mat GrayToColorFromOther(cv::Mat &phase1, cv::Mat &phase2)
{
CV_Assert(phase1.channels() == 1);
CV_Assert(phase2.channels() == 1);
if (phase1.empty() || phase2.empty())
{
cv::Mat result = cv::Mat::zeros(100, 100, CV_8UC3);
return result;
}
cv::Mat temp, result, mask;
double max1, min1;
int row = phase2.rows;
int col = phase2.cols;
// 确定参考灰度图的数据范围
cv::minMaxIdx(phase1, &min1, &max1, nullptr, nullptr, phase1 == phase1);
// 将当前灰度图以参考灰度图的数据范围作标准,进行数据变换
temp = phase2.clone();
for (int i = 0; i < row; ++i)
{
float *t2 = temp.ptr<float>(i);
for (int j = 0; j < col; ++j)
{
t2[j] = 255.0f*(phase2.at<float>(i, j) - min1) / (max1 - min1);
}
}
temp.convertTo(temp, CV_8UC1);
// 创建掩膜,目的是为了隔离nan值的干扰
mask = cv::Mat::zeros(phase2.size(), CV_8UC1);
mask.setTo(255, phase2 == phase2);
// 初始化三通道颜色图
cv::Mat color1, color2, color3;
color1 = cv::Mat::zeros(temp.size(), temp.type());
color2 = cv::Mat::zeros(temp.size(), temp.type());
color3 = cv::Mat::zeros(temp.size(), temp.type());
// 基于灰度图的灰度层级,给其上色,最底的灰度值0为蓝色(255,0,0),最高的灰度值255为红色(0,0,255),中间的灰度值127为绿色(0,255,0)
for (int i = 0; i < row; ++i)
{
uchar *c1 = color1.ptr<uchar>(i);
uchar *c2 = color2.ptr<uchar>(i);
uchar *c3 = color3.ptr<uchar>(i);
uchar *r = temp.ptr<uchar>(i);
uchar *m = mask.ptr<uchar>(i);
for (int j = 0; j < col; ++j)
{
if (m[j] == 255)
{
if (r[j] > (3 * 255 / 4) && r[j] <= 255)
{
c1[j] = 255;
c2[j] = 4 * (255 - r[j]);
c3[j] = 0;
}
else if (r[j] <= (3 * 255 / 4) && r[j] > (255 / 2))
{
c1[j] = 255 - 4 * (3 * 255 / 4 - r[j]);
c2[j] = 255;
c3[j] = 0;
}
else if (r[j] <= (255 / 2) && r[j] > (255 / 4))
{
c1[j] = 0;
c2[j] = 255;
c3[j] = 4 * (255 / 2 - r[j]);
}
else if (r[j] <= (255 / 4) && r[j] >= 0)
{
c1[j] = 0;
c2[j] = 255 - 4 * (255 / 4 - r[j]);
c3[j] = 255;
}
else {
c1[j] = 0;
c2[j] = 0;
c3[j] = 0;
}
}
}
}
// 三通道合并,得到颜色图
vector<cv::Mat> images;
images.push_back(color3);
images.push_back(color2);
images.push_back(color1);
cv::merge(images, result);
return result;
}测试效果

图1 参考灰度图上色效果
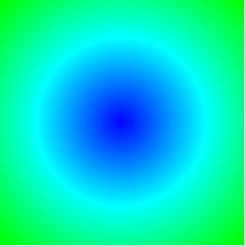
图2 基于参考灰度图色板的上色效果
如上图所示,为了方便,我生成了一个2001*2001的图像矩阵,并设置了另一个对比图像,该图像为原图像的1/2,那么原图像就是参考灰度图,而对比图像就是需要基于参考灰度图色板上色的灰度图。图1为参考灰度图的上色效果,图2是基于参考灰度图色板给对比图像上色的效果图。原图像的数据从0-1.3左右,其颜色变化从蓝到绿再到红,而对比图像的数据从0-1.3/2左右,则颜色变化为蓝到绿,满足了前面提到的需求。
以上是“C++如何实现基于灰度图上色GrayToColorFromOthe”这篇文章的所有内容,感谢各位的阅读!相信大家都有了一定的了解,希望分享的内容对大家有所帮助,如果还想学习更多知识,欢迎关注亿速云行业资讯频道!
免责声明:本站发布的内容(图片、视频和文字)以原创、转载和分享为主,文章观点不代表本网站立场,如果涉及侵权请联系站长邮箱:is@yisu.com进行举报,并提供相关证据,一经查实,将立刻删除涉嫌侵权内容。


