本篇内容主要讲解“如何使用OpenCV开发虚拟键盘”,感兴趣的朋友不妨来看看。本文介绍的方法操作简单快捷,实用性强。下面就让小编来带大家学习“如何使用OpenCV开发虚拟键盘”吧!
OpenCV 是最流行的计算机视觉任务库,它是用于机器学习、图像处理等的跨平台开源库,用于开发实时计算机视觉应用程序。
CVzone 是一个计算机视觉包,它使用 OpenCV 和 Media Pipe 库作为其核心,使我们易于运行,例如手部跟踪、人脸检测、面部标志检测、姿势估计等,以及图像处理和其他计算机视觉相关的应用程序。
让我们创建一个虚拟键盘。
首先,让我们安装所需的模块。
pip install numpy

pip install opencv-python

pip install cvzone

pip install pynput
现在让我们导入所需的模块
import cv2
import cvzone
from cvzone.HandTrackingModule import HandDetector
from time import sleep
import numpy as np
from pynput.keyboard import Controller
这里我们从 cvzone.HandTrackingModule 导入 HandDetector 模块,然后为了使虚拟键盘工作,我们需要从 pynput.keyboard 导入Controller。
cap = cv2.VideoCapture(0, cv2.CAP_DSHOW)
cap.set(3, 1280)
cap.set(4, 720)
现在让我们从 cv2.Videocapture 获取实时输入
detector = HandDetector(detectionCon=0.8)
keyboard_keys = [["Q", "W", "E", "R", "T", "Y", "U", "I", "O", "P"],
                  ["A", "S", "D", "F", "G", "H", "J", "K", "L", ";"],
                  ["Z", "X", "C", "V", "B", "N", "M", ",", ".", "/"]]
final_text = ""
我们以 0.8 的检测置信度初始化 HandDetector 并将其分配给检测器。
然后我们根据键盘的布局创建一个列表数组,并定义一个空字符串来存储键入的键。
keyboard = Controller()
def draw(img, buttonList):
    for button in buttonList:
        x, y = button.pos
        w, h = button.size
        cvzone.cornerRect(img, (button.pos[0], button.pos[1],
                                                   button.size[0],button.size[0]), 20 ,rt=0)
        cv2.rectangle(img, button.pos, (int(x + w), int(y + h)), (255, 144, 30), cv2.FILLED)
        cv2.putText(img, button.text, (x + 20, y + 65),
                    cv2.FONT_HERSHEY_PLAIN, 4, (0, 0, 0), 4)
    return img
初始化键盘控制器,并定义一个名为draw()的函数,它接受两个参数,即图像和按钮列表并返回图像。在draw()函数内部,我们使用 cvzone 的cornerRect函数在每个键的角落绘制矩形边缘。这是为了让我们的键盘布局看起来更好看。就像下面的图片。
你也可以尝试更改不同的颜色。
class Button():
    def __init__(self, pos, text, size=[85, 85]):
        self.pos = pos
        self.size = size
        self.text = text
然后我们定义一个名为 Button() 的类,并提供位置、文本和大小作为输入,以便我们可以按照明确定义的顺序排列键盘按键。
buttonList = []
# mybutton = Button([100, 100], "Q")
for k in range(len(keyboard_keys)):
    for x, key in enumerate(keyboard_keys[k]):
        buttonList.append(Button([100 * x + 25, 100 * k + 50], key))
上面的循环将遍历键盘按键和 Button 对象,我们在其中给出位置和文本作为输入附加在一个名为 button list 的列表中。稍后我们可以将这个列表传递给 draw 函数以在我们的实时框架之上进行绘制。
重要的部分来了。
while True:
    success, img = cap.read()
    img = detector.findHands(img)
    lmList, bboxInfo = detector.findPosition(img)
    img = draw(img, buttonList)  # change the draw funtion to transparent_layout for transparent keys
    if lmList:
        for button in buttonList:
            x, y = button.pos
            w, h = button.size

if x < lmList[8][0]<x+w and y < lmList[8][1] < y+h:
cv2.rectangle(img, button.pos, (x + w, y + h),
(0, 255, 255), cv2.FILLED)
cv2.putText(img, button.text, (x + 20, y + 65),
cv2.FONT_HERSHEY_PLAIN, 4, (0, 0, 0), 4)
l, _, _ = detector.findDistance(8,12, img, draw=False)
print(l)

if l < 25:
keyboard.press(button.text)
cv2.rectangle(img, button.pos, (x + w, y + h),
(0, 255, 0), cv2.FILLED)
cv2.putText(img, button.text, (x + 20, y + 65),
cv2.FONT_HERSHEY_PLAIN, 4, (0, 0, 0), 4)
final_text += button.text
sleep(0.20)

cv2.rectangle(img, (25,350), (700, 450),
(255, 255, 255), cv2.FILLED)
cv2.putText(img, final_text, (60, 425),
cv2.FONT_HERSHEY_PLAIN, 4, (0, 0, 0), 4)

# cv2.rectangle(img, (100,100), (200,200),
# (100, 255, 0), cv2.FILLED)
# cv2.putText(img, 'Q', (120,180), cv2.FONT_HERSHEY_PLAIN, 5,
# (0, 0, 0), 5)

# img = mybutton.draw(img)
cv2.imshow("output", img)
cv2.waitKey(1)
在 while 循环中,首先我们读取实时输入帧并将其存储在一个名为img的变量中。然后我们将该图像传递给*检测器.findHands()*以便在帧中找到手。然后在该图像中,我们需要找到检测到的手的位置和边界框信息。
在这里我们可以找到我们的食指和中指的顶点之间的距离,如果两者之间的距离小于某个阈值,那么我们就可以输入我们所指示的字母。
一旦我们获得了位置,我们就会遍历整个位置列表。从该列表中,我们找到按钮位置和按钮大小,然后根据明确定义的方式将其绘制在框架上。
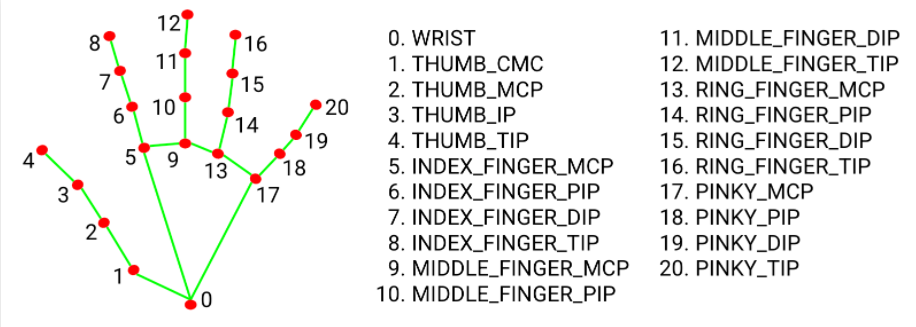
图 1:手地标模型
之后,我们需要找到食指和中指的顶点之间的距离。在上图中,你可以看到我们需要的最高点是点 8 和点 12。因此,我们需要在距离查找函数中传递 8, 12 以获得它们之间的距离。
在上面的代码中,你可以看到 detector.findDistance(),我们通过了 8、12 和图像来查找距离,并将绘制标志设置为 false,这样我们就不需要两点之间的任何线。
如果点之间的距离非常小,我们将使用 press() 函数来按下按键。在上面的代码keyboard.press() 中,我们传递button.text以显示按下的键。最后,我们在键盘布局下方绘制一个小的白色矩形框,以显示按下的键。
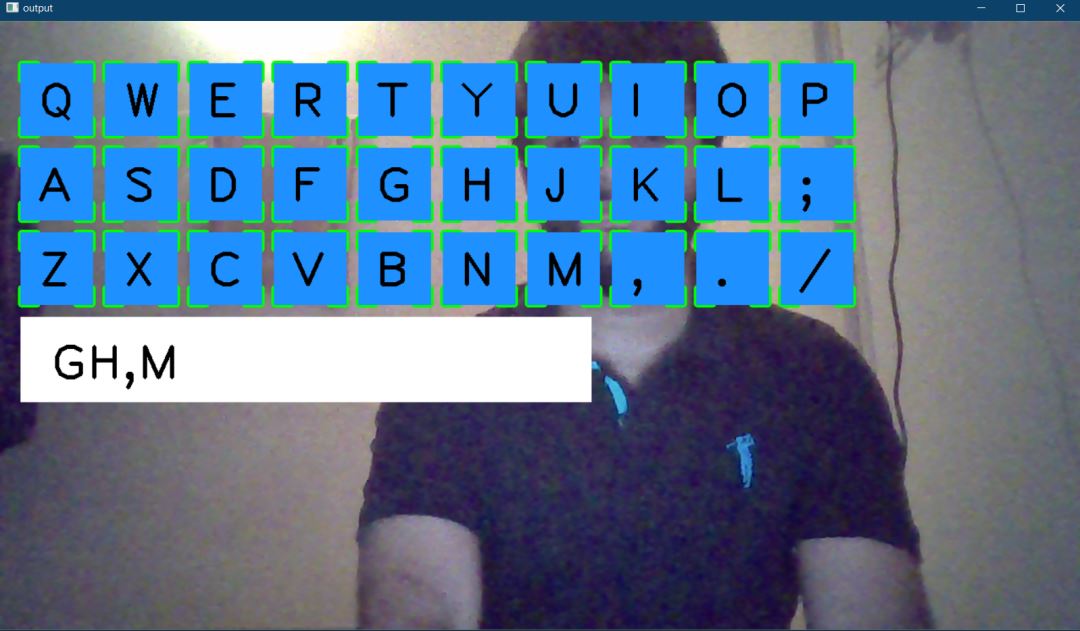
一旦你执行了整个代码,它看起来像这样。

将食指和中指靠近特定字母的顶部后,你可以键入该字母。
如果你需要更自定义的键盘布局,我们可以使键盘布局透明。我们只需要添加一个透明布局函数并将*draw()函数替换为transparent_layout()*函数即可。
让我们定义transparent_layout()函数。下面是函数的代码,它采用与draw()函数相同的输入。在这里,我们将 numpy 的zero_like()函数分配给 名为imgNew的变量,并对其执行所需的操作,例如获得角矩形、为每个键创建矩形框并将文本放入框内。之后,我们将该图像复制到一个新变量并创建一个imgNew掩码,然后我们使用 OpenCV 的*addWeighted()*函数将掩码放置在实际图像的顶部。因此,这使键盘布局透明。
def transparent_layout(img, buttonList):
    imgNew = np.zeros_like(img, np.uint8)
    for button in buttonList:
        x, y = button.pos
        cvzone.cornerRect(imgNew, (button.pos[0], button.pos[1],
                                                   button.size[0],button.size[0]), 20 ,rt=0)
        cv2.rectangle(imgNew, button.pos, (x + button.size[0], y + button.size[1]),
                                   (255, 144, 30), cv2.FILLED)
        cv2.putText(imgNew, button.text, (x + 20, y + 65),
                    cv2.FONT_HERSHEY_PLAIN, 4, (0, 0, 0), 4)
        out = img.copy()
        alpaha = 0.5
        mask = imgNew.astype(bool)
        print(mask.shape)
        out[mask] = cv2.addWeighted(img, alpaha, imgNew, 1-alpaha, 0)[mask]
        return out
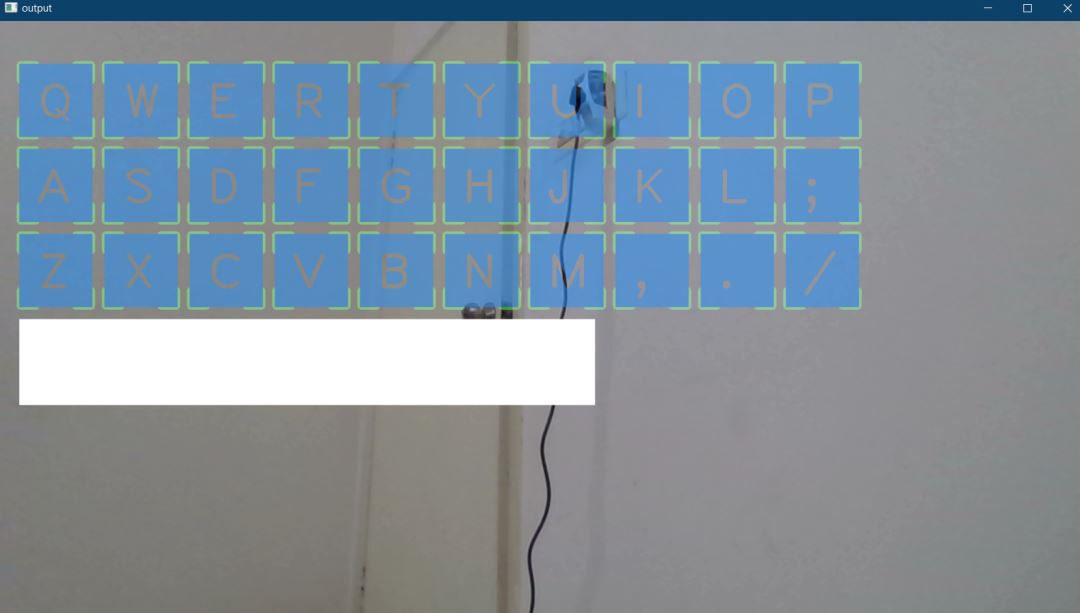
一旦将while 循环中的*draw()函数替换为transparent_layout()*函数,它将如下所示。(下图)
下面是完整的代码
import cv2
import cvzone
from cvzone.HandTrackingModule import HandDetector
from time import sleep
import numpy as np
from pynput.keyboard import Controller

cap = cv2.VideoCapture(0, cv2.CAP_DSHOW)
cap.set(3, 1280)
cap.set(4, 720)

detector = HandDetector(detectionCon=0.8)
keyboard_keys = [["Q", "W", "E", "R", "T", "Y", "U", "I", "O", "P"],
                  ["A", "S", "D", "F", "G", "H", "J", "K", "L", ";"],
                  ["Z", "X", "C", "V", "B", "N", "M", ",", ".", "/"]]

final_text = ""

keyboard = Controller()


def draw(img, buttonList):
    for button in buttonList:
        x, y = button.pos
        w, h = button.size
        cvzone.cornerRect(img, (button.pos[0], button.pos[1],
                                                   button.size[0],button.size[0]), 20 ,rt=0)
        cv2.rectangle(img, button.pos, (int(x + w), int(y + h)), (255, 144, 30), cv2.FILLED)
        cv2.putText(img, button.text, (x + 20, y + 65),
                    cv2.FONT_HERSHEY_PLAIN, 4, (0, 0, 0), 4)
    return img


def transparent_layout(img, buttonList):
    imgNew = np.zeros_like(img, np.uint8)
    for button in buttonList:
        x, y = button.pos
        cvzone.cornerRect(imgNew, (button.pos[0], button.pos[1],
                                                   button.size[0],button.size[0]), 20 ,rt=0)
        cv2.rectangle(imgNew, button.pos, (x + button.size[0], y + button.size[1]),
                                   (255, 144, 30), cv2.FILLED)
        cv2.putText(imgNew, button.text, (x + 20, y + 65),
                    cv2.FONT_HERSHEY_PLAIN, 4, (0, 0, 0), 4)

    out = img.copy()
    alpaha = 0.5
    mask = imgNew.astype(bool)
    print(mask.shape)
    out[mask] = cv2.addWeighted(img, alpaha, imgNew, 1-alpaha, 0)[mask]
    return out


class Button():
    def __init__(self, pos, text, size=[85, 85]):
        self.pos = pos
        self.size = size
        self.text = text


buttonList = []
# mybutton = Button([100, 100], "Q")
for k in range(len(keyboard_keys)):
    for x, key in enumerate(keyboard_keys[k]):
        buttonList.append(Button([100 * x + 25, 100 * k + 50], key))


while True:
    success, img = cap.read()
    img = detector.findHands(img)
    lmList, bboxInfo = detector.findPosition(img)
    img = draw(img, buttonList)  # change the draw funtion to transparent_layout for transparent keys

    if lmList:
        for button in buttonList:
            x, y = button.pos
            w, h = button.size

            if x < lmList[8][0]<x+w and y < lmList[8][1] < y+h:
                cv2.rectangle(img, button.pos, (x + w, y + h),
                              (0, 255, 255), cv2.FILLED)
                cv2.putText(img, button.text, (x + 20, y + 65),
                            cv2.FONT_HERSHEY_PLAIN, 4, (0, 0, 0), 4)
                l, _, _ = detector.findDistance(8,12, img, draw=False)
                print(l)

                if l < 25:
                    keyboard.press(button.text)
                    cv2.rectangle(img, button.pos, (x + w, y + h),
                                  (0, 255, 0), cv2.FILLED)
                    cv2.putText(img, button.text, (x + 20, y + 65),
                                cv2.FONT_HERSHEY_PLAIN, 4, (0, 0, 0), 4)
                    final_text += button.text
                    sleep(0.20)

    cv2.rectangle(img, (25,350), (700, 450),
                  (255, 255, 255), cv2.FILLED)
    cv2.putText(img, final_text, (60, 425),
                cv2.FONT_HERSHEY_PLAIN, 4, (0, 0, 0), 4)

    # cv2.rectangle(img, (100,100), (200,200),
    #               (100, 255, 0), cv2.FILLED)
    # cv2.putText(img, 'Q', (120,180), cv2.FONT_HERSHEY_PLAIN, 5,
    #             (0, 0, 0), 5)

    # img = mybutton.draw(img)
    cv2.imshow("output", img)
    cv2.waitKey(1)
到此,相信大家对“如何使用OpenCV开发虚拟键盘”有了更深的了解,不妨来实际操作一番吧!这里是亿速云网站,更多相关内容可以进入相关频道进行查询,关注我们,继续学习!
免责声明:本站发布的内容(图片、视频和文字)以原创、转载和分享为主,文章观点不代表本网站立场,如果涉及侵权请联系站长邮箱:is@yisu.com进行举报,并提供相关证据,一经查实,将立刻删除涉嫌侵权内容。


