这篇文章主要为大家展示了“C++11中thread多线程编程如何创建”,内容简而易懂,条理清晰,希望能够帮助大家解决疑惑,下面让小编带领大家一起研究并学习一下“C++11中thread多线程编程如何创建”这篇文章吧。
C++11 新标准中引入了四个头文件来支持多线程编程,他们分别是<atomic> ,<thread>,<mutex>,<condition_variable>和<future>。
<atomic>:该头文主要声明了两个类, std::atomic 和 std::atomic_flag,另外还声明了一套 C 风格的原子类型和与 C 兼容的原子操作的函数。
<thread>:该头文件主要声明了 std::thread 类,另外 std::this_thread 命名空间也在该头文件中。
<mutex>:该头文件主要声明了与互斥量(mutex)相关的类,包括 std::mutex 系列类,std::lock_guard, std::unique_lock, 以及其他的类型和函数。<condition_variable>:该头文件主要声明了与条件变量相关的类,包括 std::condition_variable 和 std::condition_variable_any。
<future>:该头文件主要声明了 std::promise, std::package_task 两个 Provider 类,以及 std::future 和 std::shared_future 两个 Future 类,另外还有一些与之相关的类型和函数,std::async() 函数就声明在此头文件中。
#include <iostream>
#include <utility>
#include <thread>
#include <chrono>
#include <functional>
#include <atomic>

void f1(int n)
{
  for (int i = 0; i < 5; ++i) {
    std::cout << "Thread " << n << " executing\n";
    std::this_thread::sleep_for(std::chrono::milliseconds(1000));
  }
}

void f2(int& n)
{
  std::cout << "thread-id:" << std::this_thread::get_id() << "\n";
  for (int i = 0; i < 5; ++i) {
    std::cout << "Thread 2 executing:" << n << "\n";
    ++n;
    std::this_thread::sleep_for(std::chrono::milliseconds(1000));
  }
}

int main()
{
  int n = 0;
  std::thread t1; // t1 is not a thread t1 不是一个线程
  std::thread t2(f1, n + 1); // pass by value 传值
  std::thread t3(f2, std::ref(n)); // pass by reference  传引用

  std::this_thread::sleep_for(std::chrono::milliseconds(2000));
  std::cout << "\nThread 4 create :\n";
  std::thread t4(std::move(t3)); // t4 is now running f2(). t3 is no longer a thread 这时候t3将不是线程,t4接替t3继续运行f2
  t2.join();
  t4.join();
  std::cout << "Final value of n is " << n << '\n';
}(1). 默认构造函数,创建一个空的 thread 执行对象。
(2). 初始化构造函数,创建一个 thread对象,该 thread对象可被 joinable,新产生的线程会调用 fn 函数,该函数的参数由 args 给出。
(3). 拷贝构造函数(被禁用),意味着 thread 不可被拷贝构造。
(4). move 构造函数,move 构造函数,调用成功之后 x 不代表任何 thread 执行对象。
注意:可被 joinable 的 thread 对象必须在他们销毁之前被主线程 join 或者将其设置为 detached.
std::thread定义一个线程对象,传入线程所需要的线程函数和参数,线程自动开启
join()
创建线程执行线程函数,调用该函数会阻塞当前线程,直到线程执行完join才返回;等待t线程结束,当前线程继续往下运行
detach()
detach调用之后,目标线程就成为了守护线程,驻留后台运行,与之关联的std::thread对象失去对目标线程的关联,无法再通过std::thread对象取得该线程的控制权,由操作系统负责回收资源;主线程结束,整个进程结束,所有子线程都自动结束了!
#include <iostream>
#include <thread>
using namespace std;

void threadHandle1(int time)
{
	//让子线程睡眠time秒
	std::this_thread::sleep_for(std::chrono::seconds(time));
	cout << "hello thread1!" << endl;
}
void threadHandle2(int time)
{
	//让子线程睡眠time秒ace this_thread是namespace
	std::this_thread::sleep_for(std::chrono::seconds(time));
	cout << "hello thread2!" << endl;
}
int main()
{
	//创建了一个线程对象,传入一个线程函数(作为线程入口函数),
	//新线程就开始运行了,没有先后顺序,随着CPU的调度算法执行
	std::thread t1(threadHandle1, 2);
	std::thread t2(threadHandle2, 3);

	//主线程(main)运行到这里,等待子线程结束,主线程才继续往下运行
	t1.join();
	t2.join();

	//把子线程设置为分离线程,子线程和主线程就毫无关系了
	//主线程结束的时候查看其他线程
	//但是这个子线程运行完还是没运行完都和这个主线程没关系了
	//这个子线程就从这个main分离出去了
	//运行程序时也看不到这个子线程的任何输出打印了
    //t1.detach();

	cout << "main thread done!" << endl;

	//主线程运行完成,查看如果当前进程还有未运行完成的子线程
	//进程就会异常终止
	return 0;
}Mutex 又称互斥量,C++ 11中与 Mutex 相关的类(包括锁类型)和函数都声明在 <mutex> 头文件中,所以如果你需要使用 std::mutex,就必须包含 <mutex> 头文件。
Mutex 系列类(四种)
std::mutex,最基本的 Mutex 类。
std::recursive_mutex,递归 Mutex 类。
std::time_mutex,定时 Mutex 类。
std::recursive_timed_mutex,定时递归 Mutex 类。
Lock 类(两种)
std::lock_guard,与 Mutex RAII 相关,方便线程对互斥量上锁。
std::unique_lock,与 Mutex RAII 相关,方便线程对互斥量上锁,但提供了更好的上锁和解锁控制。
其他类型
std::once_flagstd::adopt_lock_tstd::defer_lock_tstd::try_to_lock_t
函数
std::try_lock,尝试同时对多个互斥量上锁。
std::lock,可以同时对多个互斥量上锁。
std::call_once,如果多个线程需要同时调用某个函数,call_once 可以保证多个线程对该函数只调用一次。
下面以 std::mutex 为例介绍 C++11 中的互斥量用法。
std::mutex 是C++11 中最基本的互斥量,std::mutex 对象提供了独占所有权的特性——即不支持递归地对 std::mutex 对象上锁,而 std::recursive_lock 则可以递归地对互斥量对象上锁。
构造函数,std::mutex不允许拷贝构造,也不允许 move 拷贝,最初产生的 mutex 对象是处于 unlocked 状态的。
lock(),调用线程将锁住该互斥量。线程调用该函数会发生下面 3 种情况:(1). 如果该互斥量当前没有被锁住,则调用线程将该互斥量锁住,直到调用 unlock之前,该线程一直拥有该锁。(2). 如果当前互斥量被其他线程锁住,则当前的调用线程被阻塞住。(3). 如果当前互斥量被当前调用线程锁住,则会产生死锁(deadlock)。
unlock(), 解锁,释放对互斥量的所有权。
try_lock(),尝试锁住互斥量,如果互斥量被其他线程占有,则当前线程也不会被阻塞。线程调用该函数也会出现下面 3 种情况,(1). 如果当前互斥量没有被其他线程占有,则该线程锁住互斥量,直到该线程调用 unlock 释放互斥量。(2). 如果当前互斥量被其他线程锁住,则当前调用线程返回 false,而并不会被阻塞掉。(3). 如果当前互斥量被当前调用线程锁住,则会产生死锁(deadlock)
为了保证lock()和unlock()对应使用,一般不直接使用mutex,而是和lock_guard、unique_lock一起使用;
std::lock_guard是RAII模板类的简单实现,功能简单。
1.std::lock_guard 在构造函数中进行加锁,析构函数中进行解锁。
		// CLASS TEMPLATE lock_guard
template<class _Mutex>
	class lock_guard
	{	// class with destructor that unlocks a mutex
public:
	using mutex_type = _Mutex;

	explicit lock_guard(_Mutex& _Mtx)
		: _MyMutex(_Mtx)
		{	// construct and lock
		_MyMutex.lock();
		}

	lock_guard(_Mutex& _Mtx, adopt_lock_t)
		: _MyMutex(_Mtx)
		{	// construct but don't lock
		}

	~lock_guard() noexcept
		{	// unlock
		_MyMutex.unlock();
		}

	lock_guard(const lock_guard&) = delete;
	lock_guard& operator=(const lock_guard&) = delete;
private:
	_Mutex& _MyMutex;
	};
从lock_guard源码可以看出,它在构造时进行上锁,在出作用域执行析构函数释放锁;同时不允许拷贝构造和赋值运算符;比较简单,不能用在函数参数传递或者返回过程中,因为它的拷贝构造和赋值运算符被禁用了;只能用在简单的临界区代码的互斥操作
类 unique_lock 是通用互斥包装器,允许
延迟锁定、锁定的有时限尝试、递归锁定、所有权转移和与条件变量一同使用。
unique_lock比lock_guard使用更加灵活,功能更加强大。
使用unique_lock需要付出更多的时间、性能成本。
template<class _Mutex>
	class unique_lock
	{	// whizzy class with destructor that unlocks mutex
public:
	typedef _Mutex mutex_type;

	// CONSTRUCT, ASSIGN, AND DESTROY
	unique_lock() noexcept
		: _Pmtx(nullptr), _Owns(false)
		{	// default construct
		}

	explicit unique_lock(_Mutex& _Mtx)
		: _Pmtx(_STD addressof(_Mtx)), _Owns(false)
		{	// construct and lock
		_Pmtx->lock();
		_Owns = true;
		}

	unique_lock(_Mutex& _Mtx, adopt_lock_t)
		: _Pmtx(_STD addressof(_Mtx)), _Owns(true)
		{	// construct and assume already locked
		}

	unique_lock(_Mutex& _Mtx, defer_lock_t) noexcept
		: _Pmtx(_STD addressof(_Mtx)), _Owns(false)
		{	// construct but don't lock
		}

	unique_lock(_Mutex& _Mtx, try_to_lock_t)
		: _Pmtx(_STD addressof(_Mtx)), _Owns(_Pmtx->try_lock())
		{	// construct and try to lock
		}

	template<class _Rep,
		class _Period>
		unique_lock(_Mutex& _Mtx,
			const chrono::duration<_Rep, _Period>& _Rel_time)
		: _Pmtx(_STD addressof(_Mtx)), _Owns(_Pmtx->try_lock_for(_Rel_time))
		{	// construct and lock with timeout
		}

	template<class _Clock,
		class _Duration>
		unique_lock(_Mutex& _Mtx,
			const chrono::time_point<_Clock, _Duration>& _Abs_time)
		: _Pmtx(_STD addressof(_Mtx)), _Owns(_Pmtx->try_lock_until(_Abs_time))
		{	// construct and lock with timeout
		}

	unique_lock(_Mutex& _Mtx, const xtime *_Abs_time)
		: _Pmtx(_STD addressof(_Mtx)), _Owns(false)
		{	// try to lock until _Abs_time
		_Owns = _Pmtx->try_lock_until(_Abs_time);
		}

	unique_lock(unique_lock&& _Other) noexcept
		: _Pmtx(_Other._Pmtx), _Owns(_Other._Owns)
		{	// destructive copy
		_Other._Pmtx = nullptr;
		_Other._Owns = false;
		}

	unique_lock& operator=(unique_lock&& _Other)
		{	// destructive copy
		if (this != _STD addressof(_Other))
			{	// different, move contents
			if (_Owns)
				_Pmtx->unlock();
			_Pmtx = _Other._Pmtx;
			_Owns = _Other._Owns;
			_Other._Pmtx = nullptr;
			_Other._Owns = false;
			}
		return (*this);
		}

	~unique_lock() noexcept
		{	// clean up
		if (_Owns)
			_Pmtx->unlock();
		}

	unique_lock(const unique_lock&) = delete;
	unique_lock& operator=(const unique_lock&) = delete;

	void lock()
		{	// lock the mutex
		_Validate();
		_Pmtx->lock();
		_Owns = true;
		}

	_NODISCARD bool try_lock()
		{	// try to lock the mutex
		_Validate();
		_Owns = _Pmtx->try_lock();
		return (_Owns);
		}

	template<class _Rep,
		class _Period>
		_NODISCARD bool try_lock_for(const chrono::duration<_Rep, _Period>& _Rel_time)
		{	// try to lock mutex for _Rel_time
		_Validate();
		_Owns = _Pmtx->try_lock_for(_Rel_time);
		return (_Owns);
		}

	template<class _Clock,
		class _Duration>
		_NODISCARD bool try_lock_until(const chrono::time_point<_Clock, _Duration>& _Abs_time)
		{	// try to lock mutex until _Abs_time
		_Validate();
		_Owns = _Pmtx->try_lock_until(_Abs_time);
		return (_Owns);
		}

	_NODISCARD bool try_lock_until(const xtime *_Abs_time)
		{	// try to lock the mutex until _Abs_time
		_Validate();
		_Owns = _Pmtx->try_lock_until(_Abs_time);
		return (_Owns);
		}

	void unlock()
		{	// try to unlock the mutex
		if (!_Pmtx || !_Owns)
			_THROW(system_error(
				_STD make_error_code(errc::operation_not_permitted)));

		_Pmtx->unlock();
		_Owns = false;
		}

	void swap(unique_lock& _Other) noexcept
		{	// swap with _Other
		_STD swap(_Pmtx, _Other._Pmtx);
		_STD swap(_Owns, _Other._Owns);
		}

	_Mutex *release() noexcept
		{	// disconnect
		_Mutex *_Res = _Pmtx;
		_Pmtx = nullptr;
		_Owns = false;
		return (_Res);
		}

	_NODISCARD bool owns_lock() const noexcept
		{	// return true if this object owns the lock
		return (_Owns);
		}

	explicit operator bool() const noexcept
		{	// return true if this object owns the lock
		return (_Owns);
		}

	_NODISCARD _Mutex *mutex() const noexcept
		{	// return pointer to managed mutex
		return (_Pmtx);
		}

private:
	_Mutex *_Pmtx;
	bool _Owns;

	void _Validate() const
		{	// check if the mutex can be locked
		if (!_Pmtx)
			_THROW(system_error(
				_STD make_error_code(errc::operation_not_permitted)));

		if (_Owns)
			_THROW(system_error(
				_STD make_error_code(errc::resource_deadlock_would_occur)));
		}
	};
其中,有_Mutex *_Pmtx; 指向一把锁的指针;不允许使用左值拷贝构造和赋值,但是可以使用右值拷贝构造和赋值,可以在函数调用过程中使用。因此可以和条件变量一起使用:cv.wait(lock);//可以作为函数参数传入;
在多线程环境中运行的代码段,需要考虑是否存在竞态条件,如果存在竞态条件,我们就说该代码段不是线程安全的,不能直接运行在多线程环境当中,对于这样的代码段,我们经常称之为临界区资源,对于临界区资源,多线程环境下需要保证它以原子操作执行,要保证临界区的原子操作,就需要用到线程间的互斥操作-锁机制,thread类库还提供了更轻量级的基于CAS操作的原子操作类。
无锁时:
#include <iostream>
#include <atomic>//C++11线程库提供的原子类
#include <thread>//C++线程类库的头文件
#include <vector>


int count = 0;

//线程函数
void sumTask()
{

  //每个线程给count加10次
  for (int i = 0; i < 10; ++i)
  {
    count++;
    std::this_thread::sleep_for(std::chrono::milliseconds(10));
  }
}

int main()
{
  //创建10个线程放在容器当中
  std::vector<std::thread> vec;
  for (int i = 0; i < 10; ++i)
  {
    vec.push_back(std::thread(sumTask));
  }

  //等待线程执行完成
  for (unsigned int i = 0; i < vec.size(); ++i)
  {
    vec[i].join();
  }

  //所有子线程运行结束
  std::cout << "count : " << count << std::endl;

  return 0;
}
多线程同时对count进行操作,并不能保证同时只有一个线程对count执行++操作,最后的的结果不一定是100;
使用lock_guard:
#include <iostream>
#include <atomic>//C++11线程库提供的原子类
#include <thread>//C++线程类库的头文件
#include <mutex>
#include <vector>


int count = 0;
std::mutex mutex;

//线程函数
void sumTask()
{

  //每个线程给count加10次
  for (int i = 0; i < 10; ++i)
  {
    {
      std::lock_guard<std::mutex> lock(mutex);
      count++;
    }
;
    std::this_thread::sleep_for(std::chrono::milliseconds(10));
  }
}

int main()
{
  //创建10个线程放在容器当中
  std::vector<std::thread> vec;
  for (int i = 0; i < 10; ++i)
  {
    vec.push_back(std::thread(sumTask));
  }

  //等待线程执行完成
  for (unsigned int i = 0; i < vec.size(); ++i)
  {
    vec[i].join();
  }

  //所有子线程运行结束,count的结果每次运行应该都是10000
  std::cout << "count : " << count << std::endl;

  return 0;
}
对count++ 操作上锁,保证一次只有一个线程能对其操作,结果是100
上面的保证原子操作需要在多线程环境下添加互斥操作,但是mutex互斥锁毕竟比较重,对于系统消耗有些大,C++11的thread类库提供了针对简单类型的原子操作类,如std::atomic_int,atomic_long,atomic_bool等,它们值的增减都是基于CAS操作的,既保证了线程安全,效率还非常高。
#include <iostream>
#include <atomic>//C++11线程库提供的原子类
#include <thread>//C++线程类库的头文件
#include <vector>

//原子整型,CAS操作保证给count自增自减的原子操作
std::atomic_int count = 0;

//线程函数
void sumTask()
{
  //每个线程给count加10次
  for (int i = 0; i < 10; ++i)
  {
    count++;
  }
}

int main()
{
  //创建10个线程放在容器当中
  std::vector<std::thread> vec;
  for (int i = 0; i < 10; ++i)
  {
    vec.push_back(std::thread(sumTask));
  }

  //等待线程执行完成
  for (unsigned int i = 0; i < vec.size(); ++i)
  {
    vec[i].join();
  }

  //所有子线程运行结束,count的结果每次运行应该都是10000
  std::cout << "count : " << count << std::endl;

  return 0;
}多线程在运行过程中,各个线程都是随着OS的调度算法,占用CPU时间片来执行指令做事情,每个线程的运行完全没有顺序可言。但是在某些应用场景下,一个线程需要等待另外一个线程的运行结果,才能继续往下执行,这就需要涉及线程之间的同步通信机制。
线程间同步通信最典型的例子就是生产者-消费者模型,生产者线程生产出产品以后,会通知消费者线程去消费产品;如果消费者线程去消费产品,发现还没有产品生产出来,它需要通知生产者线程赶快生产产品,等生产者线程生产出产品以后,消费者线程才能继续往下执行。
C++11 线程库提供的条件变量condition_variable,就是Linux平台下的Condition Variable机制,用于解决线程间的同步通信问题,下面通过代码演示一个生产者-消费者线程模型:
#include <iostream>           //std::cout
#include <thread>             //std::thread
#include <mutex>              //std::mutex, std::unique_lock
#include <condition_variable> //std::condition_variable
#include <vector>

//定义互斥锁(条件变量需要和互斥锁一起使用)
std::mutex mtx;
//定义条件变量(用来做线程间的同步通信)
std::condition_variable cv;
//定义vector容器,作为生产者和消费者共享的容器
std::vector<int> vec;

//生产者线程函数
void producer()
{
  //生产者每生产一个,就通知消费者消费一个
  for (int i = 1; i <= 10; ++i)
  {
    //获取mtx互斥锁资源
    std::unique_lock<std::mutex> lock(mtx);

    //如果容器不为空,代表还有产品未消费,等待消费者线程消费完,再生产
    while (!vec.empty())
    {
      //判断容器不为空,进入等待条件变量的状态,释放mtx锁,
      //让消费者线程抢到锁能够去消费产品
      cv.wait(lock);
    }
    vec.push_back(i); // 表示生产者生产的产品序号i
    std::cout << "producer生产产品:" << i << std::endl;

    /*
    生产者线程生产完产品,通知等待在cv条件变量上的消费者线程,
    可以开始消费产品了,然后释放锁mtx
    */
    cv.notify_all();

    //生产一个产品,睡眠100ms
    std::this_thread::sleep_for(std::chrono::milliseconds(100));
  }
}
//消费者线程函数
void consumer()
{
  //消费者每消费一个,就通知生产者生产一个
  for (int i = 1; i <= 10; ++i)
  {
    //获取mtx互斥锁资源
    std::unique_lock<std::mutex> lock(mtx);

    //如果容器为空,代表还有没有产品可消费,等待生产者生产,再消费
    while (vec.empty())
    {
      //判断容器为空,进入等待条件变量的状态,释放mtx锁,
      //让生产者线程抢到锁能够去生产产品
      cv.wait(lock);
    }
    int data = vec.back(); // 表示消费者消费的产品序号i
    vec.pop_back();
    std::cout << "consumer消费产品:" << data << std::endl;

    /*
    消费者消费完产品,通知等待在cv条件变量上的生产者线程,
    可以开始生产产品了,然后释放锁mtx
    */
    cv.notify_all();

    //消费一个产品,睡眠100ms
    std::this_thread::sleep_for(std::chrono::milliseconds(100));
  }
}
int main()
{
  //创建生产者和消费者线程
  std::thread t1(producer);
  std::thread t2(consumer);

  //main主线程等待所有子线程执行完
  t1.join();
  t2.join();

  return 0;
}死锁概述
线程死锁是指两个或两个以上的线程互相持有对方所需要的资源,由于synchronized的特性,一个线程持有一个资源,或者说获得一个锁,在该线程释放这个锁之前,其它线程是获取不到这个锁的,而且会一直死等下去,因此这便造成了死锁。
死锁产生的条件
互斥条件:一个资源,或者说一个锁只能被一个线程所占用,当一个线程首先获取到这个锁之后,在该线程释放这个锁之前,其它线程均是无法获取到这个锁的。
占有且等待:一个线程已经获取到一个锁,再获取另一个锁的过程中,即使获取不到也不会释放已经获得的锁。
不可剥夺条件:任何一个线程都无法强制获取别的线程已经占有的锁
循环等待条件:线程A拿着线程B的锁,线程B拿着线程A的锁。
示例:
当一个程序的多个线程获取多个互斥锁资源的时候,就有可能发生死锁问题,比如线程A先获取了锁1,线程B获取了锁2,进而线程A还需要获取锁2才能继续执行,但是由于锁2被线程B持有还没有释放,线程A为了等待锁2资源就阻塞了;线程B这时候需要获取锁1才能往下执行,但是由于锁1被线程A持有,导致A也进入阻塞。
线程A和线程B都在等待对方释放锁资源,但是它们又不肯释放原来的锁资源,导致线程A和B一直互相等待,进程死锁了。下面代码示例演示这个问题:
#include <iostream>           //std::cout
#include <thread>             //std::thread
#include <mutex>              //std::mutex, std::unique_lock
#include <condition_variable> //std::condition_variable
#include <vector>

//锁资源1
std::mutex mtx1;
//锁资源2
std::mutex mtx2;

//线程A的函数
void taskA()
{
  //保证线程A先获取锁1
  std::lock_guard<std::mutex> lockA(mtx1);
  std::cout << "线程A获取锁1" << std::endl;

  //线程A睡眠2s再获取锁2,保证锁2先被线程B获取,模拟死锁问题的发生
  std::this_thread::sleep_for(std::chrono::seconds(2));

  //线程A先获取锁2
  std::lock_guard<std::mutex> lockB(mtx2);
  std::cout << "线程A获取锁2" << std::endl;

  std::cout << "线程A释放所有锁资源,结束运行!" << std::endl;
}

//线程B的函数
void taskB()
{
  //线程B先睡眠1s保证线程A先获取锁1
  std::this_thread::sleep_for(std::chrono::seconds(1));
  std::lock_guard<std::mutex> lockB(mtx2);
  std::cout << "线程B获取锁2" << std::endl;

  //线程B尝试获取锁1
  std::lock_guard<std::mutex> lockA(mtx1);
  std::cout << "线程B获取锁1" << std::endl;

  std::cout << "线程B释放所有锁资源,结束运行!" << std::endl;
}
int main()
{
  //创建生产者和消费者线程
  std::thread t1(taskA);
  std::thread t2(taskB);

  //main主线程等待所有子线程执行完
  t1.join();
  t2.join();

  return 0;
}
输出:
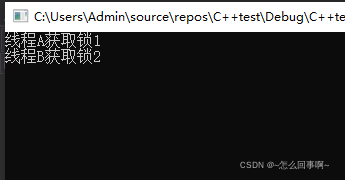
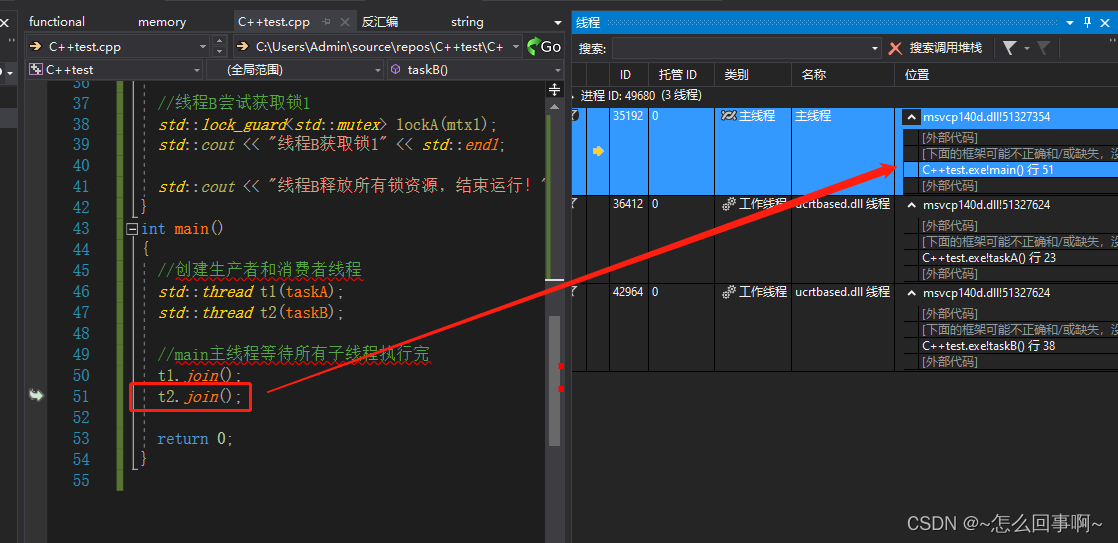
可以看到,线程A获取锁1、线程B获取锁2以后,进程就不往下继续执行了,一直等待在这里,如果这是我们碰到的一个问题场景,我们如何判断出这是由于线程间死锁引起的呢?
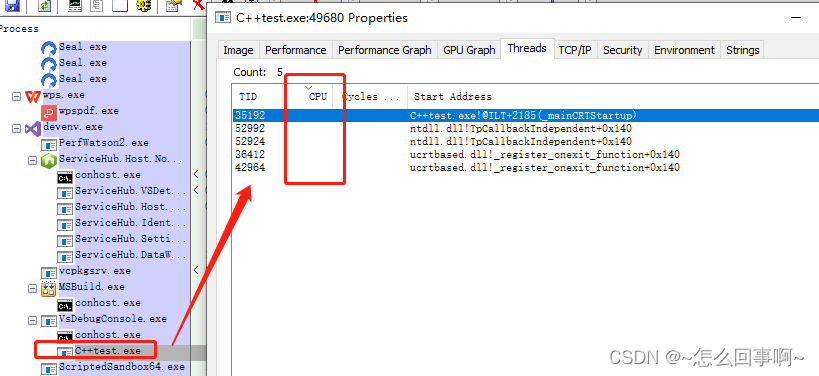
打开process Explorer.找到该进程,查看线程状态,发现线程的cpu利用率为0,那么应该不是死循环,应该是死锁了:
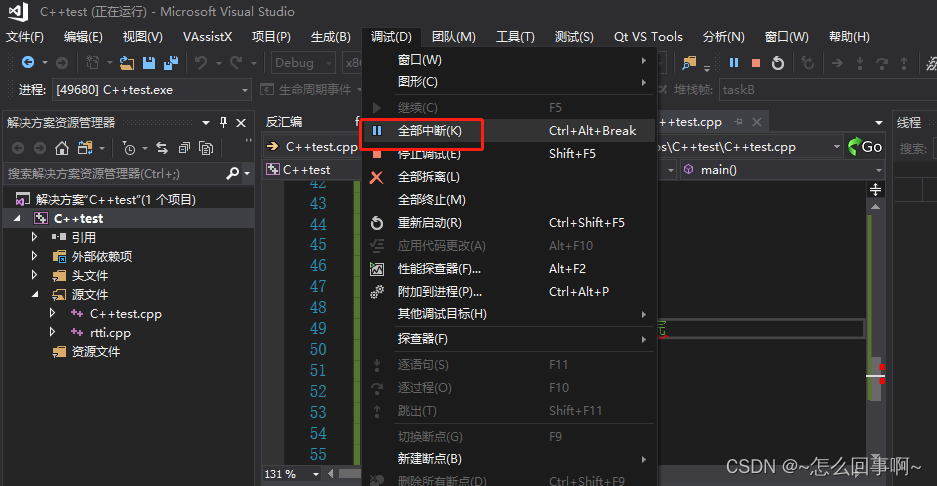
点击vs 的全部中断:查看每一个线程的函数执行的位置
发现当前线程正在申请锁的位置,判断出应该是锁了。
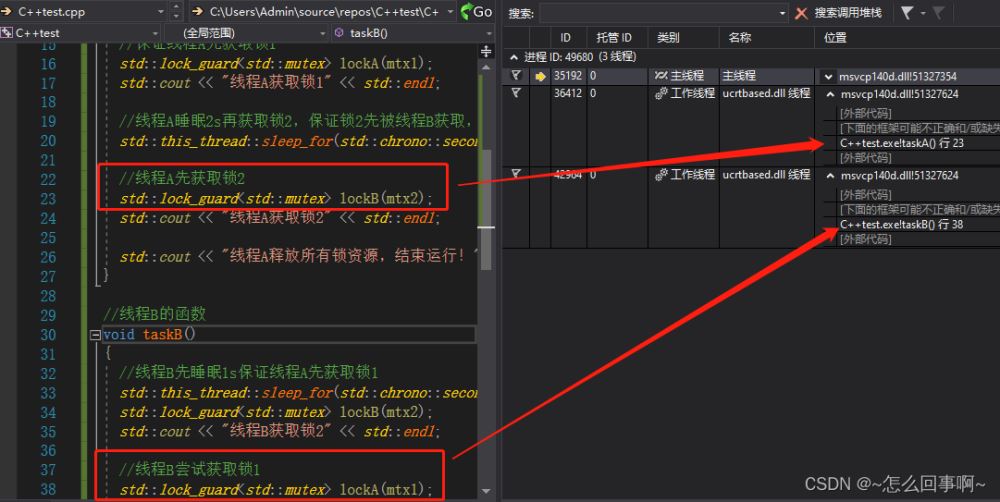
同时主线程走了等待子线程结束;
那如果是死循环的情况呢?,如将线程2加一个死循环:
#include <iostream>           //std::cout
#include <thread>             //std::thread
#include <mutex>              //std::mutex, std::unique_lock
#include <condition_variable> //std::condition_variable
#include <vector>

//锁资源1
std::mutex mtx1;
//锁资源2
std::mutex mtx2;

//线程A的函数
void taskA()
{
  //保证线程A先获取锁1
  std::lock_guard<std::mutex> lockA(mtx1);
  std::cout << "线程A获取锁1" << std::endl;

  //线程A睡眠2s再获取锁2,保证锁2先被线程B获取,模拟死锁问题的发生
  std::this_thread::sleep_for(std::chrono::seconds(2));

  //线程A先获取锁2
  std::lock_guard<std::mutex> lockB(mtx2);
  std::cout << "线程A获取锁2" << std::endl;

  std::cout << "线程A释放所有锁资源,结束运行!" << std::endl;
}

//线程B的函数
void taskB()
{
  while (true)
  {

  }
}
int main()
{
  //创建生产者和消费者线程
  std::thread t1(taskA);
  std::thread t2(taskB);

  //main主线程等待所有子线程执行完
  t1.join();
  t2.join();

  return 0;
}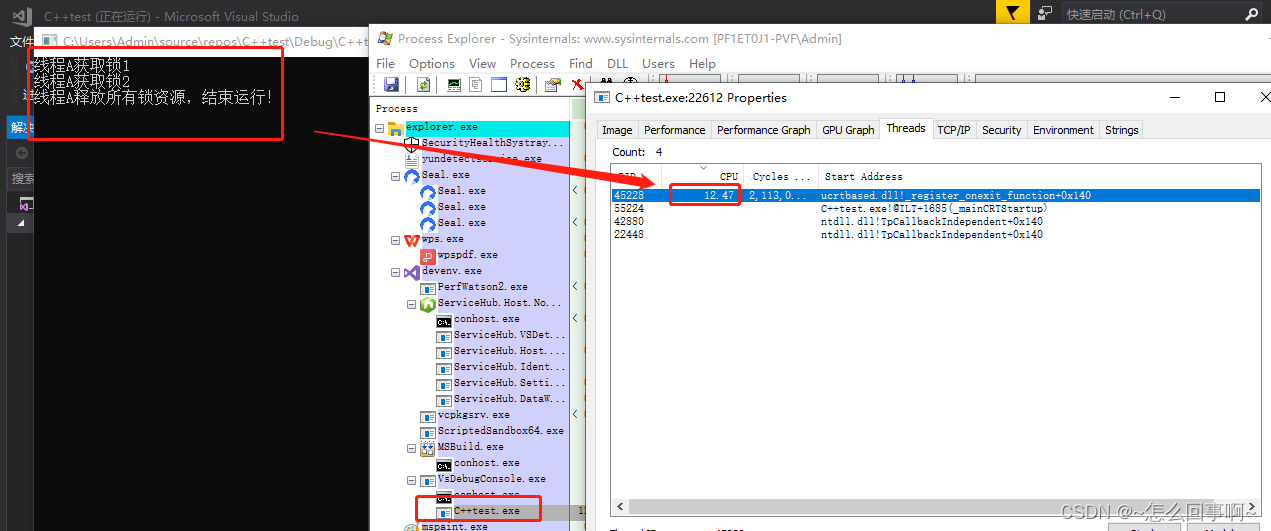
这时候工作线程占满了CPU,我的电脑是8核,因此占满一个cpu是12.5%
以上是“C++11中thread多线程编程如何创建”这篇文章的所有内容,感谢各位的阅读!相信大家都有了一定的了解,希望分享的内容对大家有所帮助,如果还想学习更多知识,欢迎关注亿速云行业资讯频道!
免责声明:本站发布的内容(图片、视频和文字)以原创、转载和分享为主,文章观点不代表本网站立场,如果涉及侵权请联系站长邮箱:is@yisu.com进行举报,并提供相关证据,一经查实,将立刻删除涉嫌侵权内容。


