Vueдёӯзҡ„з”ҹе‘Ҫе‘Ёжңҹе®һдҫӢеҲҶжһҗ
иҝҷзҜҮж–Үз« дё»иҰҒд»Ӣз»ҚвҖңVueдёӯзҡ„з”ҹе‘Ҫе‘Ёжңҹе®һдҫӢеҲҶжһҗвҖқпјҢеңЁж—Ҙеёёж“ҚдҪңдёӯпјҢзӣёдҝЎеҫҲеӨҡдәәеңЁVueдёӯзҡ„з”ҹе‘Ҫе‘Ёжңҹе®һдҫӢеҲҶжһҗй—®йўҳдёҠеӯҳеңЁз–‘жғ‘пјҢе°Ҹзј–жҹҘйҳ…дәҶеҗ„ејҸиө„ж–ҷпјҢж•ҙзҗҶеҮәз®ҖеҚ•еҘҪз”Ёзҡ„ж“ҚдҪңж–№жі•пјҢеёҢжңӣеҜ№еӨ§е®¶и§Јзӯ”вҖқVueдёӯзҡ„з”ҹе‘Ҫе‘Ёжңҹе®һдҫӢеҲҶжһҗвҖқзҡ„з–‘жғ‘жңүжүҖеё®еҠ©пјҒжҺҘдёӢжқҘпјҢиҜ·и·ҹзқҖе°Ҹзј–дёҖиө·жқҘеӯҰд№ еҗ§пјҒ
д»Җд№ҲжҳҜvueзҡ„з”ҹе‘Ҫе‘Ёжңҹ
Vueдёӯзҡ„з”ҹе‘Ҫе‘ЁжңҹжҳҜжҢҮ组件д»ҺеҲӣе»әеҲ°й”ҖжҜҒзҡ„дёҖзі»еҲ—иҝҮзЁӢгҖӮзңӢдёӢйқўиҝҷеј е®ҳж–№ж–ҮжЎЈзҡ„еӣҫпјҡ
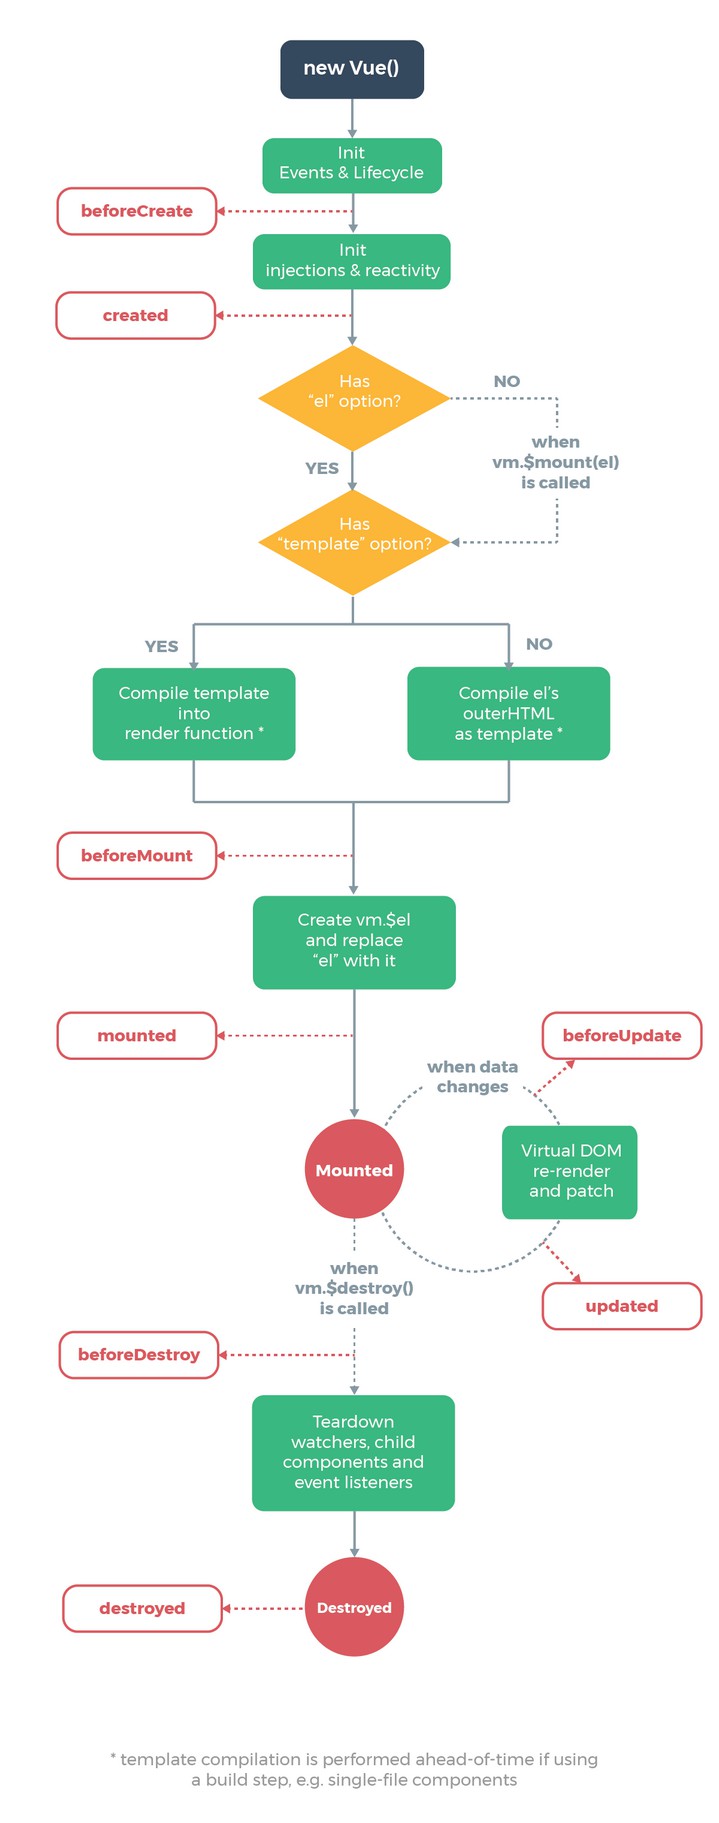
д»ҺеӣҫзүҮдёӯеҸҜд»ҘзңӢеҮәVueзҡ„ж•ҙдёӘз”ҹе‘Ҫе‘ЁжңҹеҢ…жӢ¬8дёӘзҠ¶жҖҒпјҢжҢүз…§е…ҲеҗҺйЎәеәҸеҲҶеҲ«дёәпјҡ
beforeCreate
Created
beforeMount
mounted
beforeUpdate
updated
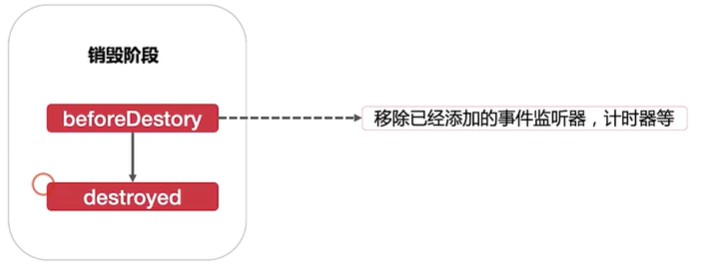
beforeDestroy
destroyed
Vue组件зҡ„з”ҹе‘Ҫе‘Ёжңҹе…ұеҲҶдёәдёүдёӘйҳ¶ж®өпјҢеҰӮдёӢеӣҫжүҖзӨәпјҡ
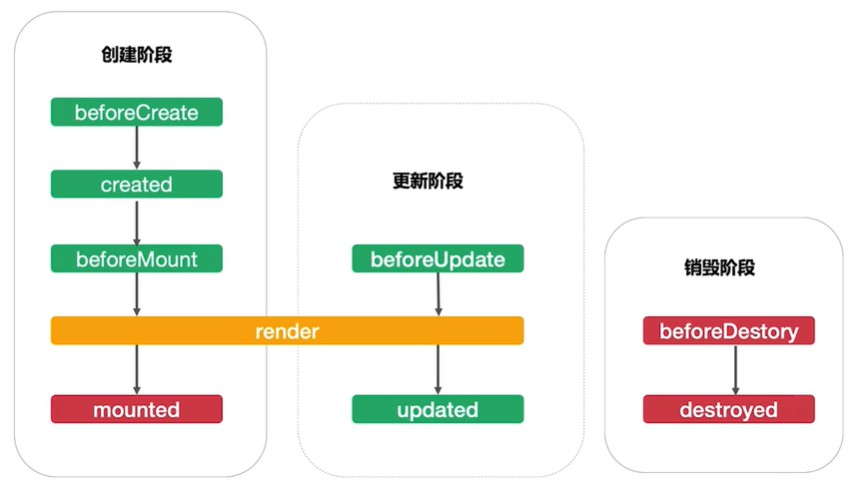
еҲӣе»әйҳ¶ж®өе’Ңй”ҖжҜҒйҳ¶ж®өеңЁз»„件зҡ„з”ҹе‘Ҫе‘ЁжңҹдёӯеҸӘдјҡжү§иЎҢдёҖж¬ЎпјҢиҖҢжӣҙж–°йҳ¶ж®өдјҡжү§иЎҢеӨҡж¬ЎгҖӮ
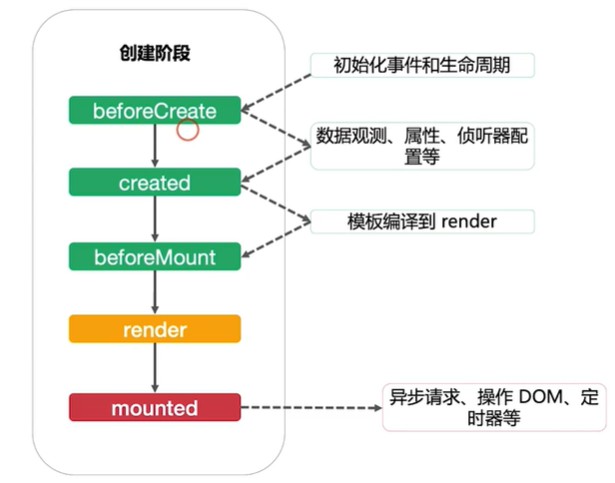
е…ҲзңӢдёҖдёӢеҲӣе»әйҳ¶ж®өе®ҢжҲҗзҡ„дәӢжғ…пјҡ
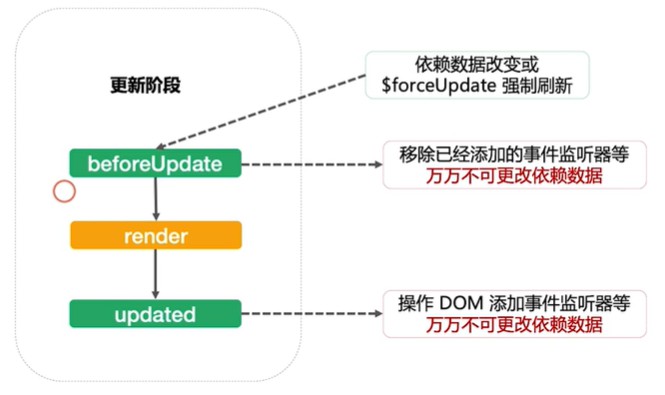
еңЁзңӢжӣҙж–°йҳ¶ж®өе®ҢжҲҗзҡ„дәӢжғ…пјҡ
жңҖеҗҺеңЁзңӢдёҖдёӢй”ҖжҜҒйҳ¶ж®өе®ҢжҲҗзҡ„дәӢжғ…пјҡ
е…ҲзңӢдёӢйқўзҡ„дёҖж®өд»Јз Ғпјҡ
<!DOCTYPE html>
<html lang="en">
<head>
<meta charset="UTF-8">
<meta name="viewport" content="width=device-width, initial-scale=1.0">
<meta http-equiv="X-UA-Compatible" content="ie=edge">
<title>з”ҹе‘Ҫе‘Ёжңҹ</title>
<!--еј•е…Ҙvue.js-->
<script src="./js/vue.js" ></script>
<script>
window.onload=function(){
new Vue({
el:'#app',// 2.0дёҚе…Ғи®ёжҢӮиҪҪеҲ°html,bodyе…ғзҙ дёҠ
data:{
msg:'welcome'
},
methods:{
update(){
this.msg="ж¬ўиҝҺ";
},
destroy(){
this.$destroy();
}
},
//еҲӣе»әеүҚзҠ¶жҖҒ elе’Ңdata并жңӘеҲқе§ӢеҢ–
beforeCreate(){
console.group('------beforeCreateеҲӣе»әеүҚзҠ¶жҖҒ------');
console.log("%c%s", "color:red" , "el : " + this.$el); //undefined
console.log("%c%s", "color:red","data : " + this.$data); //undefined
console.log("%c%s", "color:red","message: " + this.msg)
console.log('组件е®һдҫӢеҲҡеҲҡеҲӣе»әпјҢиҝҳжңӘиҝӣиЎҢж•°жҚ®и§ӮжөӢе’ҢдәӢ件й…ҚзҪ®');
},
created(){//еёёз”Ё еҲӣе»әе®ҢжҜ•зҠ¶жҖҒ е®ҢжҲҗдәҶdataж•°жҚ®зҡ„еҲқе§ӢеҢ– elжІЎжңү
console.group('------createdеҲӣе»әе®ҢжҜ•зҠ¶жҖҒ------');
console.log("%c%s", "color:red","el : " + this.$el); //undefined
console.log("%c%s", "color:red","data : " + this.$data); //е·Іиў«еҲқе§ӢеҢ–
console.log("%c%s", "color:red","message: " + this.msg); //е·Іиў«еҲқе§ӢеҢ–
console.log("е®һдҫӢе·Із»ҸеҲӣе»әе®ҢжҲҗпјҢ并且已з»ҸиҝӣиЎҢж•°жҚ®и§ӮжөӢе’ҢдәӢ件й…ҚзҪ®")
},
beforeMount(){ //жҢӮиҪҪеүҚзҠ¶жҖҒ е®ҢжҲҗдәҶelе’ҢdataеҲқе§ӢеҢ–
this.msg="112233";
console.group('------beforeMountжҢӮиҪҪеүҚзҠ¶жҖҒ------');
console.log("%c%s", "color:red","el : " + (this.$el)); //е·Іиў«еҲқе§ӢеҢ–
console.log(this.$el);
console.log("%c%s", "color:red","data : " + this.$data); //е·Іиў«еҲқе§ӢеҢ–
console.log("%c%s", "color:red","message: " + this.msg); //е·Іиў«еҲқе§ӢеҢ–
console.log("жЁЎжқҝзј–иҜ‘д№ӢеүҚпјҢиҝҳжІЎжҢӮиҪҪ");
},
mounted(){//еёёз”Ё жҢӮиҪҪз»“жқҹзҠ¶жҖҒ е®ҢжҲҗжҢӮиҪҪ
console.group('------mounted жҢӮиҪҪз»“жқҹзҠ¶жҖҒ------');
console.log("%c%s", "color:red","el : " + this.$el); //е·Іиў«еҲқе§ӢеҢ–
console.log(this.$el);
console.log("%c%s", "color:red","data : " + this.$data); //е·Іиў«еҲқе§ӢеҢ–
console.log("%c%s", "color:red","message: " + this.msg); //е·Іиў«еҲқе§ӢеҢ–
console.log("жЁЎжқҝзј–иҜ‘д№ӢеҗҺпјҢе·Із»ҸжҢӮиҪҪпјҢжӯӨж—¶жүҚдјҡжңүжёІжҹ“йЎөйқўпјҢжүҚиғҪзңӢеҲ°йЎөйқўдёҠж•°жҚ®зҡ„жҳҫзӨә")
},
beforeUpdate(){ //жӣҙж–°еүҚзҠ¶жҖҒ
console.group('------beforeUpdate жӣҙж–°еүҚзҠ¶жҖҒ------');
console.log("%c%s", "color:red","el : " + this.$el);
console.log(this.$el);
console.log("%c%s", "color:red","data : " + this.$data);
console.log("%c%s", "color:red","message: " + this.msg);
},
updated(){ //жӣҙж–°е®ҢжҲҗзҠ¶жҖҒ
console.group('------updated жӣҙж–°е®ҢжҲҗзҠ¶жҖҒ------');
console.log("%c%s", "color:red","el : " + this.$el);
console.log(this.$el);
console.log("%c%s", "color:red","data : " + this.$data);
console.log("%c%s", "color:red","message: " + this.msg);
},
beforeDestroy(){ //й”ҖжҜҒеүҚзҠ¶жҖҒ
console.group('------beforeDestroy й”ҖжҜҒеүҚзҠ¶жҖҒ------');
console.log("%c%s", "color:red","el : " + this.$el);
console.log(this.$el);
console.log("%c%s", "color:red","data : " + this.$data);
console.log("%c%s", "color:red","message: " + this.msg);
},
destroyed(){ //й”ҖжҜҒе®ҢжҲҗзҠ¶жҖҒ
console.group('------destroyed 组件й”ҖжҜҒе®ҢжҲҗзҠ¶жҖҒ------');
console.log("%c%s", "color:red","el : " + this.$el);
console.log(this.$el);
console.log("%c%s", "color:red","data : " + this.$data);
console.log("%c%s", "color:red","message: " + this.msg)
}
});
}
</script>
</head>
<body>
<div id="app">
<input type="text" v-model="msg" />
<button @click="update">жӣҙж–°ж•°жҚ®</button>
<button @click="destroy">й”ҖжҜҒ组件</button>
</div>
</body>
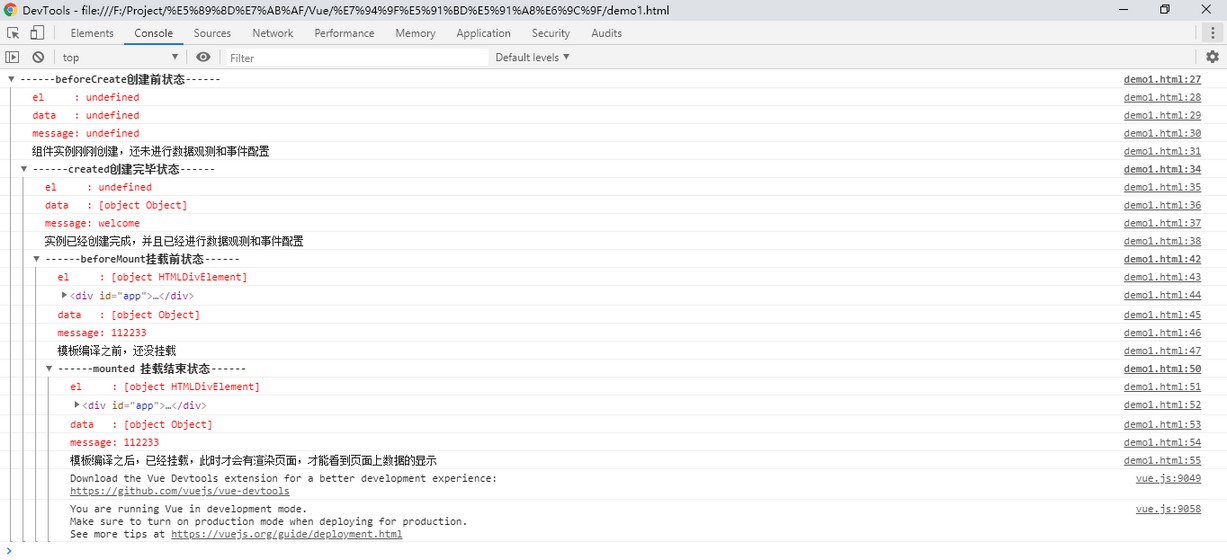
</html>еңЁжҺ§еҲ¶еҸ°зҡ„consoleйҮҢйқўжҹҘзңӢиҝҗиЎҢеҗҺзҡ„ж•Ҳжһңпјҡ
然еҗҺзӮ№еҮ»вҖңжӣҙж–°ж•°жҚ®вҖқжҢүй’®пјҢдјҡзңӢеҲ°inputз»‘е®ҡзҡ„ж•°жҚ®еҸ‘з”ҹеҸҳеҢ–пјҡ
ж•°жҚ®жӣҙж–°еүҚпјҡ

ж•°жҚ®жӣҙж–°еҗҺпјҡ

жҺ§еҲ¶еҸ°жҳҫзӨәзҡ„жү“еҚ°дҝЎжҒҜпјҡ

жңҖеҗҺзӮ№еҮ»вҖңй”ҖжҜҒ组件вҖқжҢүй’®пјҢжҹҘзңӢжҺ§еҲ¶еҸ°жҳҫзӨәзҡ„жү“еҚ°дҝЎжҒҜпјҡ

иҝҷж ·пјҢдёҖдёӘе®Ңж•ҙзҡ„Vueе®һдҫӢз”ҹе‘Ҫе‘Ёжңҹе°ұз»“жқҹдәҶгҖӮ
жіЁж„ҸпјҡVue组件被й”ҖжҜҒд»ҘеҗҺпјҢиҝҷж—¶еҰӮжһңеңЁжӣҙж–°ж•°жҚ®е°ұдёҚдјҡжңүд»»дҪ•еҸҚеә”дәҶпјҢеӣ дёә组件已з»Ҹиў«й”ҖжҜҒ
еҲ°жӯӨпјҢе…ідәҺвҖңVueдёӯзҡ„з”ҹе‘Ҫе‘Ёжңҹе®һдҫӢеҲҶжһҗвҖқзҡ„еӯҰд№ е°ұз»“жқҹдәҶпјҢеёҢжңӣиғҪеӨҹи§ЈеҶіеӨ§е®¶зҡ„з–‘жғ‘гҖӮзҗҶи®әдёҺе®һи·өзҡ„жҗӯй…ҚиғҪжӣҙеҘҪзҡ„её®еҠ©еӨ§е®¶еӯҰд№ пјҢеҝ«еҺ»иҜ•иҜ•еҗ§пјҒиӢҘжғіз»§з»ӯеӯҰд№ жӣҙеӨҡзӣёе…ізҹҘиҜҶпјҢиҜ·з»§з»ӯе…іжіЁдәҝйҖҹдә‘зҪ‘з«ҷпјҢе°Ҹзј–дјҡ继з»ӯеҠӘеҠӣдёәеӨ§е®¶еёҰжқҘжӣҙеӨҡе®һз”Ёзҡ„ж–Үз« пјҒ


