本文小编为大家详细介绍“Android怎么用Palette实现提取图片颜色”,内容详细,步骤清晰,细节处理妥当,希望这篇“Android怎么用Palette实现提取图片颜色”文章能帮助大家解决疑惑,下面跟着小编的思路慢慢深入,一起来学习新知识吧。
Palette即调色板这个功能其实很早就发布了,Jetpack同样将这个功能也纳入其中,想要使用这个功能,需要先依赖库
implementation 'androidx.palette:palette:1.0.0'
创建Palette其实很简单,如下
var builder = Palette.from(bitmap)
var palette = builder.generate()
这样,我们就通过一个Bitmap创建一个Pallete对象。
注意:直接使用Palette.generate(bitmap)也可以,但是这个方法已经不推荐使用了,网上很多老文章中依然使用这种方式。建议还是使用Palette.Builder这种方式。
generate()这个函数是同步的,当然考虑图片处理可能比较耗时,Android同时提供了异步函数
public AsyncTask<Bitmap, Void, Palette> generate(
        @NonNull final PaletteAsyncListener listener) {
通过一个PaletteAsyncListener来获取Palette实例,这个接口如下:
public interface PaletteAsyncListener {
    /**
     * Called when the {@link Palette} has been generated. {@code null} will be passed when an
     * error occurred during generation.
     */
    void onGenerated(@Nullable Palette palette);
}有了Palette实例,就可以通过Palette对象的相应函数就可以获取图片中的颜色,而且不只一种颜色,下面一一列举:
getDominantColor:获取图片中的主色调
getMutedColor:获取图片中柔和的颜色
getDarkMutedColor:获取图片中柔和的暗色
getLightMutedColor:获取图片中柔和的亮色
getVibrantColor:获取图片中有活力的颜色
getDarkVibrantColor:获取图片中有活力的暗色
getLightVibrantColor:获取图片中有活力的亮色
这些函数都需要提供一个默认颜色,如果这个颜色Swatch无效则使用这个默认颜色。光这么说不直观,我们来测试一下,代码如下:
var bitmap = BitmapFactory.decodeResource(resources, R.mipmap.a)
var builder = Palette.from(bitmap)
var palette = builder.generate()
color0.setBackgroundColor(palette.getDominantColor(Color.WHITE))
color1.setBackgroundColor(palette.getMutedColor(Color.WHITE))
color2.setBackgroundColor(palette.getDarkMutedColor(Color.WHITE))
color3.setBackgroundColor(palette.getLightMutedColor(Color.WHITE))
color4.setBackgroundColor(palette.getVibrantColor(Color.WHITE))
color5.setBackgroundColor(palette.getDarkVibrantColor(Color.WHITE))
color6.setBackgroundColor(palette.getLightVibrantColor(Color.WHITE))
运行后结果如下:
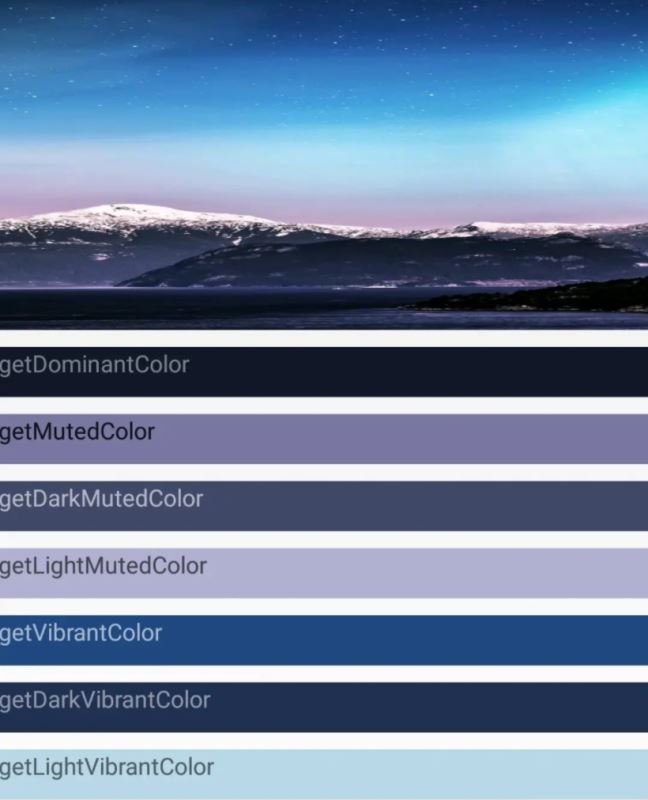
这样各个颜色的差别就一目了然。除了上面的函数,还可以使用getColorForTarget这个函数,如下:
@ColorInt
public int getColorForTarget(@NonNull final Target target, @ColorInt final int defaultColor) {
这个函数需要一个Target,提供了6个静态字段,如下:
/**
 * A target which has the characteristics of a vibrant color which is light in luminance.
*/
public static final Target LIGHT_VIBRANT;

/**
 * A target which has the characteristics of a vibrant color which is neither light or dark.
 */
public static final Target VIBRANT;

/**
 * A target which has the characteristics of a vibrant color which is dark in luminance.
 */
public static final Target DARK_VIBRANT;

/**
 * A target which has the characteristics of a muted color which is light in luminance.
 */
public static final Target LIGHT_MUTED;

/**
 * A target which has the characteristics of a muted color which is neither light or dark.
 */
public static final Target MUTED;

/**
 * A target which has the characteristics of a muted color which is dark in luminance.
 */
public static final Target DARK_MUTED;
其实就是对应着上面除了主色调之外的六种颜色。
在上面的运行结果中可以看到,每个颜色上面的文字都很清楚的显示,而且它们并不是同一种颜色。其实这也是Palette提供的功能。
通过下面的函数,我们可以得到各种色调所对应的Swatch对象:
getDominantSwatch
getMutedSwatch
getDarkMutedSwatch
getLightMutedSwatch
getVibrantSwatch
getDarkVibrantSwatch
getLightVibrantSwatch
注意:同上面一样,也可以通过getSwatchForTarget(@NonNull final Target target)来获取
Swatch类提供了以下函数:
getPopulation(): 样本中的像素数量
getRgb(): 颜色的RBG值
getHsl(): 颜色的HSL值
getBodyTextColor(): 能都适配这个Swatch的主体文字的颜色值
getTitleTextColor(): 能都适配这个Swatch的标题文字的颜色值
所以我们通过getBodyTextColor()和getTitleTextColor()可以很容易得到在这个颜色上可以很好现实的标题和主体文本颜色。所以上面的测试代码完整如下:
var bitmap = BitmapFactory.decodeResource(resources, R.mipmap.a)
var builder = Palette.from(bitmap)
var palette = builder.generate()

color0.setBackgroundColor(palette.getDominantColor(Color.WHITE))
color0.setTextColor(palette.dominantSwatch?.bodyTextColor ?: Color.WHITE)

color1.setBackgroundColor(palette.getMutedColor(Color.WHITE))
color1.setTextColor(palette.mutedSwatch?.bodyTextColor ?: Color.WHITE)

color2.setBackgroundColor(palette.getDarkMutedColor(Color.WHITE))
color2.setTextColor(palette.darkMutedSwatch?.bodyTextColor ?: Color.WHITE)

color3.setBackgroundColor(palette.getLightMutedColor(Color.WHITE))
color3.setTextColor(palette.lightMutedSwatch?.bodyTextColor ?: Color.WHITE)

color4.setBackgroundColor(palette.getVibrantColor(Color.WHITE))
color4.setTextColor(palette.vibrantSwatch?.bodyTextColor ?: Color.WHITE)

color5.setBackgroundColor(palette.getDarkVibrantColor(Color.WHITE))
color5.setTextColor(palette.darkVibrantSwatch?.bodyTextColor ?: Color.WHITE)

color6.setBackgroundColor(palette.getLightVibrantColor(Color.WHITE))
color6.setTextColor(palette.lightVibrantSwatch?.bodyTextColor ?: Color.WHITE)
这样每个颜色上的文字都可以清晰的显示。
那么这个标题和主体文本颜色有什么差别,他们又是如何的到的?我们来看看源码:
/**
 * Returns an appropriate color to use for any 'title' text which is displayed over this
 * {@link Swatch}'s color. This color is guaranteed to have sufficient contrast.
 */
@ColorInt
public int getTitleTextColor() {
    ensureTextColorsGenerated();
    return mTitleTextColor;
}

/**
 * Returns an appropriate color to use for any 'body' text which is displayed over this
 * {@link Swatch}'s color. This color is guaranteed to have sufficient contrast.
 */
@ColorInt
public int getBodyTextColor() {
    ensureTextColorsGenerated();
    return mBodyTextColor;
}可以看到都会先执行ensureTextColorsGenerated(),它的源码如下:
private void ensureTextColorsGenerated() {
    if (!mGeneratedTextColors) {
        // First check white, as most colors will be dark
        final int lightBodyAlpha = ColorUtils.calculateMinimumAlpha(
                Color.WHITE, mRgb, MIN_CONTRAST_BODY_TEXT);
        final int lightTitleAlpha = ColorUtils.calculateMinimumAlpha(
                Color.WHITE, mRgb, MIN_CONTRAST_TITLE_TEXT);

        if (lightBodyAlpha != -1 && lightTitleAlpha != -1) {
            // If we found valid light values, use them and return
            mBodyTextColor = ColorUtils.setAlphaComponent(Color.WHITE, lightBodyAlpha);
            mTitleTextColor = ColorUtils.setAlphaComponent(Color.WHITE, lightTitleAlpha);
            mGeneratedTextColors = true;
            return;
        }

        final int darkBodyAlpha = ColorUtils.calculateMinimumAlpha(
                Color.BLACK, mRgb, MIN_CONTRAST_BODY_TEXT);
        final int darkTitleAlpha = ColorUtils.calculateMinimumAlpha(
                Color.BLACK, mRgb, MIN_CONTRAST_TITLE_TEXT);

        if (darkBodyAlpha != -1 && darkTitleAlpha != -1) {
            // If we found valid dark values, use them and return
            mBodyTextColor = ColorUtils.setAlphaComponent(Color.BLACK, darkBodyAlpha);
            mTitleTextColor = ColorUtils.setAlphaComponent(Color.BLACK, darkTitleAlpha);
            mGeneratedTextColors = true;
            return;
        }

        // If we reach here then we can not find title and body values which use the same
        // lightness, we need to use mismatched values
        mBodyTextColor = lightBodyAlpha != -1
                ? ColorUtils.setAlphaComponent(Color.WHITE, lightBodyAlpha)
                : ColorUtils.setAlphaComponent(Color.BLACK, darkBodyAlpha);
        mTitleTextColor = lightTitleAlpha != -1
                ? ColorUtils.setAlphaComponent(Color.WHITE, lightTitleAlpha)
                : ColorUtils.setAlphaComponent(Color.BLACK, darkTitleAlpha);
        mGeneratedTextColors = true;
    }
}
通过代码可以看到,这两种文本颜色实际上要么是白色要么是黑色,只是透明度Alpha不同。
这里面有一个关键函数,即ColorUtils.calculateMinimumAlpha():
public static int calculateMinimumAlpha(@ColorInt int foreground, @ColorInt int background,
        float minContrastRatio) {
    if (Color.alpha(background) != 255) {
        throw new IllegalArgumentException("background can not be translucent: #"
                + Integer.toHexString(background));
    }

    // First lets check that a fully opaque foreground has sufficient contrast
    int testForeground = setAlphaComponent(foreground, 255);
    double testRatio = calculateContrast(testForeground, background);
    if (testRatio < minContrastRatio) {
        // Fully opaque foreground does not have sufficient contrast, return error
        return -1;
    }

    // Binary search to find a value with the minimum value which provides sufficient contrast
    int numIterations = 0;
    int minAlpha = 0;
    int maxAlpha = 255;

    while (numIterations <= MIN_ALPHA_SEARCH_MAX_ITERATIONS &&
            (maxAlpha - minAlpha) > MIN_ALPHA_SEARCH_PRECISION) {
        final int testAlpha = (minAlpha + maxAlpha) / 2;

        testForeground = setAlphaComponent(foreground, testAlpha);
        testRatio = calculateContrast(testForeground, background);

        if (testRatio < minContrastRatio) {
            minAlpha = testAlpha;
        } else {
            maxAlpha = testAlpha;
        }

        numIterations++;
    }

    // Conservatively return the max of the range of possible alphas, which is known to pass.
    return maxAlpha;
}
它根据背景色和前景色计算前景色最合适的Alpha。这期间如果小于minContrastRatio则返回-1,说明这个前景色不合适。而标题和主体文本的差别就是这个minContrastRatio不同而已。
回到ensureTextColorsGenerated代码可以看到,先根据当前色调,计算出白色前景色的Alpha,如果两个Alpha都不是-1,就返回对应颜色;否则计算黑色前景色的Alpha,如果都不是-1,返回对应颜色;否则标题和主体文本一个用白色一个用黑色,返回对应颜色即可。
上面我们创建Palette时先通过Palette.from(bitmap)的到了一个Palette.Builder对象,通过这个builder可以实现更多功能,比如:
addFilter:增加一个过滤器
setRegion:设置图片上的提取区域
maximumColorCount:调色板的最大颜色数
等等
读到这里,这篇“Android怎么用Palette实现提取图片颜色”文章已经介绍完毕,想要掌握这篇文章的知识点还需要大家自己动手实践使用过才能领会,如果想了解更多相关内容的文章,欢迎关注亿速云行业资讯频道。
免责声明:本站发布的内容(图片、视频和文字)以原创、转载和分享为主,文章观点不代表本网站立场,如果涉及侵权请联系站长邮箱:is@yisu.com进行举报,并提供相关证据,一经查实,将立刻删除涉嫌侵权内容。


