本文小编为大家详细介绍“怎么使用Pandas实现MySQL日期函数”,内容详细,步骤清晰,细节处理妥当,希望这篇“怎么使用Pandas实现MySQL日期函数”文章能帮助大家解决疑惑,下面跟着小编的思路慢慢深入,一起来学习新知识吧。
环境:
windows11 64位
Python3.9
MySQL8
pandas1.4.2
使用 Python 构建该数据集的语法如下:
import pandas as pd
import numpy as np

df1 = pd.DataFrame({ 'col1' : list(range(1,7))
                    ,'col2' : ['AA','AA','AA','BB','AA','BB']#list('AABCA')
                    ,'col3' : ['2022-01-01','2022-01-01','2022-01-02','2022-01-02','2022-01-03','2022-01-03']
                    ,'col4' : ['2022-02-01','2022-01-21','2022-01-23','2022-01-12','2022-02-03','2022-01-05']
                    ,'col5' : [1643673600,1642723200,1642896000,1641945600,1643846400,1641340800]
                   })
df1['col3'] = pd.to_datetime(df1.col3)
df1['col4'] = pd.to_datetime(df1.col4)
df1
注:直接将代码放 jupyter 的 cell 跑即可。后文都直接使用
df1调用对应的数据。
使用 MySQL 构建该数据集的语法如下:
with t1 as(
  select  1 as col1, 'AA' as col2, '2022-01-01' as col3, '2022-02-01' as col4, 1643673600 as col5 union all
  select  2 as col1, 'AA' as col2, '2022-01-01' as col3, '2022-01-21' as col4, 1642723200 as col5 union all
  select  3 as col1, 'AA' as col2, '2022-01-02' as col3, '2022-01-23' as col4, 1642896000 as col5 union all
  select  4 as col1, 'BB' as col2, '2022-01-02' as col3, '2022-01-12' as col4, 1641945600 as col5 union all
  select  5 as col1, 'AA' as col2, '2022-01-03' as col3, '2022-02-03' as col4, 1643846400 as col5 union all
  select  6 as col1, 'BB' as col2, '2022-01-03' as col3, '2022-01-05' as col4, 1641340800 as col5
)
select * from t1;
注:直接将代码放 MySQL 代码运行框跑即可。后文跑 SQL 代码时,默认带上数据集(代码的1~8行),仅展示查询语句,如第9行。
对应关系如下:
| Python 数据集 | MySQL 数据集 |
|---|---|
| df1 | t1 |
date_add()/date_sub()
时间的加减,在 MySQL 中,使用的是date_add()/date_sub()来实现,二者可以替换使用,只要对相加/减的时间加上负号即可(详见后面例子)。
而在 Pandas 中,可以通过Timedelta()或DateOffset()实现,二者有差异,如果是针对月份和年度计算差值,只能使用后者;如果是计算日、时、分、秒,则二者通用。
时间范围对应的语法参数见下表:
| 时间范围 | date_add()/date_sub() | pandas.Timedelta() | pandas.DateOffset() |
|---|---|---|---|
| 年 | year | - | years |
| 月 | month | - | months |
| 日 | day | days | days |
| 时 | hour | hours | hours |
| 分 | minute | minutes | minutes |
| 秒 | second | seconds | seconds |
1、增加1天
MySQL 增加 1 天,可以使用date_add()+1 day或者用date_sub()-1 day。
Pandas 中,可以使用 DateFrame 时间列直接加上pd.Timedelta(days=1)或者pd.DateOffset(days=1)。
| 语言 | Python | MySQL |
|---|---|---|
| 代码 | 【Python1】 df1.col3 + pd.Timedelta(days=1) 【Python2】 df1.col3 + pd.DateOffset(days=1) | 【MySQL1】 select date_add(t1.col3,interval 1 day) as col3_1 from t1; 【MySQL2】 select date_sub(t1.col3,interval -1 day) as col3_1 from t1; |
| 结果 | 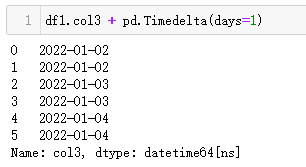 | 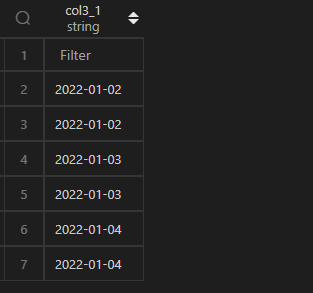 |
2、减掉1天
| 语言 | Python | MySQL |
|---|---|---|
| 代码 | 【Python1】 df1.col3 + pd.Timedelta(days=-1) 【Python2】 df1.col3 + pd.DateOffset(days=-1) | 【MySQL1】 select date_add(t1.col3,interval -1 day) as col3_1 from t1; 【MySQL2】 select date_sub(t1.col3,interval 1 day) as col3_1 from t1; |
| 结果 | 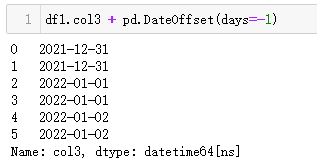 | 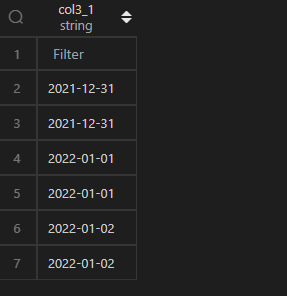 |
计算时间的差值,在 MySQL 中,使用datediff(<被减数>,<减数>)(即<被减数>-<减数>)实现;而在 Pandas 中,操作相对简单,两个 Series 相减即可。但是相减之后的数据类型是timedelta64[ns],如果要用于比较大小,或需要转化为整数,将timedelta64[ns]的数值提取出来,提取数值可以使用其属性days并借助apply()实现,具体代码逻辑见以下例子。
| 语言 | Python | MySQL |
|---|---|---|
| 代码 | (df1.col4-df1.col3).apply(lambda x:x.days) | select datediff(col4,col3) as diff from t1; |
| 结果 | 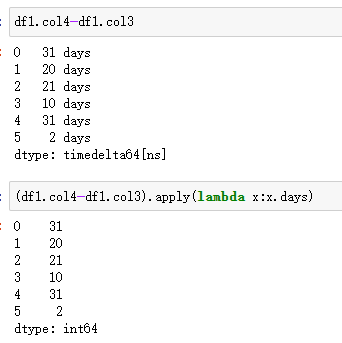 | 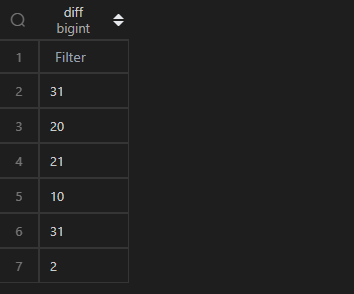 |
格式设置,在 MySQL 中,使用date_format(),在 Python 中,使用strftime(),二者都是将时间类型转化为字符串类型。标识符有一点差异,前者的分使用%i,秒使用%s,而后者分使用%M,秒使用%S。
具体格式参考下表:
| 时间范围(示例) | date_format() | strftime() |
|---|---|---|
| 年,0000~9999 | %Y | %Y |
| 月,01~12 | %m | %m |
| 日,01~31 | %d | %d |
| 时,00~24 | %H | %H |
| 分,00~59 | %i | %M |
| 秒,00~59 | %s | %S |
格式化为:年份-月份
MySQL 直接使用date_format(列,"<格式符号>")函数套用即可;而 Python 中,由于strftime('<格式符号>')是作用于时间类型,而df1.col3是 Series 类型,所以需要使用apply()来辅助处理每一个值(如下 Python 代码)。
| 语言 | Python | MySQL |
|---|---|---|
| 代码 | df1.col3.apply(lambda x:x.strftime(‘%Y-%m’)) | select date_format(t1.col3,‘%Y-%m’) as col3_1 from t1; |
| 结果 | 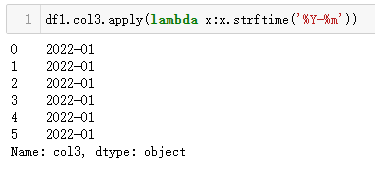 | 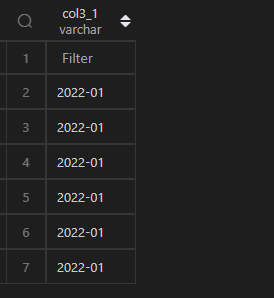 |
取时间的某一部分(如:年、月、日、时、分、秒),在 MySQL 中,直接使用对应的函数作用于字段即可。
在 Python 中,时间类型的值也有对应的属性可以获取到对应的值,同样地,由于df1.col3是 Series 类型,所以需要使用apply()来辅助处理每一个值(如下 Python 代码)。
| 语言 | Python | MySQL |
|---|---|---|
| 代码 | df_timepart = pd.concat([ df1.col4.apply(lambda x:x.year) ,df1.col4.apply(lambda x:x.month) ,df1.col4.apply(lambda x:x.day) ,df1.col4.apply(lambda x:x.hour) ,df1.col4.apply(lambda x:x.minute) ,df1.col4.apply(lambda x:x.second) ],axis=1 ) df_timepart.columns=[‘year’,‘month’,‘day’,‘hour’,‘minute’,‘second’] df_timepart | select year(col4),month(col4),day(col4),hour(col4),minute(col4),second(col4) from t1; |
| 结果 | 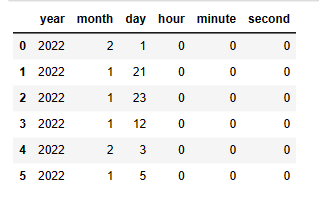 | 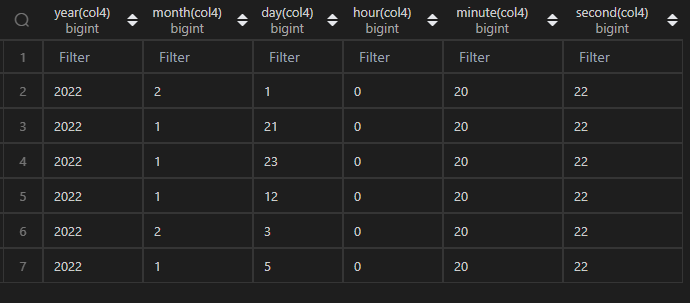 |
使用时间戳时,需要特别注意:pandas 采用的是 零时区的时间,MySQL 会默认当地时间,北京时间采用的是东八区,所以北京的时间会比零时区早8小时,也就是说,同一个时间戳,北京时间会比零时区时间多8小时,如:1577836800,转化为北京时间是【2020-01-01 08:00:00】,转化为零时区时间为【2020-01-01 00:00:00】。
1、时间戳转时间
时间戳转时间,在 MySQL 中,通过from_unixtime()函数直接作用于列即可,还可以指定时间格式,格式化字符参考date_format()中的表格。
在 Pandas 中,通过to_datetime()实现,注意需要指定unit,它根据时间戳的精度设置,常见参数有:【D,s,ms】,分别对应日数、秒数、毫秒数(相对1970-01-01 00:00:00的间隔数)。
注意:如果需要转化为东八区,只能通过手动添加 8 小时。
| 语言 | Python | MySQL |
|---|---|---|
| 代码 | 【Python 1 默认时区】 pd.to_datetime(df1.col5, unit=‘s’) 【Python 2 东八时区】 pd.to_datetime(df1.col5, unit=‘s’)+pd.Timedelta(hours=8) | select from_unixtime(col5) from t1; |
| 结果 | 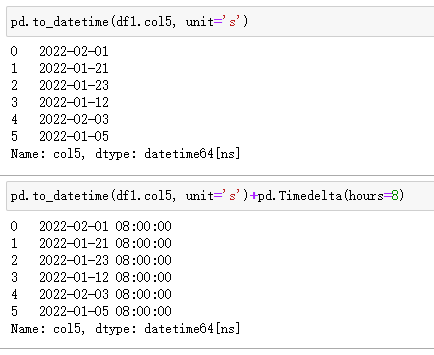 | 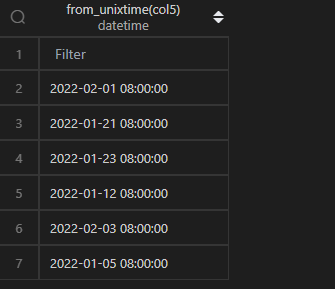 |
2、时间转时间戳
时间转时间戳,在 MySQL 中,通过unix_timestamp()函数直接作用于列即可。
在 Pandas 中,通过apply()+timestamp()实现,如果需要转化为东八区,先对时间做一层tz_localize("Asia/Shanghai")处理,然后再转化即可,返回的是浮点数。
注意:这里有一个小细节,由于返回的值默认是科学计数方式,而我需要查看完整数字串,而且没有小数值,我加了int()处理。如果使用的时间精确到毫秒,即存在小数,加int()处理会丢失精度,应用时需要结合自己的实际情况和需求做处理。
| 语言 | Python | MySQL |
|---|---|---|
| 代码 | 【Python 1 默认时区】 df1.col4.apply(lambda x:int(x.timestamp())) 【Python 2 东八时区】 df1.col4.apply(lambda x:int(x.tz_localize(“Asia/Shanghai”).timestamp())) | select unix_timestamp(col4) from t1; |
| 结果 | 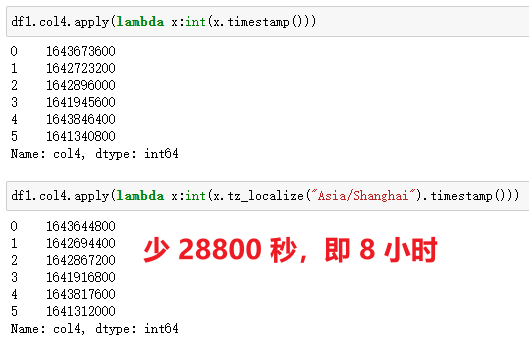 | 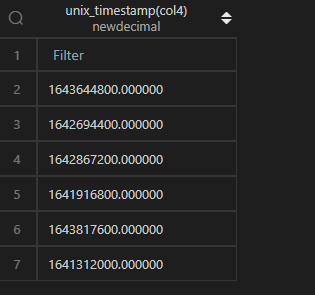 |
读到这里,这篇“怎么使用Pandas实现MySQL日期函数”文章已经介绍完毕,想要掌握这篇文章的知识点还需要大家自己动手实践使用过才能领会,如果想了解更多相关内容的文章,欢迎关注亿速云行业资讯频道。
免责声明:本站发布的内容(图片、视频和文字)以原创、转载和分享为主,文章观点不代表本网站立场,如果涉及侵权请联系站长邮箱:is@yisu.com进行举报,并提供相关证据,一经查实,将立刻删除涉嫌侵权内容。


