本文在介绍关于nconf的安装和配置的基础上,重点探讨了其具体步骤,步骤简单易上手操作,文章内容步步紧凑,希望大家根据这篇文章可以有所收获。
nconf提供WEB界面,管理nagios配置,其将nagios配置文件放入数据库,用户做相应修改后点击生成配置文件,Nconf会从数据库中将配置写入配置文件。所以最后nagios的配置还是以文件的形式存在,这是相对与nagioSQL本人比较喜欢Nconf的原因,其次Nconf还提供了静态文件的修改页面。
一、初始化数据库
mysql> create database nconf default character set utf8;
mysql> grant all privileges on nconf.* to 'nconf'@'localhost' identified by 'XXXX' with grant option;
mysql> grant all privileges on nconf.* to 'nconf'@'%' identified by 'XXXX' with grant option;
mysql> flush privileges;
二、安装Nconf
#tar -zxvf nconf-1.3.0-0.tgz -C /var/www/html/
#chown -R apache:apache /var/www/html/nconf
三、初始化Nconf

第二步骤需要建立软连接,并且注意原文件的权限最好修改为777
#chmod 777 /usr/local/nagios/bin/nagios
#ln -s /usr/local/nagios/bin/nagios /var/www/html/nconf/bin/
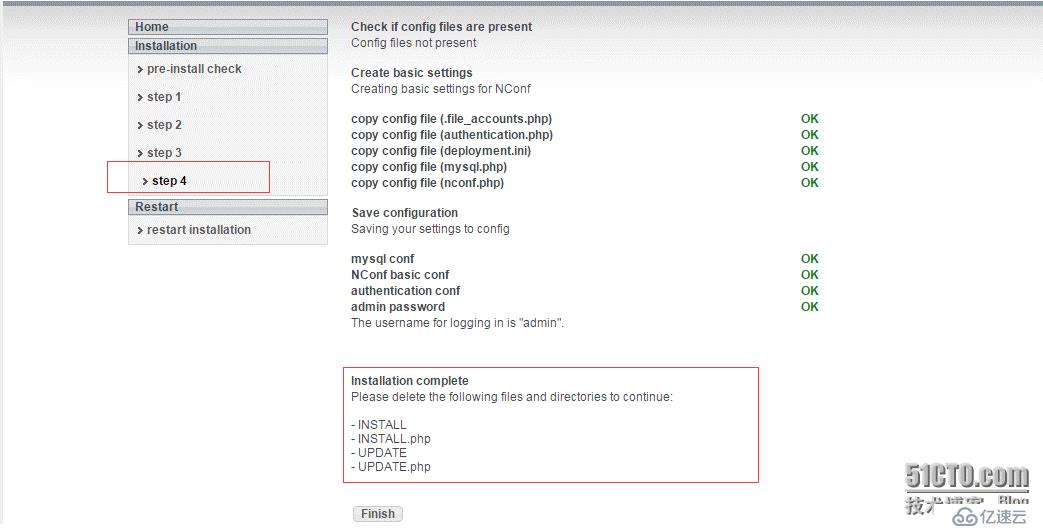
#第四步结束后删除临时文件
#rm -rf /var/www/html/nconf/{INSTALL,INSTALL.php,UPDATE,UPDATE.php}
三、配置Nconf sudo权限和自动生成配置文件
#visudo
apache ALL=(ALL) NOPASSWD:/etc/init.d/nagios
//修改nconf配置文件
#cat /var/www/html/nconf/config/deployment.ini
[extract config]
type = local
source_file = "/var/www/html/nconf/output/NagiosConfig.tgz"
target_file = "/var/www/html/nconf/temp/"
action = extract
[copy collector config]
type = local
source_file = "/var/www/html/nconf/temp/Default_collector/"
target_file = "/usr/local/nagios/etc/Default_collector/"
action = copy
[copy global config]
type = local
source_file = "/var/www/html/nconf/temp/global/"
target_file = "/usr/local/nagios/etc/global/"
action = copy
reload_command = "sudo /etc/rc.d/init.d/nagios reload"
四、nconf生成配置文件的流程
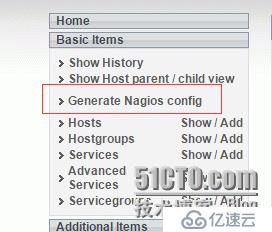
点击 Generate Nagios config 后会检测Nagios配置文件是否有问题

无问题后点击 Deploy ,就会安装下面的流程和上面配置文件中配置的路径去执行相关操作。
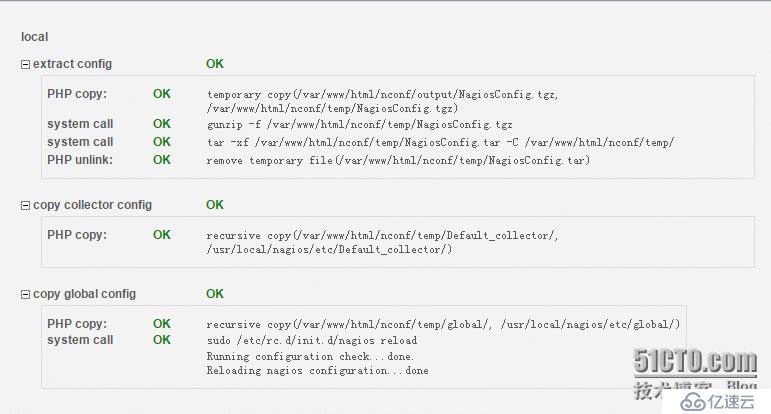
(1)在 [extract config] 配置的source_file下生成压缩文件同时备份之前的压缩文件,之后解压到target_file下面

(2)按照[copy collector config] 和 [copy global config] 的配置,将source_file 的文件复制到target_file 下。
(3)执行 sudo /etc/init.d/nagios reload
五、将现有配置导入Nconf中
(1)注意事项
按以下方式导入可避免配置文件之间的冲突:
1. timeperiods
2. misccommands & check_commands
3. contacts
4. contactgroups (considering that some contactgroups might be linked to others)
5. host-templates
6. parent-hosts, then remaining hosts
7. hostgroups (considering that some hostgroups might be linked to others)
8. host-dependencies(主机依赖)
9. service-templates
10. services
11. advanced-services
12. servicegroups (considering that some servicegroups might be linked to others)
13. service-dependencies
现有配置文件按属性做更精细的分离,确保每个配置文件里面只有对应的配置属性
(2)语法
Usage:
/var/www/html/nconf/bin/add_items_from_nagios.pl -c class -f /path/to/file [-x (1-5)] [-s]
Help:
required
-c Specify the class of items that you wish to import. Must correspond to an NConf class
(e.g. "host", "service, "hostgroup", "checkcommand", "contact", "timeperiod"...)
-f The path to the file which is to be imported. CAUTION: Make sure you have
only items of one class in the same file (e.g. "hosts.cfg", "services.cfg"...)
Also make sure you import host- or service-templates separately ("host" or
"service" items containing a "name" attribute)
optional
-x Set a custom loglevel (1 = lowest, 5 = most verbose)
-s Simulate only. Do not make any actual modifications to the database.
#-s为测试模式,不会往数据库插入任何数据
/var/www/html/nconf/bin/add_items_from_nagios.pl -c timeperiod -f /usr/local/nagios/etc/objects/timeperiods.cfg -s
(3)实战
/var/www/html/nconf/bin/add_items_from_nagios.pl -c timeperiod -f /usr/local/nagios/etc/objects/timeperiods.cfg -s
/var/www/html/nconf/bin/add_items_from_nagios.pl -c misccommand -f /usr/local/nagios/etc/objects/misccommands.cfg -s
/var/www/html/nconf/bin/add_items_from_nagios.pl -c checkcommand -f /usr/local/nagios/etc/objects/checkcommands.cfg -s
/var/www/html/nconf/bin/add_items_from_nagios.pl -c contact -f /usr/local/nagios/etc/objects/contacts.cfg -s
/var/www/html/nconf/bin/add_items_from_nagios.pl -c contactgroup -f /usr/local/nagios/etc/objects/contactgroup.cfg -s
/var/www/html/nconf/bin/add_items_from_nagios.pl -c host-template -f /usr/local/nagios/etc/objects/host-template.cfg -s
/var/www/html/nconf/bin/add_items_from_nagios.pl -c host -f /usr/local/nagios/etc/objects/hosts.cfg -s
/var/www/html/nconf/bin/add_items_from_nagios.pl -c service-template -f /usr/local/nagios/etc/objects/service-template.cfg -s
/var/www/html/nconf/bin/add_items_from_nagios.pl -c service -f /usr/local/nagios/etc/objects/services.cfg -s
/var/www/html/nconf/bin/add_items_from_nagios.pl -c service -f /usr/local/nagios/etc/objects/localhost.cfg -s
六、静态文件修改功能
static_cfg默认路径为/var/www/html/nconf/static_cfg
//创建一个测试文件
#echo "您好kjklsj111" >>/var/www/html/nconf/static_cfg/test.txt
页面点击Administration->Edit static config files,你会发现有保存和下载按钮,直接编辑文件后点击保存就可

关于nconf的安装和配置就分享到这里了,希望以上内容可以对大家有一定的帮助,可以学到更多知识。如果喜欢这篇文章,不如把它分享出去让更多的人看到。
免责声明:本站发布的内容(图片、视频和文字)以原创、转载和分享为主,文章观点不代表本网站立场,如果涉及侵权请联系站长邮箱:is@yisu.com进行举报,并提供相关证据,一经查实,将立刻删除涉嫌侵权内容。


