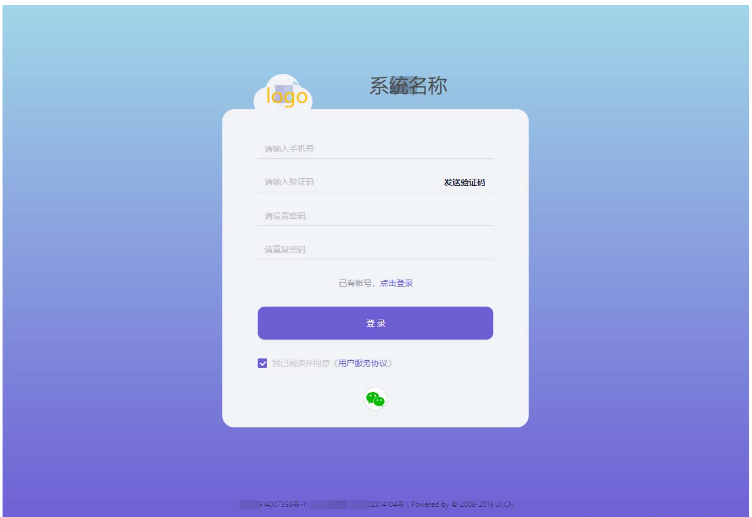
今天小编给大家分享一下怎么用Ant Design编写登录和注册页面的相关知识点,内容详细,逻辑清晰,相信大部分人都还太了解这方面的知识,所以分享这篇文章给大家参考一下,希望大家阅读完这篇文章后有所收获,下面我们一起来了解一下吧。
代码如下(示例):
import { Form, Input, Button, Tabs, Row, Col } from 'antd';
import { Footer } from 'antd/lib/layout/layout';
import React from 'react';
import styles from './index.module.less';

const onFinish = (values: any) => {
  console.log('Received values of form: ', values);
};

const { TabPane } = Tabs;
function callback(key) {
  console.log(key);
}
export default function Login() {
  return (
    <div className={styles.bg}>
      <div className={styles.heard}>
        <div className={styles.cloud}>
          <img src="../logo.png" alt="logo" />
        </div>
        <h2 className={styles.title}>项目名称</h2>
      </div>
      <div className={styles.login_card}>
        <Tabs type="card" defaultActiveKey="1" onChange={callback} centered style={{ margin: '0 auto' }}>
          <TabPane tab="账户密码登录" key="1">
            <Form
              name="normal_login"
              className="login-form"
              initialValues={{ remember: true }}
              onFinish={onFinish}
            >
              <Form.Item
                name="username"
                rules={[{ required: true, message: '请输入手机号 / 用户名!' }]}
                style={{ borderBottom: '1px solid #DCDCDC' }}
              >
                <Input placeholder="请输入手机号 / 用户名" bordered={false} />
              </Form.Item>
              <Form.Item
                name="password"
                rules={[{ required: true, message: '请输入密码!' }]}
                style={{ borderBottom: '1px solid #DCDCDC' }}
              >
                <Input
                  bordered={false}
                  type="password"
                  placeholder="请输入密码"
                />
              </Form.Item>


              <Form.Item>
                <a style={{ color: '#8C8D9B' }} href="">创建账号</a>
              </Form.Item>

              <Form.Item>
                <Button type="primary" htmlType="submit" block style={{ height: '56PX', borderRadius: '12PX' }}>
                  登录
                </Button>
              </Form.Item>
            </Form>

          </TabPane>

          <TabPane tab="验证码登录" key="2">
            <Form
              name="normal_login"
              className="login-form"
              initialValues={{ remember: true }}
              onFinish={onFinish}
            >
              <Form.Item
                name="phone"
                rules={[{ required: true, message: '请输入手机号!' }]}
                style={{ borderBottom: '1px solid #DCDCDC' }}
              >
                <Input placeholder="请输入手机号" bordered={false} />
              </Form.Item>
              <Form.Item
                name="captcha"
                rules={[{ required: true, message: '请输入验证码!' }]}
                style={{ borderBottom: '1px solid #DCDCDC' }}
              >
                <Row>
                  <Col span={18}>
                    <Input
                      bordered={false}
                      type="password"
                      placeholder="请输入验证码"
                    />
                  </Col>
                  <Col span={6} style={{ float: 'right' }}>
                    <Button type="link" style={{ color: '#151830', fontWeight: 'bold' }}>发送验证码</Button>
                  </Col>
                </Row>
              </Form.Item>


              <Form.Item>
                <a style={{ color: '#8C8D9B' }} href="">创建账号</a>
              </Form.Item>

              <Form.Item>
                <Button type="primary" htmlType="submit" block style={{ height: '56PX', borderRadius: '12PX' }}>
                  登录
                </Button>
              </Form.Item>


            </Form>

          </TabPane>

        </Tabs>

       <Button size="large" shape="circle"><img src="/weixin.png" alt="微信图片" /></Button>

      </div>
      <Footer className={styles.footer}>
        <text>
          底部说明
        </text>
      </Footer>
    </div>
  )
}代码如下(示例):
.bg {
  height: 900px;
  background: linear-gradient(180deg, #a0d7e7, #6c5dd3);
  margin: auto;
  // padding: 200px;
  text-align: center;
  justify-content: center;
  display: flex;
  align-items: center;
}

.login_card {
  width: 520px;
  height: 450px;
  background: #f2f3f7;
  border-radius: 20px;
  margin: auto;
  text-align: center;
  justify-content: center;
  padding: 51px 60px;
}

.login-button {
  width: 400px;
  height: 56px;
  background: #6c5dd3;
  border-radius: 12px;
}

.heard {
  position: absolute;
  display: flex;
  top: 264px;
}
.title {
  width: 315px;
  font-size: 30px;
  font-family: Arial;
  font-weight: bold;
  color: #151830;
}
.cloud {
  width: 100px;
  height: 72px;
  line-height: 72px;
  background-image: url("../../../../public/img/cloud.png");
}
.cloud img {
  width: 40px;
  height: 40px;
}
.footer {
  width: 100%;
  height: 12px;
  font-size: 10px;
  font-family: Microsoft YaHei;
  font-weight: 300;
  color: #151830;
  background: none;
  bottom: 34px;
  left: 0;
  position: absolute;
}注册页面代码和样式,不多描述,直接看图

代码如下(示例):
import React from 'react';
import { Form, Input, Button, Checkbox, Tabs, Row, Col } from 'antd';
import styles from './index.module.less';
import { Footer } from 'antd/lib/layout/layout';

const onFinish = (values: any) => {
  console.log('Received values of form: ', values);
};
export default function Register() {
  return (
    <div className={styles.bg}>
      <div className={styles.heard}>
        <div className={styles.cloud}>
          <img src="../logo.png" alt="logo" />
        </div>
        <h2 className={styles.title}>系统名称</h2>
      </div>
      <div className={styles.login_card}>
        <Form
          name="normal_login"
          className="login-form"
          initialValues={{ remember: true }}
          onFinish={onFinish}
        >
          <Form.Item
            name="phone"
            rules={[{ required: true, message: '请输入手机号!' }]}
            style={{ borderBottom: '1px solid #DCDCDC' }}
          >
            <Input placeholder="请输入手机号" bordered={false} />
          </Form.Item>
          <Form.Item
            name="captcha"
            rules={[{ required: true, message: '请输入验证码!' }]}
            style={{ borderBottom: '1px solid #DCDCDC' }}
          >
            <Row>
              <Col span={18}>
                <Input
                  bordered={false}
                  type="password"
                  placeholder="请输入验证码"
                />
              </Col>
              <Col span={6} style={{ float: 'right' }}>
                <Button type="link" style={{ color: '#151830', fontWeight: 'bold' }}>发送验证码</Button>
              </Col>
            </Row>
          </Form.Item>
          <Form.Item
            name="password"
            rules={[{ required: true, message: '请设置密码!' }]}
            style={{ borderBottom: '1px solid #DCDCDC' }}
          >
            <Input
              bordered={false}
              type="password"
              placeholder="请设置密码"
            />
          </Form.Item>
          <Form.Item
            name="password"
            rules={[{ required: true, message: '请重复密码!' }]}
            style={{ borderBottom: '1px solid #DCDCDC' }}
          >
            <Input
              bordered={false}
              type="password"
              placeholder="请重复密码"
            />
          </Form.Item>

          <Form.Item>
            已有帐号,<a href="#" rel="external nofollow" >点击登录</a>
          </Form.Item>

          <Form.Item>
            <Button type="primary" htmlType="submit" block style={{ height: '56PX', borderRadius: '12PX' }}>
              登录
            </Button>
          </Form.Item>
          <Form.Item name="" valuePropName="checked" style={{ textAlign: 'left' }}>
            <Checkbox style={{ color: '#CCCCCC' }}>我已阅读并同意《<a>用户服务协议</a>》</Checkbox>
          </Form.Item>
          <Button size="large" shape="circle"><img src="../weixin.png" alt="微信图片" /></Button>

        </Form>
      </div>

      <Footer className={styles.footer}>
        <text>
          底部说明
        </text>
      </Footer>
    </div>
  );
}代码如下(示例):
.bg {
  height: 900px;
  background: linear-gradient(180deg, #a0d7e7, #6c5dd3);
  margin: auto;
  padding: 150px;
  text-align: center;
  justify-content: center;
  display: flex;
  align-items: center;
}

.login_card {
  width: 520px;
  height: 540px;
  background: #f2f3f7;
  border-radius: 20px;
  margin: auto;
  text-align: center;
  justify-content: center;
  padding: 51px 60px;
}

.login-button {
  width: 400px;
  height: 56px;
  background: #6c5dd3;
  border-radius: 12px;
}
.heard {
  position: absolute;
  display: flex;
  top: 218px;
}
.title {
  width: 315px;
  font-size: 30px;
  font-family: Arial;
  font-weight: bold;
  color: #151830;
}
.cloud {
  width: 100px;
  height: 72px;
  line-height: 72px;
  background-image: url("../../../../public/img/cloud.png");
}
.cloud img {
  width: 40px;
  height: 40px;
}
.footer {
  width: 100%;
  height: 12px;
  font-size: 10px;
  font-family: Microsoft YaHei;
  font-weight: 300;
  color: #151830;
  background: none;
  bottom: 34px;
  left: 0;
  position: absolute;
}好像没啥重点,div垂直居中算个重点吧。
  justify-content: center;
  display: flex;
  align-items: center;
以上就是“怎么用Ant Design编写登录和注册页面”这篇文章的所有内容,感谢各位的阅读!相信大家阅读完这篇文章都有很大的收获,小编每天都会为大家更新不同的知识,如果还想学习更多的知识,请关注亿速云行业资讯频道。
免责声明:本站发布的内容(图片、视频和文字)以原创、转载和分享为主,文章观点不代表本网站立场,如果涉及侵权请联系站长邮箱:is@yisu.com进行举报,并提供相关证据,一经查实,将立刻删除涉嫌侵权内容。