温馨提示×

温馨提示×

您好,登录后才能下订单哦!

密码登录×
登录注册×
其他方式登录
点击 登录注册 即表示同意《亿速云用户服务条款》

Nagios远程监控软件的安装与配置详解

发布时间:2020-05-28 14:19:11 来源:网络 阅读:600 作者:kuangling 栏目:移动开发

一、环境配置

1、系统:CentOS release 5.6  IP:192.168.4.200   主机名:JW01

二、软件下载

 Nagios安装至少也应该配置下Apache的Httpd(已装)服务器,否则没有界面,只能靠查看日志去找错误,那就是完全没有意外了。

Nagios下载地址:http://www.nagios.org/download/

nagios-3.4.4.tar.gz     nagios-plugins-1.4.16.tar.gz   

必须安装GCC!!! 其实,我们的apache可以直接用yum来安装,不必指定路径,就可以直接配置apache了。

三、安装前的准备工作

1、解决安装Nagios的依赖关系:
 Nagios基本组件的运行依赖于httpd、gcc和gd。可以通过以下命令来检查nagios所依赖的rpm包是否已经完全安装:

[root@jw01 ~] # yum -y install httpd gcc glibc glibc-common *gd* php php-mysql mysql mysql-server

2、所需要安装组件:
 
服务端所用的安装包为 nagios nagios-plugins ndoutils(非必须)
linux客户端 nrpe
windows客户端 NSClient++
  
3、进行selinux设置,或者关闭selinux
 

[root@jw01 ~]# vim /etc/selinux/config 
SELINUX=disabled


 4、添加nagios运行所需要的用户和组:

[root@jw01 ~]#  groupadd nagcmd
[root@jw01 ~]#  useradd -m nagios
[root@jw01 ~]#  usermod -a -G nagcmd nagios

 四、编译安装nagios

1、安装nagios

[root@jw01 software]# tar -zxvf nagios-3.4.4.tar.gz     #解压nagios
[root@jw01 software]# cd nagios/
[root@jw01 nagios]# ./configure -prefix=/usr/local/nagios  #配置nagios的安装路径
[root@jw01 nagios]# make all                                          #编译
[root@jw01 nagios]# make install                #主要安装程序、CGI以及HTML文件
make install-config
     - This installs sample config files in /usr/local/nagios/etc
make[1]: Leaving directory `/opt/software/nagios'
[root@jw01 nagios]# make install-commandnode  #给外部命令访问nagios配置文件权限
/usr/bin/install -c -m 775 -o nagios -g nagios -d /usr/local/nagios/var/rw
chmod g+s /usr/local/nagios/var/rw
*** External command directory configured ***
[root@jw01 nagios]# /usr/bin/install -c -m 775 -o nagios -g nagios -d /usr/local/nagios/var/rw
[root@jw01 nagios]# chmod g+s /usr/local/nagios/var/rw
[root@jw01 nagios]# mekde install-config      #把配置文件的例子复制到nagios的安装目录
[root@jw01 nagios]# make install-init   #把nagios做成一个运行脚本,使nagios随系统开机启动
/usr/bin/install -c -m 755 -d -o root -g root /etc/rc.d/init.d
/usr/bin/install -c -m 755 -o root -g root daemon-init /etc/rc.d/init.d/nagios
*** Init script installed ***
[root@jw01 nagios]# usr/bin/install -c -m 755 -d -o root -g root /etc/rc.d/init.d
[root@jw01 nagios]# /usr/bin/install -c -m 755 -o root -g root daemon-init /etc/rc.d/init.d/nagios

2、验证程序是否安装正确

[root@jw01 nagios]# cd /usr/local/nagios/
[root@jw01 nagios]# ll
total 28
drwxrwxr-x  2 nagios nagios 4096 Feb  7 17:00 bin
drwxrwxr-x  3 nagios nagios 4096 Feb  7 15:40 etc
drwxr-xr-x  2 root   root   4096 Feb  7 14:52 include
drwxrwxr-x  2 nagios nagios 4096 Feb  7 14:52 libexec
drwxrwxr-x  2 nagios nagios 4096 Feb  7 17:00 sbin
drwxrwxr-x 11 nagios nagios 4096 Feb  7 17:00 share
drwxrwxr-x  5 nagios nagios 4096 Feb  7 14:19
var 

存在 etc、bin、 sbin、 share、 var这五个目录,如果存在则可以表明程序被正确的安装到系统了。后表是五个目录功能的简要说明:     

         bin          

Nagios执行程序所在目录,这个目录只有一个文件nagios

etc Nagios配置文件位置,初始安装完后,只有几个*.cfg-sample文件

sbin

Nagios Cgi文件所在目录,也就是执行外部命令所需文件所在的目录

share

Nagios网页文件所在的目录
var Nagios日志文件、spid 等文件所在的目录

五、安装nagios插件

[root@jw01 software]# tar -zxvf nagios-plugins-1.4.16.tar.gz
[root@jw01 software]# cd nagios-plugins-1.4.16
[root@jw01 software]# ./configure -prefix=/usr/local/nagios   #这里的路径是安装nagios的路径
[root@jw01 software]# make
[root@jw01 software]#
make install

    说明一下的是在配置过程指定的安装路径是/usr/local/nagios,而不是/usr/local/nagios-plus,安装完成后,将在目录/usr/local/nagios生成目录libexec(里面有很多文件),这正是nagios所需要的。
 

六、安装Apache (前段时间APACHE已经安装了)

Web服务不是nagios所必须的,但是如果nagios没有web,查看监控对象的对象将是非常费事和没有趣味的事情(只有通过查看nagios的日志来判断状态)。我不愿干特无聊的事,所以就花少许时间把web安装一下。
在unix/linux世界,apache是web服务器的首选对象,其下载网站为www.apache.org  。建议下载源码。因为我们不需要很复杂的web功能,因此简单的执行一下几个步骤就可以正确的把apache安装到系统:

1、安装Apache;

[root@jw01 software]# tar -zxvf httpd-2.2.0.tar.gz
[root@jw01 software]# cd httpd-2.2.0
[root@jw01 software]#  ./configure –prefix=/usr/local/apache  #指定Apache的安装路径
[root@jw01 software]#
 
make
[root@jw01 software]#  make install
[root@jw01 software]# ./usr/local/apache/bin/apachectl –t     #检查一下apache是否正确安装

[root@jw01 ~]# /usr/sbin/apachectl -t
Syntax OK
[root@jw01 ~]#                           #自己的的路径 


2、Apache 配置

第一步是修改apache的配置文件httpd.conf,这里的文件路径是/usr/local/apache/conf/httpd.conf 。把apache的运行用户[1]和运行组改成nagios,往下把下面的行追加到文件httpd.conf的末尾:
我自己是写在代理的目录下,效果都是一样的。

[root@jw01 ~]# /usr/local/apache/conf/httpd.conf
#setting for nagios
ScriptAlias /nagios/cgi-bin /usr/local/nagios/sbin
<Directory "/usr/local/nagios/sbin">      
    AuthType Basic
    Options ExecCGI
    AllowOverride None
    Order allow,deny
    Allow from all
    AuthName "Nagios Access"
    AuthUserFile /usr/local/nagios/etc/htpasswd
    Require valid-user
</directory>
Alias /nagios /usr/local/nagios/share
<Directory "/usr/local/nagios/share">      
    AuthType Basic
    Options None
    AllowOverride None
    Order allow,deny
    Allow from all
    AuthName "nagios Access"
    AuthUserFile /usr/local/nagios/etc/htpasswd 
    Require valid-user
</directory>

[root@jw01 conf.d]# pwd
/etc/httpd/conf.d
[root@jw01 conf.d]# ll
total 136
-rw-r--r-- 1 root root  648 Feb  7 17:30 nagios.conf    #自己在代理目录下新增了nagios.conf文件

上述文本块的作用是对nagios的目录进行用户验证,只有合法的授权用户才可以访问nagios的页面文件。第二步是生成用户验证文件:只要执行命令

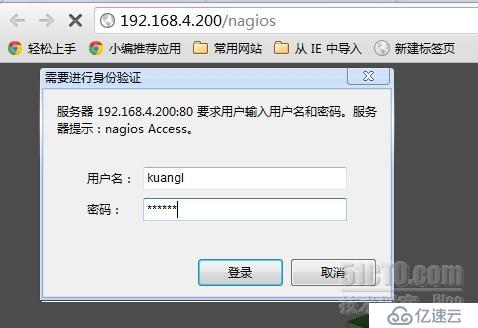
[root@jw01~]# /usr/bin/htpasswd -c  /usr/local/nagios/etc/htpasswd kuangl

就会生成web的合法访问用户kuangl;命令交互执行,需要输入2次密码,然后就在文件/usr/local/nagios/etc/htpasswd写入一行-第一个字段是刚生成的用户名,第二个是加密后的密码,如果还要添加更多的用户,执行命令 htpasswd 就不需要选项 “-c”,否则就会覆盖所有已经生成的行。
配置完成后,执行/usr/local/apache/bin/apachctl –t  检查apache配置文件是否有语法错误,无误后用/usr/local/apache/bin/apachctl start & 把apache启动,然后从另外的机器的浏览器输入nagios 的访问地址(如:
http://192.168.4.200/nagios),如果正常,将出现下图的登录验证窗口等待用户输入:

Nagios远程监控软件的安装与配置详解 

  七、nagios配置

 刚安装完成的nagios,其配置文件的目录是/usr/local/nagios/etc,下图是其etc目录的文件:

[root@jw01 conf.d]# cd /usr/local/nagios/etc/
[root@jw01 etc]# ll
total 68
-rw-rw-r-- 1 nagios nagios 11717 Feb  7 17:57 cgi.cfg
-rw-r--r-- 1 root   root      21 Feb 20 13:47 htpasswd
-rw-rw-r-- 1 nagios nagios 44710 Feb  7 14:43 nagios.cfg
drwxrwxr-x 2 nagios nagios  4096 Feb 20 15:23 objects
-rw-rw---- 1 nagios nagios  1340 Feb  7 14:43 resource.cfg
[root@jw01 etc]#

 从nagios2.6版开始,不需要更改文件名也不用修改配置文件localhost.cfg就可以直接运行../bin/nagios –v nagios.cfg验证程序是否能正常运行(nagios2.5及以前版本的最小运行的配置文件是minimal.cfg,但需要修改这个文件多处才能验证成功)。

1、修改nagios的主配置文件nagios.cfg

[root@jw01 etc]# vim nagios.cfg
在文件中的143行改check_external_commands=0为check_external_commands=1 这行的作用是允许执行在web界面下重启nagios、停止主机/服务检查等操作。
在文件中的161行改command_check_interva=15s的值从默认的15 command_check_interval=10s

2、修改cgi.cfg 配置文件

[root@jw01 etc]# vim cgi.cfg
在文件的78行确保use_authentication=1。曾看过不少的文章,都是建议把use_authentication的值设置成”0”来取消验证,这是一个十分糟糕的想法。接下来修改default_user_name=sery ,再后面的修改在下表列出:
authorized_for_system_information=nagiosadmin,kuangl
authorized_for_configuration_information=nagiosadmin,kuangl
authorized_for_system_commands=nagiosadmin,kuangl               //多个用户之间用逗号隔开
authorized_for_all_services=nagiosadmin,kuangl
authorized_for_all_hosts=nagiosadmin,kuangl
authorized_for_all_service_commands=nagiosadmin,kuangl
authorized_for_all_host_commands=nagiosadmin,kuangl

|
那么上述用户名打那里来的呢?是执行命令
 /usr/local/apache/bin/htpasswd –c /usr/local/nagios/etc/htpasswd kuangl 所生成的,这个要注意,不能随便加没有存在的验证用户,为了安全起见,不要添加过多的验证用户。

3、修改commands.cfg 配置文件,这个文件的主要功能是用来发送报警短信和报警邮件。

[root@jw01 objects]# vim commands.cfg 

修改配置文件或者新增以下内容:

#host-notify-by-sms   //发送短信报警
define command {
       command_name      host-notify-by-sms
       command_line      /usr/local/bin/sms_send "Host $HOSTSTATE$alert for $HOSTNAME$! on '$DATETIME$' " $CONTACTPAGER$
      }

#service notify by sms  //发送短信报警
define command {
       command_name     service-notify-by-sms
       command_line     /usr/local/bin/sms_send "'$HOSTADDRESS$'$HOSTALIAS$/$SERVICEDESC$ is $SERVICESTATE$" $CONTACTPAGER$
       }


 # ‘notify-host-by-email’ command definition

 define command{

 command_name host-notify-by-email

 command_line /usr/bin/printf “%b” “***** Nagios *****\n\nNotification Typ$NOTIFICATIONTYPE$\nHost:       $HOSTNAME$\nState:$HOSTSTATE$\nAddress: $HOSTADDRESS$\nInfo: $HOSTOUTPUT$\n\nDate/Time:      $LONGDATETIME$\n” | /bin/mai -s “** $NOTIFICATIONTYPE$ Host Alert: $HOSTNAME$ is $HOSTSTATE$ **”  $CONTTEMAIL$

 }

  # ’service_notification_commands’ command definition

 define command{

 command_name service-notify-by-email

 command_line /usr/bin/printf “%b” “***** Nagios *****\n\nNotification Typ$NOTIFICATIONTYPE$\n\nService:   $SERVICEDESC$\nHost: $HOSTALIAS$\nAddress: $HOSTADDRESS$\nState: $SERVICESTATE$\n\nDate/Time:  $LONGDATETIME$\n\nAdditional Info:\n\n$SERVICEOUTPUT$” | /bin/mail -s “** $NOTIFICATIONTYPE$ Service ert:  $HOSTALIAS$/$SERVICEDESC$ is $SERVICESTATE$ **” $CONTACTEMAIL$

 }

4、修改contacts.cfg 配置文件;

define contact{
        contact_name                    kuangl          ; Short name of user
        use                             generic-contact         ; Inherit default values from generic-contact template (defined above)
        alias                           Nagios Admin            ; Full name of user
        service_notification_period    24x7
        host_notification_period       24x7
        service_notification_options   w,u,c,r
        host_notification_options       d,u,r
        service_notification_commands  service-notify-by-sms,service-notify-by-email
        host_notification_commands     host-notify-by-email,host-notify-by-sms
        email                          
kuangl@lorient-meadia.com ; <<***** CHANGE THIS TO YOUR EMAIL ADDRESS ******
        pager                           138XXXXXX79
        }
 

在文件最后面修改:

define contactgroup{
        contactgroup_name       sysadmin       #定义的属组
        alias                   Nagios Administrators
        members                 kuangl                 #定义的用户
        }

多个成员之间用逗号做分界符,如果有更多的联系组,就依相同的格式在文件中追加余下的组。
 

5、新增hosts.cfg 配置文件,下面是我定义的两个主机的基本样式;

define host{
        name                            generichost    ; Referenced in other host definitions, used for template recursion/resolution
        notifications_enabled           1       ; Host notifications are enabled
        event_handler_enabled           1       ; Host event handler is enabled
        flap_detection_enabled          1       ; Flap detection is enabled
        process_perf_data               1       ; Process performance data
        retain_status_information       1       ; Retain status information across program restarts
        retain_nonstatus_information    1       ; Retain non-status information across program restarts
        register                        0       ; DONT REGISTER THIS DEFINITION - ITS NOT A REAL HOST, JUST A TEMPLATE!
        check_command                   check-host-alive
        max_check_attempts              3
        contact_groups                  sysadmin
        notification_interval           60
        notification_period             24x7
        notification_options            d,u,r
        }

define host{
        name                            generichost1    ; Referenced in other host definitions, used for template recursion/resolution
        notifications_enabled           1       ; Host notifications are enabled
        event_handler_enabled           1       ; Host event handler is enabled
        flap_detection_enabled          1       ; Flap detection is enabled
        process_perf_data               1       ; Process performance data
        retain_status_information       1       ; Retain status information across program restarts
        retain_nonstatus_information    1       ; Retain non-status information across program restarts
        register                        0       ; DONT REGISTER THIS DEFINITION - ITS NOT A REAL HOST, JUST A TEMPLATE!
        check_command                   check_tcp!80
        max_check_attempts              3
        contact_groups                  sysadmin
        notification_interval           60
        notification_period             24x7
        notification_options            d,u,r
        }

define host{
        use                             generichost
        host_name                       jw01
        alias                           jw01
        address                         192.168.4.200
        }

define host{
        use                             generichost
        host_name                       jw02
        alias                           jw02
        address                         192.168.4.244
        }

    更多的主机依此格式逐个追加进来。

6、新增services.cfg 配置文件,没有这个文件,什么监控也没用。

define service{
        name                            genericservice
        active_checks_enabled           1
        passive_checks_enabled          1
        parallelize_check               1
        obsess_over_service             1
        check_freshness                 0
        notifications_enabled           1
        event_handler_enabled           1
        flap_detection_enabled          1
        process_perf_data               1
        retain_status_information       1
        retain_nonstatus_information    1
        register                        0
        is_volatile                     0
        max_check_attempts              2
        check_interval                  3
        retry_interval                  2
        event_handler_enabled           1
        check_period                    24x7
        contact_groups                  sysadmin
        notification_interval           60
        notification_period             24x7
        notification_options            w,u,c,r
        #notes_url                     
http://webops/nocweb/home/template/bpv%2CBp***View.vm?instancename=BDC_NMS
        }
 

#################### jw01 ######################

define service{
        use                             genericservice
        host_name                       jw01
service_description                     PING
        check_command                   check-host-alive
        }

define service{
        use                             genericservice
        host_name                       jw01
        service_description             tcp_22
        check_command                   check_tcp!22
        }

define service{
        use                             genericservice
        host_name                       jw01
        service_description             tcp_10000
        check_command                   check_tcp!10000
        }


define service{
        use                             genericservice
        host_name                       jw01
        service_description             tcp_80
        check_command                   check_tcp!80
        }
define service{
        use                             genericservice
        host_name                       jw01
        service_description             tcp_8081
        check_command                   check_tcp!8081
        }

define service{
        use                             genericservice
        host_name                       jw01
        service_description             tcp_971
        check_command                   check_tcp!971
        }

define service{
        use                             genericservice
        host_name                       jw01
        service_description             tcp_111
        check_command                   check_tcp!111
        }

define service{
        use                             genericservice
        host_name                       jw01
        service_description             HTTP
        check_command                   check_http
        }

define service{
        use                             genericservice
        host_name                       jw01
        service_description             SSH
        check_command                   check_ssh
}

define service{
        use                             genericservice
        host_name                       jw01
        service_description             Nrpe_users
        check_command                   check_nrpe!check_users
        }

define service{
        use                             genericservice
        host_name                       jw01
        service_description             Nrpe_load
        check_command                   check_nrpe!check_load
        }

define service{
        use                             genericservice
        host_name                       jw01
        service_description             Nrpe_sda1
        check_command                   check_nrpe!check_/boot

        }

define service{
        use                             genericservice
        host_name                       jw01
        service_description             Nrpe_zomie_procs
        check_command                   check_nrpe!check_zombie_procs
        }

书写时要注意的是,check_tcp与要监控的服务端口之间要用”!”做分隔符。如果服务太多,以应该考虑用脚本来生成。

7、修改nagios配置文件

[root@jw01 objects]# vim /usr/local/nagios/etc/nagios.cfg

     在配置文件里面增加services.cfg、hosts.cfg等文件保存退出!

cfg_file=/usr/local/nagios/etc/objects/commands.cfg 
cfg_file=/usr/local/nagios/etc/objects/contacts.cfg           //联系人配置文件路径
cfg_file=/usr/local/nagios/etc/objects/timeperiods.cfg      //监视时段配置文件路径
cfg_file=/usr/local/nagios/etc/objects/templates.cfg
cfg_file=/usr/local/nagios/etc/objects/services.cfg           //服务配置文件路径
cfg_file=/usr/local/nagios/etc/objects/hosts.cfg               //主机配置文件路径

# Definitions for monitoring the local (Linux) host
cfg_file=/usr/local/nagios/etc/objects/localhost.cfg           //本机配置文件路径


8、检查文件配置的正确性

[root@jw01 objects]# /usr/local/nagios/bin/nagios -v /usr/local/nagios/etc/nagios.cfg 

Total Warnings: 0
Total Errors:   0

Things look okay - No serious problems were detected during the pre-flight check

     这样的情况,大功告成;但我却没有这么幸运,修改了好多个地方才成功。

问题总结:

报错1:Error: Contact group 'admins' specified in service 'Current Load' for host 'localhost' is not defined anywhere!
解决:将templates.cfg配置中的admins组更改为contactgroups.cfg中定义的sysadmin  #自己定义的属组

报错2:Error: Service notification command 'service-notify-by-email' specified for contact 'kuangl' is not defined anywhere!
Error: Host notification command 'host-notify-by-email' specified for contact 'kuangl' is not defined anywhere!
解决:在这两条报错证明在commands.cfg里没有定义这两条,在commands.cfg里添加以下内容:

# ‘notify-host-by-email’ command definition

define command{

command_name host-notify-by-email

command_line /usr/bin/printf “%b” “***** Nagios *****\n\nNotification Typ$NOTIFICATIONTYPE$\nHost: $HOSTNAME$\nState:$HOSTSTATE$\nAddress: $HOSTADDRESS$\nInfo: $HOSTOUTPUT$\n\nDate/Time: $LONGDATETIME$\n” | /bin/mai -s “** $NOTIFICATIONTYPE$ Host Alert: $HOSTNAME$ is $HOSTSTATE$ **” $CONTTEMAIL$

}

# ’service_notification_commands’ command definition

define command{

command_name service-notify-by-email

command_line /usr/bin/printf “%b” “***** Nagios *****\n\nNotification Typ$NOTIFICATIONTYPE$\n\nService: $SERVICEDESC$\nHost: $HOSTALIAS$\nAddress: $HOSTADDRESS$\nState: $SERVICESTATE$\n\nDate/Time: $LONGDATETIME$\n\nAdditional Info:\n\n$SERVICEOUTPUT$” | /bin/mail -s “** $NOTIFICATIONTYPE$ Service ert: $HOSTALIAS$/$SERVICEDESC$ is $SERVICESTATE$ **” $CONTACTEMAIL$

}
 

报错3:如果提示“You don't have permission to access /nagios/ on this server” 那绝对是你没有配置好php 
 解决:

[root@jw01 etc]# yum -y install php

报错4:如果提示“Whoops! Error: Could not read object configuration data! ”,这是因为没有启动nagios后台进程,执行以下命令

[root@jw01 objects]# /usr/local/nagios/bin/nagios -d /usr/local/nagios/etc/nagios.cfg
      

9、将nagios 作为守护进程

[root@jw01 objects]# /usr/local/nagios/bin/nagios -d /usr/local/nagios/etc/nagios.cfg
[root@jw01 objects]# ps -ef |grep nagios
nagios    8640     1  0 15:25 ?        00:00:00 /usr/local/nagios/bin/nagios -d /usr/local/nagios/etc/nagios.cfg
root     11397  5291  0 17:25 pts/1    00:00:00 grep nagios

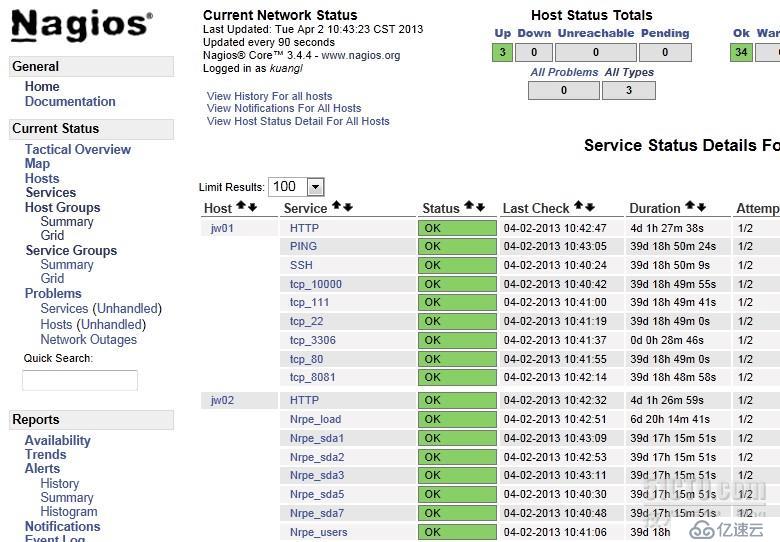
10、在IE输入:https://192.168.4.200/nagios/

Nagios远程监控软件的安装与配置详解


向AI问一下细节

免责声明:本站发布的内容(图片、视频和文字)以原创、转载和分享为主,文章观点不代表本网站立场,如果涉及侵权请联系站长邮箱:is@yisu.com进行举报,并提供相关证据,一经查实,将立刻删除涉嫌侵权内容。

AI