本文介绍了Keycloak基础知识、ADFS和Salesforce IDP配置、Spring Boot和Angular集成Keycloak实现单点登录的方法。
本文代码以Angular 8集成Spring Boot 2详解为基础,删除了原JWT、用户、权限、登录等代码。Angular代码使用了keycloak-angular,稍做修改。GitHub源码地址:heroes-api 、heroes-web 。
软件环境:
Keycloak 8.0.1
Spring Boot 2.2.2
Angular 8.2
ADFS 2016
Salesforce Cloud
Keycloak为现代应用和服务提供开源的认证和访问管理,即通常所说的认证和授权。Keycloak支持OpenID、OAuth 2.0和SAML 2.0协议;支持用户注册、用户管理、权限管理;支持OTP,支持代理OpenID、SAML 2.0 IDP,支持GitHub、LinkedIn等第三方登录,支持整合LDAP和Active Directory;支持自定义认证流程、自定义用户界面,支持国际化。
Keycloak支持Java、C#、Python、Android、iOS、JavaScript、Nodejs等平台或语言,提供简单易用的Adapter,仅需少量配置和代码即可实现SSO。
Keycloak新的发行版命名为Quarkus,专为GraalVM和OpenJDK HotSpot量身定制的一个Kurbernetes Native Java框架,计划2019年底正式发布。
Keycloak构建在WildFly application server之上,从官网下载Standalone server distribution解压后运行bin/standalone.sh即可启动。默认使用h3数据库,可以修改配置使用其它数据库。Standalone Clustered Mode、Domain Clustered Mode启动模式和更多配置请参阅官方文档。
默认,本地网址为http://localhost:8080/auth ,首次登录时必须创建admin用户: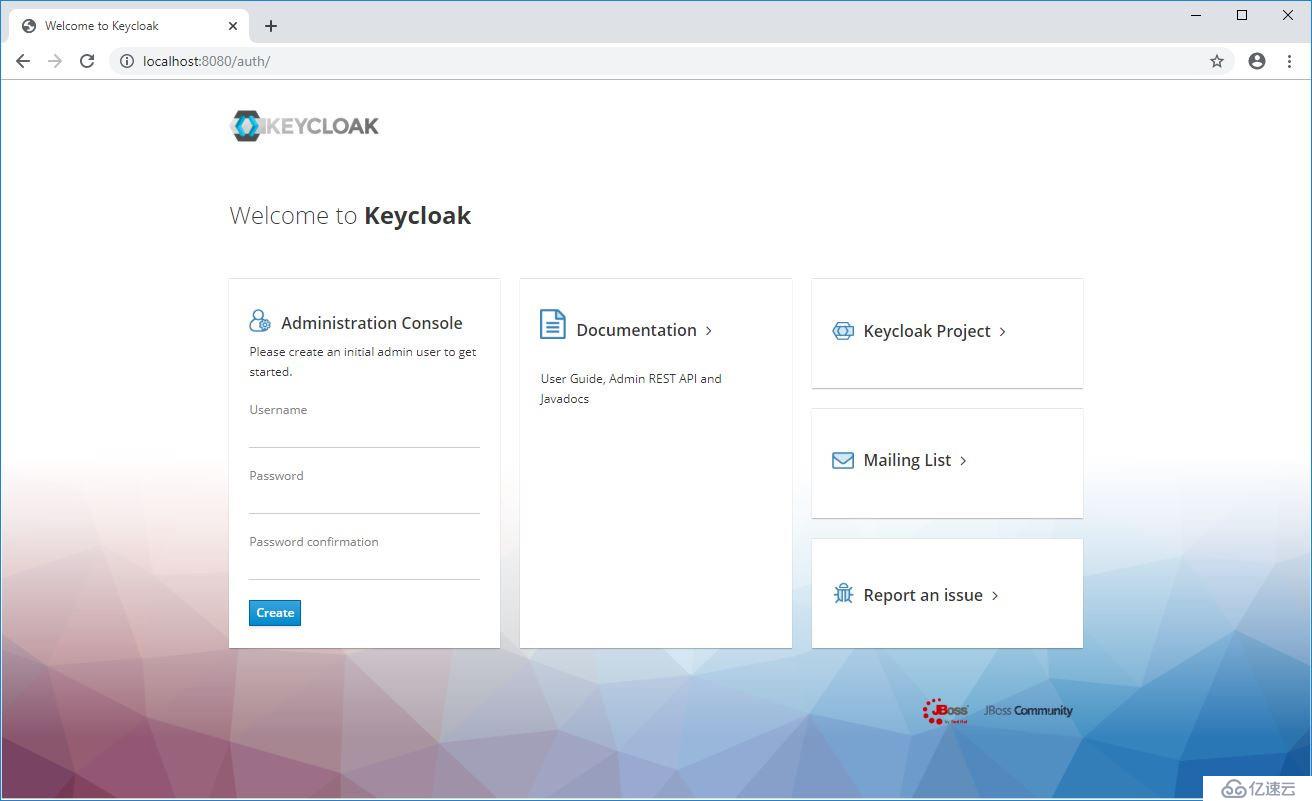
直接登录Admin Console http://localhost:8080/auth/admin/ :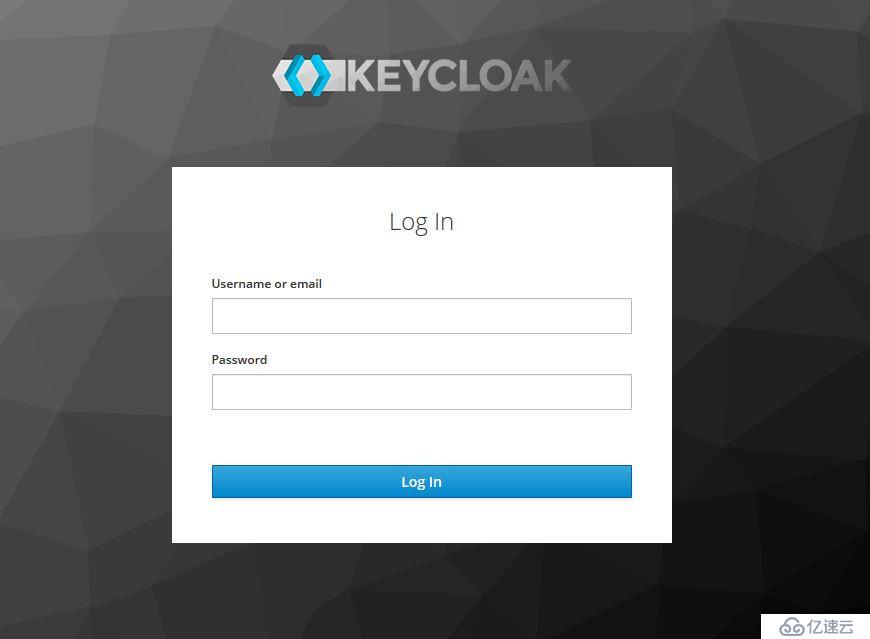
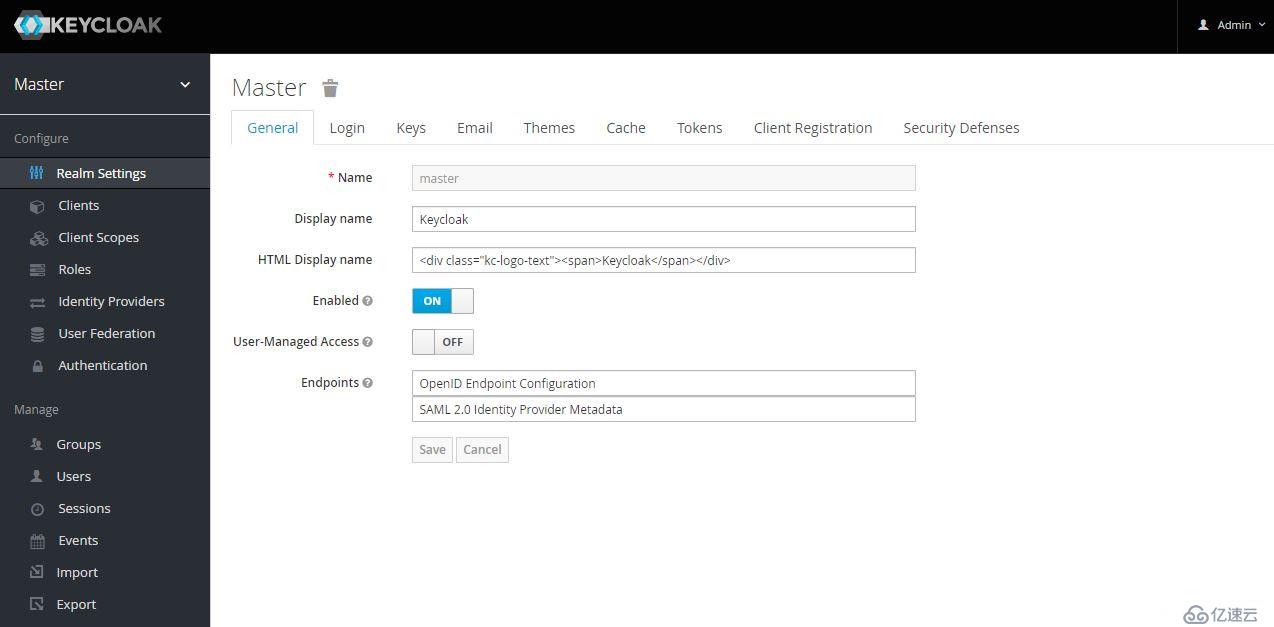
为保护不同的应用,通常创建不同的Realm,各Realm间的数据和配置是独立的。初始创建的Realm为Master,Master是最高级别的Realm。Master Realm内的admin用户(授予admin角色的用户)拥有查看和管理任何其它realm的权限。因此,不推荐使用master realm管理用户和应用,而应仅供超级管理员来创建和管理realm。
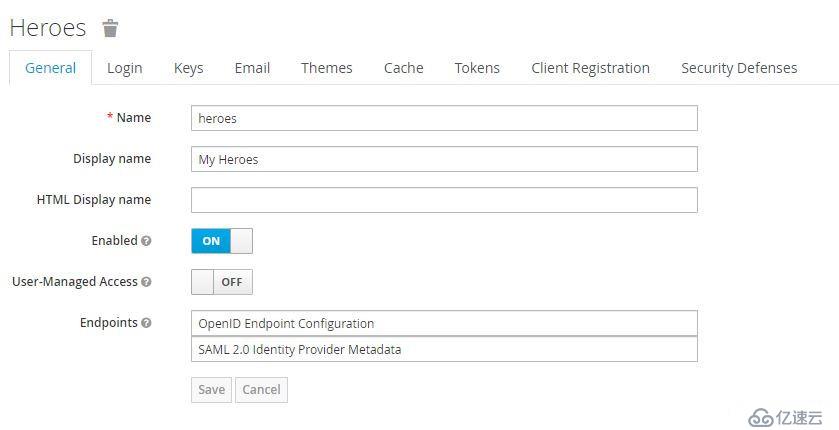
每个realm有专用的管理控制台,可以设置自已的管理员账号,比如接下来我们创建的heroes realm,控制台网址为http://localhost:8080/auth/admin/heroes/console 。
创建Heroes realm
点击左上角下拉菜单 -> Add realm:
Login Tab中有多个可配置选项:用户注册、编辑用户名、忘记密码、记住我、验证email、使用email登录、需要SSL。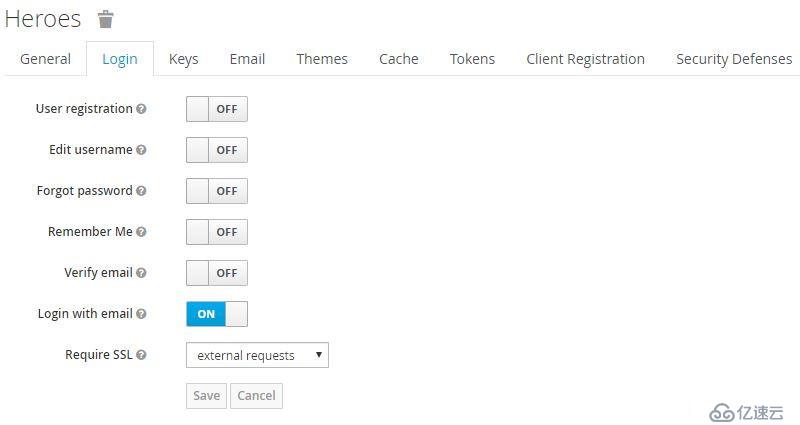
其中,Require SSL有三个选项:all requests、external requests、none,默认为external requests,在生产环境中应配置为all requests。
Themes Tab可以配置界面主题、启用国际化:
Tokens Tab可以配置token签名算法、过期时间等。
Client是realm中受信任的应用。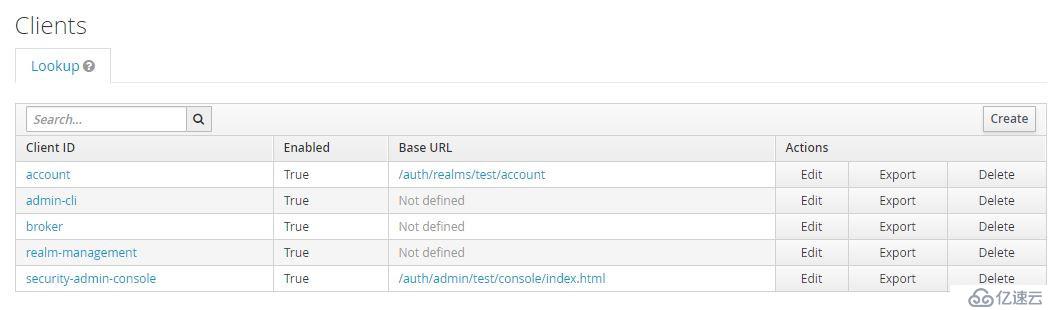
创建realm后自动创建以下client:
如Realm配置中启用了User-Managed Access则可以管理自己的Resource:
创建heroes client
点击Clients右上方的Create: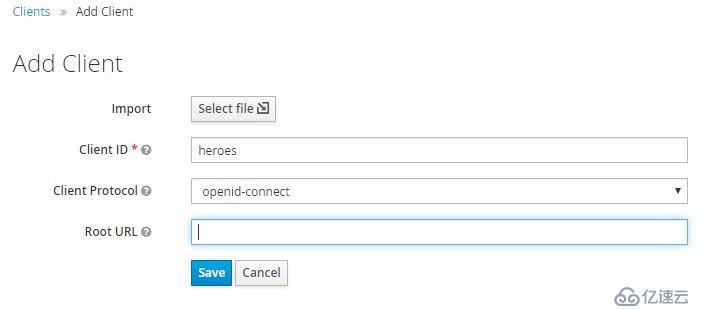

Client Protocol使用默认值openid-connect。Access Type有三个选项confidential、public、bearer-only,保持默认值public。confidential需要client secret,但我们将在web应用中使用此client,web无法以安全的方式传输secret,因此必须使用public client。只要严格使用HTTPS,可以保证安全。Valid Redirect URIs输入 http://localhost:4200/* 。
认证流程:
调用示例,POST请求地址:http://localhost:8080/auth/realms/heroes/protocol/openid-connect/token :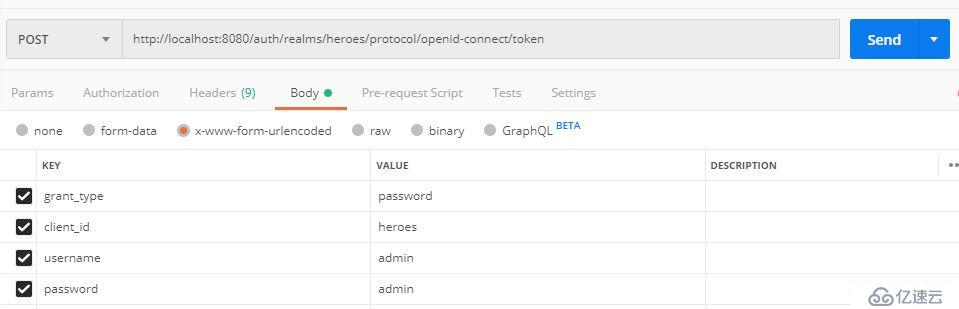
OIDC URI Endpoints
查询网址:http://localhost:8080/auth/realms/heroes/.well-known/openid-configuration ,这些Endpoint是非常有用的,比如REST调用。
Client Scope定义了协议映射关系,keycloak预定义了一些Scope,每个client会自动继承,这样就不必在client内重复定义mapper了。Client Scope分为default和optional两种, default scope会自动生效,optional scope指定使用时才生效。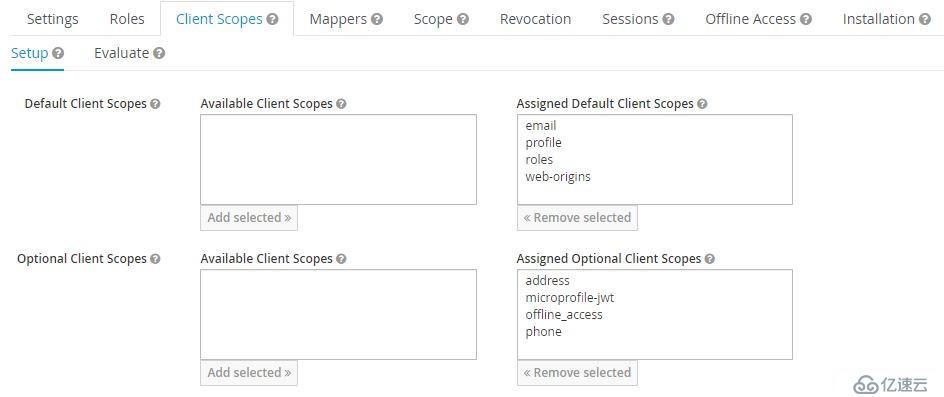
启用optional scope需要使用scope参数: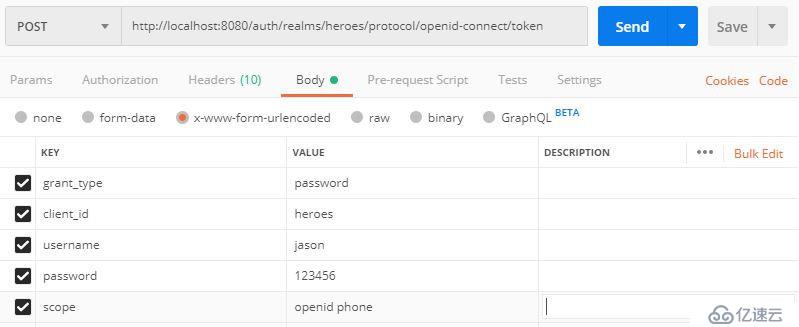
启用相应scope或配置mapper后,才能在token或userinfo中显示相应的属性。比如,上图中我们启用了phone scope,其mapper中定义了phone number: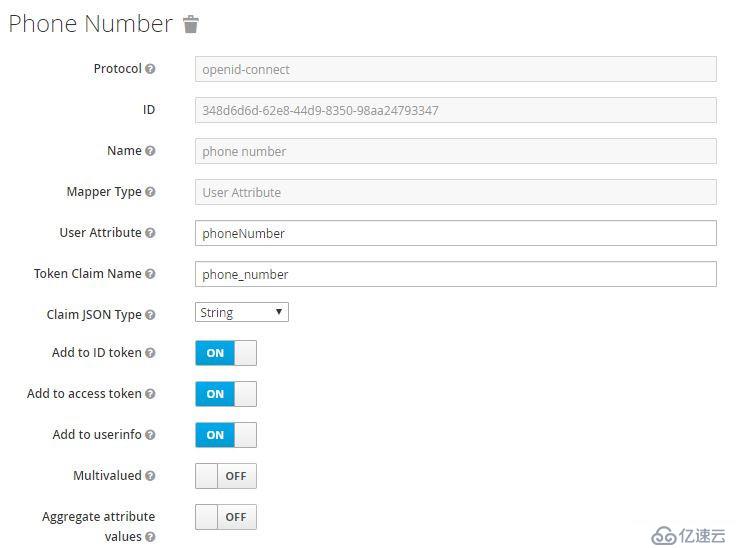
如果用户属性中定义了phoneNumber,在token中则会显示phone_number,可以在heroes client -> Client Scopes -> Evaluate查看效果: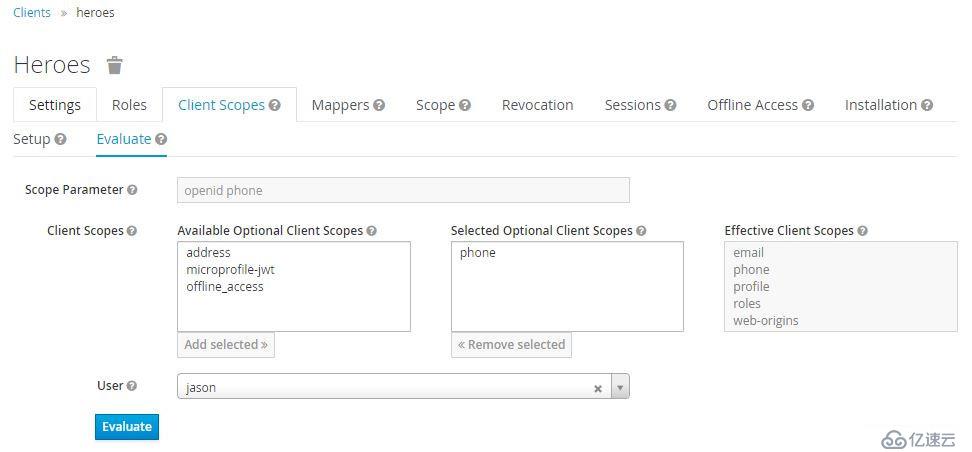
Role
Role分为两种级别:Realm、Client,默认Realm Role:offline_access、uma_authorization。
Role、Group和User的关系
User可以属于一个或多个Group,Role可以授予User和Group。
创建Realm管理用户
添加用户: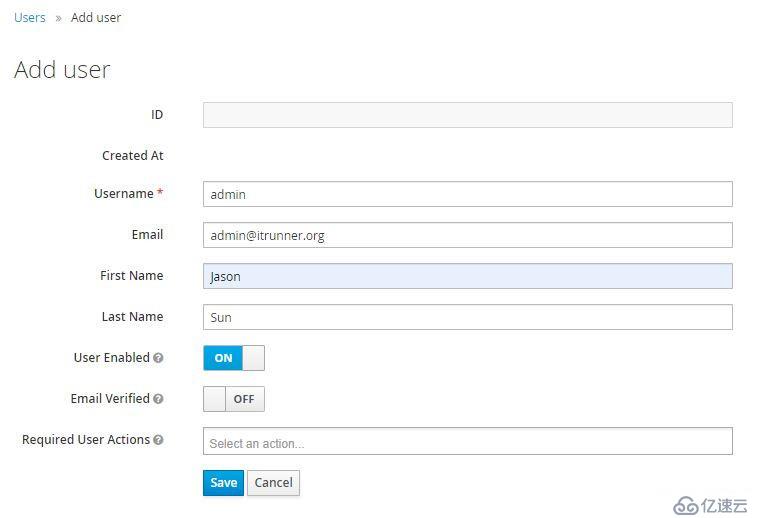
授予realm-management权限:
Keycloak预定义了Browser、Direct Grant、Registration、Reset Credentials等认证流程,用户也可自定义流程。以Brower流程为例: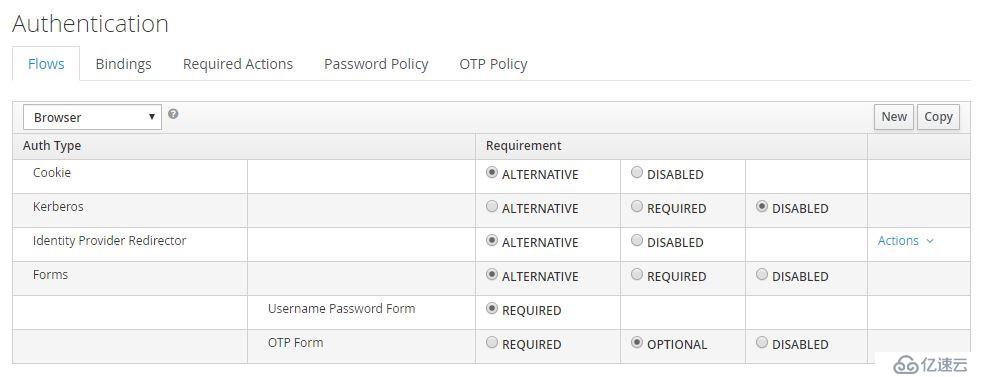
Required是必须执行的,Alternative至少须执行一个,Optional则由用户决定是否启用。Browser流程中Cookie(Session Cookie)、Identity Provider Redirector、Forms均为Alternative,因此只有前者没有验证成功才会执行后者。其中Identity Provider可以配置默认IDP;当执行Form认证时,用户名/密码是必须的,OTP为可选的。
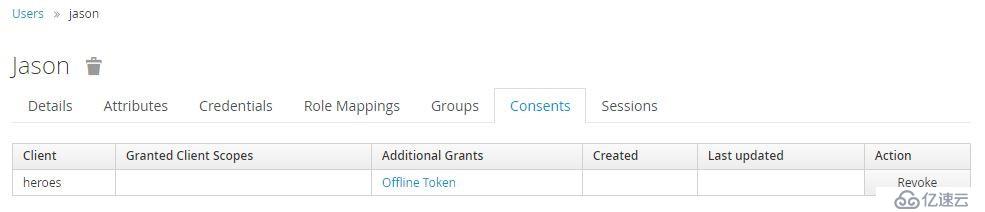
用户启用OTP的方法,登录Account Console,点击认证方,根据说明操作即可:
支持代理OpenID、SAML 2.0 IDP,支持社交登录。无论您采用什么认证方式,token都由keycloak签发,完全与外部IDP解耦,客户端不需知道keycloak与IDP使用的协议,简化了认证和授权管理。
Identity Broker Flow: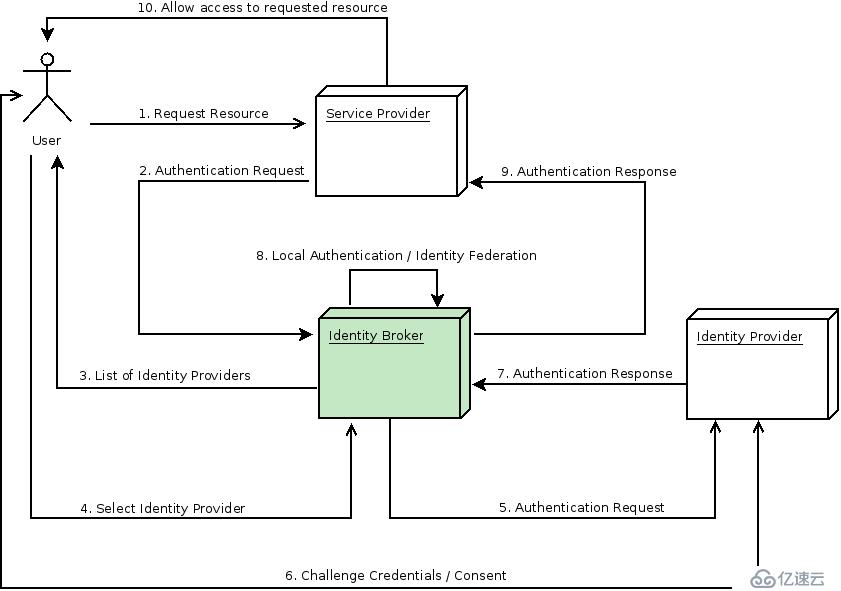
解释一下第7、8步:
IDP认证成功后,重定向到keycloak,通常返回的响应中包含一个security token。Keycloak检查response是否有效,如果有效将在keycloak创建一个新用户(如果用户已存在则跳过此步,如果IDP更新了用户信息则会同步信息),之后keycloak颁发自己的token。
Keycloak支持配置默认IDP,客户端也可以请求指定的IDP。
若要配置IDP,Keycloak需要启用SSL/HTTPS。在生产环境一般使用reverse proxy或load balancer启用HTTPS。为了演示,我们在keycloak server中配置。
$ keytool -genkey -alias sso.itrunner.org -keyalg RSA -keystore keycloak.jks -validity 10950
Enter keystore password:
Re-enter new password:
What is your first and last name?
  [Unknown]:  sso.itrunner.org
What is the name of your organizational unit?
  [Unknown]:  itrunner
What is the name of your organization?
  [Unknown]:  itrunner
What is the name of your City or Locality?
  [Unknown]:  Beijing
What is the name of your State or Province?
  [Unknown]:  Beijing
What is the two-letter country code for this unit?
  [Unknown]:  CN
Is CN=sso.itrunner.org, OU=itrunner, O=itrunner, L=Beijing, ST=Beijing, C=CN correct?
  [no]:  yes

Enter key password for <sso.itrunner.org>
        (RETURN if same as keystore password):
Re-enter new password:将keycloak.jks拷贝到configuration/目录,连接Jboss CLI后执行以下命令创建新的security-realm:
$ /core-service=management/security-realm=UndertowRealm:add()

$ /core-service=management/security-realm=UndertowRealm/server-identity=ssl:add(keystore-path=keycloak.jks, keystore-relative-to=jboss.server.config.dir, keystore-password=secret)
修改https-listener使用新创建的realm:
$ /subsystem=undertow/server=default-server/https-listener=https:write-attribute(name=security-realm, value=UndertowRealm)下面介绍如何配置SAML 2.0协议的ADFS和Salesforce IDP。
配置Keycloak Identity Provider
Identity Providers -> Add provider -> SAML v2.0: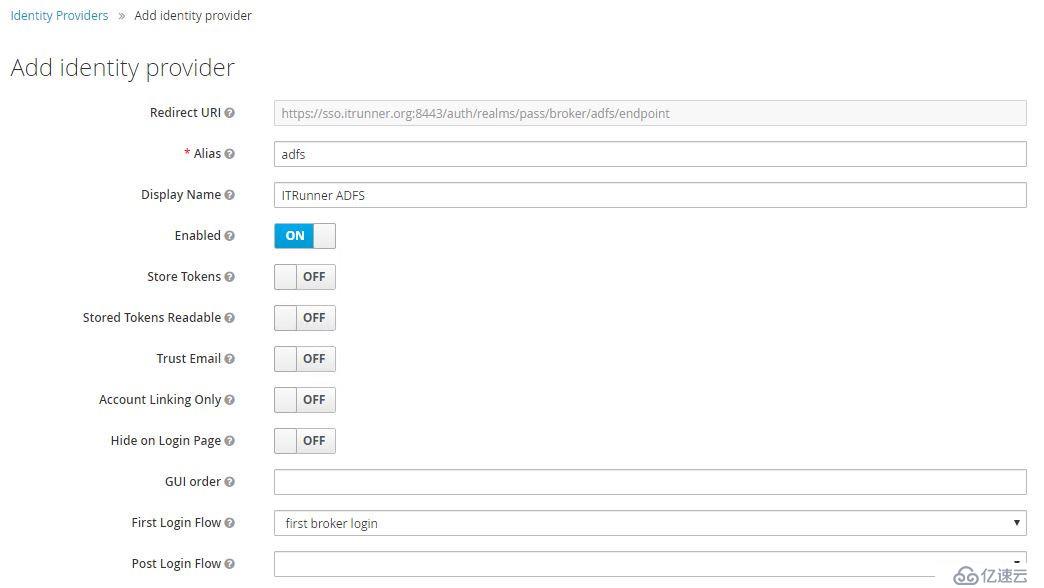
填入Alias、Display Name后滚动到底部,导入ADFS FederationMetadata: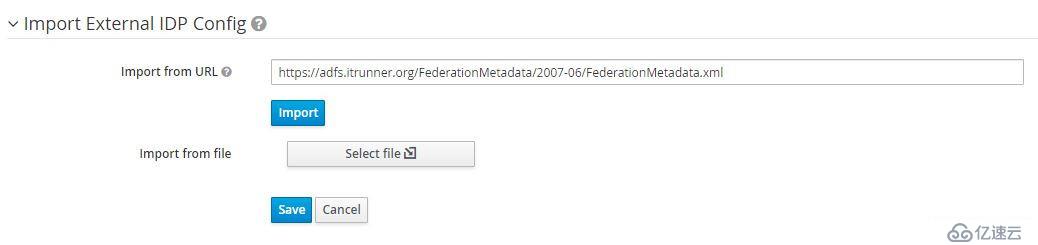
ADFS FederationMetadata地址为:https://adfs.domain.name/FederationMetadata/2007-06/FederationMetadata.xml ,也可以保存后从文件导入。
导入成功后,NameID Policy Format选择Email,启用Want AuthnRequests Signed和Validate Signature,SAML Signature Key Name选择CERT_SUBJECT。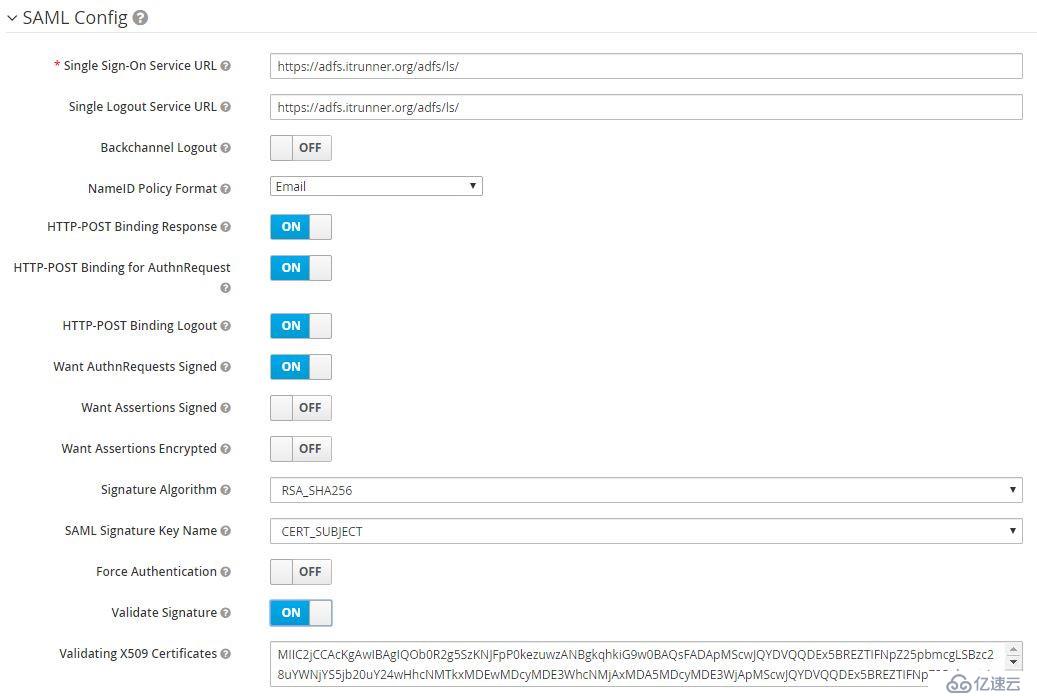
保存后配置映射关系email、firstName、lastName,使ADFS和Keycloak的用户信息相对应: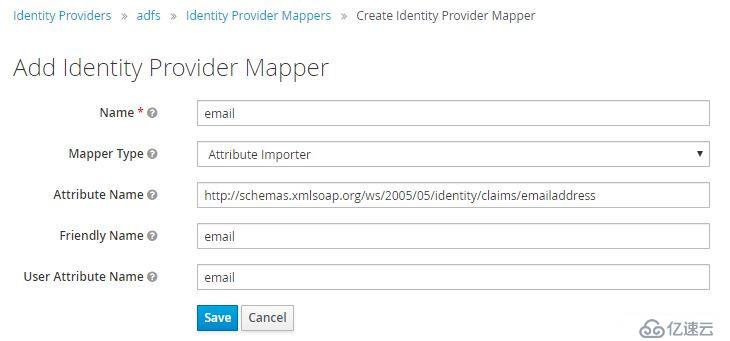
Mapper Type选择Attribute Importer,Attribute Name分别为:
email -> http://schemas.xmlsoap.org/ws/2005/05/identity/claims/emailaddress
firstName -> http://schemas.xmlsoap.org/ws/2005/05/identity/claims/givenname
lastName -> http://schemas.xmlsoap.org/ws/2005/05/identity/claims/surname
配置ADFS
先从IDP获取SAML descriptor:https://sso.itrunner.org:8443/auth/realms/heroes/broker/adfs/endpoint/descriptor ,也可以从Identity Provider -> Export下载。
进入AD FS管理控制台,右击Relying Party Trusts -> Add Relying Party Trust:
选择Claims aware -> Start: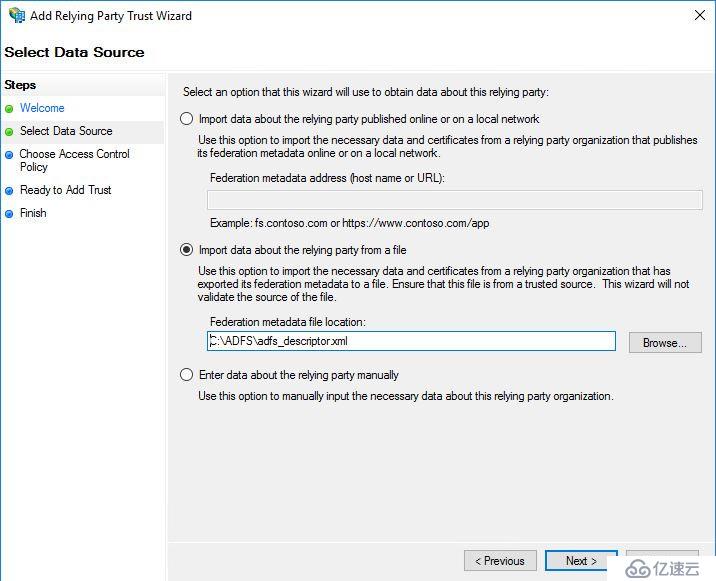
导入之前的descriptor XML文件。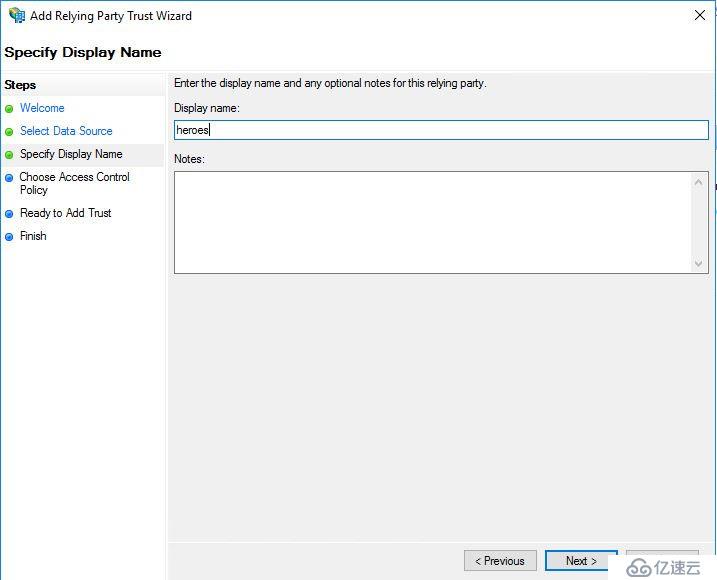
输入Display Name,接下来的设置保持默认值。
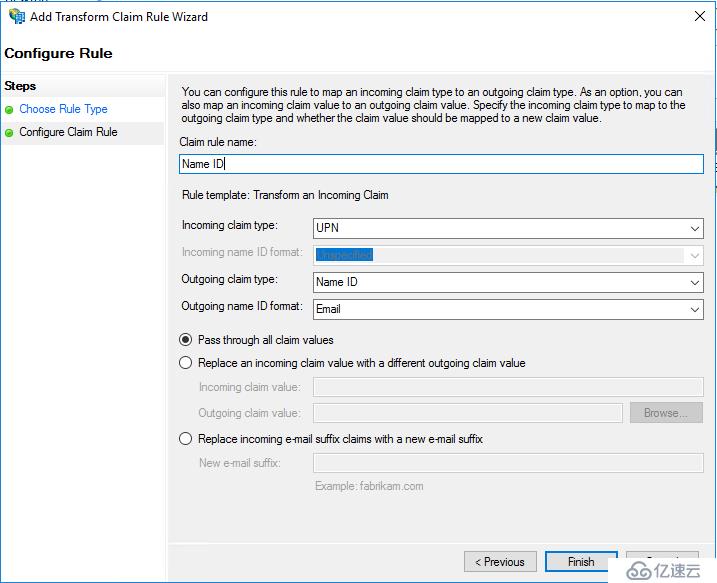
我们需要配置两个Rule:Name ID和User属性。在弹出的Edit Claim Issuance Policy窗口中点击Add Rule:
Name ID的rule template选择Transform an incoming claim:
User属性的rule template选择Send LDAP attributes as Claims,然后添加以下属性: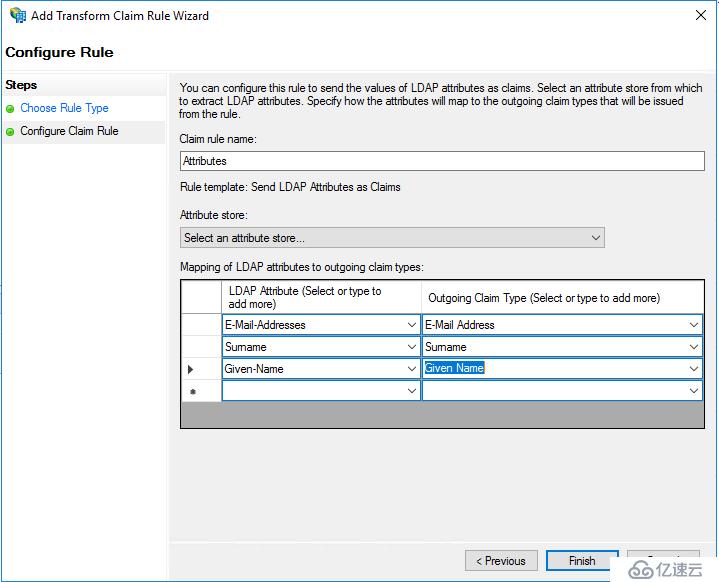
说明:如果ADFS为自签名证书,需要将证书导入Java truststore
前提,Salesforce已启用Identity Provider并分配了域名。如果未启用,依次进入 Setup -> Setttins -> Identity -> Identity Provider -> Enable。启用后点击Download Metadata下载Metadata。
配置Keycloak Identity Provider
Identity Providers -> Add provider -> SAML v2.0: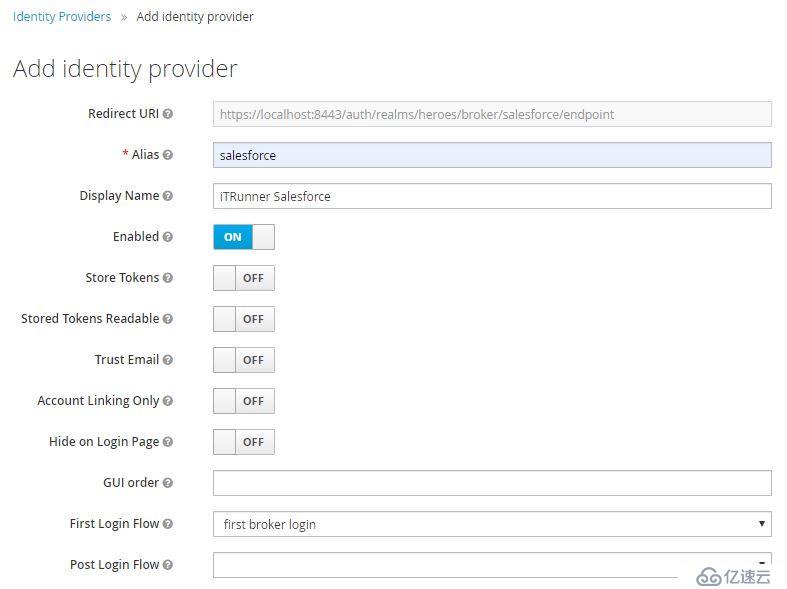
填入Alias、Display Name后滚动到底部,导入Salesforce Metadata: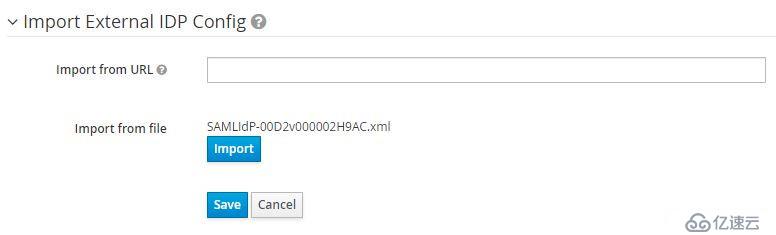
导入成功后,NameID Policy Format选择Persistent,启用Want AuthnRequests Signed和Validate Signature,SAML Signature Key Name选择KEYI_ID。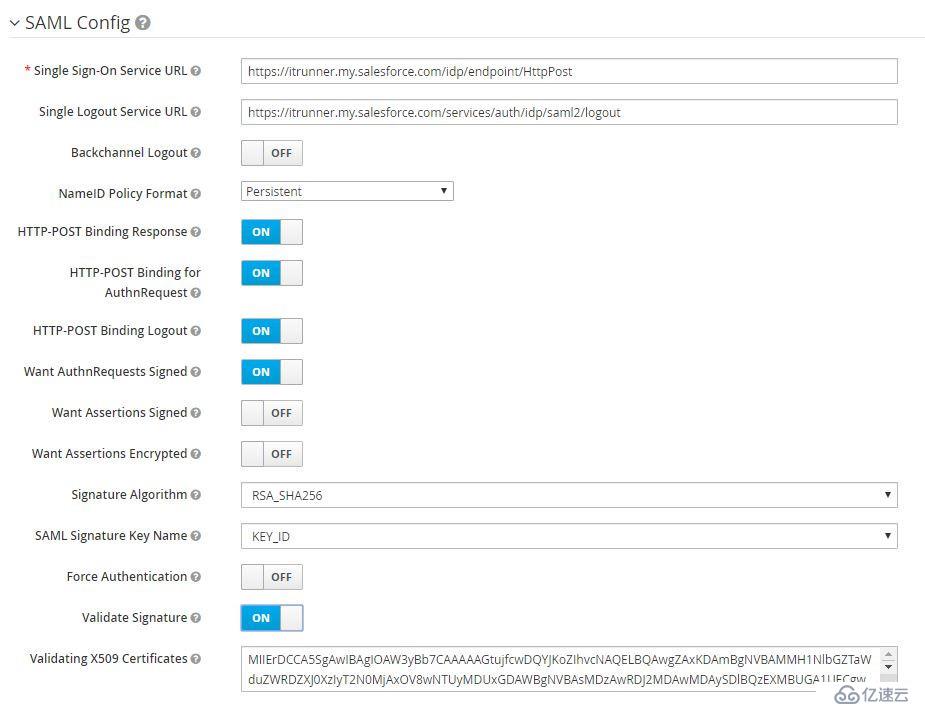
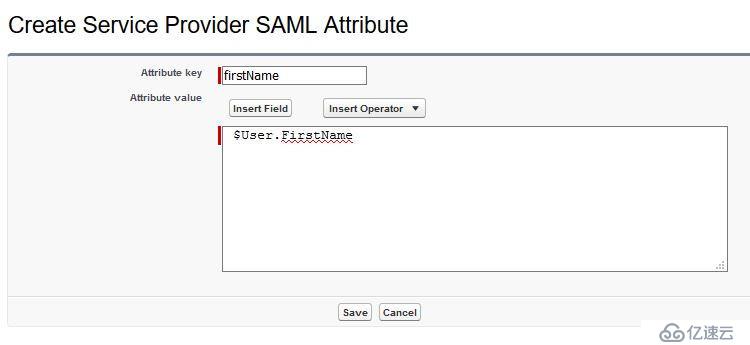
保存后配置映射关系email、firstName、lastName:
配置Salesforce Connected App
在Salesforce Identity Provider页面,点击底部Service Providers的链接"Click here",创建新的Connected App: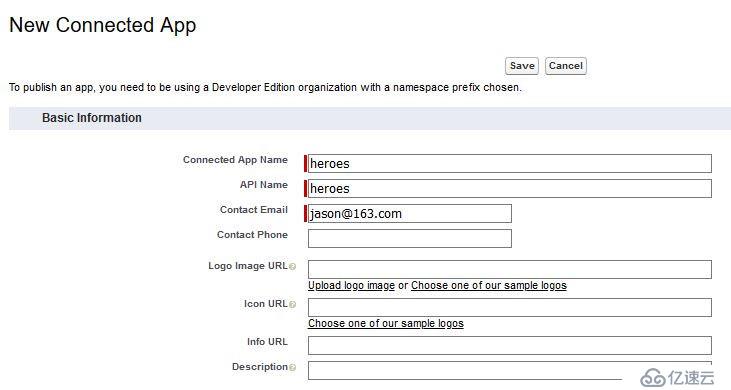
接下来配置SAML,同样先从IDP获取SAML descriptor:https://sso.itrunner.org:8443/auth/realms/heroes/broker/salesforce/endpoint/descriptor ,其中包含了下面需要的内容: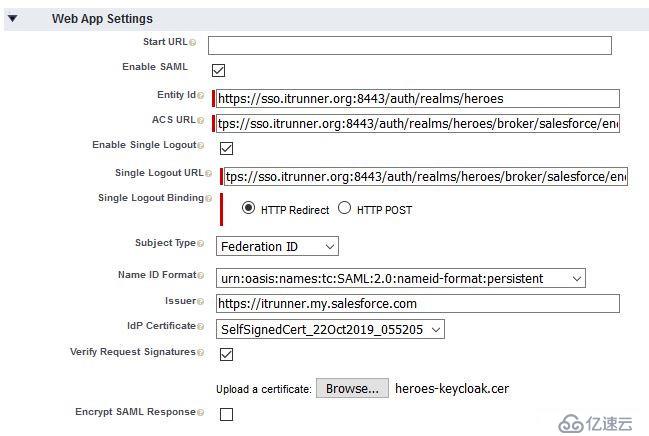
保存,然后点击页面顶部的Manage,配置Profiles和Permission Sets: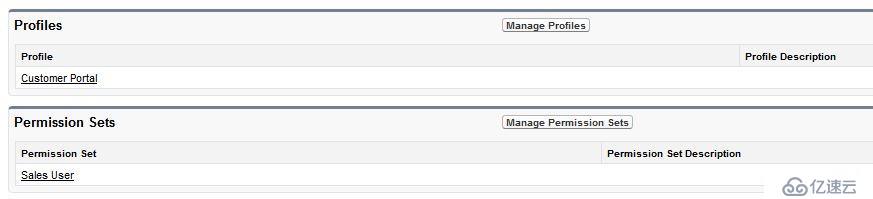
最后定义Custom Attributes:firstName、lastName: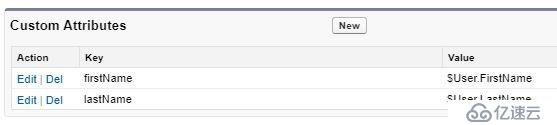
采用Keycloak结合Spring security的方式。
<dependencies>
    ...
    <dependency>
        <groupId>org.keycloak</groupId>
        <artifactId>keycloak-spring-boot-starter</artifactId>
    </dependency>
    ...
</dependencies>

<dependencyManagement>
    <dependencies>
        <dependency>
            <groupId>org.keycloak.bom</groupId>
            <artifactId>keycloak-adapter-bom</artifactId>
            <version>8.0.1</version>
            <type>pom</type>
            <scope>import</scope>
        </dependency>
    </dependencies>
</dependencyManagement>application.yml:
keycloak:
  cors: true
  cors-allowed-methods: GET,POST,DELETE,PUT,OPTIONS
  cors-allowed-headers: Accept,Accept-Encoding,Accept-Language,Authorization,Connection,Content-Type,Host,Origin,Referer,User-Agent,X-Requested-With
application-dev.yml
keycloak:
  enabled: true
  auth-server-url: http://localhost:8090/auth
  realm: heroes
  resource: heroes
  public-client: true
  bearer-only: true
application-prod.yml
keycloak:
  enabled: true
  auth-server-url: https://sso.itrunner.org/auth
  realm: heroes
  resource: heroes
  public-client: true
  ssl-required: all
  disable-trust-manager: true
bearer-only: trueKeycloak提供了便利的基类KeycloakWebSecurityConfigurerAdapter来创建WebSecurityConfigurer。
package org.itrunner.heroes.config;

import org.keycloak.adapters.springsecurity.KeycloakSecurityComponents;
import org.keycloak.adapters.springsecurity.authentication.KeycloakAuthenticationProvider;
import org.keycloak.adapters.springsecurity.client.KeycloakClientRequestFactory;
import org.keycloak.adapters.springsecurity.client.KeycloakRestTemplate;
import org.keycloak.adapters.springsecurity.config.KeycloakWebSecurityConfigurerAdapter;
import org.keycloak.adapters.springsecurity.filter.KeycloakAuthenticatedActionsFilter;
import org.keycloak.adapters.springsecurity.filter.KeycloakAuthenticationProcessingFilter;
import org.keycloak.adapters.springsecurity.filter.KeycloakPreAuthActionsFilter;
import org.keycloak.adapters.springsecurity.filter.KeycloakSecurityContextRequestFilter;
import org.keycloak.adapters.springsecurity.management.HttpSessionManager;
import org.springframework.beans.factory.annotation.Value;
import org.springframework.beans.factory.config.ConfigurableBeanFactory;
import org.springframework.boot.actuate.autoconfigure.security.servlet.EndpointRequest;
import org.springframework.boot.autoconfigure.condition.ConditionalOnMissingBean;
import org.springframework.boot.web.servlet.FilterRegistrationBean;
import org.springframework.context.annotation.Bean;
import org.springframework.context.annotation.ComponentScan;
import org.springframework.context.annotation.Scope;
import org.springframework.security.config.annotation.authentication.builders.AuthenticationManagerBuilder;
import org.springframework.security.config.annotation.web.builders.HttpSecurity;
import org.springframework.security.config.annotation.web.builders.WebSecurity;
import org.springframework.security.config.annotation.web.configuration.EnableWebSecurity;
import org.springframework.security.core.authority.mapping.SimpleAuthorityMapper;
import org.springframework.security.web.authentication.session.NullAuthenticatedSessionStrategy;
import org.springframework.security.web.authentication.session.SessionAuthenticationStrategy;

@EnableWebSecurity
@ComponentScan(basePackageClasses = KeycloakSecurityComponents.class)
public class WebSecurityConfig extends KeycloakWebSecurityConfigurerAdapter {
    private static final String ROLE_ADMIN = "ADMIN";

    @Value("${security.ignore-paths}")
    private String[] ignorePaths;

    @Value("${management.endpoints.web.exposure.include}")
    private String[] actuatorExposures;

    public final KeycloakClientRequestFactory keycloakClientRequestFactory;

    public WebSecurityConfig(KeycloakClientRequestFactory keycloakClientRequestFactory) {
        this.keycloakClientRequestFactory = keycloakClientRequestFactory;
    }

    @Override
    public void configure(WebSecurity web) {
        web.ignoring().antMatchers(ignorePaths);
    }

    @Override
    protected void configure(AuthenticationManagerBuilder auth) throws Exception {
        KeycloakAuthenticationProvider keycloakAuthenticationProvider = keycloakAuthenticationProvider();
        SimpleAuthorityMapper grantedAuthoritiesMapper = new SimpleAuthorityMapper();
        grantedAuthoritiesMapper.setConvertToUpperCase(true);
        keycloakAuthenticationProvider.setGrantedAuthoritiesMapper(grantedAuthoritiesMapper);
        auth.authenticationProvider(keycloakAuthenticationProvider);
    }

    @Override
    protected void configure(HttpSecurity http) throws Exception {
        super.configure(http);
        http.csrf().disable().authorizeRequests().requestMatchers(EndpointRequest.to(actuatorExposures)).permitAll().anyRequest().hasRole(ROLE_ADMIN);
    }

    @Bean
    @Override
    protected SessionAuthenticationStrategy sessionAuthenticationStrategy() {
        return new NullAuthenticatedSessionStrategy();
    }

    @Bean
    @Scope(ConfigurableBeanFactory.SCOPE_PROTOTYPE)
    public KeycloakRestTemplate keycloakRestTemplate() {
        return new KeycloakRestTemplate(keycloakClientRequestFactory);
    }

    @Bean
    public FilterRegistrationBean keycloakAuthenticationProcessingFilterRegistrationBean(KeycloakAuthenticationProcessingFilter filter) {
        FilterRegistrationBean registrationBean = new FilterRegistrationBean(filter);
        registrationBean.setEnabled(false);
        return registrationBean;
    }

    @Bean
    public FilterRegistrationBean keycloakPreAuthActionsFilterRegistrationBean(KeycloakPreAuthActionsFilter filter) {
        FilterRegistrationBean registrationBean = new FilterRegistrationBean(filter);
        registrationBean.setEnabled(false);
        return registrationBean;
    }

    @Bean
    public FilterRegistrationBean keycloakAuthenticatedActionsFilterBean(KeycloakAuthenticatedActionsFilter filter) {
        FilterRegistrationBean registrationBean = new FilterRegistrationBean(filter);
        registrationBean.setEnabled(false);
        return registrationBean;
    }

    @Bean
    public FilterRegistrationBean keycloakSecurityContextRequestFilterBean(KeycloakSecurityContextRequestFilter filter) {
        FilterRegistrationBean registrationBean = new FilterRegistrationBean(filter);
        registrationBean.setEnabled(false);
        return registrationBean;
    }

    @Bean
    @Override
    @ConditionalOnMissingBean(HttpSessionManager.class)
    protected HttpSessionManager httpSessionManager() {
        return new HttpSessionManager();
    }
}
说明:
KeycloakRestTemplate
@Service
public class RemoteProductService {

    @Autowired
    private KeycloakRestTemplate template;

    private String endpoint;

    public List<String> getProducts() {
        ResponseEntity<String[]> response = template.getForEntity(endpoint, String[].class);
        return Arrays.asList(response.getBody());
    }
}默认,Keycloak Spring Security Adapter将查找keycloak.json配置文件, 为确保使用Keycloak Spring Boot Adapter的配置增加KeycloakSpringBootConfigResolver:
@SpringBootApplication
@EnableJpaRepositories(basePackages = {"org.itrunner.heroes.repository"})
@EntityScan(basePackages = {"org.itrunner.heroes.domain"})
@EnableJpaAuditing
public class HeroesApplication {
    public static void main(String[] args) {
        SpringApplication.run(HeroesApplication.class, args);
    }

    @Bean
    public KeycloakSpringBootConfigResolver KeycloakConfigResolver() {
        return new KeycloakSpringBootConfigResolver();
    }
}工具类,从SecurityContext Authentication中获取登录用户的信息。
package org.itrunner.heroes.util;

import org.keycloak.KeycloakSecurityContext;
import org.keycloak.adapters.springsecurity.token.KeycloakAuthenticationToken;
import org.keycloak.representations.AccessToken;
import org.springframework.security.core.Authentication;
import org.springframework.security.core.context.SecurityContextHolder;

import java.util.Optional;

import static java.util.Optional.empty;
import static java.util.Optional.of;

public final class KeycloakContext {
    private KeycloakContext() {
    }

    public static Optional<AccessToken> getAccessToken() {
        Authentication authentication = SecurityContextHolder.getContext().getAuthentication();
        if (authentication == null || !(authentication instanceof KeycloakAuthenticationToken) || !authentication.isAuthenticated()) {
            return empty();
        }
        KeycloakSecurityContext credentials = (KeycloakSecurityContext) authentication.getCredentials();
        return of(credentials.getToken());
    }

    public static Optional<String> getUsername() {
        Optional<AccessToken> accessToken = getAccessToken();
        return accessToken.map(AccessToken::getPreferredUsername);
    }

    public static Optional<String> getEmail() {
        Optional<AccessToken> accessToken = getAccessToken();
        return accessToken.map(AccessToken::getEmail);
    }

}调用Keycloak token endpoint获取access token,然后添加到BearerAuth Header。
package org.itrunner.heroes;

import org.itrunner.heroes.domain.Hero;
import org.itrunner.heroes.exception.ErrorMessage;
import org.junit.jupiter.api.BeforeEach;
import org.junit.jupiter.api.Test;
import org.springframework.beans.factory.annotation.Autowired;
import org.springframework.boot.test.context.SpringBootTest;
import org.springframework.boot.test.context.SpringBootTest.WebEnvironment;
import org.springframework.boot.test.web.client.TestRestTemplate;
import org.springframework.http.*;
import org.springframework.util.LinkedMultiValueMap;
import org.springframework.util.MultiValueMap;

import java.util.Collections;
import java.util.HashMap;
import java.util.List;
import java.util.Map;

import static org.assertj.core.api.Assertions.assertThat;

@SpringBootTest(webEnvironment = WebEnvironment.RANDOM_PORT)
class HeroesApplicationTests {

    @Autowired
    private TestRestTemplate restTemplate;

    @BeforeEach
    void setup() {
        HttpHeaders requestHeaders = new HttpHeaders();
        requestHeaders.setContentType(MediaType.APPLICATION_FORM_URLENCODED);

        MultiValueMap<String, String> map = new LinkedMultiValueMap<>();
        map.add("grant_type", "password");
        map.add("client_id", "heroes");
        map.add("username", "admin");
        map.add("password", "admin");

        HttpEntity<MultiValueMap<String, String>> requestEntity = new HttpEntity<>(map, requestHeaders);

        Map<String, String> response = restTemplate.postForObject("http://localhost:8090/auth/realms/heroes/protocol/openid-connect/token", requestEntity, Map.class);
        String token = response.get("access_token");

        restTemplate.getRestTemplate().setInterceptors(
                Collections.singletonList((request, body, execution) -> {
                    HttpHeaders headers = request.getHeaders();
                    headers.setBearerAuth(token);
                    return execution.execute(request, body);
                }));
    }

    @Test
    void crudSuccess() {
        Hero hero = new Hero();
        hero.setName("Jack");

        // add hero
        hero = restTemplate.postForObject("/api/heroes", hero, Hero.class);
        assertThat(hero.getId()).isNotNull();

        // update hero
        hero.setName("Jacky");
        HttpEntity<Hero> requestEntity = new HttpEntity<>(hero);
        hero = restTemplate.exchange("/api/heroes", HttpMethod.PUT, requestEntity, Hero.class).getBody();
        assertThat(hero.getName()).isEqualTo("Jacky");

        // find heroes by name
        Map<String, String> urlVariables = new HashMap<>();
        urlVariables.put("name", "m");
        List<Hero> heroes = restTemplate.getForObject("/api/heroes/?name={name}", List.class, urlVariables);
        assertThat(heroes.size()).isEqualTo(5);

        // get hero by id
        hero = restTemplate.getForObject("/api/heroes/" + hero.getId(), Hero.class);
        assertThat(hero.getName()).isEqualTo("Jacky");

        // delete hero successfully
        ResponseEntity<String> response = restTemplate.exchange("/api/heroes/" + hero.getId(), HttpMethod.DELETE, null, String.class);
        assertThat(response.getStatusCodeValue()).isEqualTo(200);

        // delete hero
        response = restTemplate.exchange("/api/heroes/9999", HttpMethod.DELETE, null, String.class);
        assertThat(response.getStatusCodeValue()).isEqualTo(400);
    }

    ...
}为了mock KeycloakSecurityContext,定义WithMockKeycloakUser注解和实现类WithMockCustomUserSecurityContextFactory:
WithMockKeycloakUser
package org.itrunner.heroes.base;

import org.springframework.security.test.context.support.WithSecurityContext;

import java.lang.annotation.Retention;
import java.lang.annotation.RetentionPolicy;

@Retention(RetentionPolicy.RUNTIME)
@WithSecurityContext(factory = WithMockCustomUserSecurityContextFactory.class)
public @interface WithMockKeycloakUser {
    String username() default "admin";

    String email() default "admin@itrunner.org";

    String[] roles() default {"USER", "ADMIN"};
}
WithMockCustomUserSecurityContextFactory
package org.itrunner.heroes.base;

import org.keycloak.KeycloakPrincipal;
import org.keycloak.adapters.RefreshableKeycloakSecurityContext;
import org.keycloak.adapters.spi.KeycloakAccount;
import org.keycloak.adapters.springsecurity.account.SimpleKeycloakAccount;
import org.keycloak.adapters.springsecurity.token.KeycloakAuthenticationToken;
import org.keycloak.representations.AccessToken;
import org.springframework.security.core.Authentication;
import org.springframework.security.core.GrantedAuthority;
import org.springframework.security.core.authority.SimpleGrantedAuthority;
import org.springframework.security.core.context.SecurityContext;
import org.springframework.security.core.context.SecurityContextHolder;
import org.springframework.security.test.context.support.WithSecurityContextFactory;

import java.util.ArrayList;
import java.util.HashSet;
import java.util.List;

public class WithMockCustomUserSecurityContextFactory implements WithSecurityContextFactory<WithMockKeycloakUser> {
    @Override
    public SecurityContext createSecurityContext(WithMockKeycloakUser keycloakUser) {
        AccessToken accessToken = new AccessToken();
        accessToken.setPreferredUsername(keycloakUser.username());
        accessToken.setEmail(keycloakUser.email());
        accessToken.expiration(Integer.MAX_VALUE);
        accessToken.setScope("openid profile email");
        accessToken.type("Bearer");

        RefreshableKeycloakSecurityContext keycloakSecurityContext = new RefreshableKeycloakSecurityContext(null, null, "access-token-string", accessToken, null, null, null);
        KeycloakPrincipal<RefreshableKeycloakSecurityContext> principal = new KeycloakPrincipal<>("user-id", keycloakSecurityContext);

        HashSet<String> roles = new HashSet<>();
        List<GrantedAuthority> grantedAuthorities = new ArrayList<>();
        for (String role : keycloakUser.roles()) {
            roles.add(role);
            grantedAuthorities.add(new SimpleGrantedAuthority("ROLE_" + role));
        }
        KeycloakAccount account = new SimpleKeycloakAccount(principal, roles, keycloakSecurityContext);
        Authentication auth = new KeycloakAuthenticationToken(account, false, grantedAuthorities);

        SecurityContext context = SecurityContextHolder.createEmptyContext();
        context.setAuthentication(auth);
        return context;
    }
}
注意,WebSecurityConfig中我们使用了SimpleAuthorityMapper,这里要使用SimpleGrantedAuthority。
测试示例
package org.itrunner.heroes.controller;

import org.itrunner.heroes.base.WithMockKeycloakUser;
import org.itrunner.heroes.domain.Hero;
import org.junit.jupiter.api.Test;
import org.springframework.beans.factory.annotation.Autowired;
import org.springframework.boot.test.autoconfigure.web.servlet.AutoConfigureMockMvc;
import org.springframework.boot.test.context.SpringBootTest;
import org.springframework.http.MediaType;
import org.springframework.test.web.servlet.MockMvc;

import static org.itrunner.heroes.util.JsonUtils.asJson;
import static org.springframework.test.web.servlet.request.MockMvcRequestBuilders.*;
import static org.springframework.test.web.servlet.result.MockMvcResultMatchers.content;
import static org.springframework.test.web.servlet.result.MockMvcResultMatchers.status;

@SpringBootTest
@AutoConfigureMockMvc
class HeroControllerTest {
    @Autowired
    private MockMvc mvc;

    @Test
    @WithMockKeycloakUser
    public void crudSuccess() throws Exception {
        Hero hero = new Hero();
        hero.setName("Jack");

        // add hero
        mvc.perform(post("/api/heroes").content(asJson(hero)).contentType(MediaType.APPLICATION_JSON).accept(MediaType.APPLICATION_JSON))
                .andExpect(status().isOk()).andExpect(content().json("{'id':11, 'name':'Jack', 'createBy':'admin'}"));

        // update hero
        hero.setId(11l);
        hero.setName("Jacky");
        mvc.perform(put("/api/heroes").content(asJson(hero)).contentType(MediaType.APPLICATION_JSON).accept(MediaType.APPLICATION_JSON))
                .andExpect(status().isOk()).andExpect(content().json("{'name':'Jacky'}"));

        // find heroes by name
        mvc.perform(get("/api/heroes/?name=m").accept(MediaType.APPLICATION_JSON))
                .andExpect(status().isOk());

        // get hero by id
        mvc.perform(get("/api/heroes/11").accept(MediaType.APPLICATION_JSON))
                .andExpect(status().isOk()).andExpect(content().json("{'name':'Jacky'}"));

        // delete hero successfully
        mvc.perform(delete("/api/heroes/11").accept(MediaType.APPLICATION_JSON))
                .andExpect(status().isOk());

        // delete hero
        mvc.perform(delete("/api/heroes/9999")).andExpect(status().is4xxClientError());
    }

    @Test
    @WithMockKeycloakUser
    void addHeroValidationFailed() throws Exception {
        Hero hero = new Hero();
        mvc.perform(post("/api/heroes").content(asJson(hero)).contentType(MediaType.APPLICATION_JSON))
                .andExpect(status().is(400));
    }
}引入keycloak-js,版本要与Keycloak Server一致。
...
"keycloak-js": "8.0.1",
...KeycloakService创建Keycloak实例,提供与Keycloak交互的基本方法。
import {Injectable} from '@angular/core';
import {HttpHeaders} from '@angular/common/http';
import {Observable} from 'rxjs';
import {ExcludedUrl, ExcludedUrlRegex, KeycloakOptions} from './keycloak-options';
import * as Keycloak from 'keycloak-js';

@Injectable({providedIn: 'root'})
export class KeycloakService {
  private keycloak: Keycloak.KeycloakInstance;
  private userProfile: Keycloak.KeycloakProfile;
  private loadUserProfileAtStartUp: boolean;
  private _enableBearerInterceptor: boolean;
  private _excludedUrls: ExcludedUrlRegex[];

  /**
   * Keycloak initialization. It should be called to initialize the adapter.
   * Options is a object with 2 main parameters: config and initOptions. The first one will be used to create the Keycloak instance.
   * The second one are options to initialize the keycloak instance.
   *
   * @param options
   * Config: may be a string representing the keycloak URI or an object with the following content:
   * - url: Keycloak json URL
   * - realm: realm name
   * - clientId: client id
   *
   * initOptions:
   * - onLoad: Specifies an action to do on load. Supported values are 'login-required' or 'check-sso'.
   * - token: Set an initial value for the token.
   * - refreshToken: Set an initial value for the refresh token.
   * - idToken: Set an initial value for the id token (only together with token or refreshToken).
   * - timeSkew: Set an initial value for skew between local time and Keycloak server in seconds(only together with token or refreshToken).
   * - checkLoginIframe: Set to enable/disable monitoring login state (default is true).
   * - checkLoginIframeInterval: Set the interval to check login state (default is 5 seconds).
   * - responseMode: Set the OpenID Connect response mode send to Keycloak server at login request.
   * Valid values are query or fragment . Default value is fragment, which means that after successful authentication will Keycloak redirect to
   * javascript application with OpenID Connect parameters added in URL fragment. This is generally safer and recommended over query.
   * - flow: Set the OpenID Connect flow. Valid values are standard, implicit or hybrid.
   *
   * enableBearerInterceptor: Flag to indicate if the bearer will added to the authorization header.
   *
   * loadUserProfileInStartUp: Indicates that the user profile should be loaded at the keycloak initialization, just after the login.
   *
   * bearerExcludedUrls: String Array to exclude the urls that should not have the Authorization Header automatically added.
   *
   * @returns A Promise with a boolean indicating if the initialization was successful.
   */
  init(options: KeycloakOptions = {}): Promise<boolean> {
    return new Promise((resolve, reject) => {
      this.initServiceValues(options);

      const {config, initOptions} = options;

      this.keycloak = Keycloak(config);

      this.keycloak.init(initOptions)
        .success(async authenticated => {
          if (authenticated && this.loadUserProfileAtStartUp) {
            await this.loadUserProfile();
          }
          resolve(authenticated);
        })
        .error((kcError) => {
          let msg = 'An error happened during Keycloak initialization.';
          if (kcError) {
            msg = msg.concat(`\nAdapter error details:\nError: ${kcError.error}\nDescription: ${kcError.error_description}`
            );
          }
          reject(msg);
        });
    });
  }

  /**
   * Loads all bearerExcludedUrl content in a uniform type: ExcludedUrl,
   * so it becomes easier to handle.
   *
   * @param bearerExcludedUrls array of strings or ExcludedUrl that includes
   * the url and HttpMethod.
   */
  private loadExcludedUrls(bearerExcludedUrls: (string | ExcludedUrl)[]): ExcludedUrlRegex[] {
    const excludedUrls: ExcludedUrlRegex[] = [];
    for (const item of bearerExcludedUrls) {
      let excludedUrl: ExcludedUrlRegex;
      if (typeof item === 'string') {
        excludedUrl = {urlPattern: new RegExp(item, 'i'), httpMethods: []};
      } else {
        excludedUrl = {
          urlPattern: new RegExp(item.url, 'i'),
          httpMethods: item.httpMethods
        };
      }
      excludedUrls.push(excludedUrl);
    }
    return excludedUrls;
  }

  /**
   * Handles the class values initialization.
   */
  private initServiceValues({enableBearerInterceptor = true, loadUserProfileAtStartUp = true, bearerExcludedUrls = []}): void {
    this._enableBearerInterceptor = enableBearerInterceptor;
    this.loadUserProfileAtStartUp = loadUserProfileAtStartUp;
    this._excludedUrls = this.loadExcludedUrls(bearerExcludedUrls);
  }

  /**
   * Redirects to login form
   */
  login(options: Keycloak.KeycloakLoginOptions = {}): Promise<void> {
    return new Promise((resolve, reject) => {
      this.keycloak.login(options)
        .success(async () => {
          if (this.loadUserProfileAtStartUp) {
            await this.loadUserProfile();
          }
          resolve();
        })
        .error(() => reject(`An error happened during the login.`));
    });
  }

  /**
   * Redirects to logout.
   *
   * @param redirectUri Specifies the uri to redirect to after logout.
   * @returns A void Promise if the logout was successful, cleaning also the userProfile.
   */
  logout(redirectUri?: string): Promise<void> {
    return new Promise((resolve, reject) => {
      const options: any = {redirectUri};

      this.keycloak.logout(options)
        .success(() => {
          this.userProfile = undefined;
          resolve();
        })
        .error(() => reject('An error happened during logout.'));
    });
  }

  /**
   * Redirects to the Account Management Console
   */
  account() {
    this.keycloak.accountManagement();
  }

  /**
   * Check if the user has access to the specified role.
   *
   * @param role role name
   * @param resource resource name If not specified, `clientId` is used
   * @returns A boolean meaning if the user has the specified Role.
   */
  hasRole(role: string, resource?: string): boolean {
    let hasRole: boolean;

    hasRole = this.keycloak.hasResourceRole(role, resource);
    if (!hasRole) {
      hasRole = this.keycloak.hasRealmRole(role);
    }
    return hasRole;
  }

  /**
   * Check if user is logged in.
   *
   * @returns A boolean that indicates if the user is logged in.
   */
  async isLoggedIn(): Promise<boolean> {
    try {
      if (!this.keycloak.authenticated) {
        return false;
      }
      await this.updateToken(20);
      return true;
    } catch (error) {
      return false;
    }
  }

  /**
   * Returns true if the token has less than minValidity seconds left before it expires.
   *
   * @param minValidity Seconds left. (minValidity) is optional. Default value is 0.
   * @returns Boolean indicating if the token is expired.
   */
  isTokenExpired(minValidity: number = 0): boolean {
    return this.keycloak.isTokenExpired(minValidity);
  }

  /**
   * If the token expires within minValidity seconds the token is refreshed. If the
   * session status iframe is enabled, the session status is also checked.
   * Returns a promise telling if the token was refreshed or not. If the session is not active
   * anymore, the promise is rejected.
   *
   * @param minValidity Seconds left. (minValidity is optional, if not specified 5 is used)
   * @returns Promise with a boolean indicating if the token was successfully updated.
   */
  updateToken(minValidity: number = 5): Promise<boolean> {
    return new Promise(async (resolve, reject) => {
      if (!this.keycloak) {
        reject('Keycloak Angular library is not initialized.');
        return;
      }

      this.keycloak.updateToken(minValidity)
        .success(refreshed => {
          resolve(refreshed);
        })
        .error(() => reject('Failed to refresh the token, or the session is expired'));
    });
  }

  /**
   * Returns the authenticated token, calling updateToken to get a refreshed one if
   * necessary. If the session is expired this method calls the login method for a new login.
   *
   * @returns Promise with the generated token.
   */
  getToken(): Promise<string> {
    return new Promise(async (resolve) => {
      try {
        await this.updateToken(10);
        resolve(this.keycloak.token);
      } catch (error) {
        this.login();
      }
    });
  }

  /**
   * Loads the user profile.
   * Returns promise to set functions to be invoked if the profile was loaded
   * successfully, or if the profile could not be loaded.
   *
   * @param forceReload
   * If true will force the loadUserProfile even if its already loaded.
   * @returns
   * A promise with the KeycloakProfile data loaded.
   */
  loadUserProfile(forceReload: boolean = false): Promise<Keycloak.KeycloakProfile> {
    return new Promise(async (resolve, reject) => {
      if (this.userProfile && !forceReload) {
        resolve(this.userProfile);
        return;
      }

      if (!this.keycloak.authenticated) {
        reject('The user profile was not loaded as the user is not logged in.');
        return;
      }

      this.keycloak.loadUserProfile()
        .success(result => {
          this.userProfile = result as Keycloak.KeycloakProfile;
          resolve(this.userProfile);
        })
        .error(() => reject('The user profile could not be loaded.'));
    });
  }

  /**
   * Returns the logged username.
   */
  getUsername(): string {
    if (!this.userProfile) {
      throw new Error('User not logged in or user profile was not loaded.');
    }

    return this.userProfile.username;
  }

  /**
   * Returns email of the logged user
   */
  getUserEmail(): string {
    if (!this.userProfile) {
      throw new Error('User not logged in or user profile was not loaded.');
    }

    return this.userProfile.email;
  }

  /**
   * Clear authentication state, including tokens. This can be useful if application
   * has detected the session was expired, for example if updating token fails.
   * Invoking this results in onAuthLogout callback listener being invoked.
   */
  clearToken(): void {
    this.keycloak.clearToken();
  }

  /**
   * Adds a valid token in header. The key & value format is: Authorization Bearer <token>.
   * If the headers param is undefined it will create the Angular headers object.
   *
   * @param headers Updated header with Authorization and Keycloak token.
   * @returns An observable with the HTTP Authorization header and the current token.
   */
  addTokenToHeader(headers: HttpHeaders = new HttpHeaders()): Observable<HttpHeaders> {
    return new Observable((observer) => {
      this.getToken().then(token => {
        headers = headers.set('Authorization', 'bearer ' + token);
        observer.next(headers);
        observer.complete();
      }).catch(error => {
        observer.error(error);
      });
    });
  }

  get enableBearerInterceptor(): boolean {
    return this._enableBearerInterceptor;
  }

  get excludedUrls(): ExcludedUrlRegex[] {
    return this._excludedUrls;
  }
}创建Keycloak实例时若未提供config参数,则将使用keycloak.json。为适用不同的环境,我们在environment中配置Keycloak参数。
environment.ts
export const environment = {
  production: false,
  apiUrl: 'http://localhost:8080',
  keycloak: {
    config: {
      url: 'http://localhost:8090/auth',
      realm: 'heroes',
      clientId: 'heroes'
    },
    initOptions: {
      onLoad: 'login-required',
      checkLoginIframe: false
    },
    enableBearerInterceptor: true,
    loadUserProfileAtStartUp: true,
    bearerExcludedUrls: ['/assets']
  }
};
environment.prod.ts
export const environment = {
  production: true,
  apiUrl: 'http://heroes-api.apps.itrunner.org',
  keycloak: {
    config: {
      url: 'https://sso.itrunner.org/auth',
      realm: 'heroes',
      clientId: 'heroes'
    },
    initOptions: {
      onLoad: 'login-required',
      checkLoginIframe: false
    },
    enableBearerInterceptor: true,
    loadUserProfileAtStartUp: true,
    bearerExcludedUrls: ['/assets']
  }
};
参数说明:
为HTTP请求添加bearer token。
import {Injectable} from '@angular/core';
import {HttpEvent, HttpHandler, HttpInterceptor, HttpRequest} from '@angular/common/http';
import {Observable} from 'rxjs';
import {KeycloakService} from './keycloak.service';
import {mergeMap} from 'rxjs/operators';
import {ExcludedUrlRegex} from './keycloak-options';

@Injectable()
export class KeycloakBearerInterceptor implements HttpInterceptor {
  constructor(private keycloakService: KeycloakService) {
  }

  intercept(req: HttpRequest<any>, next: HttpHandler): Observable<HttpEvent<any>> {
    const {enableBearerInterceptor, excludedUrls} = this.keycloakService;
    if (!enableBearerInterceptor) {
      return next.handle(req);
    }

    const shallPass: boolean = excludedUrls.findIndex(item => this.isUrlExcluded(req, item)) > -1;
    if (shallPass) {
      return next.handle(req);
    }

    return this.keycloakService.addTokenToHeader(req.headers).pipe(
      mergeMap(headersWithBearer => {
        const kcReq = req.clone({headers: headersWithBearer});
        return next.handle(kcReq);
      })
    );
  }

  /**
   * Checks if the url is excluded from having the Bearer Authorization header added.
   *
   * @param req http request from @angular http module.
   * @param excludedUrlRegex contains the url pattern and the http methods,
   * excluded from adding the bearer at the Http Request.
   */
  private isUrlExcluded({method, url}: HttpRequest<any>, {urlPattern, httpMethods}: ExcludedUrlRegex): boolean {
    const httpTest = httpMethods.length === 0 || httpMethods.join().indexOf(method.toUpperCase()) > -1;
    const urlTest = urlPattern.test(url);

    return httpTest && urlTest;
  }
}import {Injectable} from '@angular/core';
import {ActivatedRouteSnapshot, CanActivate, Router, RouterStateSnapshot} from '@angular/router';
import {KeycloakService} from './keycloak.service';
@Injectable({providedIn: 'root'})
export class CanActivateAuthGuard implements CanActivate {
constructor(private router: Router, private keycloakService: KeycloakService) {
}
canActivate(route: ActivatedRouteSnapshot, state: RouterStateSnapshot): Promise<boolean> {
return new Promise(async (resolve) => {
const authenticated = await this.keycloakService.isLoggedIn();
if (authenticated) {
resolve(true);
} else {
this.keycloakService.login();
resolve(false);
}
});
}
}为提高性能,在app.module.ts中初始化KeycloakService。
...
export function initKeycloak(keycloak: KeycloakService): () => Promise<any> {
  return (): Promise<any> => {
    return new Promise(async (resolve, reject) => {
      try {
        // @ts-ignore
        await keycloak.init(environment.keycloak);
        resolve();
      } catch (error) {
        reject(error);
      }
    });
  };
}
...

  providers: [
    [
      {provide: APP_INITIALIZER, useFactory: initKeycloak, deps: [KeycloakService], multi: true},
      {provide: HTTP_INTERCEPTORS, useClass: KeycloakBearerInterceptor, multi: true},
      ...
    ]
  ],
...Angular与Keycloak集成完毕,启动服务后访问页面会自动跳转到Keycloak登录界面: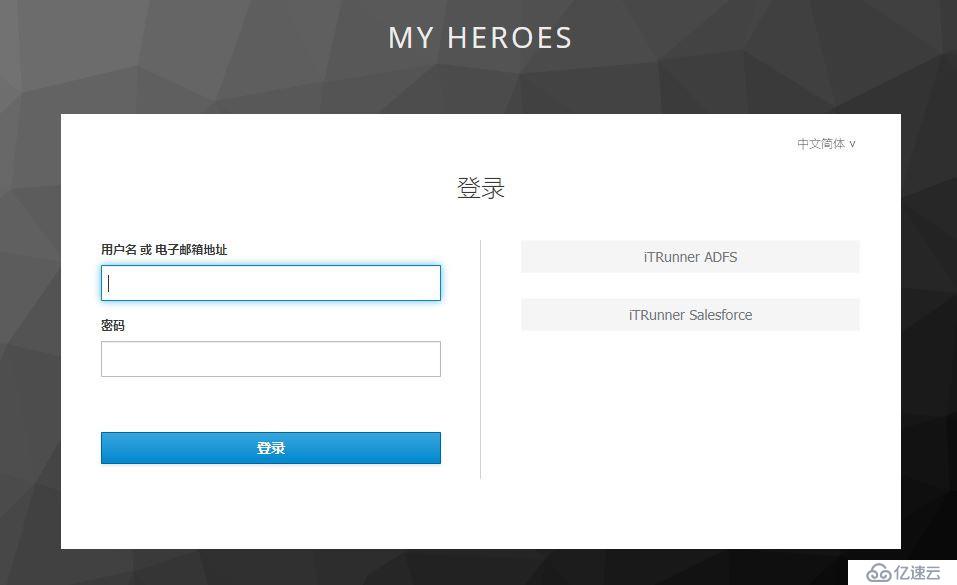
用户可以直接输入用户名/密码、可以选择IDP登录。
配置Keycloak IDP时可以控制是否在登录界面显示,认证流程中可以设置默认IDP,客户端调用时可以指定IDP,多种方式灵活组合可以满足不同需求。
指定IDP,Angular调用时仅需指定idpHint参数,其值为IDP的alias:
keycloakService.login({idpHint: 'adfs'});keycloak.conf
ServerTokens Prod
Header always set Strict-Transport-Security "max-age=8640000; includeSubDomains; preload"
Header always append X-Frame-Options SAMEORIGIN

<VirtualHost *:443>
    ServerName   sso.itrunner.org
    ServerAlias  sso.itrunner.org
    ErrorLog     logs/keycloak_error_log
    TransferLog  logs/keycloak_access_log
    LogLevel warn

    SSLEngine on
    SSLProtocol all -SSLv2 -SSLv3
    SSLCipherSuite HIGH:3DES:!aNULL:!MD5:!SEED:!IDEA
    SSLCertificateFile /etc/pki/tls/certs/ca.crt
    SSLCertificateKeyFile /etc/pki/tls/private/ca.key

    RewriteEngine On
    RewriteCond %{DOCUMENT_ROOT}%{REQUEST_URI} -f [OR]
    RewriteCond %{DOCUMENT_ROOT}%{REQUEST_URI} -d
    RewriteRule ^ - [L]

    ProxyPreserveHost on
    ProxyPass /auth http://127.0.0.1:8080/auth timeout=600
    ProxyPa***everse /auth http://127.0.0.1:8080/auth
</VirtualHost>Keycloak
AD FS Docs
Salesforce Identity Providers and Service Providers
A Quick Guide to Using Keycloak with Spring Boot
How to Setup MS AD FS 3.0 as Brokered Identity Provider in Keycloak
免责声明:本站发布的内容(图片、视频和文字)以原创、转载和分享为主,文章观点不代表本网站立场,如果涉及侵权请联系站长邮箱:is@yisu.com进行举报,并提供相关证据,一经查实,将立刻删除涉嫌侵权内容。


