本篇内容主要讲解“linux做防火墙时如何运用iptables进行NAT地址转换”,感兴趣的朋友不妨来看看。本文介绍的方法操作简单快捷,实用性强。下面就让小编来带大家学习“linux做防火墙时如何运用iptables进行NAT地址转换”吧!
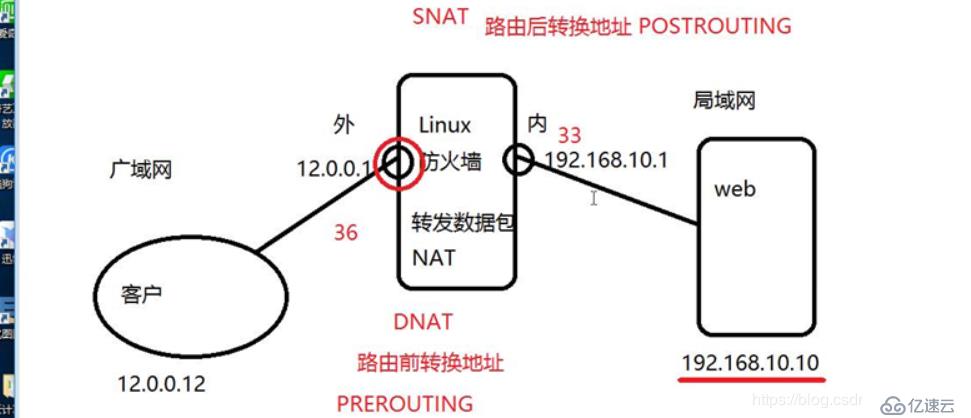
DNAT地址转换,客户机访问服务端
SNAT地址转化,服务端访问客户机
注意:配置网卡要全都配置为仅主机模式
[root@localhost ~]# cd /etc/sysconfig/network-scripts/
[root@localhost network-scripts]# cp -p ifcfg-ens33 ifcfg-ens36
[root@localhost network-scripts]# vim ifcfg-ens33
[root@localhost network-scripts]# vim ifcfg-ens36
[root@localhost network-scripts]# systemctl restart network
[root@localhost network-scripts]# ifconfig
ens33: flags=4163<UP,BROADCAST,RUNNING,MULTICAST>  mtu 1500
        inet 192.168.10.1  netmask 255.255.255.0  broadcast 192.168.10.255

ens36: flags=4163<UP,BROADCAST,RUNNING,MULTICAST>  mtu 1500
        inet 12.0.0.1  netmask 255.255.255.0  broadcast 12.0.0.255
web服务端:
仅主机模式,修改网卡
[root@localhost ~]# vim /etc/sysconfig/network-scripts/ifcfg-ens33
[root@localhost ~]# systemctl restart network
[root@localhost ~]# ifconfig
ens33: flags=4163<UP,BROADCAST,RUNNING,MULTICAST>  mtu 1500
        inet 192.168.10.10  netmask 255.255.255.0  broadcast 192.168.10.255
ping 防火墙验证是否互联互通
[root@localhost ~]# ping 192.168.10.1
PING 192.168.10.1 (192.168.10.1) 56(84) bytes of data.
64 bytes from 192.168.10.1: icmp_seq=1 ttl=64 time=2.09 ms
64 bytes from 192.168.10.1: icmp_seq=2 ttl=64 time=0.903 ms
64 bytes from 192.168.10.1: icmp_seq=3 ttl=64 time=0.984 ms
^C
--- 192.168.10.1 ping statistics ---
3 packets transmitted, 3 received, 0% packet loss, time 2003ms
rtt min/avg/max/mdev = 0.903/1.325/2.090/0.543 ms
[root@localhost ~]#
搭建web服务
[root@localhost ~]# yum install httpd -y
[root@localhost ~]# vim /etc/httpd/conf/httpd.conf
 41 Listen 192.168.10.10:80
 42 #Listen 80
95 ServerName www.kgc.com:80
[root@localhost ~]# systemctl stop firewalld.service
[root@localhost ~]# setenforce 0
[root@localhost ~]# systemctl start httpd
[root@localhost ~]# netstat -natp | grep httpd
tcp        0      0 192.168.10.10:80        0.0.0.0:*               LISTEN      9437/httpd
客户端配置ip地址:
此时可以临时把防火墙主机的防火墙给关掉,测试是否互联互通,然后再开启
C:\Users\GSY>ipconfig

Windows IP 配置

以太网适配器 Ethernet0:

   连接特定的 DNS 后缀 . . . . . . . :
   本地链接 IPv6 地址. . . . . . . . : fe80::3407:c668:fbd0:9316%3
   IPv4 地址 . . . . . . . . . . . . : 12.0.0.12
   子网掩码  . . . . . . . . . . . . : 255.255.255.0
   默认网关. . . . . . . . . . . . . : 12.0.0.1
   C:\Users\GSY>ping 12.0.0.1

正在 Ping 12.0.0.1 具有 32 字节的数据:
来自 12.0.0.1 的回复: 字节=32 时间=7ms TTL=64
来自 12.0.0.1 的回复: 字节=32 时间<1ms TTL=64
来自 12.0.0.1 的回复: 字节=32 时间<1ms TTL=64
来自 12.0.0.1 的回复: 字节=32 时间<1ms TTL=64

12.0.0.1 的 Ping 统计信息:
    数据包: 已发送 = 4,已接收 = 4,丢失 = 0 (0% 丢失),
往返行程的估计时间(以毫秒为单位):
    最短 = 0ms,最长 = 7ms,平均 = 1ms
    C:\Users\GSY>ping 192.168.10.1

正在 Ping 192.168.10.1 具有 32 字节的数据:
来自 192.168.10.1 的回复: 字节=32 时间<1ms TTL=64
来自 192.168.10.1 的回复: 字节=32 时间<1ms TTL=64
来自 192.168.10.1 的回复: 字节=32 时间<1ms TTL=64
来自 192.168.10.1 的回复: 字节=32 时间<1ms TTL=64

192.168.10.1 的 Ping 统计信息:
    数据包: 已发送 = 4,已接收 = 4,丢失 = 0 (0% 丢失),
往返行程的估计时间(以毫秒为单位):
    最短 = 0ms,最长 = 0ms,平均 = 0ms

C:\Users\GSY>ping 192.168.10.10

正在 Ping 192.168.10.10 具有 32 字节的数据:
请求超时。
请求超时。

192.168.10.10 的 Ping 统计信息:
    数据包: 已发送 = 2,已接收 = 0,丢失 = 2 (100% 丢失),
Control-C
^C
可以发现此时客户机无法访问服务端
[root@localhost network-scripts]# systemctl stop firewalld.service
[root@localhost network-scripts]# setenforce 0
[root@localhost network-scripts]# setenforce 1
[root@localhost network-scripts]# systemctl start firewalld.service
[root@localhost network-scripts]# iptables -F
[root@localhost network-scripts]# iptables -t nat  -F
[root@localhost network-scripts]# vim /etc/sysctl.conf
[root@localhost network-scripts]# echo "net.ipv4.ip_forward=1" >> /etc/sysctl.conf
[root@localhost network-scripts]# tail -2 /etc/sysctl.conf
# For more information, see sysctl.conf(5) and sysctl.d(5).
net.ipv4.ip_forward=1
[root@localhost log]# sysctl -p
net.ipv4.ip_forward = 1
[root@localhost network-scripts]# iptables -F
[root@localhost network-scripts]# iptables -t nat  -F
firewall也有日志文件
[root@localhost network-scripts]# cd /var/log
[root@localhost log]# ls
anaconda   gdm                 qemu-ga            vmware-vgauthsvc.log.0
audit      glusterfs           rhsm               vmware-vmsvc.log
boot.log   grubby_prune_debug  sa                 vmware-vmusr.log
btmp       lastlog             samba              wpa_supplicant.log
chrony     libvirt             secure             wtmp
cron       maillog             speech-dispatcher  Xorg.0.log
cups       messages            spooler            Xorg.0.log.old
dmesg      ntpstats            sssd               Xorg.9.log
dmesg.old  pluto               tallylog           yum.log
firewalld  ppp                 tuned
从外网访问内网,先转换,再转发
从内网访问外网时,先转发,再转换
dnat是在路由前转换地址 prerouting
snat是在路由后转换地址 postrouting
-d 要转换的目标地址名
-p 指定协议
--dport 80端口
-i ens36端口进
-j DNAT操作
--to-destination 转换后的ip地址
[root@localhost log]# iptables -t nat -I PREROUTING -d 12.0.0.1 -p tcp --dport 80 -i ens36 -j DNAT --to-destination 192.168.10.10
[root@localhost log]# iptables -t nat -I POSTROUTING -s 192.168.10.10 -o ens36 -j SNAT --to-source 12.0.0.1

到此,相信大家对“linux做防火墙时如何运用iptables进行NAT地址转换”有了更深的了解,不妨来实际操作一番吧!这里是亿速云网站,更多相关内容可以进入相关频道进行查询,关注我们,继续学习!
免责声明:本站发布的内容(图片、视频和文字)以原创、转载和分享为主,文章观点不代表本网站立场,如果涉及侵权请联系站长邮箱:is@yisu.com进行举报,并提供相关证据,一经查实,将立刻删除涉嫌侵权内容。


