这篇文章将为大家详细讲解有关如何使用mpvue实现左侧导航与右侧内容的联动,小编觉得挺实用的,因此分享给大家做个参考,希望大家阅读完这篇文章后可以有所收获。
效果图如下:
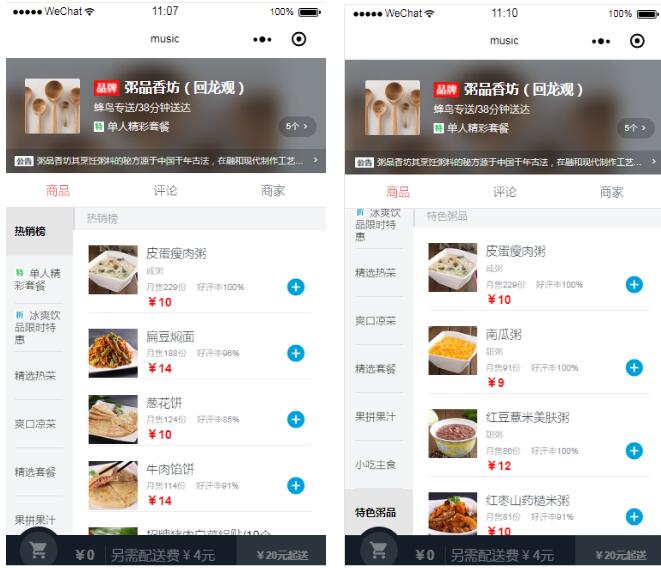
(1)左侧导航联动右侧内容
实现:点击左侧导航,右侧内容滑到对应的位置,并且导航上有current当前样式。
mpvue用的还是微信小程序提供的组件scroll-view,它里面有一个属性scroll-into-view,值为某子元素的id,滚动到该元素。
template:
<scroll-view class="menu-wrapper" scroll-y>
 <ul>
 <li class="menu-item"
 v-for="(item,index) in goods"
 :class="index===currentIndex ? 'current' : ''"
 :key="index"
 @tap="selectMenu(index)">
  {{item.name}}
 </li>
 </ul>
</scroll-view>
<scroll-view scroll-y
  :scroll-into-view="contentId"
  scroll-with-animation="true"
  class="foods-wrapper">
 <ul>
 <li v-for="(item,i) in goods"
 :id="'con_'+i"
 class="food-list food-list-hook" :key="i">
 </li>
 </ul>
<scroll-view>
js:
data() {
 return {
 goods: [],
 contentId: '', // 每个food-list的id,scroll-into-view滚动到对应的id
 currentIndex: 0
 }
},
methods: {
 selectMenu(index) {
 this.contentId = `con_${index}`
 this.currentIndex = index
 }
}
(2)在左侧导航联动右侧内容的基础上增加右侧内容联动左侧导航
实现:滑动右侧内容区域,给左侧对应导航增加current样式,并且当导航高度过长,会联动其滚动
补充:contentHeight是右侧内容scroll-view的高度,同时也是左侧导航scroll-view的高度,navItemHeight是导航ul下每一个item的高度,当导航下ul的高度超过scroll-view的高度,并且this.currentIndex * this.navItemHeight > this.contentHeight,导航才向上滚动。
tempate:
<scroll-view class="menu-wrapper"
  :scroll-into-view="navId"
  scroll-with-animation="true"
  scroll-y>
 <ul class="menu-ul">
 <li class="menu-item"
 v-for="(item,index) in goods"
 :id="'nav_'+index"
 :class="index===currentIndex ? 'current' : ''"
 :key="index"
 @tap="selectMenu(index)">
  {{item.name}}
 </li>
 </ul>
</scroll-view>
<scroll-view scroll-y
  @scroll="onScroll"
  :scroll-into-view="contentId"
  scroll-with-animation="true"
  class="foods-wrapper">
 <ul>
 <li v-for="(item,i) in goods"
 :id="'con_'+i"
 class="food-list food-list-hook" :key="i">
 </li>
 </ul>
</scroll-view>
js:
export default{
 data() {
 return {
 goods: [],
 contentId: '', // 每个food-list的id,scroll-into-view滚动到对应的id
 navId: '', // 导航模块对应的id,用来联动内容区域
 currentIndex: 0,
 navulHeight: 0, // 导航里ul高度
 navItemHeight: 0, // 每个导航高度
 listHeight: [], // foods内部块的高度
 contentHeight: [], // 内容区域scroll-view高度
 }
 },
 watch: {
 currentIndex() {
 console.log(this.currentIndex)
 if (this.contentHeight < this.navulHeight) {
 let h = this.currentIndex * this.navItemHeight
 if (h > this.contentHeight) {
  // 导航滑动
  this.navId = `nav_${this.currentIndex}`
 } else {
  this.navId = 'nav_0'
 }
 }
 }
 },
 methods: {
 selectMenu(index) {
 this.contentId = `con_${index}`
 this.navId = `nav_${index}`
 this.currentIndex = index
 },
 onScroll(e) {
 this.contentId = ''
 let scrollTop = e.target.scrollTop
 // console.log(scrollTop)
 let length = this.listHeight.length
 if (scrollTop >= this.listHeight[length - 1] - this.contentHeight) {
 return
 } else if (scrollTop > 0 && scrollTop < this.listHeight[0]) {
 this.currentIndex = 0
 }
 for (let i = 0; i < length; i++) {
 if (scrollTop >= this.listHeight[i - 1] && scrollTop < this.listHeight[i]) {
  this.currentIndex = i
 }
 }
 // console.log(this.currentIndex)
 },
 getFoodHeight() {
 var query = wx.createSelectorQuery()
 let h = 0
 query.selectAll('.food-list-hook').boundingClientRect((rects) => {
 // console.log(rects)
 rects.forEach((rect) => {
  h += rect.height
  this.listHeight.push(h)
 })
 // console.log(this.listHeight)
 })
 query.select('.foods-wrapper').boundingClientRect((rect) => {
 this.contentHeight = rect.height
 })
 query.select('.menu-ul').boundingClientRect((rect) => {
 this.navulHeight = rect.height
 })
 query.select('.menu-item').boundingClientRect((rect) => {
 this.navItemHeight = rect.height
 }).exec()
 }
 },
 watch: {
 goods() {
 // 获取模块高度,即food-list
 setTimeout(() => {
 this.getFoodHeight()
 }, 60)
 }
 }
}
关于“如何使用mpvue实现左侧导航与右侧内容的联动”这篇文章就分享到这里了,希望以上内容可以对大家有一定的帮助,使各位可以学到更多知识,如果觉得文章不错,请把它分享出去让更多的人看到。
免责声明:本站发布的内容(图片、视频和文字)以原创、转载和分享为主,文章观点不代表本网站立场,如果涉及侵权请联系站长邮箱:is@yisu.com进行举报,并提供相关证据,一经查实,将立刻删除涉嫌侵权内容。


