基于ElasticSearch多实例架构,实现资源合理分配、冷热数据分离
作者:“发颠的小狼”,欢迎转载与投稿
▪ 用途
▪ 架构
▪ 192.168.1.51 elasticsearch-data部署双实例
▪ 192.168.1.52 elasticsearch-data部署双实例
▪ 192.168.1.53 elasticsearch-data部署双实例
▪ 测试
前情提要:
▷ 在第一篇《EFK教程 - 快速入门指南》中,阐述了EFK的安装部署,其中ES的架构为三节点,即master、ingest、data角色同时部署在三台服务器上。
▷ 在第二篇《EFK教程 - ElasticSearch高性能高可用架构》中,阐述了EFK的data/ingest/master角色的用途及分别部署三节点,在实现性能最大化的同时保障高可用
前两篇文章,ES集群中只存在一个实例,而在本文中,将在一个集群中部署多个ES实例,来实现资源合理分配。例如data服务器存在SSD与SAS硬盘,可以将热数据存放到SSD,而冷数据存放到SAS,实现数据冷热分离。
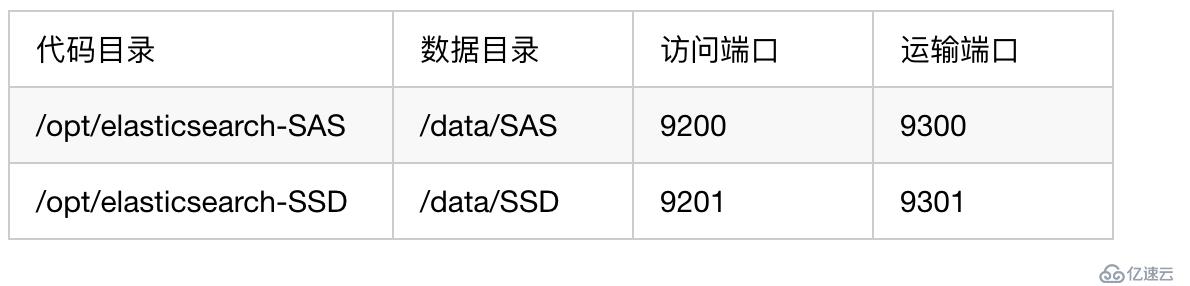
在本文中,将为data服务器创建2个实例,分别基于SSD和基于SAS硬盘,将nginx的9月份索引放在SAS盘上,其它的全放在SSD盘上
架构图

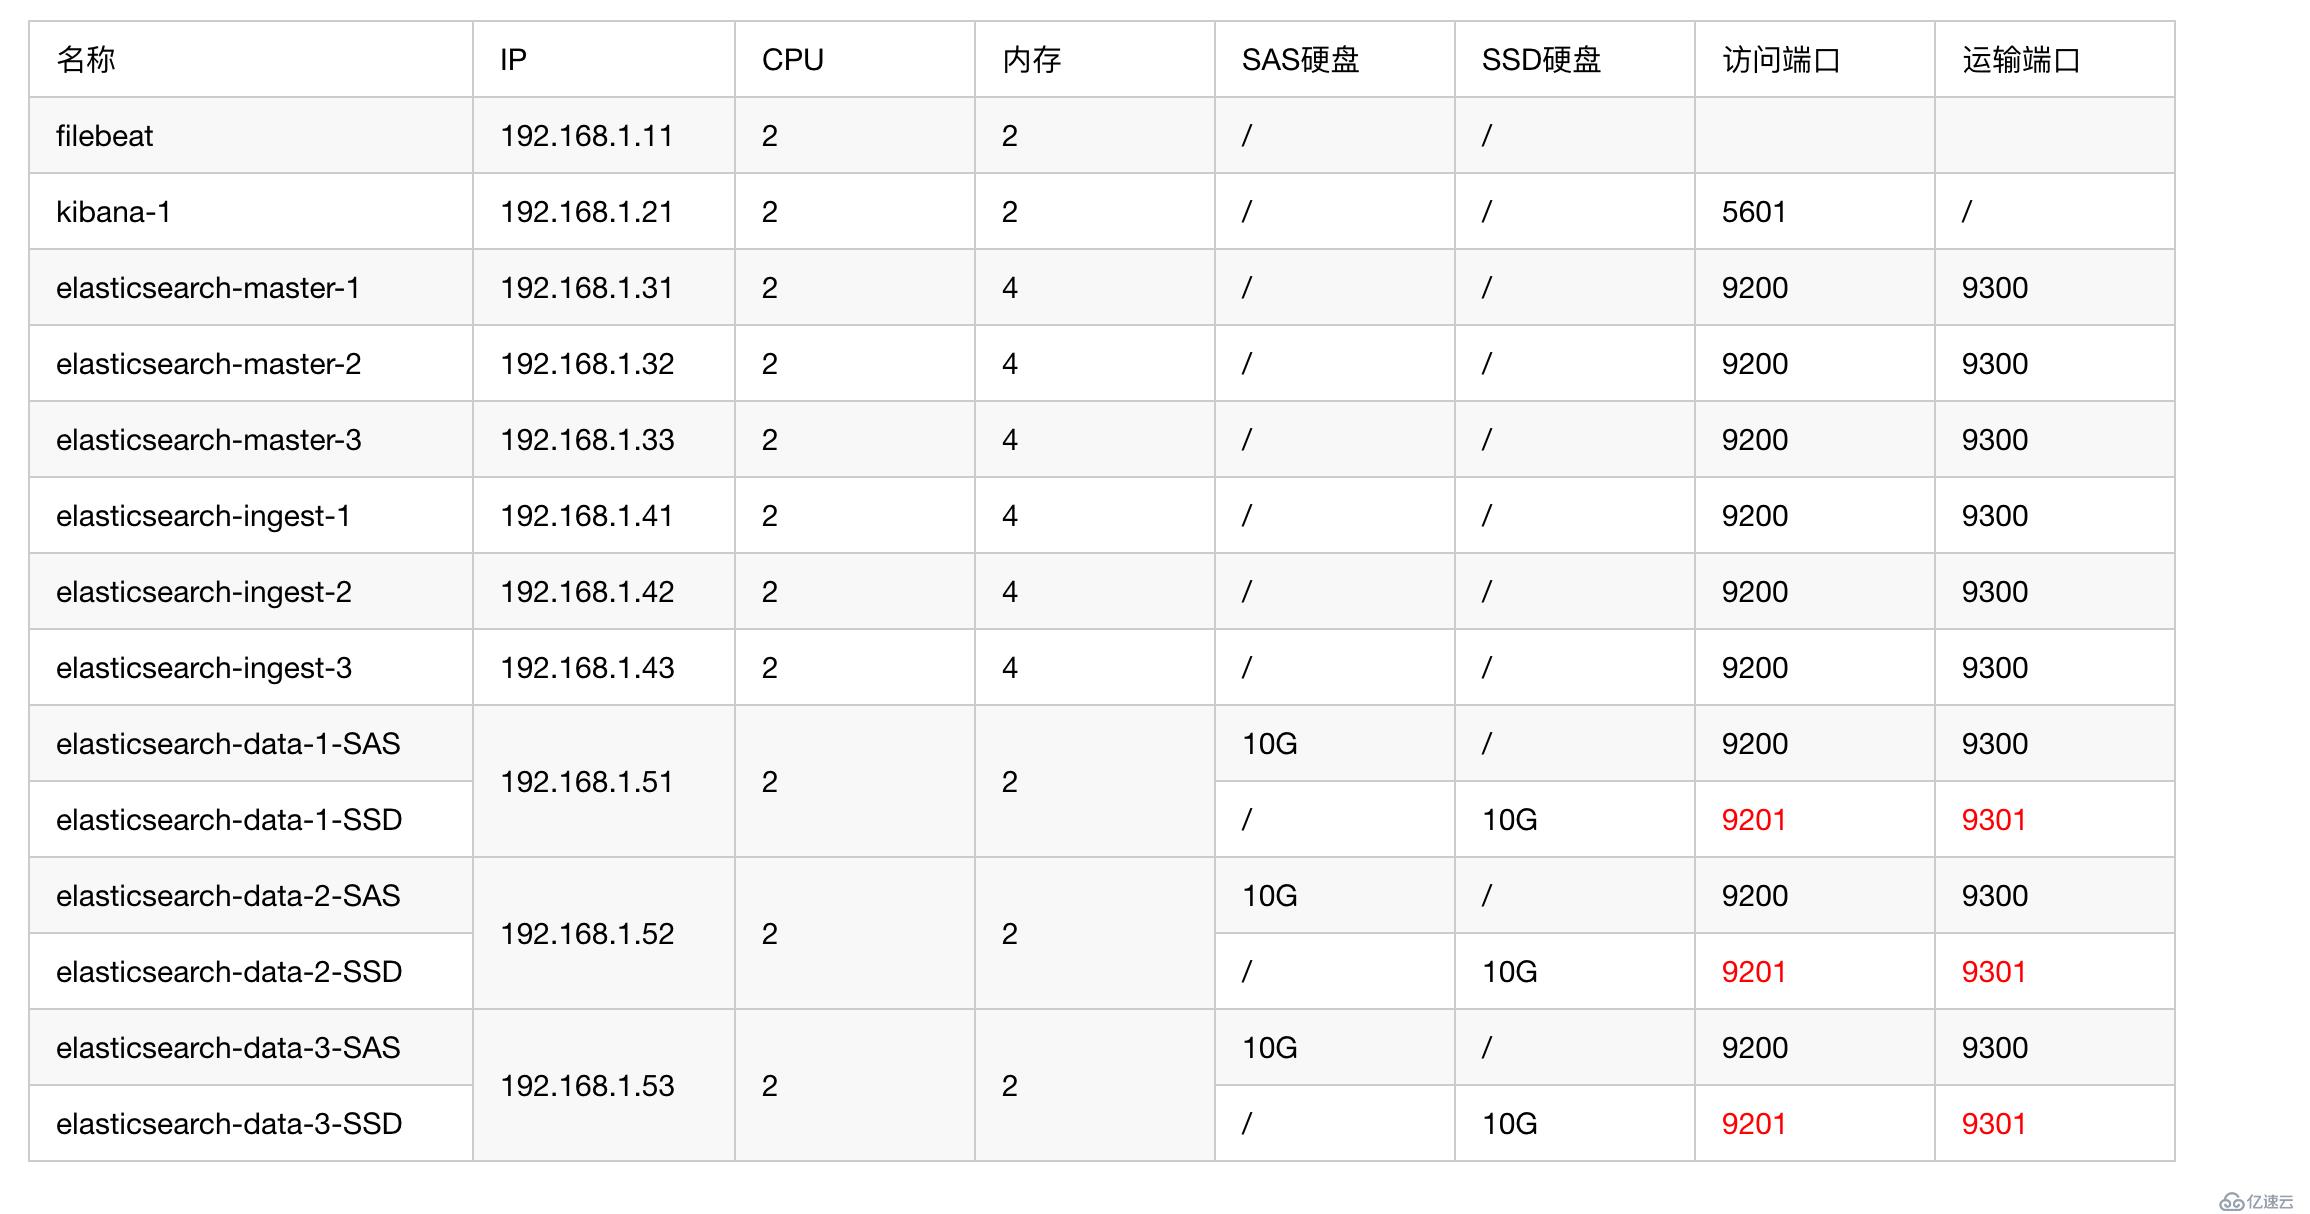
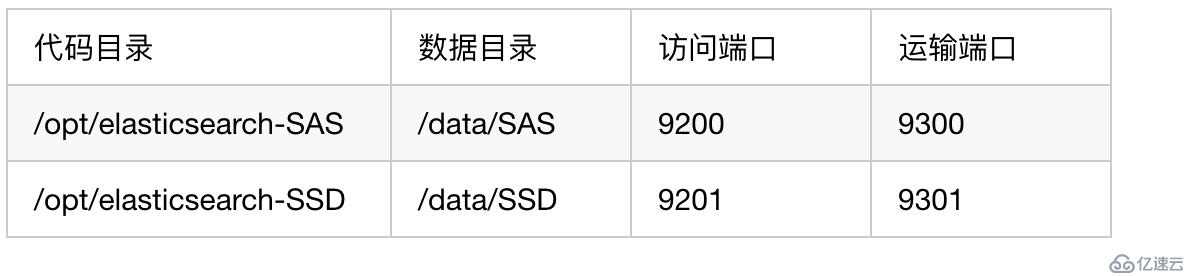
服务器配置
索引迁移(此步不能忽略):将192.168.1.51上的索引放到其它2台data节点上
curl -X PUT "192.168.1.31:9200/*/_settings?pretty" -H 'Content-Type: application/json' -d'
{
  "index.routing.allocation.include._ip": "192.168.1.52,192.168.1.53"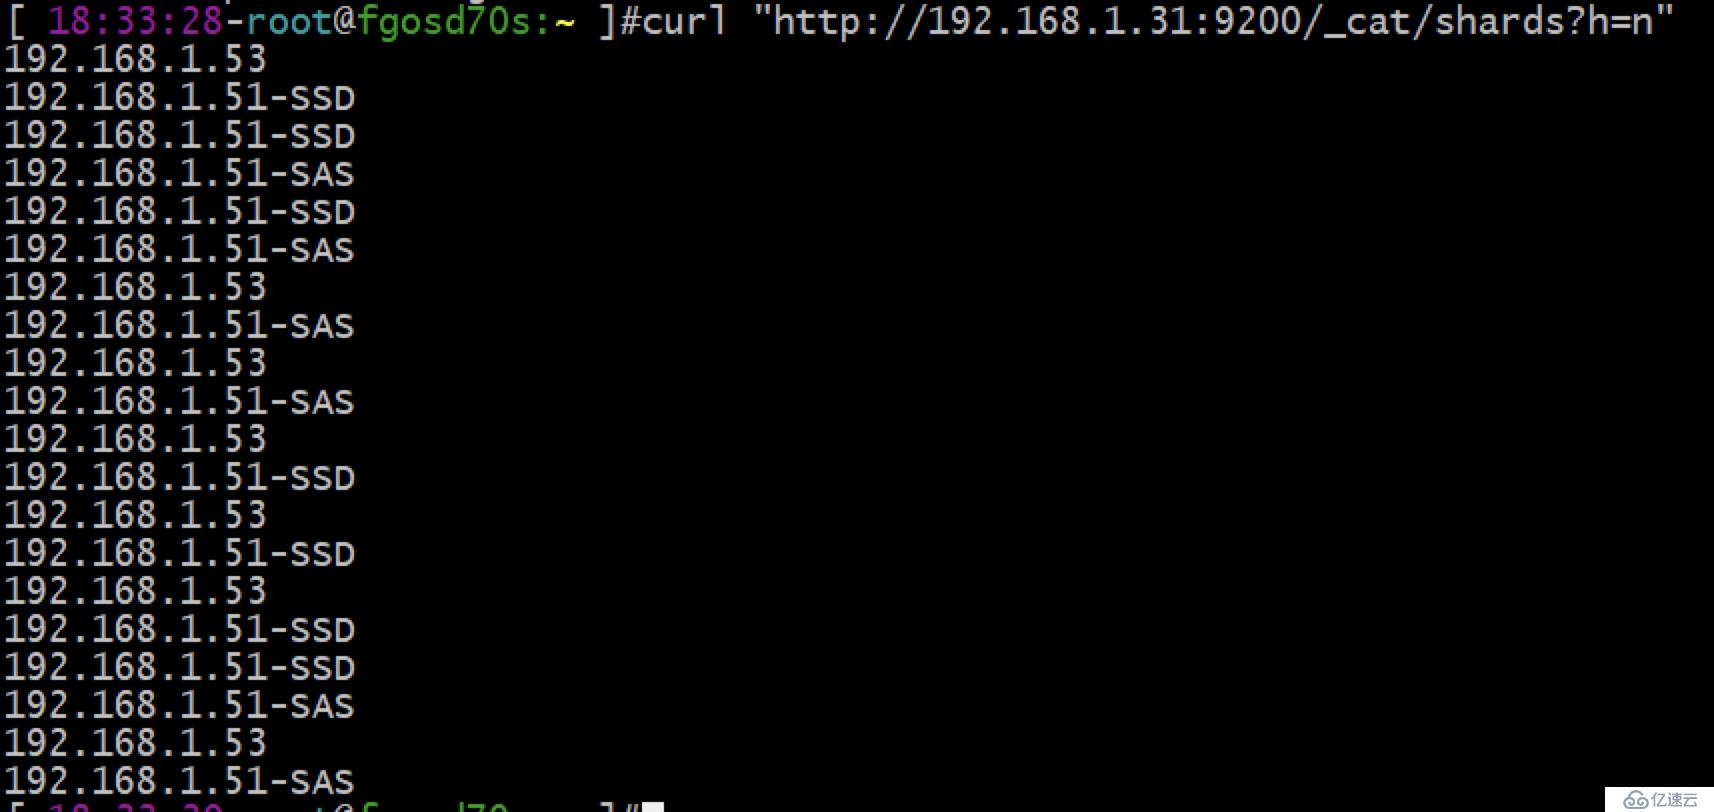
}'确认当前索引存储位置:确认所有索引不在192.168.1.51节点上
curl "http://192.168.1.31:9200/_cat/shards?h=n"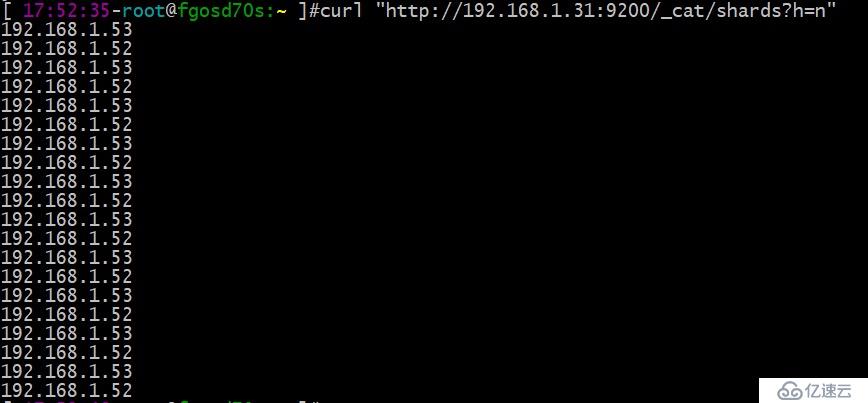
停掉192.168.1.51的进程,修改目录结构及配置:请自行按SSD和SAS硬盘挂载好数据盘

# 安装包下载和部署请参考第一篇《EFK教程 - 快速入门指南》
cd /opt/software/
tar -zxvf elasticsearch-7.3.2-linux-x86_64.tar.gz
mv /opt/elasticsearch /opt/elasticsearch-SAS
mv elasticsearch-7.3.2 /opt/
mv /opt/elasticsearch-7.3.2 /opt/elasticsearch-SSD
chown elasticsearch.elasticsearch /opt/elasticsearch-* -R
rm -rf /data/SAS/*
chown elasticsearch.elasticsearch /data/* -R
mkdir -p /opt/logs/elasticsearch-SAS
mkdir -p /opt/logs/elasticsearch-SSD
chown elasticsearch.elasticsearch /opt/logs/* -R
SAS实例/opt/elasticsearch-SAS/config/elasticsearch.yml配置
cluster.name: my-application
node.name: 192.168.1.51-SAS
path.data: /data/SAS
path.logs: /opt/logs/elasticsearch-SAS
network.host: 192.168.1.51

http.port: 9200
transport.port: 9300
# discovery.seed_hosts和cluster.initial_master_nodes 一定要带上端口号,不然会走http.port和transport.port端口
discovery.seed_hosts: ["192.168.1.31:9300","192.168.1.32:9300","192.168.1.33:9300"]
cluster.initial_master_nodes: ["192.168.1.31:9300","192.168.1.32:9300","192.168.1.33:9300"]
http.cors.enabled: true
http.cors.allow-origin: "*"

node.master: false
node.ingest: false
node.data: true

# 本机只允行启2个实例
node.max_local_storage_nodes: 2
SSD实例/opt/elasticsearch-SSD/config/elasticsearch.yml配置
cluster.name: my-application
node.name: 192.168.1.51-SSD
path.data: /data/SSD
path.logs: /opt/logs/elasticsearch-SSD
network.host: 192.168.1.51

http.port: 9201
transport.port: 9301
# discovery.seed_hosts和cluster.initial_master_nodes 一定要带上端口号,不然会走http.port和transport.port端口
discovery.seed_hosts: ["192.168.1.31:9300","192.168.1.32:9300","192.168.1.33:9300"]
cluster.initial_master_nodes: ["192.168.1.31:9300","192.168.1.32:9300","192.168.1.33:9300"]
http.cors.enabled: true
http.cors.allow-origin: "*"

node.master: false
node.ingest: false
node.data: true

# 本机只允行启2个实例
node.max_local_storage_nodes: 2
SAS实例和SSD实例启动方式
sudo -u elasticsearch /opt/elasticsearch-SAS/bin/elasticsearch
sudo -u elasticsearch /opt/elasticsearch-SSD/bin/elasticsearch
确认SAS和SSD已启2实例
curl "http://192.168.1.31:9200/_cat/nodes?v"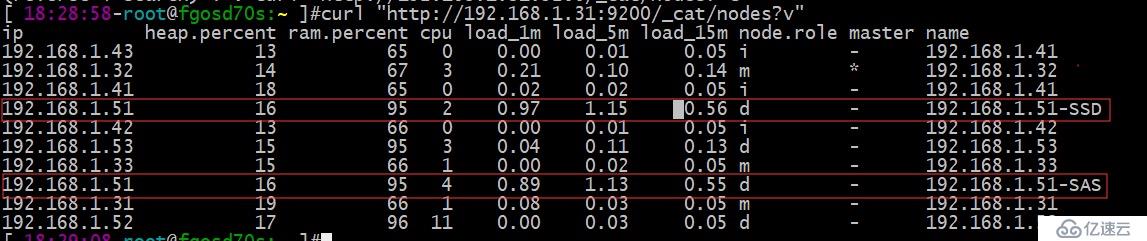
索引迁移(此步不能忽略):将192.168.1.52上的索引放到其它2台data节点上
curl -X PUT "192.168.1.31:9200/*/_settings?pretty" -H 'Content-Type: application/json' -d'
{
  "index.routing.allocation.include._ip": "192.168.1.51,192.168.1.53"
}'确认当前索引存储位置: 确认所有索引不在192.168.1.52节点上
curl "http://192.168.1.31:9200/_cat/shards?h=n"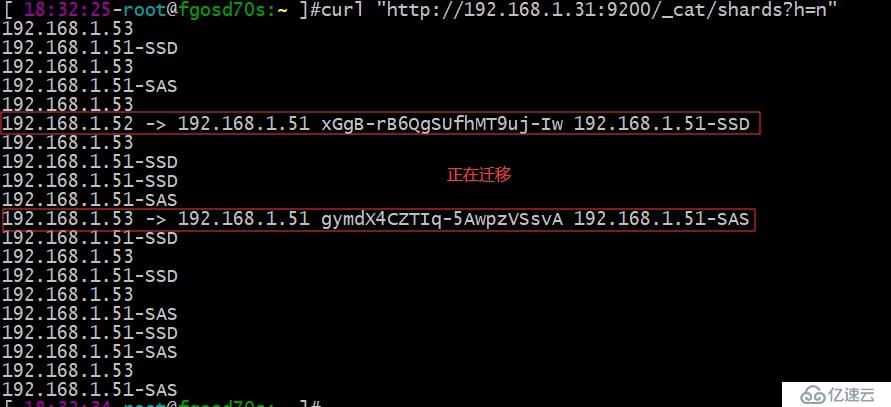
停掉192.168.1.52的进程,修改目录结构及配置:请自行按SSD和SAS硬盘挂载好数据盘
# 安装包下载和部署请参考第一篇《EFK教程 - 快速入门指南》
cd /opt/software/
tar -zxvf elasticsearch-7.3.2-linux-x86_64.tar.gz
mv /opt/elasticsearch /opt/elasticsearch-SAS
mv elasticsearch-7.3.2 /opt/
mv /opt/elasticsearch-7.3.2 /opt/elasticsearch-SSD
chown elasticsearch.elasticsearch /opt/elasticsearch-* -R
rm -rf /data/SAS/*
chown elasticsearch.elasticsearch /data/* -R
mkdir -p /opt/logs/elasticsearch-SAS
mkdir -p /opt/logs/elasticsearch-SSD
chown elasticsearch.elasticsearch /opt/logs/* -R
SAS实例/opt/elasticsearch-SAS/config/elasticsearch.yml配置
cluster.name: my-application
node.name: 192.168.1.52-SAS
path.data: /data/SAS
path.logs: /opt/logs/elasticsearch-SAS
network.host: 192.168.1.52

http.port: 9200
transport.port: 9300
# discovery.seed_hosts和cluster.initial_master_nodes 一定要带上端口号,不然会走http.port和transport.port端口
discovery.seed_hosts: ["192.168.1.31:9300","192.168.1.32:9300","192.168.1.33:9300"]
cluster.initial_master_nodes: ["192.168.1.31:9300","192.168.1.32:9300","192.168.1.33:9300"]
http.cors.enabled: true
http.cors.allow-origin: "*"

node.master: false
node.ingest: false
node.data: true

# 本机只允行启2个实例
node.max_local_storage_nodes: 2
SSD实例/opt/elasticsearch-SSD/config/elasticsearch.yml配置
cluster.name: my-application
node.name: 192.168.1.52-SSD
path.data: /data/SSD
path.logs: /opt/logs/elasticsearch-SSD
network.host: 192.168.1.52

http.port: 9201
transport.port: 9301
# discovery.seed_hosts和cluster.initial_master_nodes 一定要带上端口号,不然会走http.port和transport.port端口
discovery.seed_hosts: ["192.168.1.31:9300","192.168.1.32:9300","192.168.1.33:9300"]
cluster.initial_master_nodes: ["192.168.1.31:9300","192.168.1.32:9300","192.168.1.33:9300"]
http.cors.enabled: true
http.cors.allow-origin: "*"

node.master: false
node.ingest: false
node.data: true

# 本机只允行启2个实例
node.max_local_storage_nodes: 2
SAS实例和SSD实例启动方式
sudo -u elasticsearch /opt/elasticsearch-SAS/bin/elasticsearch
sudo -u elasticsearch /opt/elasticsearch-SSD/bin/elasticsearch
确认SAS和SSD已启2实例
curl "http://192.168.1.31:9200/_cat/nodes?v"
索引迁移(此步不能忽略):一定要做这步,将192.168.1.53上的索引放到其它2台data节点上
curl -X PUT "192.168.1.31:9200/*/_settings?pretty" -H 'Content-Type: application/json' -d'
{
  "index.routing.allocation.include._ip": "192.168.1.51,192.168.1.52"
}'确认当前索引存储位置:确认所有索引不在192.168.1.52节点上
curl "http://192.168.1.31:9200/_cat/shards?h=n"
停掉192.168.1.53的进程,修改目录结构及配置:请自行按SSD和SAS硬盘挂载好数据盘
# 安装包下载和部署请参考第一篇《EFK教程 - 快速入门指南》
cd /opt/software/
tar -zxvf elasticsearch-7.3.2-linux-x86_64.tar.gz
mv /opt/elasticsearch /opt/elasticsearch-SAS
mv elasticsearch-7.3.2 /opt/
mv /opt/elasticsearch-7.3.2 /opt/elasticsearch-SSD
chown elasticsearch.elasticsearch /opt/elasticsearch-* -R
rm -rf /data/SAS/*
chown elasticsearch.elasticsearch /data/* -R
mkdir -p /opt/logs/elasticsearch-SAS
mkdir -p /opt/logs/elasticsearch-SSD
chown elasticsearch.elasticsearch /opt/logs/* -R
SAS实例/opt/elasticsearch-SAS/config/elasticsearch.yml配置
cluster.name: my-application
node.name: 192.168.1.53-SAS
path.data: /data/SAS
path.logs: /opt/logs/elasticsearch-SAS
network.host: 192.168.1.53

http.port: 9200
transport.port: 9300
# discovery.seed_hosts和cluster.initial_master_nodes 一定要带上端口号,不然会走http.port和transport.port端口
discovery.seed_hosts: ["192.168.1.31:9300","192.168.1.32:9300","192.168.1.33:9300"]
cluster.initial_master_nodes: ["192.168.1.31:9300","192.168.1.32:9300","192.168.1.33:9300"]
http.cors.enabled: true
http.cors.allow-origin: "*"

node.master: false
node.ingest: false
node.data: true

# 本机只允行启2个实例
node.max_local_storage_nodes: 2
SSD实例/opt/elasticsearch-SSD/config/elasticsearch.yml配置
cluster.name: my-application
node.name: 192.168.1.53-SSD
path.data: /data/SSD
path.logs: /opt/logs/elasticsearch-SSD
network.host: 192.168.1.53

http.port: 9201
transport.port: 9301
# discovery.seed_hosts和cluster.initial_master_nodes 一定要带上端口号,不然会走http.port和transport.port端口
discovery.seed_hosts: ["192.168.1.31:9300","192.168.1.32:9300","192.168.1.33:9300"]
cluster.initial_master_nodes: ["192.168.1.31:9300","192.168.1.32:9300","192.168.1.33:9300"]
http.cors.enabled: true
http.cors.allow-origin: "*"

node.master: false
node.ingest: false
node.data: true

# 本机只允行启2个实例
node.max_local_storage_nodes: 2
SAS实例和SSD实例启动方式
sudo -u elasticsearch /opt/elasticsearch-SAS/bin/elasticsearch
sudo -u elasticsearch /opt/elasticsearch-SSD/bin/elasticsearch
确认SAS和SSD已启2实例
curl "http://192.168.1.31:9200/_cat/nodes?v"
将所有索引移到SSD硬盘上
# 下面的参数会在后面的文章讲解,此处照抄即可
curl -X PUT "192.168.1.31:9200/*/_settings?pretty" -H 'Content-Type: application/json' -d'
{
"index.routing.allocation.include._host_ip": "",
"index.routing.allocation.include._host": "",
"index.routing.allocation.include._name": "",
"index.routing.allocation.include._ip": "",
"index.routing.allocation.require._name": "*-SSD"
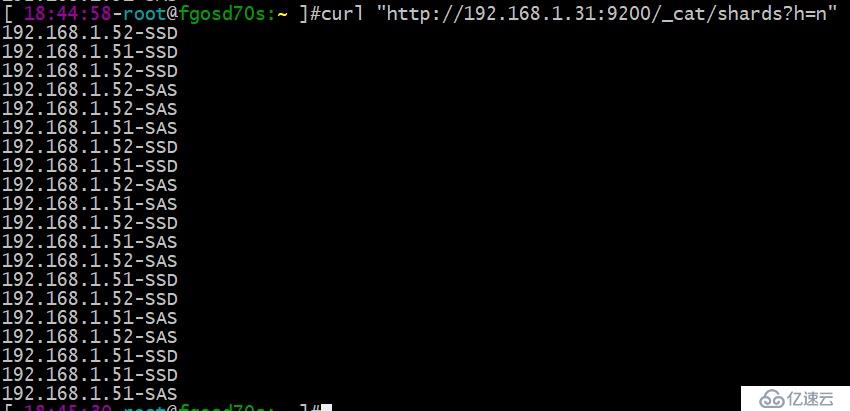
}'确认所有索引全在SSD硬盘上
curl "http://192.168.1.31:9200/_cat/shards?h=n"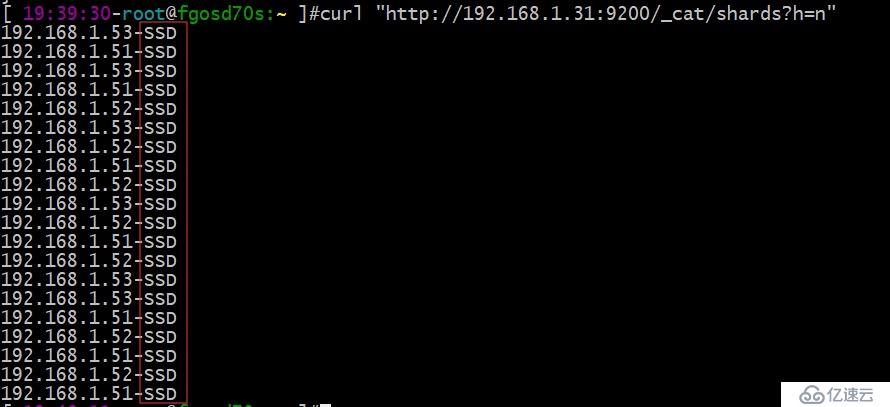
将nginx9月份的日志索引迁移到SAS硬盘上
curl -X PUT "192.168.1.31:9200/nginx_*_2019.09/_settings?pretty" -H 'Content-Type: application/json' -d'
{
  "index.routing.allocation.require._name": "*-SAS"
}'
确认nginx9月份的日志索引迁移到SAS硬盘上
curl "http://192.168.1.31:9200/_cat/shards"
免责声明:本站发布的内容(图片、视频和文字)以原创、转载和分享为主,文章观点不代表本网站立场,如果涉及侵权请联系站长邮箱:is@yisu.com进行举报,并提供相关证据,一经查实,将立刻删除涉嫌侵权内容。


