话不多说先上效果图,先确定是不是你想要达到的结果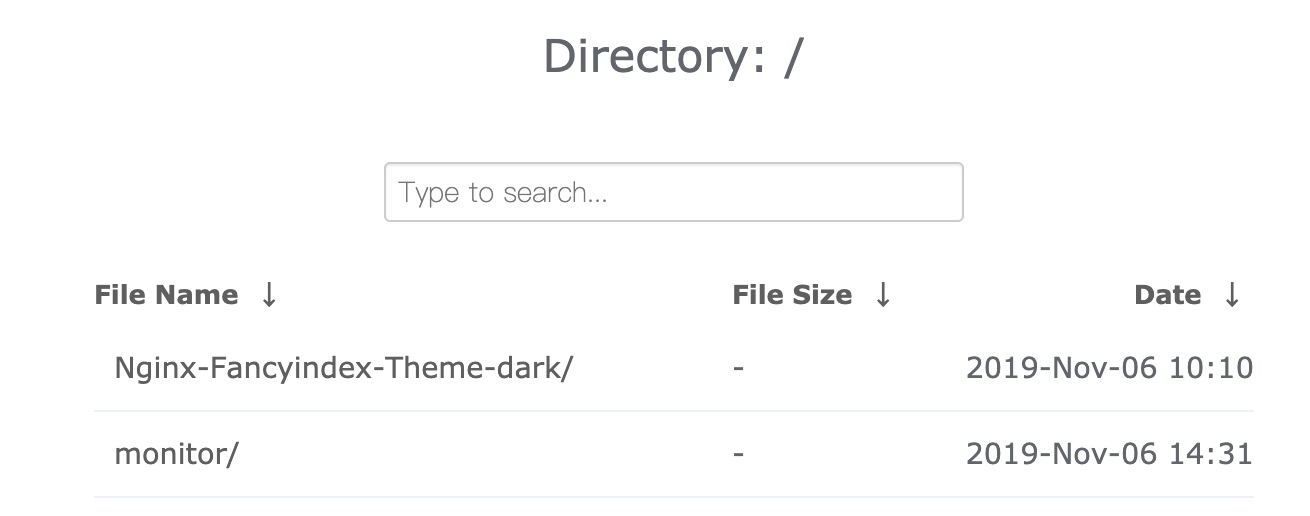
##安装编译docker 环境
我们这里采用的是nginx1.16.0 版本来进行编译安装的,如果有需要你可以自行更改成别的nginx版本,Dockerfile如下
FROM alpine:latest AS alpine-base
WORKDIR /usr/local
#更换apline的源为阿里云的
RUN echo "http://mirrors.aliyun.com/alpine/latest-stable/main/" > /etc/apk/repositories && \
    echo "http://mirrors.aliyun.com/alpine/latest-stable/community/" >> /etc/apk/repositories && \
    apk update && \
#安装wget 和git 我们为了使镜像最小化这个都放在另外一个镜像里面来实现
    apk add --no-cache wget git && \
#下载nginx包
    wget http://nginx.org/download/nginx-1.16.0.tar.gz && \
    tar xvf nginx-1.16.0.tar.gz && \
#克隆我们需要的模块和主题
    git clone https://github.com/Naereen/Nginx-Fancyindex-Theme.git && \
    git clone https://github.com/aperezdc/ngx-fancyindex.git && \
    mkdir /usr/local/nginx-1.16.0/model && \
    mv ./ngx-fancyindex /usr/local/nginx-1.16.0/model/

FROM alpine:latest
MAINTAINER zhangshoufu zsf18163201@163.com
WORKDIR /root
#从上面一个镜像中把我们刚才下载安装的包拷贝到这个里面
COPY --from=alpine-base /usr/local/nginx-1.16.0 /usr/local/nginx-1.16.0
RUN echo "http://mirrors.aliyun.com/alpine/latest-stable/main/" > /etc/apk/repositories && \
    echo "http://mirrors.aliyun.com/alpine/latest-stable/community/" >> /etc/apk/repositories && \
    apk update && \
#安装编译安装需要的依赖
    apk add --no-cache gcc libc-dev make openssl-dev pcre-dev zlib-dev linux-headers curl && \
    cd /usr/local/nginx-1.16.0/ && \
#执行编译安装
    ./configure --prefix=/etc/nginx \
    --sbin-path=/usr/sbin/nginx \
    --modules-path=/usr/lib/nginx/modules \
    --conf-path=/etc/nginx/nginx.conf \
    --error-log-path=/var/log/nginx/error.log \
    --http-log-path=/var/log/nginx/access.log \
    --pid-path=/var/run/nginx.pid \
    --lock-path=/var/run/nginx.lock \
    --http-client-body-temp-path=/var/cache/nginx/client_temp \
    --http-proxy-temp-path=/var/cache/nginx/proxy_temp \
    --http-fastcgi-temp-path=/var/cache/nginx/fastcgi_temp \
    --http-uwsgi-temp-path=/var/cache/nginx/uwsgi_temp \
    --http-scgi-temp-path=/var/cache/nginx/scgi_temp \
#指定安装扩展模块的位置
     --add-module=/usr/local/nginx-1.16.0/model/ngx-fancyindex \
    --with-compat \
    --with-file-aio \
    --with-threads \
    --with-http_addition_module \
    --with-http_auth_request_module \
    --with-http_dav_module \
    --with-http_flv_module \
    --with-http_gunzip_module \
    --with-http_gzip_static_module \
    --with-http_mp4_module \
    --with-http_random_index_module \
    --with-http_realip_module \
    --with-http_secure_link_module \
    --with-http_slice_module \
    --with-http_ssl_module \
    --with-http_stub_status_module \
    --with-http_sub_module \
    --with-http_v2_module \
    --with-mail \
    --with-mail_ssl_module \
    --with-stream --with-stream_realip_module \
    --with-stream_ssl_module \
    --with-stream_ssl_preread_module \
    --with-cc-opt='-g -O2 -fdebug-prefix-map=/data/builder/debuild/nginx-1.16.0/debian/debuild-base/nginx-1.16.0=. -fstack-protector-strong -Wformat -Werror=format-security -Wp,-D_FORTIFY_SOURCE=2 -fPIC' \
    --with-ld-opt='-Wl,-z,relro -Wl,-z,now -Wl,--as-needed -pie' && \
    make && make install && \
    mkdir -p /var/cache/nginx/client_temp && \
    rm -rf /usr/local/nginx-1.16.0
#把主题拷贝到网站根目录下
COPY --from=alpine-base /usr/local/./Nginx-Fancyindex-Theme /etc/nginx/html
EXPOSE 80
CMD ["/bin/sh","-c","nginx -g 'daemon off;'"]
我们执行构建动作
docker build -t apline-nginx:v2.0 -f Dockerfile .截止目前为止我们的docker 包已经构建完成了,
因为我们打包的docker包里面索引主题放在了/etc/nginx/html下面,所以我们就把网站根目录设在这个目录下,然后我们通过挂载的方式把网站目录挂载到这个目录下,我们先编写nginx.conf文件
```nginx.conf
worker_processes auto;
events {
worker_connections 1024;
}
http {
include mime.types;
default_type application/octet-stream;
sendfile on;
keepalive_timeout 65;
fancyindex on;
fancyindex_exact_size off;
fancyindex_localtime on;
fancyindex_header "/Nginx-Fancyindex-Theme-light/header.html";
fancyindex_footer "/Nginx-Fancyindex-Theme-light/footer.html";
fancyindex_ignore "examplefile.html";
fancyindex_ignore "Nginx-Fancyindex-Theme-light";
fancyindex_name_length 255;

server {
    listen       80;
    server_name  localhost;

    location / {
        autoindex on;
        root   /etc/nginx/html;
        index  index.html index.htm;
    }
}
}
因为这个里面有两套主题,一套黑的一套白的,我们上面nginx配置文件使用的是白色的主题,如果我们想使用黑色的只需要把配置文件里面的`Nginx-Fancyindex-Theme-light`更换成`Nginx-Fancyindex-Theme-dark`即可。
然后我们现在开始启动这个docker 容器

```bash
docker run -id --name voice_nginx -p 9999:80 -v /home/monitor/:/etc/nginx/html/monitor -v /home/monitor/nginx.conf:/etc/nginx/nginx.conf --restart=always apline-nginx:v2.0
启动完成之后我们就可以在浏览器里面打开看到我们想要的界面了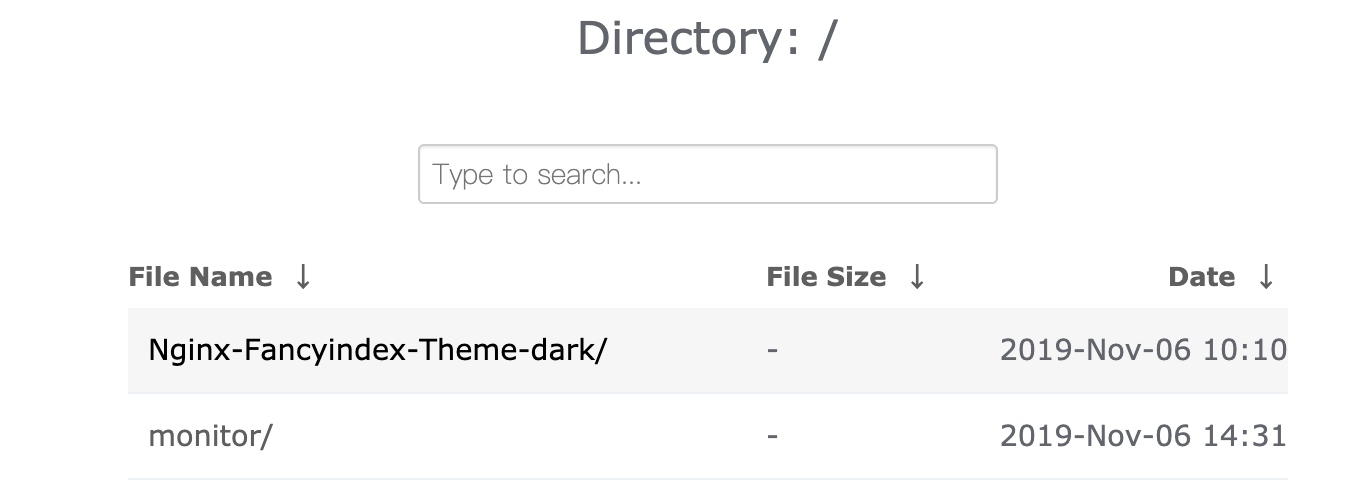
免责声明:本站发布的内容(图片、视频和文字)以原创、转载和分享为主,文章观点不代表本网站立场,如果涉及侵权请联系站长邮箱:is@yisu.com进行举报,并提供相关证据,一经查实,将立刻删除涉嫌侵权内容。


