Tensorflow数据读取有三种方式:
这三种有读取方式有什么区别呢? 我们首先要知道TensorFlow(TF)是怎么样工作的。
TF的核心是用C++写的,这样的好处是运行快,缺点是调用不灵活。而Python恰好相反,所以结合两种语言的优势。涉及计算的核心算子和运行框架是用C++写的,并提供API给Python。Python调用这些API,设计训练模型(Graph),再将设计好的Graph给后端去执行。简而言之,Python的角色是Design,C++是Run。
一、预加载数据:
import tensorflow as tf
# 设计Graph
x1 = tf.constant([2, 3, 4])
x2 = tf.constant([4, 0, 1])
y = tf.add(x1, x2)
# 打开一个session --> 计算y
with tf.Session() as sess:
  print sess.run(y)
二、python产生数据,再将数据喂给后端
import tensorflow as tf
# 设计Graph
x1 = tf.placeholder(tf.int16)
x2 = tf.placeholder(tf.int16)
y = tf.add(x1, x2)
# 用Python产生数据
li1 = [2, 3, 4]
li2 = [4, 0, 1]
# 打开一个session --> 喂数据 --> 计算y
with tf.Session() as sess:
  print sess.run(y, feed_dict={x1: li1, x2: li2})
说明:在这里x1, x2只是占位符,没有具体的值,那么运行的时候去哪取值呢?这时候就要用到sess.run()中的feed_dict参数,将Python产生的数据喂给后端,并计算y。
这两种方案的缺点:
1、预加载:将数据直接内嵌到Graph中,再把Graph传入Session中运行。当数据量比较大时,Graph的传输会遇到效率问题。
2、用占位符替代数据,待运行的时候填充数据。
前两种方法很方便,但是遇到大型数据的时候就会很吃力,即使是Feeding,中间环节的增加也是不小的开销,比如数据类型转换等等。最优的方案就是在Graph定义好文件读取的方法,让TF自己去从文件中读取数据,并解码成可使用的样本集。
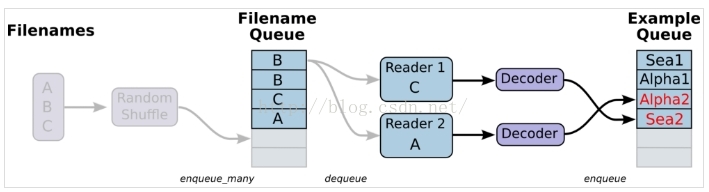
三、从文件中读取,简单来说就是将数据读取模块的图搭好
1、准备数据,构造三个文件,A.csv,B.csv,C.csv
$ echo -e "Alpha1,A1\nAlpha2,A2\nAlpha3,A3" > A.csv
$ echo -e "Bee1,B1\nBee2,B2\nBee3,B3" > B.csv
$ echo -e "Sea1,C1\nSea2,C2\nSea3,C3" > C.csv
2、单个Reader,单个样本
#-*- coding:utf-8 -*-
import tensorflow as tf
# 生成一个先入先出队列和一个QueueRunner,生成文件名队列
filenames = ['A.csv', 'B.csv', 'C.csv']
filename_queue = tf.train.string_input_producer(filenames, shuffle=False)
# 定义Reader
reader = tf.TextLineReader()
key, value = reader.read(filename_queue)
# 定义Decoder
example, label = tf.decode_csv(value, record_defaults=[['null'], ['null']])
#example_batch, label_batch = tf.train.shuffle_batch([example,label], batch_size=1, capacity=200, min_after_dequeue=100, num_threads=2)
# 运行Graph
with tf.Session() as sess:
  coord = tf.train.Coordinator() #创建一个协调器,管理线程
  threads = tf.train.start_queue_runners(coord=coord) #启动QueueRunner, 此时文件名队列已经进队。
  for i in range(10):
    print example.eval(),label.eval()
  coord.request_stop()
  coord.join(threads)
说明:这里没有使用tf.train.shuffle_batch,会导致生成的样本和label之间对应不上,乱序了。生成结果如下:
Alpha1 A2
Alpha3 B1
Bee2 B3
Sea1 C2
Sea3 A1
Alpha2 A3
Bee1 B2
Bee3 C1
Sea2 C3
Alpha1 A2
解决方案:用tf.train.shuffle_batch,那么生成的结果就能够对应上。
#-*- coding:utf-8 -*-
import tensorflow as tf
# 生成一个先入先出队列和一个QueueRunner,生成文件名队列
filenames = ['A.csv', 'B.csv', 'C.csv']
filename_queue = tf.train.string_input_producer(filenames, shuffle=False)
# 定义Reader
reader = tf.TextLineReader()
key, value = reader.read(filename_queue)
# 定义Decoder
example, label = tf.decode_csv(value, record_defaults=[['null'], ['null']])
example_batch, label_batch = tf.train.shuffle_batch([example,label], batch_size=1, capacity=200, min_after_dequeue=100, num_threads=2)
# 运行Graph
with tf.Session() as sess:
  coord = tf.train.Coordinator() #创建一个协调器,管理线程
  threads = tf.train.start_queue_runners(coord=coord) #启动QueueRunner, 此时文件名队列已经进队。
  for i in range(10):
    e_val,l_val = sess.run([example_batch, label_batch])
    print e_val,l_val
  coord.request_stop()
  coord.join(threads)
3、单个Reader,多个样本,主要也是通过tf.train.shuffle_batch来实现
#-*- coding:utf-8 -*-
import tensorflow as tf
filenames = ['A.csv', 'B.csv', 'C.csv']
filename_queue = tf.train.string_input_producer(filenames, shuffle=False)
reader = tf.TextLineReader()
key, value = reader.read(filename_queue)
example, label = tf.decode_csv(value, record_defaults=[['null'], ['null']])
# 使用tf.train.batch()会多加了一个样本队列和一个QueueRunner。
#Decoder解后数据会进入这个队列,再批量出队。
# 虽然这里只有一个Reader,但可以设置多线程,相应增加线程数会提高读取速度,但并不是线程越多越好。
example_batch, label_batch = tf.train.batch(
   [example, label], batch_size=5)
with tf.Session() as sess:
  coord = tf.train.Coordinator()
  threads = tf.train.start_queue_runners(coord=coord)
  for i in range(10):
    e_val,l_val = sess.run([example_batch,label_batch])
    print e_val,l_val
  coord.request_stop()
  coord.join(threads)
说明:下面这种写法,提取出来的batch_size个样本,特征和label之间也是不同步的
#-*- coding:utf-8 -*-
import tensorflow as tf
filenames = ['A.csv', 'B.csv', 'C.csv']
filename_queue = tf.train.string_input_producer(filenames, shuffle=False)
reader = tf.TextLineReader()
key, value = reader.read(filename_queue)
example, label = tf.decode_csv(value, record_defaults=[['null'], ['null']])
# 使用tf.train.batch()会多加了一个样本队列和一个QueueRunner。
#Decoder解后数据会进入这个队列,再批量出队。
# 虽然这里只有一个Reader,但可以设置多线程,相应增加线程数会提高读取速度,但并不是线程越多越好。
example_batch, label_batch = tf.train.batch(
   [example, label], batch_size=5)
with tf.Session() as sess:
  coord = tf.train.Coordinator()
  threads = tf.train.start_queue_runners(coord=coord)
  for i in range(10):
    print example_batch.eval(), label_batch.eval()
  coord.request_stop()
  coord.join(threads)
说明:输出结果如下:可以看出feature和label之间是不对应的
['Alpha1' 'Alpha2' 'Alpha3' 'Bee1' 'Bee2'] ['B3' 'C1' 'C2' 'C3' 'A1']
['Alpha2' 'Alpha3' 'Bee1' 'Bee2' 'Bee3'] ['C1' 'C2' 'C3' 'A1' 'A2']
['Alpha3' 'Bee1' 'Bee2' 'Bee3' 'Sea1'] ['C2' 'C3' 'A1' 'A2' 'A3']
4、多个reader,多个样本
#-*- coding:utf-8 -*-
import tensorflow as tf
filenames = ['A.csv', 'B.csv', 'C.csv']
filename_queue = tf.train.string_input_producer(filenames, shuffle=False)
reader = tf.TextLineReader()
key, value = reader.read(filename_queue)
record_defaults = [['null'], ['null']]
#定义了多种解码器,每个解码器跟一个reader相连
example_list = [tf.decode_csv(value, record_defaults=record_defaults)
         for _ in range(2)] # Reader设置为2
# 使用tf.train.batch_join(),可以使用多个reader,并行读取数据。每个Reader使用一个线程。
example_batch, label_batch = tf.train.batch_join(
   example_list, batch_size=5)
with tf.Session() as sess:
  coord = tf.train.Coordinator()
  threads = tf.train.start_queue_runners(coord=coord)
  for i in range(10):
    e_val,l_val = sess.run([example_batch,label_batch])
    print e_val,l_val
  coord.request_stop()
  coord.join(threads)
tf.train.batch与tf.train.shuffle_batch函数是单个Reader读取,但是可以多线程。tf.train.batch_join与tf.train.shuffle_batch_join可设置多Reader读取,每个Reader使用一个线程。至于两种方法的效率,单Reader时,2个线程就达到了速度的极限。多Reader时,2个Reader就达到了极限。所以并不是线程越多越快,甚至更多的线程反而会使效率下降。
5、迭代控制,设置epoch参数,指定我们的样本在训练的时候只能被用多少轮
#-*- coding:utf-8 -*-
import tensorflow as tf
filenames = ['A.csv', 'B.csv', 'C.csv']
#num_epoch: 设置迭代数
filename_queue = tf.train.string_input_producer(filenames, shuffle=False,num_epochs=3)
reader = tf.TextLineReader()
key, value = reader.read(filename_queue)
record_defaults = [['null'], ['null']]
#定义了多种解码器,每个解码器跟一个reader相连
example_list = [tf.decode_csv(value, record_defaults=record_defaults)
         for _ in range(2)] # Reader设置为2
# 使用tf.train.batch_join(),可以使用多个reader,并行读取数据。每个Reader使用一个线程。
example_batch, label_batch = tf.train.batch_join(
   example_list, batch_size=1)
#初始化本地变量
init_local_op = tf.initialize_local_variables()
with tf.Session() as sess:
  sess.run(init_local_op)
  coord = tf.train.Coordinator()
  threads = tf.train.start_queue_runners(coord=coord)
  try:
    while not coord.should_stop():
      e_val,l_val = sess.run([example_batch,label_batch])
      print e_val,l_val
  except tf.errors.OutOfRangeError:
      print('Epochs Complete!')
  finally:
      coord.request_stop()
  coord.join(threads)
  coord.request_stop()
  coord.join(threads)
在迭代控制中,记得添加tf.initialize_local_variables(),官网教程没有说明,但是如果不初始化,运行就会报错。
对于传统的机器学习而言,比方说分类问题,[x1 x2 x3]是feature。对于二分类问题,label经过one-hot编码之后就会是[0,1]或者[1,0]。一般情况下,我们会考虑将数据组织在csv文件中,一行代表一个sample。然后使用队列的方式去读取数据
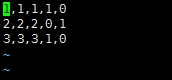
说明:对于该数据,前三列代表的是feature,因为是分类问题,后两列就是经过one-hot编码之后得到的label
使用队列读取该csv文件的代码如下:
#-*- coding:utf-8 -*-
import tensorflow as tf
# 生成一个先入先出队列和一个QueueRunner,生成文件名队列
filenames = ['A.csv']
filename_queue = tf.train.string_input_producer(filenames, shuffle=False)
# 定义Reader
reader = tf.TextLineReader()
key, value = reader.read(filename_queue)
# 定义Decoder
record_defaults = [[1], [1], [1], [1], [1]]
col1, col2, col3, col4, col5 = tf.decode_csv(value,record_defaults=record_defaults)
features = tf.pack([col1, col2, col3])
label = tf.pack([col4,col5])
example_batch, label_batch = tf.train.shuffle_batch([features,label], batch_size=2, capacity=200, min_after_dequeue=100, num_threads=2)
# 运行Graph
with tf.Session() as sess:
  coord = tf.train.Coordinator() #创建一个协调器,管理线程
  threads = tf.train.start_queue_runners(coord=coord) #启动QueueRunner, 此时文件名队列已经进队。
  for i in range(10):
    e_val,l_val = sess.run([example_batch, label_batch])
    print e_val,l_val
  coord.request_stop()
  coord.join(threads)
输出结果如下:
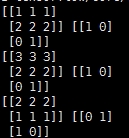
说明:
record_defaults = [[1], [1], [1], [1], [1]]
代表解析的模板,每个样本有5列,在数据中是默认用‘,'隔开的,然后解析的标准是[1],也即每一列的数值都解析为整型。[1.0]就是解析为浮点,['null']解析为string类型
二、此处给出了几种不同的next_batch方法,该文章只是做出代码片段的解释,以备以后查看:
 def next_batch(self, batch_size, fake_data=False):
  """Return the next `batch_size` examples from this data set."""
  if fake_data:
   fake_image = [1] * 784
   if self.one_hot:
    fake_label = [1] + [0] * 9
   else:
    fake_label = 0
   return [fake_image for _ in xrange(batch_size)], [
     fake_label for _ in xrange(batch_size)
   ]
  start = self._index_in_epoch
  self._index_in_epoch += batch_size
  if self._index_in_epoch > self._num_examples: # epoch中的句子下标是否大于所有语料的个数,如果为True,开始新一轮的遍历
   # Finished epoch
   self._epochs_completed += 1
   # Shuffle the data
   perm = numpy.arange(self._num_examples) # arange函数用于创建等差数组
   numpy.random.shuffle(perm) # 打乱
   self._images = self._images[perm]
   self._labels = self._labels[perm]
   # Start next epoch
   start = 0
   self._index_in_epoch = batch_size
   assert batch_size <= self._num_examples
  end = self._index_in_epoch
  return self._images[start:end], self._labels[start:end]
该段代码摘自mnist.py文件,从代码第12行start = self._index_in_epoch开始解释,_index_in_epoch-1是上一次batch个图片中最后一张图片的下边,这次epoch第一张图片的下标是从 _index_in_epoch开始,最后一张图片的下标是_index_in_epoch+batch, 如果 _index_in_epoch 大于语料中图片的个数,表示这个epoch是不合适的,就算是完成了语料的一遍的遍历,所以应该对图片洗牌然后开始新一轮的语料组成batch开始
def ptb_iterator(raw_data, batch_size, num_steps):
 """Iterate on the raw PTB data.

 This generates batch_size pointers into the raw PTB data, and allows
 minibatch iteration along these pointers.

 Args:
  raw_data: one of the raw data outputs from ptb_raw_data.
  batch_size: int, the batch size.
  num_steps: int, the number of unrolls.

 Yields:
  Pairs of the batched data, each a matrix of shape [batch_size, num_steps].
  The second element of the tuple is the same data time-shifted to the
  right by one.

 Raises:
  ValueError: if batch_size or num_steps are too high.
 """
 raw_data = np.array(raw_data, dtype=np.int32)

 data_len = len(raw_data)
 batch_len = data_len // batch_size #有多少个batch
 data = np.zeros([batch_size, batch_len], dtype=np.int32) # batch_len 有多少个单词
 for i in range(batch_size): # batch_size 有多少个batch
  data[i] = raw_data[batch_len * i:batch_len * (i + 1)]

 epoch_size = (batch_len - 1) // num_steps # batch_len 是指一个batch中有多少个句子
 #epoch_size = ((len(data) // model.batch_size) - 1) // model.num_steps # // 表示整数除法
 if epoch_size == 0:
  raise ValueError("epoch_size == 0, decrease batch_size or num_steps")

 for i in range(epoch_size):
  x = data[:, i*num_steps:(i+1)*num_steps]
  y = data[:, i*num_steps+1:(i+1)*num_steps+1]
  yield (x, y)
第三种方式:
  def next(self, batch_size):
    """ Return a batch of data. When dataset end is reached, start over.
    """
    if self.batch_id == len(self.data):
      self.batch_id = 0
    batch_data = (self.data[self.batch_id:min(self.batch_id +
                         batch_size, len(self.data))])
    batch_labels = (self.labels[self.batch_id:min(self.batch_id +
                         batch_size, len(self.data))])
    batch_seqlen = (self.seqlen[self.batch_id:min(self.batch_id +
                         batch_size, len(self.data))])
    self.batch_id = min(self.batch_id + batch_size, len(self.data))
    return batch_data, batch_labels, batch_seqlen
第四种方式:
def batch_iter(sourceData, batch_size, num_epochs, shuffle=True):
  data = np.array(sourceData) # 将sourceData转换为array存储
  data_size = len(sourceData)
  num_batches_per_epoch = int(len(sourceData) / batch_size) + 1
  for epoch in range(num_epochs):
    # Shuffle the data at each epoch
    if shuffle:
      shuffle_indices = np.random.permutation(np.arange(data_size))
      shuffled_data = sourceData[shuffle_indices]
    else:
      shuffled_data = sourceData

    for batch_num in range(num_batches_per_epoch):
      start_index = batch_num * batch_size
      end_index = min((batch_num + 1) * batch_size, data_size)

      yield shuffled_data[start_index:end_index]
迭代器的用法,具体学习Python迭代器的用法
另外需要注意的是,前三种方式只是所有语料遍历一次,而最后一种方法是,所有语料遍历了num_epochs次
以上就是本文的全部内容,希望对大家的学习有所帮助,也希望大家多多支持亿速云。
免责声明:本站发布的内容(图片、视频和文字)以原创、转载和分享为主,文章观点不代表本网站立场,如果涉及侵权请联系站长邮箱:is@yisu.com进行举报,并提供相关证据,一经查实,将立刻删除涉嫌侵权内容。


