Nagios是一款开源电脑系统和网络监视工具,能够有效监控windows,linux,Uninx的主机状态,交换机路由器等网络设置,打印机等.在系统或服务状态异常时发出邮件或短信报警第一时间通知运维人员,在状态恢复后发出正常的邮件或短信报警通知。
Nagios Core 是一个开源的系统,Nagios XI是收费的。我们这里安装前者。
一、Nagios 结构说明
Nagios 结构上来说, 可分为核心和插件两个部分。Nagios 的核心部分只提供了很少的监控功能,因此要搭建一个完善的 IT 监控管理系统,用户还需要在 Nagios 服务器安装相应的插件,插件可以从 Nagios 官方网站下载 http://www.nagios.org/,也可以根据实际要求自己编写所需的插件。
Nagios 可实现的功能特性:
监控网络服务(SMTP、POP3、HTTP、FTP、PING 等);
监控本机及远程主机资源(CPU 负荷、磁盘利用率、进程 等);
允许用户编写自己的插件来监控特定的服务,方便地扩展自己服务的检测方法,支持多种开发语言(Shell、Perl、Python、PHP 等)
具备定义网络分层结构的能力,用"parent"主机定义来表达网络主机间的关系,这种关系可被用来发现和明晰主机宕机或不可达状态;
当服务或主机问题产生与解决时将告警发送给联系人(通过 EMail、短信、用户定义方式);
可以支持并实现对主机的冗余监控;
可用 WEB 界面用于查看当前的网络状态、通知和故障历史、日志文件等;
二.Nagios工作原理
Nagiosq的功能是监控服务和主机,但也是 他 自身并不包括这部分功能,所有的监控,检测功能都是通过各种插件来完成的。
启动Nagios后他会周期性的自动调用插件去检查服务器状态 ,同时Nagios会维持一个列队,所有插件返回来的状态信息都进入列队 ,Nagios每次都从队首开始读取信息,并进行处理,把状态结果通过web结果通过显示出来
Nagios提供了许多插件,利用这些插件可以方便的监控很多服务状态,安装完成 后,在Nagios主目录下的/libexec里放有nagios自的可以使用的所有插件,如,check_disk是检查磁盘空间的插件,check_load是检查CPU负载的,等等。每一个插件可以通过运行 ./check_xxx –h 来查看使用方法和功能;
Nagios可以识别4种状态返回信息,即0(OK)表示状态正常/绿色,1(WARNING)表示出现警告/X色,2(CRITTCAL)表示出现 非常严重 的错误/红色,3(UNKNOWN)表示未知错误 、深X色。Nagios根据插件返回来的值,来判断 监控对象的状态,并通过web显示出来,以提供管理员及时发现故障


再说报警功能,如果 监控系统发现问题不能报警那就没有意义了,所以报警也是nagios很重要的功能之一,但是,同样的,Nagios自身业没有报警部分的代码,甚至没有插件,而是交给用户或者其他 相关开源项目组去完成
Nagios安装,是指基本平台,也就是Nagios软件包的安装,它是监控体系的框架,也是所有监控基础。
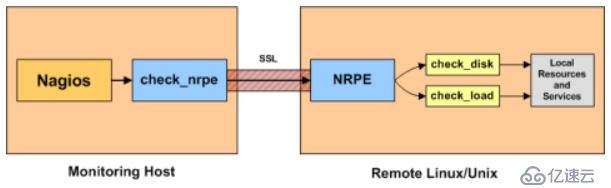
Nagios通过NRPE来远端管理服务
Nagios执行安装在它里面的check_nrpe插件,并告诉check_nrpe去检测哪些服务。
通过SSL,check_nrpe连接远端 机子上的NRPE daemon
NRPE运行本地的各种插件去检测本地的服务和状态
最后,NRPE把检测的结果传给主机端check_nrpe,check_nrpe在把结果 送到Nagios状态队列中,
Nagios依次读取队列中信息,再把结果显示出来

二.Nagios部署
备注:默认情况下Nagios没有数据库,可以安装NDOUtils保存Nagios数据到Mysql数据库中。
1、环境准备
设置或停止防火墙:
[root@localhost ~]# systemctl stop firewalld.service
[root@localhost ~]# systemctl disable firewalld.service
关闭selinux:
临时关闭:
[root@localhost ~]# setenforce 0

永久关闭(修改配置文件):
[root@localhost ~]# vi /etc/selinux/config
改成SELINUX=disabled
[root@localhost ~]# rpm -qa httpd*
[root@localhost ~]# rpm -e --nodeps 包名
有多个httpd*,用脚本删除for name in `rpm -qa httpd*`;do rpm -e --nodeps $name;done
[root@localhost ~]# rpm -Uvh https://dl.fedoraproject.org/pub/epel/epel-release-latest-7.noarch.rpm
[root@localhost ~]# yum install wget lrzsz vim lynx lsof netstat-tools unzip -y
时区设置:
[root@localhost ~]timedatectl
[root@localhost ~]timedatectl list-timezones  #该命令列出了所有的时区
[root@localhost ~]timedatectl set-timezone Asia/Shanghai #该命令把时区设置为上海
时间同步:
[root@localhost ~]# ntpdate time.nist.gov #如果没有yum安装此命令
[root@localhost ~]# /usr/sbin/ntpdate time.nist.gov
[root@localhost ~]# crontab -e
*/10**** /usr/sbin/ntpdate time.nist.gov >/dev/null 2>&1
2、源码安装nagios core(主程序)
参考:https://support.nagios.com/kb/article/nagios-core-installing-nagios-core-from-source-96.html#_ga=2.130440076.2034626946.1559144380-1378811618.1556870555
[root@localhost ~]# yum install -y gcc glibc glibc-common wget unzip httpd php gd php-gd gd-devel perl postfix
[root@localhost ~]# cd /tmp
[root@localhost tmp]# wget -O nagioscore.tar.gz https://github.com/NagiosEnterprises/nagioscore/archive/nagios-4.4.3.tar.gz
[root@localhost tmp]# tar zxvf nagioscore.tar.gz
[root@localhost tmp]# cd /tmp/nagioscore-nagios-4.4.3/
[root@localhost nagioscore-nagios-4.4.3]# ./configure
[root@localhost nagioscore-nagios-4.4.3]# make all
[root@localhost nagioscore-nagios-4.4.3]# make install-groups-users
[root@localhost nagioscore-nagios-4.4.3]# usermod -a -G nagios apache
#安装主程序
[root@localhost nagioscore-nagios-4.4.3]# make install
[root@localhost nagioscore-nagios-4.4.3]# make install-daemoninit
[root@localhost nagioscore-nagios-4.4.3]# systemctl enable httpd.service
#配置目录权限
[root@localhost nagioscore-nagios-4.4.3]# make install-commandmode
#安装示例配置文件
[root@localhost nagioscore-nagios-4.4.3]# make install-config
#安装nagios的web接口,会在/etc/httpd/conf.d目录中创建nagios.conf文件
[root@localhost nagioscore-nagios-4.4.3]# make install-webconf
执行上述操作后,会在/usr/local/nagios目录下产生如下目录:
bin:nagios执行程序所在的目录,nagios文件即为主程序。
etc:nagios配置文件目录,当make install-config完以后etc下面就会出现默认的配置文件。
sbin:nagios CGI文件所在目录,这里存放的是一些外部命令执行程序。
share:nagios网页文件目录,存放一些html文件。
var:nagios日志文件、pid等文件目录。
Libexec:系统默认插件的存储位置
修改nagios警告信息的邮件地址
[root@localhost ~]# vi /usr/local/nagios/etc/objects/contacts.cfg
    email                   442102293@qq.com ; <<***** CHANGE THIS TO YOUR EMAIL ADDRESS ******
nagiosadmin设置密码
root@localhost ~]# htpasswd -c /usr/local/nagios/etc/htpasswd.users nagiosadmin
[root@localhost ~]# systemctl start httpd.service
[root@localhost ~]# systemctl start nagios.service
http://192.168.146.128/nagios

不使用默认nagiosadmin账号,新增gxm账号并配置权限,如果不配置点击Hosts会报红色错误。
[root@localhost ~]# htpasswd -bc /usr/local/nagios/etc/htpasswd.users gxm 123456
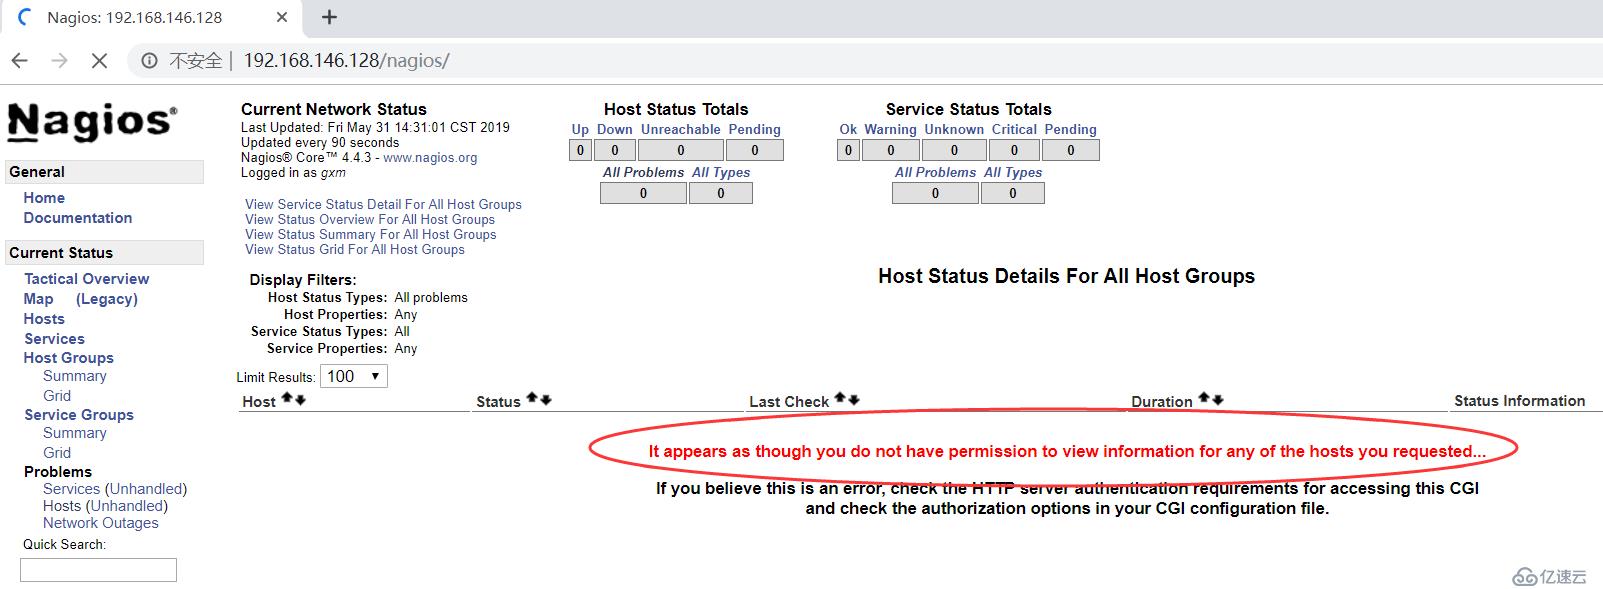
[root@localhost ~]# cd /usr/local/nagios/etc/
[root@localhost etc]# sed -i 's#nagiosadmin#gxm#g' cgi.cfg
[root@localhost etc]# grep gxm cgi.cfg
authorized_for_system_information=gxm
authorized_for_configuration_information=gxm
authorized_for_system_commands=gxm
authorized_for_all_services=gxm
authorized_for_all_hosts=gxm
authorized_for_all_service_commands=gxm
authorized_for_all_host_commands=gxm
[root@localhost etc]# systemctl restart  httpd.service
#检查语法错误
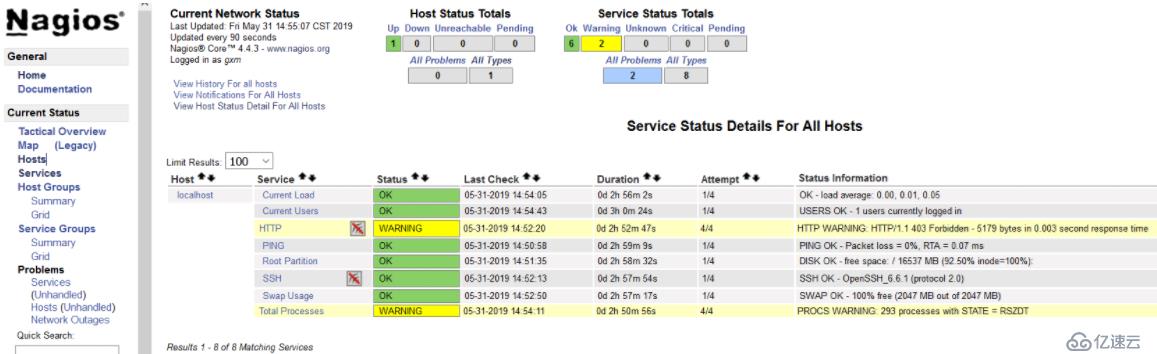
[root@localhost etc]# /usr/local/nagios/bin/nagios -v /usr/local/nagios/etc/nagios.cfg
Nagios Core 4.4.3
Copyright (c) 2009-present Nagios Core Development Team and Community Contributors
Copyright (c) 1999-2009 Ethan Galstad
Last Modified: 2019-01-15
License: GPL
Website: https://www.nagios.org
Reading configuration data...
   Read main config file okay...
   Read object config files okay...
Running pre-flight check on configuration data...
Checking objects...
    Checked 8 services.
    Checked 1 hosts.
    Checked 1 host groups.
    Checked 0 service groups.
    Checked 1 contacts.
    Checked 1 contact groups.
    Checked 24 commands.
    Checked 5 time periods.
    Checked 0 host escalations.
    Checked 0 service escalations.
Checking for circular paths...
    Checked 1 hosts
    Checked 0 service dependencies
    Checked 0 host dependencies
    Checked 5 timeperiods
Checking global event handlers...
Checking obsessive compulsive processor commands...
Checking misc settings...
Total Warnings: 0
Total Errors:   0
Things look okay - No serious problems were detected during the pre-flight check
3、安装nagios插件(监控功能通过插件完成)
上述安装的Nagios主程序只是一个控制中心,而能够起到服务监测和系统监测等功能的是众多Nagios的插件,没有插件的Nagios系统其实只是一个空壳。因此在安装了Nagios平台之后我们还需要安装插件。
[root@localhost ~]# yum install -y gcc glibc glibc-common make gettext automake autoconf wget openssl-devel net-snmp net-snmp-utils epel-release
[root@localhost ~]# yum install -y perl-Net-SNMP
或者
[root@localhost ~]# cd /tmp
[root@localhost ~]# wget https://dl.fedoraproject.org/pub/epel/epel-release-latest-7.noarch.rpm
[root@localhost ~]# rpm -ihv epel-release-latest-7.noarch.rpm
[root@localhost ~]# subscription-manager repos --enable=rhel-7-server-optional-rpms
[root@localhost ~]# yum install -y gcc glibc glibc-common make gettext automake autoconf wget openssl-devel net-snmp net-snmp-utils
[root@localhost ~]# yum install -y perl-Net-SNMP
[root@localhost ~]# cd /tmp
[root@localhost ~]# wget --no-check-certificate -O nagios-plugins.tar.gz https://github.com/nagios-plugins/nagios-plugins/archive/release-2.2.1.tar.gz
[root@localhost ~]# tar zxvf nagios-plugins.tar.gz
[root@localhost ~]# cd /tmp/nagios-plugins-release-2.2.1/
[root@localhost nagios-plugins-release-2.2.1]# ./tools/setup
[root@localhost nagios-plugins-release-2.2.1]# ./configure
[root@localhost nagios-plugins-release-2.2.1]# make
[root@localhost nagios-plugins-release-2.2.1]# make install
[root@localhost nagios-plugins-release-2.2.1]# systemctl start nagios.service
[root@localhost nagios-plugins-release-2.2.1]# systemctl stop nagios.service
[root@localhost nagios-plugins-release-2.2.1]# systemctl restart nagios.service
[root@localhost nagios-plugins-release-2.2.1]# systemctl status nagios.service

[root@localhost libexec]# ll /usr/local/nagios/libexec
-rwxr-xr-x 1 root root 210656 5月  31 11:54 check_apt
-rwxr-xr-x 1 root root   2354 5月  31 11:54 check_breeze
-rwxr-xr-x 1 root root 214653 5月  31 11:54 check_by_ssh
lrwxrwxrwx 1 root root      9 5月  31 11:54 check_clamd -> check_tcp
-rwxr-xr-x 1 root root 163022 5月  31 11:54 check_cluster
-r-sr-xr-x 1 root root 211527 5月  31 11:54 check_dhcp
-rwxr-xr-x 1 root root 227293 5月  31 11:54 check_disk
-rwxr-xr-x 1 root root   9477 5月  31 11:54 check_disk_smb
-rwxr-xr-x 1 root root 127110 5月  31 11:54 check_dummy
-rwxr-xr-x 1 root root   3868 5月  31 11:54 check_file_age
-rwxr-xr-x 1 root root   6512 5月  31 11:54 check_flexlm
lrwxrwxrwx 1 root root      9 5月  31 11:54 check_ftp -> check_tcp
-rwxr-xr-x 1 root root 209501 5月  31 11:54 check_hpjd
-rwxr-xr-x 1 root root 375004 5月  31 11:54 check_http
-r-sr-xr-x 1 root root 227225 5月  31 11:54 check_icmp
-rwxr-xr-x 1 root root 169900 5月  31 11:54 check_ide_smart
-rwxr-xr-x 1 root root  15283 5月  31 11:54 check_ifoperstatus
-rwxr-xr-x 1 root root  13435 5月  31 11:54 check_ifstatus
lrwxrwxrwx 1 root root      9 5月  31 11:54 check_imap -> check_tcp
-rwxr-xr-x 1 root root   6992 5月  31 11:54 check_ircd
lrwxrwxrwx 1 root root      9 5月  31 11:54 check_jabber -> check_tcp
-rwxr-xr-x 1 root root 187685 5月  31 11:54 check_load
-rwxr-xr-x 1 root root   6673 5月  31 11:54 check_log
-rwxr-xr-x 1 root root  22741 5月  31 11:54 check_mailq
-rwxr-xr-x 1 root root 173210 5月  31 11:54 check_mrtg
-rwxr-xr-x 1 root root 170431 5月  31 11:54 check_mrtgtraf
-rwxr-xr-x 1 root root 186817 5月  31 11:54 check_nagios
lrwxrwxrwx 1 root root      9 5月  31 11:54 check_nntp -> check_tcp
lrwxrwxrwx 1 root root      9 5月  31 11:54 check_nntps -> check_tcp
-rwxr-xr-x 1 root root 219815 5月  31 11:54 check_nt
-rwxr-xr-x 1 root root 218463 5月  31 11:54 check_ntp
-rwxr-xr-x 1 root root 208212 5月  31 11:54 check_ntp_peer
-rwxr-xr-x 1 root root 207193 5月  31 11:54 check_ntp_time
-rwxr-xr-x 1 root root 250160 5月  31 11:54 check_nwstat
-rwxr-xr-x 1 root root   9461 5月  31 11:54 check_oracle
-rwxr-xr-x 1 root root 193042 5月  31 11:54 check_overcr
-rwxr-xr-x 1 root root 223263 5月  31 11:54 check_ping
lrwxrwxrwx 1 root root      9 5月  31 11:54 check_pop -> check_tcp
-rwxr-xr-x 1 root root 224192 5月  31 11:54 check_procs
-rwxr-xr-x 1 root root 185576 5月  31 11:54 check_real
-rwxr-xr-x 1 root root   9687 5月  31 11:54 check_rpc
-rwxr-xr-x 1 root root   1537 5月  31 11:54 check_sensors
lrwxrwxrwx 1 root root      9 5月  31 11:54 check_simap -> check_tcp
-rwxr-xr-x 1 root root 268781 5月  31 11:54 check_smtp
-rwxr-xr-x 1 root root 269786 5月  31 11:54 check_snmp
lrwxrwxrwx 1 root root      9 5月  31 11:54 check_spop -> check_tcp
-rwxr-xr-x 1 root root 185227 5月  31 11:54 check_ssh
lrwxrwxrwx 1 root root      9 5月  31 11:54 check_ssmtp -> check_tcp
-rwxr-xr-x 1 root root 166806 5月  31 11:54 check_swap
-rwxr-xr-x 1 root root 252843 5月  31 11:54 check_tcp
-rwxr-xr-x 1 root root 186950 5月  31 11:54 check_time
lrwxrwxrwx 1 root root      9 5月  31 11:54 check_udp -> check_tcp
-rwxr-xr-x 1 root root 199442 5月  31 11:54 check_ups
-rwxr-xr-x 1 root root 163288 5月  31 11:54 check_uptime
-rwxr-xr-x 1 root root 157647 5月  31 11:54 check_users
-rwxr-xr-x 1 root root   3040 5月  31 11:54 check_wave
-rwxr-xr-x 1 root root 157770 5月  31 11:54 negate
-rwxr-xr-x 1 root root 151307 5月  31 11:54 urlize
-rwxr-xr-x 1 root root   1914 5月  31 11:54 utils.pm
-rwxr-xr-x 1 root root   2791 5月  31 11:54 utils.sh
4、安装nrpe(在需要监控的服务器上部署)
NRPE依赖于nagios-plugins,所以要一起安装。
可参考:https://support.nagios.com/kb/article.php?id=515
[root@localhost ~]# yum install -y gcc glibc glibc-common openssl openssl-devel perl wget
[root@localhost ~]# cd /tmp
[root@localhost ~]# wget --no-check-certificate -O nrpe.tar.gz https://github.com/NagiosEnterprises/nrpe/archive/nrpe-3.2.1.tar.gz
[root@localhost ~]# tar zxvf nrpe.tar.gz
[root@localhost ~]# cd /tmp/nrpe-nrpe-3.2.1/
[root@localhost nrpe-nrpe-3.2.1]# ./configure --enable-command-args
[root@localhost nrpe-nrpe-3.2.1]# make all
[root@localhost nrpe-nrpe-3.2.1]# make install-groups-users
[root@localhost nrpe-nrpe-3.2.1]# make install
[root@localhost nrpe-nrpe-3.2.1]# make install-config

[root@localhost nrpe-nrpe-3.2.1]# echo >> /etc/services
[root@localhost nrpe-nrpe-3.2.1]# echo '# Nagios services' >> /etc/services
[root@localhost nrpe-nrpe-3.2.1]# echo 'nrpe 5666/tcp' >> /etc/services
[root@localhost nrpe-nrpe-3.2.1]# make install-init
[root@localhost nrpe-nrpe-3.2.1]# systemctl enable nrpe.service
#添加nagios服务器IP,运行服务器连接nrpe
[root@localhost nrpe-nrpe-3.2.1]# vi /usr/local/nagios/etc/nrpe.cfg
allowed_hosts=127.0.0.1,192.168.146.128
dont_blame_nrpe=1
[root@localhost nrpe-nrpe-3.2.1]# systemctl start nrpe.service
[root@localhost ~]# cat /usr/lib/systemd/system/nrpe.service
[root@localhost nrpe-nrpe-3.2.1]# /usr/local/nagios/libexec/check_nrpe -H 127.0.0.1
NRPE v3.2.1
[root@localhost nrpe-nrpe-3.2.1]# /usr/local/nagios/libexec/check_nrpe -H 192.168.146.128
NRPE v3.2.1
测试插件和NRPE
[root@localhost nrpe-nrpe-3.2.1]# vi /usr/local/nagios/etc/nrpe.cfg
command[check_load]=/usr/local/nagios/libexec/check_load -w 15,10,5 -c 30,25,20
[root@localhost nrpe-nrpe-3.2.1]# /usr/local/nagios/libexec/check_nrpe -H 127.0.0.1 -c check_load
WARNING - load average: 0.06, 0.06, 0.09|load1=0.060;0.150;0.300;0; load5=0.060;0.100;0.250;0; load15=0.090;0.050;0.200;0;

[root@localhost ~]# netstat -tnlp
Active Internet connections (only servers)
Proto Recv-Q Send-Q Local Address           Foreign Address         State       PID/Program name
tcp        0      0 0.0.0.0:22              0.0.0.0:*               LISTEN      1062/sshd
tcp        0      0 127.0.0.1:25            0.0.0.0:*               LISTEN      1372/master
tcp        0      0 0.0.0.0:5666            0.0.0.0:*               LISTEN      60275/nrpe
tcp6       0      0 :::80                   :::*                    LISTEN      57918/httpd
tcp6       0      0 :::22                   :::*                    LISTEN      1062/sshd
tcp6       0      0 ::1:25                  :::*                    LISTEN      1372/master
tcp6       0      0 :::5666                 :::*                    LISTEN      60275/nrpe
5、安装PNP插件(监控功能通过插件完成)
可参考:https://www.cnblogs.com/caoguo/p/5022230.html
[root@localhost ~]# yum -y install rrdtool librrds-perl perl-rrdtool -y
[root@localhost ~]# tar zxvf pnp4nagios-0.6.26.tar.gz
[root@localhost ~]# cd pnp4nagios-0.6.26
[root@localhost pnp4nagios-0.6.26]# ./configure --with-nagios-user=nagios --with-nagios-group=nagios
[root@localhost pnp4nagios-0.6.26]# make all
[root@localhost pnp4nagios-0.6.26]# make install
[root@localhost pnp4nagios-0.6.26]# make install-webconf
[root@localhost pnp4nagios-0.6.26]# make install-config
[root@localhost pnp4nagios-0.6.26]# make install-init
[root@localhost pnp4nagios-0.6.26]# cd ./sample-config
[root@localhost pnp4nagios-0.6.26]# make install-webconf
配置pnp4nagios
[root@localhost pnp4nagios-0.6.26]# cd /usr/local/pnp4nagios/etc/
[root@localhost etc]# mv misccommands.cfg-sample misccommands.cfg
[root@localhost etc]# mv rra.cfg-sample rra.cfg
[root@localhost etc]# mv nagios.cfg-sample nagios.cfg
[root@localhost etc]# cd pages/
[root@localhost pages]# mv web_traffic.cfg-sample web_traffic.cfg
[root@localhost pages]# cd ../check_commands/
[root@localhost check_commands]# mv check_all_local_disks.cfg-sample check_all_local_disks.cfg
[root@localhost check_commands]# mv check_nrpe.cfg-sample check_nrpe.cfg
[root@localhost check_commands]# mv check_nwstat.cfg-sample check_nwstat.cfg
[root@localhost check_commands]# /etc/init.d/npcd start
[root@localhost check_commands]# chkconfig npcd on
配置Nagios数据输出接口(以BULK模式运行)详情参考官网https://docs.pnp4nagios.org/pnp-0.6/config#bulk_mode:
[root@localhost ~]# vi /usr/local/nagios/etc/nagios.cfg
process_performance_data=1 #默认为0,修改为1
并在该文件中添加下面的内容
#
# service performance data
#
service_perfdata_file=/usr/local/pnp4nagios/var/service-perfdata
service_perfdata_file_template=DATATYPE::SERVICEPERFDATA\tTIMET::$TIMET$\tHOSTNAME::$HOSTNAME$\tSERVICEDESC::$SERVICEDESC$\tSERVICEPERFDATA::$SERVICEPERFDATA$\tSERVICECHECKCOMMAND::$SERVICECHECKCOMMAND$\tHOSTSTATE::$HOSTSTATE$\tHOSTSTATETYPE::$HOSTSTATETYPE$\tSERVICESTATE::$SERVICESTATE$\tSERVICESTATETYPE::$SERVICESTATETYPE$
service_perfdata_file_mode=a
service_perfdata_file_processing_interval=15
service_perfdata_file_processing_command=process-service-perfdata-file
#
# host performance data starting with Nagios 3.0
#
host_perfdata_file=/usr/local/pnp4nagios/var/host-perfdata
host_perfdata_file_template=DATATYPE::HOSTPERFDATA\tTIMET::$TIMET$\tHOSTNAME::$HOSTNAME$\tHOSTPERFDATA::$HOSTPERFDATA$\tHOSTCHECKCOMMAND::$HOSTCHECKCOMMAND$\tHOSTSTATE::$HOSTSTATE$\tHOSTSTATETYPE::$HOSTSTATETYPE$
host_perfdata_file_mode=a
host_perfdata_file_processing_interval=15
host_perfdata_file_processing_command=process-host-perfdata-file
配置command.cfg:
[root@localhost ~]# vi /usr/local/nagios/etc/objects/commands.cfg
在该文件中添加下面的内容
define command{
       command_name    process-service-perfdata-file
       command_line    /usr/local/pnp4nagios/libexec/process_perfdata.pl --bulk=/usr/local/pnp4nagios/var/service-perfdata
}
define command{
       command_name    process-host-perfdata-file
       command_line    /usr/local/pnp4nagios/libexec/process_perfdata.pl --bulk=/usr/local/pnp4nagios/var/host-perfdata
}
在模板配置文件中添加图表图标模板:
[root@localhost ~]# vi /usr/local/nagios/etc/objects/templates.cfg
在该文件中添加下面的内容
define host {
   name       host-pnp
   action_url /pnp4nagios/index.php/graph?host=$HOSTNAME$&srv=_HOST_
   register   0
}
define service {
  name       service-pnp
  action_url /pnp4nagios/index.php/graph?host=$HOSTNAME$&srv=$SERVICEDESC$
   register   0
}
在监控主机和服务中调用图表模板(在主机和服务后面添加新的模板):
[root@localhost ~]# vi /usr/local/nagios/etc/objects/localhost.cfg
按下面的内容修改(不是添加)该文件
define host{
        use                     linux-server,host-pnp
        host_name               localhost
        alias                   localhost
        address                 127.0.0.1
        }
define service{
        use                            local-service,service-pnp
        host_name                       localhost
        service_description             PING
        check_command           check_ping!100.0,20%!500.0,60%
        }
define service{
        use                            local-service,service-pnp
        host_name                       localhost
        service_description             Root Partition
        check_command           check_local_disk!20%!10%!/
        }
重启nagios和apache:
[root@localhost ~]# systemctl restart nagios.service
[root@localhost ~]# systemctl restart httpd.service
访问nagios界面即可看到图表小图标:
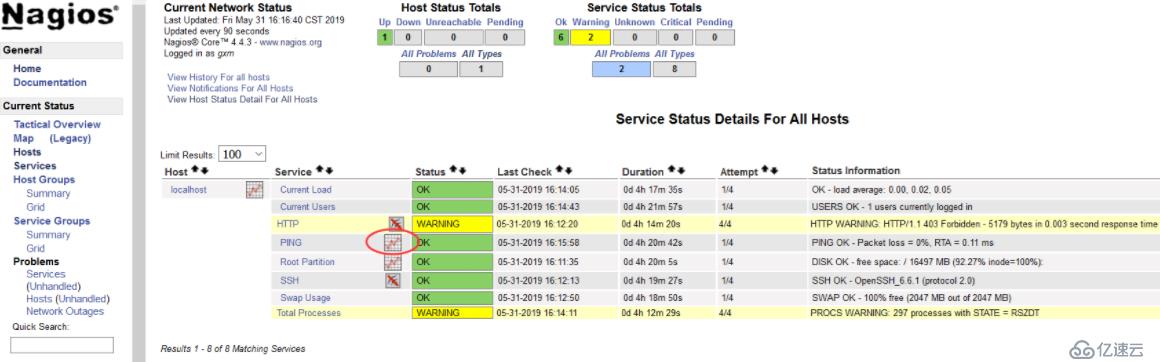


要全绿色,不绿色就按照提示解决。
[root@localhost check_commands]# mv /usr/local/pnp4nagios/share/install.php /tmp/
全绿色后刷新,正常如下:

监控本机
==============================================================================
[root@localhost ~]# cd /usr/local/nagios/etc/objects
[root@localhost ~]# vim localhost.cfg
define host{
       use                     linux-server
       host_name               localhost
       alias                   localhost
       address                 127.0.0.1
       }
# Define an optional hostgroup for Linux machines
define hostgroup{
       hostgroup_name  linux-servers ; The name of the hostgroup
       alias           Linux Servers ; Long name of the group
       members         localhost     ; Comma separated list of hosts that belong to this group
       }
# Define a service to "ftp" the local machine
define service{
       use                             local-service         ; Name of service template to use
       host_name                       localhost
       service_description             FTP
       check_command                   check_ftp
       }
# Define a service to "nfs" the local machine
define service{
       use                             local-service         ; Name of service template to use
       host_name                       localhost
       service_description             NFS
       check_command                   check_tcp!2049
       }
监控远程主机
==============================================================================
[root@localhost ~]# cd /usr/local/nagios/etc/objects
[root@localhost ~]# cp localhost.cfg 192.168.0.164.cfg
[root@localhost ~]# vim 192.168.0.164.cfg
define host{
       use                     linux-server
       host_name               testserver
       alias                   host196
       address                 192.168.0.164
       }
#define hostgroup{
#        hostgroup_name  testserver ; The name of the hostgroup
#        alias           host; Long name of the group
#        members         localhost   ; Comma separated list of hosts that belong to this group
#}
define service{
       use                             local-service
       host_name                       testserver
       service_description             PING
       check_command                   check_ping!100.0,20%!500.0,60%
       }
define service{
       use                             local-service
host_name                       testserver
       service_description             HTTP
       check_command                   check_http
#       notifications_enabled           0
       }
define service{
       use                             local-service
       host_name                       testserver
       service_description             NFS
       check_command                   check_tcp!2049
#       notifications_enabled           0
       }
=============================================================================
更改主配置文件
[root@localhost ~]# vim /usr/local/nagios/etc/nagios.cfg
添加一行
cfg_file=/usr/local/nagios/etc/objects/192.168.122.100.cfg
检测新的配置文件是否正确
[root@localhost ~]# /usr/local/nagios/bin/nagios -v /usr/local/nagios/etc/nagios.cfg
Total Warnings: 0
Total Errors:   0
Things look okay - No serious problems were detected during the pre-flight check
重启nagios,web登录确认是否新增了主机。
监控本机和远程主机参考:
https://blog.51cto.com/1585654/1386857
nagios默认不用mysql存储,可以使用NDOUtils插件实现mysql存储:
https://support.nagios.com/kb/article/ndoutils-installing-ndoutils-406.html
免责声明:本站发布的内容(图片、视频和文字)以原创、转载和分享为主,文章观点不代表本网站立场,如果涉及侵权请联系站长邮箱:is@yisu.com进行举报,并提供相关证据,一经查实,将立刻删除涉嫌侵权内容。


