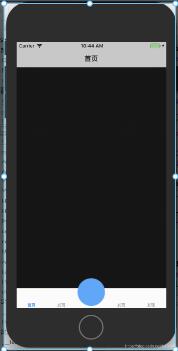
这篇文章主要讲解了iOS如何自定义UITabBar中间按钮,内容清晰明了,对此有兴趣的小伙伴可以学习一下,相信大家阅读完之后会有帮助。
自定义YLTbaBar继承自UITabBar
git地址
YLTbaBar.h
//
// YLTabBar.h
// 自定义tabbar
//
// Created by nyl on 2018/10/15.
// Copyright © 2018年 nieyinlong. All rights reserved.
//

#import <UIKit/UIKit.h>
//tab页面个数
typedef NS_ENUM(NSInteger, kTbaBarItemUIType) {
 kTbaBarItemUIType_Three = 3,//底部3个选项
 kTbaBarItemUIType_Five = 5,//底部5个选项
};

@class YLTabBar;

@protocol YLTabBarDelegate <NSObject>

-(void)tabBar:(YLTabBar *)tabBar clickCenterButton:(UIButton *)sender;

@end


@interface YLTabBar : UITabBar

@property (nonatomic, weak) id<YLTabBarDelegate> tabDelegate;
@property (nonatomic, strong) NSString *centerBtnTitle;
@property (nonatomic, strong) NSString *centerBtnIcon;

+ (instancetype)instanceCustomTabBarWithType:(kTbaBarItemUIType)type;

@end
YLTbaBar.m
//
// YLTabBar.m
// 自定义tabbar
//
// Created by nyl on 2018/10/15.
// Copyright © 2018年 nieyinlong. All rights reserved.
//

#import "YLTabBar.h"

@interface YLTabBar()

@property(nonatomic, strong) UIButton *centerButton;
@property(nonatomic, strong) UILabel *centerTitle;
@property (nonatomic,assign) kTbaBarItemUIType type;

@end

@implementation YLTabBar

+(instancetype)instanceCustomTabBarWithType:(kTbaBarItemUIType)type{
 YLTabBar *tabBar = [[YLTabBar alloc] init];
 tabBar.type = type;
 return tabBar;
}

-(instancetype)initWithFrame:(CGRect)frame{
 self = [super initWithFrame:frame];
 if (self) {
 self.translucent = NO;
 UIButton *plusBtn = [UIButton buttonWithType:UIButtonTypeCustom];
 self.centerButton = plusBtn;
 [plusBtn addTarget:self action:@selector(plusBtnDidClick) forControlEvents:UIControlEventTouchUpInside];
 [self addSubview:plusBtn];

 UILabel *lblTitle = [[UILabel alloc] init];
 self.centerTitle = lblTitle;
 lblTitle.font = [UIFont systemFontOfSize:10];
 lblTitle.textColor = [UIColor blackColor];
 lblTitle.textAlignment = NSTextAlignmentCenter;
 [self addSubview:lblTitle];

 }
 return self;
}

-(void)plusBtnDidClick{
 if (self.tabDelegate && [self.tabDelegate respondsToSelector:@selector(tabBar:clickCenterButton:)]) {
 [self.tabDelegate tabBar:self clickCenterButton:self.centerButton];
 }
}


// 调整子视图的布局
-(void)layoutSubviews{
 [super layoutSubviews];
 CGFloat width = self.frame.size.width/self.type;
 Class class = NSClassFromString(@"UITabBarButton");
 for (UIView *view in self.subviews) {
 if ([view isEqual:self.centerTitle]) {//self.centerButton
  view.frame = CGRectMake(0, 0, width, 15);
  view.center = CGPointMake(self.frame.size.width/2, self.frame.size.height - view.frame.size.height + 8);
 }else if ([view isEqual:self.centerButton]) {//self.centerButton
  view.frame = CGRectMake(0, 0, width, self.frame.size.height);
  [view sizeToFit];
  view.center = CGPointMake(self.frame.size.width/2, 10);
 }else if ([view isKindOfClass:class]){//system button
  CGRect frame = view.frame;
  int indexFromOrign = view.frame.origin.x/width;//防止UIView *view in self.subviews 获取到的不是有序的
  if (indexFromOrign >= (self.type - 1) / 2) {
  indexFromOrign++;
  }
  CGFloat x = indexFromOrign * width;
  //如果是系统的UITabBarButton,那么就调整子控件位置,空出中间位置
  view.frame = CGRectMake(x, view.frame.origin.y, width, frame.size.height);

  //调整badge postion
  for (UIView *badgeView in view.subviews){
  NSString *className = NSStringFromClass([badgeView class]);
  // Looking for _UIBadgeView
  if ([className rangeOfString:@"BadgeView"].location != NSNotFound){
   badgeView.layer.transform = CATransform3DIdentity;
   badgeView.layer.transform = CATransform3DMakeTranslation(-17.0, 1.0, 1.0);
   break;
  }
  }
 }
 }
}

-(UIView *)hitTest:(CGPoint)point withEvent:(UIEvent *)event{
 //这一个判断是关键,不判断的话push到其他页面,点击发布按钮的位置也是会有反应的,这样就不好了
 //self.isHidden == NO 说明当前页面是有tabbar的,那么肯定是在导航控制器的根控制器页面
 //在导航控制器根控制器页面,那么我们就需要判断手指点击的位置是否在发布按钮身上
 //是的话让发布按钮自己处理点击事件,不是的话让系统去处理点击事件就可以了
 if (self.isHidden == NO) {
 //将当前tabbar的触摸点转换坐标系,转换到发布按钮的身上,生成一个新的点
 CGPoint newP = [self convertPoint:point toView:self.centerButton];

 //判断如果这个新的点是在发布按钮身上,那么处理点击事件最合适的view就是发布按钮
 if ( [self.centerButton pointInside:newP withEvent:event]) {
  return self.centerButton;
 }else{//如果点不在发布按钮身上,直接让系统处理就可以了
  return [super hitTest:point withEvent:event];
 }
 }
 else {//tabbar隐藏了,那么说明已经push到其他的页面了,这个时候还是让系统去判断最合适的view处理就好了
 return [super hitTest:point withEvent:event];
 }
}

-(void)setCenterBtnIcon:(NSString *)centerBtnIcon{
 _centerBtnIcon = centerBtnIcon;
 [self.centerButton setBackgroundImage:[UIImage imageNamed:self.centerBtnIcon] forState:UIControlStateNormal];
 [self.centerButton setBackgroundImage:[UIImage imageNamed:self.centerBtnIcon] forState:UIControlStateHighlighted];
}

-(void)setCenterBtnTitle:(NSString *)centerBtnTitle{
 _centerBtnTitle = centerBtnTitle;
 self.centerTitle.text = centerBtnTitle;
}


@end
在UITabBarController中使用
// viewDidLoda中, KVO形式添加
[self setValue:self.ylTabBar forKey:@"tabBar"];

- (YLTabBar *)ylTabBar {
 if (!_ylTabBar) {
 _ylTabBar = [YLTabBar instanceCustomTabBarWithType:kTbaBarItemUIType_Five];
 _ylTabBar.centerBtnIcon = @"centerIcon";
 _ylTabBar.tabDelegate = self;
 }
 return _ylTabBar;
}
YLTabBarDelegate
-(void)tabBar:(YLTabBar *)tabBar clickCenterButton:(UIButton *)sender{
 UIAlertController *alert = [UIAlertController alertControllerWithTitle:@"提示" message:@"点击了中间按钮" preferredStyle:UIAlertControllerStyleAlert];
 UIAlertAction *action = [UIAlertAction actionWithTitle:@"OK" style:UIAlertActionStyleCancel handler:^(UIAlertAction * _Nonnull action) {

 // TODO
 }];
 [alert addAction:action];
 [self presentViewController:alert animated:YES completion:nil];
}
看完上述内容,是不是对iOS如何自定义UITabBar中间按钮有进一步的了解,如果还想学习更多内容,欢迎关注亿速云行业资讯频道。
免责声明:本站发布的内容(图片、视频和文字)以原创、转载和分享为主,文章观点不代表本网站立场,如果涉及侵权请联系站长邮箱:is@yisu.com进行举报,并提供相关证据,一经查实,将立刻删除涉嫌侵权内容。


