直接用iPhoneX截图后是没有圆角和刘海的,就像下面这样。

其实加圆角和刘海也很简单
第一步:截屏
第二步:打开我这个软件,并选取图片库中的那张图
第三步:添加圆角,刘海
第四步:将做好的图片保存到相册
还需要下边这张刘海的图片
可以上代码了(目前原图是固定的,没有从图片库选取)
//
// ViewController.m
// iPhoneXPhotoEdit
//
// Created by yfc on 2017/12/23.
// Copyright © 2017年 yfc. All rights reserved.
//
#import "ViewController.h"
#import <AssetsLibrary/AssetsLibrary.h>
#import <Photos/Photos.h>
@interface ViewController ()
@end
@implementation ViewController
- (void)viewDidLoad {
 [super viewDidLoad];

 UIButton *btn = [[UIButton alloc]init];
 btn.frame = CGRectMake(10, 44, 350, 758);
 btn.frame = CGRectMake(0, 0, 375, 812);
 [btn setBackgroundImage:[UIImage imageNamed:@"IMG_3655.PNG"] forState:UIControlStateNormal];
 //添加圆角
 btn.layer.cornerRadius = 35 ;
 btn.layer.borderColor = [UIColor blackColor].CGColor;
 btn.layer.borderWidth = 2;
 [self.view addSubview:btn];
 btn.backgroundColor = [UIColor whiteColor];
 btn.clipsToBounds = YES;


 //添加刘海
 UIImageView *imageView = [[UIImageView alloc]initWithImage:[UIImage imageNamed:@"liuhai.png"]];
 imageView.frame = CGRectMake(70, 0, 222, 28);
 [btn addSubview:imageView];

 self.view.backgroundColor = [UIColor clearColor];

 //截图保存到相册
 dispatch_after(dispatch_time(DISPATCH_TIME_NOW, (int64_t)(1 * NSEC_PER_SEC)), dispatch_get_main_queue(), ^{
  [self saveBtnAction:nil];
 });

}
-(void)saveBtnAction:(UIButton *)sender{
 [self requestAuthorizationStatus];
}
//查看权限
- (void)requestAuthorizationStatus
{
 [PHPhotoLibrary requestAuthorization:^(PHAuthorizationStatus status){
  dispatch_async(dispatch_get_main_queue(), ^{
   switch (status) {
    case PHAuthorizationStatusAuthorized:
    {
     [self cutScreen];
     break;
    }
    default://Denied
    {
     break;
    }
   }
  });
 }];
}
//截屏
-(void)cutScreen{
 UIGraphicsBeginImageContextWithOptions(self.view.bounds.size, YES, 0.0);
 //2.获取当前图形上下文
 CGContextRef ctx = UIGraphicsGetCurrentContext();
 //3.获取需要截取的view的layer
 [self.view.layer renderInContext:ctx];
 //4.从当前上下文获取图片
 UIImage *image = UIGraphicsGetImageFromCurrentImageContext();
 //5.关闭图形上下文
 UIGraphicsEndImageContext();
 //6.把图片保存到相册
 UIImageWriteToSavedPhotosAlbum(image, self, @selector(image:didFinishSavingWithError:contextInfo:), NULL);
}
//保存成功后回调
-(void)image:(UIImage *)image didFinishSavingWithError:(NSError *)error contextInfo:(void *)contextInfo{
 NSString *msg = nil;
 if (error) {
  msg = @"图片保存失败";
 }else{
  msg = @"图片保存成功";
 }
 UIAlertView *alertView = [[UIAlertView alloc] initWithTitle:@"提示" message:msg delegate:self cancelButtonTitle:@"确定" otherButtonTitles:nil, nil];
 [alertView show];
}
@end
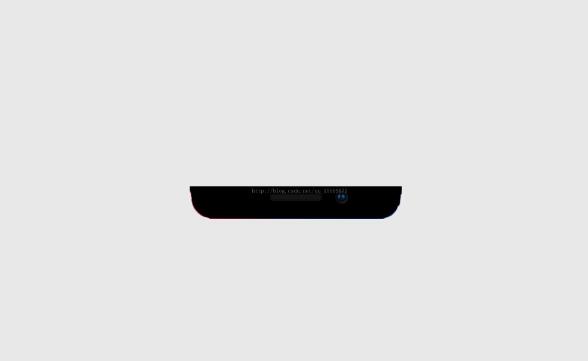
效果图是

以上这篇详谈iPhoneX截图如何带"刘海"和圆角就是小编分享给大家的全部内容了,希望能给大家一个参考,也希望大家多多支持亿速云。
免责声明:本站发布的内容(图片、视频和文字)以原创、转载和分享为主,文章观点不代表本网站立场,如果涉及侵权请联系站长邮箱:is@yisu.com进行举报,并提供相关证据,一经查实,将立刻删除涉嫌侵权内容。


