这篇文章将为大家详细讲解有关SpringBoot中怎么实现图片上传,文章内容质量较高,因此小编分享给大家做个参考,希望大家阅读完这篇文章后对相关知识有一定的了解。
1、先贴图片上传工具类
package com.prereadweb.utils;

import java.io.File;
import java.io.FileOutputStream;
import java.util.UUID;


public class FileTool {

  /**
   * @Function: 图片上传
   * @author:  YangXueFeng
   * @Date:   2019/4/18 14:13
   */
  public static void uploadFiles(byte[] file, String filePath, String fileName) throws Exception {
    File targetFile = new File(filePath);
    if (!targetFile.exists()) {
      targetFile.mkdirs();
    }
    FileOutputStream out = new FileOutputStream(filePath + fileName);
    out.write(file);
    out.flush();
    out.close();
  }

  /**
   * @Function: 创建新的文件名
   * @author:  YangXueFeng
   * @Date:   2019/4/17 17:57
   */
  public static String renameToUUID(String fileName) {
    return UUID.randomUUID() + "." + fileName.substring(fileName.lastIndexOf(".") + 1);
  }
}
2、contoller层
  @PostMapping("/postfile")
  public Object fileUpload(@RequestParam(value = "userImg", required = false) MultipartFile file, @RequestParam(value = "userId", required = false) Long userId) {
    return personalService.fileUpload(file, userId);
  }
此处提一下@RequestParam注解
value:前台所传参数的名称
required:它有两个参数,true/false,默认是true,如果设置的是true的,客户端如果传值为空的话,访问此接口会报500异常,如果是false的话,客户端传值为空,会默认给参数赋值null
3、service层
  @Override
  public Map<String, Object> fileUpload(MultipartFile file, Long userId) {
    Map<String, Object> map = new HashMap<>();
    if (Util.isEmpty(file)) {
      System.out.println("文件为空空");
      map.put("code", UserStatusEnum.EMPTY.intKey());
      map.put("msg", UserStatusEnum.EMPTY.value());
      return map;
    }
    UserEntity user = userMapper.fetchUser(userId);
    if(Util.isEmpty(user)){
      map.put("code", UserStatusEnum.USER_NOT_EXISTENCE.intKey());
      map.put("msg", UserStatusEnum.USER_NOT_EXISTENCE.value());
      return map;
    }

    String fileName = file.getOriginalFilename();
    fileName = FileTool.renameToUUID(fileName);
    try {
      FileTool.uploadFiles(file.getBytes(), uploadConfig.getUploadPath(), fileName);
    } catch (Exception e) {
    }
    if (Util.isEmpty(fileName)) {
      map.put("code", UserStatusEnum.USER_NOT_EXISTENCE.intKey());
      map.put("msg", UserStatusEnum.USER_NOT_EXISTENCE.value());
      return map;
    }

    Map<String, Object> returnMap = new HashMap<>();
    String url = "/static/" + fileName;
    updateUrl(userId, url);
    returnMap.put("imageUrl", url);
    map.put("code", UserStatusEnum.SUCCESS.intKey());
    map.put("msg", UserStatusEnum.SUCCESS.value());
    map.put("data", returnMap);
    return map;
  }
4、设置图片访问路径映射
preread:
   #文件上传目录(注意Linux和Windows上的目录结构不同)
   uploadPath: E:/image/
5、配置文件上传路径
package com.prereadweb.config.upload;

import org.springframework.boot.context.properties.ConfigurationProperties;
import org.springframework.stereotype.Component;


@Component
@ConfigurationProperties(prefix="preread")
public class PreReadUploadConfig {

  //上传路径
  private String uploadPath;

  public String getUploadPath() {
    return uploadPath;
  }

  public void setUploadPath(String uploadPath) {
    this.uploadPath = uploadPath;
  }
}
6、配置映射路径
package com.prereadweb.config.upload;

import org.springframework.beans.factory.annotation.Autowired;
import org.springframework.context.annotation.ComponentScan;
import org.springframework.context.annotation.Configuration;
import org.springframework.web.servlet.config.annotation.ResourceHandlerRegistry;
import org.springframework.web.servlet.config.annotation.WebMvcConfigurerAdapter;


@ComponentScan
@Configuration
public class WebConfigurer extends WebMvcConfigurerAdapter {

  @Autowired
  PreReadUploadConfig uploadConfig;
  @Override
  public void addResourceHandlers(ResourceHandlerRegistry registry) {
    registry.addResourceHandler("/static/**").addResourceLocations("file:///"+uploadConfig.getUploadPath());
  }
}
7、此处需要导入一个jar报
<!-- 配置 -->
 <dependency>
  <groupId> org.springframework.boot </groupId>
  <artifactId> spring-boot-configuration-processor </artifactId>
  <optional> true </optional>
</dependency>
8、postman测试接口
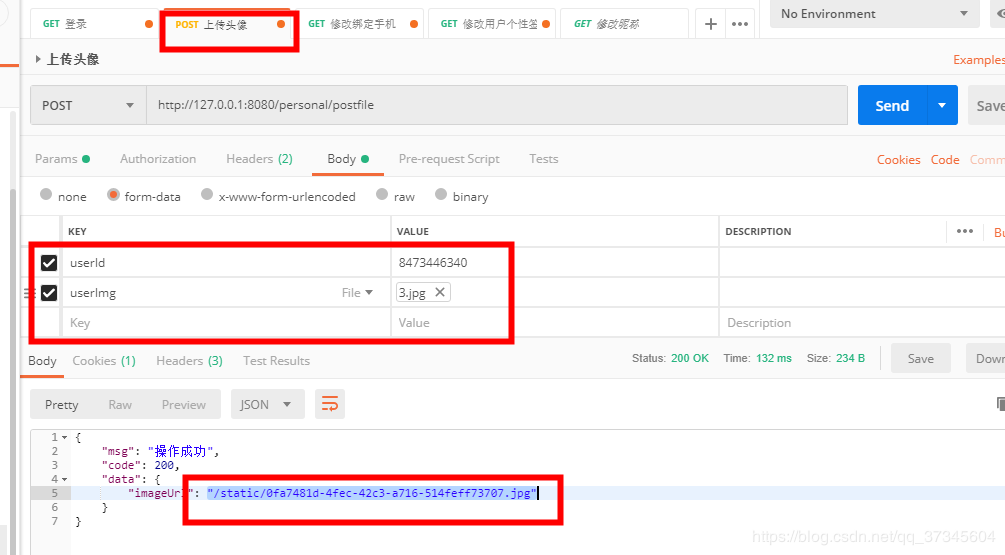
9、此时配置完成
图片的存储路径在:E:/image/
访问路径:http://127.0.0.1:8080/static/0fa7481d-4fec-42c3-a716-514feff73707.jpg
关于SpringBoot中怎么实现图片上传就分享到这里了,希望以上内容可以对大家有一定的帮助,可以学到更多知识。如果觉得文章不错,可以把它分享出去让更多的人看到。
免责声明:本站发布的内容(图片、视频和文字)以原创、转载和分享为主,文章观点不代表本网站立场,如果涉及侵权请联系站长邮箱:is@yisu.com进行举报,并提供相关证据,一经查实,将立刻删除涉嫌侵权内容。


