目前主流的消息中间件有activemq,rabbitmq,rocketmq,kafka,我们要根据实际的业务场景来选择一款合适的消息中间件,关注的主要指标有,消息投递的可靠性,可维护性,吞吐量以及中间件的特色等重要指标来选择,大数据领域肯定是kafka,那么传统的业务场景就是解耦,异步,削峰。那么就在剩下的3款产品中选择一款,从吞吐量,社区的活跃度,消息的可靠性出发,一般的中小型公司选择rabbitmq来说可能更为合适。那么我们就来看看如何使用它吧。
环境准备
本案例基于springboot集成rabbitmq,本案例主要侧重要实际的code,对于基础理论知识请自行百度。
jdk-version:1.8
rabbitmq-version:3.7
springboot-version:2.1.4.RELEASE
pom文件
 <dependency>
 <groupId>org.springframework.boot</groupId>
 <artifactId>spring-boot-starter-amqp</artifactId>
</dependency>
yml配置文件
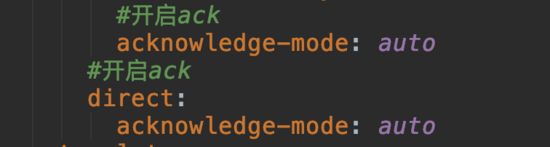
spring:
 rabbitmq:
 password: guest
 username: guest
 port: 5672
 addresses: 127.0.0.1
 #开启发送失败返回
 publisher-returns: true
 #开启发送确认
 publisher-confirms: true
 listener:
  simple:
  #指定最小的消费者数量.
  concurrency: 2
  #指定最大的消费者数量.
  max-concurrency: 2
  #开启ack
  acknowledge-mode: auto
  #开启ack
  direct:
  acknowledge-mode: auto
 #支持消息的确认与返回
 template:
  mandatory: true
配置rabbitMq的姿势
姿势一
基于javaconfig
package com.lly.order.message;
import org.springframework.amqp.core.*;
import org.springframework.context.annotation.Bean;
import org.springframework.context.annotation.Configuration;
/**
* @ClassName RabbitMqConfig
* @Description rabbitMq配置类
* @Author lly
* @Date 2019-05-13 15:05
* @Version 1.0
**/
@Configuration
public class RabbitMqConfig {
public final static String DIRECT_QUEUE = "directQueue";
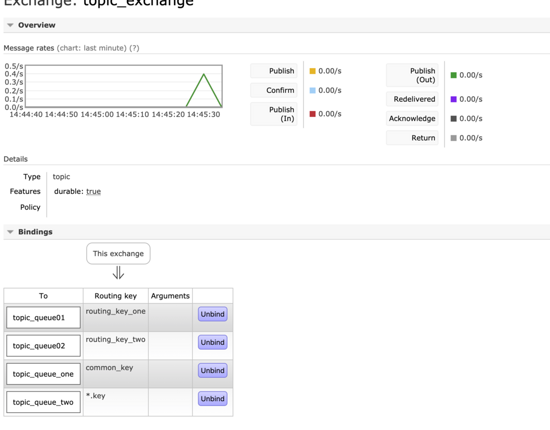
public final static String TOPIC_QUEUE_ONE = "topic_queue_one";
public final static String TOPIC_QUEUE_TWO = "topic_queue_two";
public final static String FANOUT_QUEUE_ONE = "fanout_queue_one";
public final static String FANOUT_QUEUE_TWO = "fanout_queue_two";
public final static String TOPIC_EXCHANGE = "topic_exchange";
public final static String FANOUT_EXCHANGE = "fanout_exchange";
public final static String TOPIC_ROUTINGKEY_ONE = "common_key";
public final static String TOPIC_ROUTINGKEY_TWO = "*.key";
// direct模式队列
@Bean
public Queue directQueue() {
return new Queue(DIRECT_QUEUE, true);
}
// topic 订阅者模式队列
@Bean
public Queue topicQueueOne() {
return new Queue(TOPIC_QUEUE_ONE, true);
}
@Bean
public Queue topicQueueTwo() {
return new Queue(TOPIC_QUEUE_TWO, true);
}
// fanout 广播者模式队列
@Bean
public Queue fanoutQueueOne() {
return new Queue(FANOUT_QUEUE_ONE, true);
}
@Bean
public Queue fanoutQueueTwo() {
return new Queue(FANOUT_QUEUE_TWO, true);
}
// topic 交换器
@Bean
public TopicExchange topExchange() {
return new TopicExchange(TOPIC_EXCHANGE);
}
// fanout 交换器
@Bean
public FanoutExchange fanoutExchange() {
return new FanoutExchange(FANOUT_EXCHANGE);
}
// 订阅者模式绑定
@Bean
public Binding topExchangeBingingOne() {
return BindingBuilder.bind(topicQueueOne()).to(topExchange()).with(TOPIC_ROUTINGKEY_ONE);
}
@Bean
public Binding topicExchangeBingingTwo() {
return BindingBuilder.bind(topicQueueTwo()).to(topExchange()).with(TOPIC_ROUTINGKEY_TWO);
}
// 广播模式绑定
@Bean
public Binding fanoutExchangeBingingOne() {
return BindingBuilder.bind(fanoutQueueOne()).to(fanoutExchange());
}
@Bean
public Binding fanoutExchangeBingingTwo() {
return BindingBuilder.bind(fanoutQueueTwo()).to(fanoutExchange());
}
}
姿势二
基于注解
package com.lly.order.message;
import com.rabbitmq.client.Channel;
import lombok.extern.slf4j.Slf4j;
import org.springframework.amqp.core.AmqpTemplate;
import org.springframework.amqp.core.ExchangeTypes;
import org.springframework.amqp.core.Message;
import org.springframework.amqp.rabbit.annotation.Exchange;
import org.springframework.amqp.rabbit.annotation.Queue;
import org.springframework.amqp.rabbit.annotation.QueueBinding;
import org.springframework.amqp.rabbit.annotation.RabbitListener;
import org.springframework.amqp.rabbit.connection.CorrelationData;
import org.springframework.amqp.rabbit.core.RabbitTemplate;
import org.springframework.beans.factory.annotation.Autowired;
import org.springframework.stereotype.Component;
import java.io.IOException;
import java.time.LocalTime;
import java.util.UUID;
/**
* @ClassName MQTest
* @Description 消息队列测试
* @Author lly
* @Date 2019-05-13 10:50
* @Version 1.0
**/
@Component
@Slf4j
public class MQTest implements RabbitTemplate.ConfirmCallback, RabbitTemplate.ReturnCallback {
private final static String QUEUE = "test_queue";
@Autowired
private AmqpTemplate amqpTemplate;
@Autowired
private RabbitTemplate rabbitTemplate;
public MQTest(RabbitTemplate rabbitTemplate) {
rabbitTemplate.setConfirmCallback(this);
rabbitTemplate.setReturnCallback(this);
}
public void sendMq() {
rabbitTemplate.convertAndSend("test_queue", "test_queue" + LocalTime.now());
log.info("发送消息:{}", "test_queue" + LocalTime.now());
}
public void sendMqRabbit() {
//回调id
CorrelationData cId = new CorrelationData(UUID.randomUUID().toString());
// rabbitTemplate.convertAndSend(RabbitMqConfig.FANOUT_EXCHANGE, "", "广播者模式测试",cId);
Object object = rabbitTemplate.convertSendAndReceive(RabbitMqConfig.FANOUT_EXCHANGE, "", "广播者模式测试", cId);
log.info("发送消息:{},object:{}", "广播者模式测试" + LocalTime.now(), object);
}
//发送订阅者模式
public void sendMqExchange() {
CorrelationData cId = new CorrelationData(UUID.randomUUID().toString());
CorrelationData cId01 = new CorrelationData(UUID.randomUUID().toString());
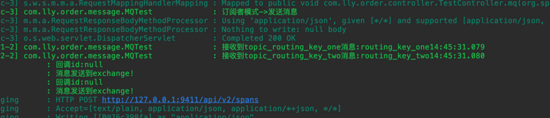
log.info("订阅者模式->发送消息:routing_key_one");
rabbitTemplate.convertSendAndReceive("topic_exchange", "routing_key_one", "routing_key_one" + LocalTime.now(), cId);
log.info("订阅者模式->发送消息routing_key_two");
rabbitTemplate.convertSendAndReceive("topic_exchange", "routing_key_two", "routing_key_two" + LocalTime.now(), cId01);
}
//如果不存在,自动创建队列
@RabbitListener(queuesToDeclare = @Queue("test_queue"))
public void receiverMq(String msg) {
log.info("接收到队列消息:{}", msg);
}
//如果不存在,自动创建队列和交换器并且绑定
@RabbitListener(bindings = {
@QueueBinding(value = @Queue(value = "topic_queue01", durable = "true"),
exchange = @Exchange(value = "topic_exchange", type = ExchangeTypes.TOPIC),
key = "routing_key_one")})
public void receiverMqExchage(String msg, Channel channel, Message message) throws IOException {
long deliveryTag = message.getMessageProperties().getDeliveryTag();
try {
log.info("接收到topic_routing_key_one消息:{}", msg);
//发生异常
log.error("发生异常");
int i = 1 / 0;
//告诉服务器收到这条消息 已经被我消费了 可以在队列删掉 这样以后就不会再发了 否则消息服务器以为这条消息没处理掉 后续还会在发
channel.basicAck(deliveryTag, false);
} catch (Exception e) {
log.error("接收消息失败,重新放回队列");
//requeu,为true,代表重新放入队列多次失败重新放回会导致队列堵塞或死循环问题,
// 解决方案,剔除此消息,然后记录到db中去补偿
//channel.basicNack(deliveryTag, false, true);
//拒绝消息
//channel.basicReject(deliveryTag, true);
}
}
@RabbitListener(bindings = {
@QueueBinding(value = @Queue(value = "topic_queue02", durable = "true"),
exchange = @Exchange(value = "topic_exchange", type = ExchangeTypes.TOPIC),
key = "routing_key_two")})
public void receiverMqExchageTwo(String msg) {
log.info("接收到topic_routing_key_two消息:{}", msg);
}
@RabbitListener(queues = RabbitMqConfig.FANOUT_QUEUE_ONE)
public void receiverMqFanout(String msg, Channel channel, Message message) throws IOException {
long deliveryTag = message.getMessageProperties().getDeliveryTag();
try {
log.info("接收到队列fanout_queue_one消息:{}", msg);
channel.basicAck(deliveryTag, false);
} catch (Exception e) {
e.printStackTrace();
//多次失败重新放回会导致队列堵塞或死循环问题 丢弃这条消息
// channel.basicNack(message.getMessageProperties().getDeliveryTag(), false, false);
log.error("接收消息失败");
}
}
@RabbitListener(queues = RabbitMqConfig.FANOUT_QUEUE_TWO)
public void receiverMqFanoutTwo(String msg) {
log.info("接收到队列fanout_queue_two消息:{}", msg);
}
/**
* @return
* @Author lly
* @Description 确认消息是否发送到exchange
* @Date 2019-05-14 15:36
* @Param [correlationData, ack, cause]
**/
@Override
public void confirm(CorrelationData correlationData, boolean ack, String cause) {
log.info("消息唯一标识id:{}", correlationData);
log.info("消息确认结果!");
log.error("消息失败原因,cause:{}", cause);
}
/**
* @return
* @Author lly
* @Description 消息消费发生异常时返回
* @Date 2019-05-14 16:22
* @Param [message, replyCode, replyText, exchange, routingKey]
**/
@Override
public void returnedMessage(Message message, int replyCode, String replyText, String exchange, String routingKey) {
log.info("消息发送失败id:{}", message.getMessageProperties().getCorrelationId());
log.info("消息主体 message : ", message);
log.info("消息主体 message : ", replyCode);
log.info("描述:" + replyText);
log.info("消息使用的交换器 exchange : ", exchange);
log.info("消息使用的路由键 routing : ", routingKey);
}
}
rabbitMq消息确认的三种方式
# 发送消息后直接确认消息
acknowledge-mode:none
# 根据消息消费的情况,智能判定消息的确认情况
acknowledge-mode:auto
# 手动确认消息的情况
acknowledge-mode:manual
我们以topic模式来试验下消息的ack
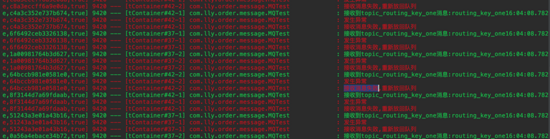
自动确认消息模式
手动确认消息模式
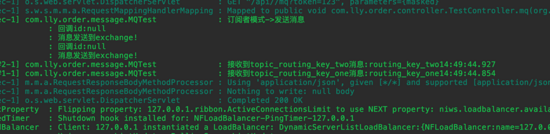

然后我们再次消费消息,发现消息是没有被确认的,所以可以被再次消费

发现同样的消息还是存在的没有被队列删除,必须手动去ack,我们修改队列1的手动ack看看效果
channel.basicAck(deliveryTag, false);
重启项目再次消费消息

再次查看队列里的消息,发现队列01里的消息被删除了,队列02的还是存在。

消费消息发生异常的情况,修改代码 模拟发生异常的情况下发生了什么, 异常发生了,消息被重放进了队列

但是会导致消息不停的循环消费,然后失败,致死循环调用大量服务器资源
所以我们正确的处理方式是,发生异常,将消息记录到db,再通过补偿机制来补偿消息,或者记录消息的重复次数,进行重试,超过几次后再放到db中。
总结
通过实际的code我们了解的rabbitmq在项目的具体的整合情况,消息ack的几种情况,方便在实际的场景中选择合适的方案来使用。如有不足,还望不吝赐教。希望对大家的学习有所帮助,也希望大家多多支持亿速云。
免责声明:本站发布的内容(图片、视频和文字)以原创、转载和分享为主,文章观点不代表本网站立场,如果涉及侵权请联系站长邮箱:is@yisu.com进行举报,并提供相关证据,一经查实,将立刻删除涉嫌侵权内容。


