Spring BootдёӯдҪҝз”ЁJDBC Templetзҡ„ж–№жі•ж•ҷзЁӢ
еүҚиЁҖ
Spring зҡ„ JDBC Templet жҳҜ Spring еҜ№ JDBC дҪҝз”Ёзҡ„дёҖдёӘеҹәжң¬зҡ„е°ҒиЈ…гҖӮд»–дё»иҰҒжҳҜеё®еҠ©зЁӢеәҸе‘ҳе®һзҺ°дәҶж•°жҚ®еә“иҝһжҺҘзҡ„з®ЎзҗҶпјҢе…¶дҪҷзҡ„дҪҝз”Ёж–№ејҸе’ҢзӣҙжҺҘдҪҝз”Ё JDBC жІЎжңүд»Җд№ҲеӨ§зҡ„еҢәеҲ«гҖӮ
дёҡеҠЎйңҖжұӮ
JDBC зҡ„дҪҝз”ЁеӨ§е®¶йғҪжҜ”иҫғзҶҹжӮүдәҶгҖӮиҝҷйҮҢдё»иҰҒдёәдәҶжј”зӨәеңЁ SpringBoot дёӯдҪҝз”Ё Spring JDBC Templet зҡ„жӯҘйӘӨпјҢжүҖд»ҘжҲ‘们е°ұи®ҫи®ЎдёҖдёӘз®ҖеҚ•зҡ„йңҖжұӮгҖӮдёҖдёӘз”ЁжҲ·еҜ№иұЎзҡ„ CURD зҡ„ж“ҚдҪңгҖӮеҜ№иұЎжңүдёӨдёӘеұһжҖ§пјҢдёҖдёӘеұһжҖ§жҳҜidпјҢдёҖдёӘеұһжҖ§жҳҜеҗҚз§°гҖӮеӯҳеӮЁеңЁ MySQL зҡ„ auth_user иЎЁйҮҢйқўгҖӮ
ж–°е»әйЎ№зӣ®е’ҢеўһеҠ дҫқиө–
еңЁ Intellij IDEA йҮҢйқўж–°е»әдёҖдёӘз©әзҡ„ SpringBoot йЎ№зӣ®гҖӮе…·дҪ“жӯҘйӘӨеҸӮиҖғ
Intellij IDEAеҲӣе»әspring-bootйЎ№зӣ®зҡ„еӣҫж–Үж•ҷзЁӢгҖӮж №жҚ®жң¬ж ·дҫӢзҡ„йңҖжұӮпјҢжҲ‘们иҰҒж·»еҠ дёӢйқўдёүдёӘдҫқиө–
<dependency>
 <groupId>org.springframework.boot</groupId>
 <artifactId>spring-boot-starter-web</artifactId>
</dependency>
<dependency>
 <groupId>org.springframework.boot</groupId>
 <artifactId>spring-boot-starter-jdbc</artifactId>
</dependency>
<dependency>
 <groupId>mysql</groupId>
 <artifactId>mysql-connector-java</artifactId>
 <version>6.0.6</version>
</dependency>
еӣ дёәиҰҒеҸ‘еёғ Http Rest зҡ„жңҚеҠЎпјҢжүҖд»Ҙж·»еҠ spring-boot-starter-web дҫқиө–пјҢиҝҷйҮҢжҲ‘们иҰҒдҪҝз”Ё JDBC Tempet ж–№жі•жқҘи®ҝй—®ж•°жҚ®еә“пјҢжүҖд»Ҙж·»еҠ дәҶ spring-boot-starter-jdbc дҫқиө–пјҢиҰҒи®ҝй—® MySQL ж•°жҚ®еә“пјҢжүҖд»Ҙж·»еҠ дәҶ MySQL жңҖж–°зүҲжң¬зҡ„ JDBC й©ұеҠЁзЁӢеәҸгҖӮ
еҮҶеӨҮж•°жҚ®еә“зҺҜеўғ
еҒҮе®ҡеңЁ Linux ж“ҚдҪңзі»з»ҹдёҠе·Із»Ҹе®үиЈ…дәҶ MySQL 5.7гҖӮд»ҘдёӢж“ҚдҪңйғҪжҳҜеңЁж“ҚдҪңзі»з»ҹзҡ„е‘Ҫд»ӨиЎҢдёӯпјҢйҖҡиҝҮ root з”ЁжҲ·зҷ»еҪ•еҲ° MySQL зҡ„е‘Ҫд»ӨиЎҢе®ўжҲ·з«Ҝдёӯжү§иЎҢзҡ„гҖӮ
е»әеә“е»әиЎЁ
create database springboot_jdbc;
create table auth_user (uuid bigint not null,name varchar(32), primary key (uuid)) default charset=utf8mb4;
и®ҫе®ҡз”ЁжҲ·жқғйҷҗ
grant all privileges on springboot_jdbc.* to 'springboot'@'%' identified by 'springboot';
flush privileges;
й…ҚзҪ®ж•°жҚ®жәҗпјҲиҝһжҺҘжұ пјү
SpringBoot зҡ„ж•°жҚ®жәҗжҳҜиҮӘеҠЁй…ҚзҪ®зҡ„гҖӮеңЁ SpringBoot 2.0 дёӯпјҢжңүеҮ з§Қж•°жҚ®жәҗй…ҚзҪ®еҸҜйҖүпјҢ他们жҢүз…§ HikariCP -> Tomcat pooling -> Commons DBCP2 дјҳе…ҲйЎәеәҸжқҘйҖүжӢ©жңҖеҗҺе®һйҷ…дҪҝз”Ёе“ӘдёӘж•°жҚ®жәҗгҖӮ
еңЁйЎ№зӣ®еҠ е…Ҙ spring-boot-starter-jdbc дҫқиө–зҡ„ж—¶еҖҷпјҢе°ұе·Із»ҸеҢ…жӢ¬дәҶ HikariCP ж•°жҚ®жәҗзҡ„дҫқиө–пјҢжүҖд»ҘиҝҷйҮҢиҮӘеҠЁй…ҚзҪ® HikariCP иҝһжҺҘжұ ж•°жҚ®жәҗгҖӮ
еңЁ appplications.properties дёӯеўһеҠ еҰӮдёӢзҡ„й…ҚзҪ®
#йҖҡз”Ёж•°жҚ®жәҗй…ҚзҪ®
spring.datasource.driver-class-name=com.mysql.cj.jdbc.Driver
spring.datasource.url=jdbc:mysql://10.110.2.5:3306/spring-boot-jdbc?charset=utf8mb4&useSSL=false
spring.datasource.username=springboot
spring.datasource.password=springboot
# Hikari ж•°жҚ®жәҗдё“з”Ёй…ҚзҪ®
spring.datasource.hikari.maximum-pool-size=20
spring.datasource.hikari.minimum-idle=5
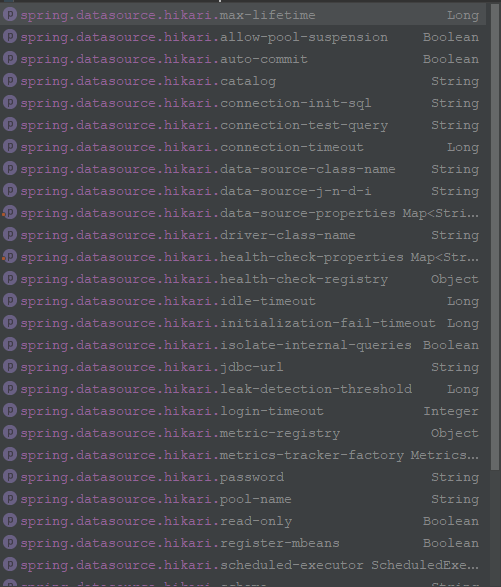
е…¶дёӯ Hikari ж•°жҚ®жәҗзҡ„еӨ§йғЁеҲҶй…ҚзҪ®еҰӮдёӢеӣҫгҖӮжҜҸдёӘй…ҚзҪ®д»ЈиЎЁзҡ„еҗ«д№үеҸҜд»ҘиҮӘиЎҢжҹҘиҜўдёҖдёӢ
зЁӢеәҸејҖеҸ‘
з”ЁжҲ·ж•°жҚ®еә“е®һдҪ“
ж №жҚ®йңҖжұӮпјҢеҜ№еә”зҡ„з”ЁжҲ·ж•°жҚ®е®һдҪ“жңүдёӨдёӘеұһжҖ§пјҢдёҖдёӘжҳҜ id пјҢдёҖдёӘжҳҜ name гҖӮиҝҷжҳҜдёҖдёӘзәҜ POJO еҜ№иұЎгҖӮ
package com.yanggaochao.springboot.learn.springbootjdbclearn.domain.dao;
/**
* з”ЁжҲ·е®һдҪ“еҜ№иұЎ
*
* @author жқЁй«ҳи¶…
* @since 2018-03-09
*/
public class UserDO {
private Long id;
private String name;
public Long getId() {
return id;
}
public void setId(Long id) {
this.id = id;
}
public String getName() {
return name;
}
public void setName(String name) {
this.name = name;
}
}
йҖҡз”Ёзҡ„ Http Rest иҝ”еӣһеҜ№иұЎ
йҖҡеёёеңЁ Http Rest жҺҘеҸЈдёӯпјҢжҲ‘们дёҚд»…жғізӣҙжҺҘиҝ”еӣһдёҡеҠЎеҜ№иұЎзҡ„еҶ…е®№пјҢиҝҳиҰҒиҝ”еӣһдёҖдәӣйҖҡз”Ёзҡ„дҝЎжҒҜпјҢдҫӢеҰӮжҺҘеҸЈи°ғз”Ёзҡ„з»“жһңпјҢи°ғз”ЁеӨұиҙҘзҡ„ж—¶еҖҷиҝ”еӣһзҡ„иҮӘе®ҡд№үж–Үжң¬ж¶ҲжҒҜзӯүгҖӮйӮЈд№ҲжҲ‘们е°ұйңҖиҰҒе»әз«ӢдёӨдёӘйҖҡз”Ёзҡ„ rest иҝ”еӣһеҜ№иұЎпјҢйҷӨдәҶиҝ”еӣһйҖҡз”Ёзҡ„жҺҘеҸЈи°ғз”Ёз»“жһңе’Ңж–Үжң¬ж¶ҲжҒҜпјҢдёҖдёӘеҢ…жӢ¬дёҖдёӘеҚ•зӢ¬зҡ„дёҡеҠЎеҶ…е®№пјҢдёҖдёӘеҢ…еҗ«дёҖдёӘжҢҒжңүеӨҡдёӘдёҡеҠЎеҶ…е®№зҡ„йӣҶеҗҲгҖӮе…·дҪ“е®ҡд№үеҰӮдёӢ
еҚ•зӢ¬дёҡеҠЎеҶ…е®№иҝ”еӣһеҜ№иұЎ
package com.yanggaochao.springboot.learn.springbootjdbclearn.domain.bo;
/**
* еҚ•дёӘеҜ№иұЎиҝ”еӣһз»“жһң
*
* @author жқЁй«ҳи¶…
* @since 2018-03-09
*/
public class RestItemResult<T> {
private String result;
private String message;
private T item;
public String getResult() {
return result;
}
public void setResult(String result) {
this.result = result;
}
public String getMessage() {
return message;
}
public void setMessage(String message) {
this.message = message;
}
public T getItem() {
return item;
}
public void setItem(T item) {
this.item = item;
}
}
йӣҶеҗҲдёҡеҠЎеҶ…е®№иҝ”еӣһеҜ№иұЎ
package com.yanggaochao.springboot.learn.springbootjdbclearn.domain.bo;
import java.util.Collection;
/**
* йӣҶеҗҲеҜ№иұЎиҝ”еӣһз»“жһң
*
* @author жқЁй«ҳи¶…
* @since 2018-03-09
*/
public class RestCollectionResult<T> {
private String result;
private String message;
private Collection<T> items;
public String getResult() {
return result;
}
public void setResult(String result) {
this.result = result;
}
public String getMessage() {
return message;
}
public void setMessage(String message) {
this.message = message;
}
public Collection<T> getItems() {
return items;
}
public void setItems(Collection<T> items) {
this.items = items;
}
}
ж•°жҚ®жҢҒд№…еұӮејҖеҸ‘
з”ЁжҲ·ж•°жҚ®жҢҒд№…еұӮжҺҘеҸЈе®ҡд№ү
package com.yanggaochao.springboot.learn.springbootjdbclearn.dao;
import com.yanggaochao.springboot.learn.springbootjdbclearn.domain.dao.UserDO;
import java.util.List;
/**
* з”ЁжҲ·ж•°жҚ®еұӮжҺҘеҸЈ
*
* @author жқЁй«ҳи¶…
* @since 2018-03-09
*/
public interface UserDao {
/**
* еҗ‘ж•°жҚ®еә“дёӯдҝқеӯҳдёҖдёӘж–°з”ЁжҲ·
*
* @param user иҰҒдҝқеӯҳзҡ„з”ЁжҲ·еҜ№иұЎ
* @return жҳҜеҗҰеўһиӮҢжҲҗеҠҹ
*/
Boolean add(UserDO user);
/**
* жӣҙж–°ж•°жҚ®еә“дёӯзҡ„дёҖдёӘз”ЁжҲ·
*
* @param user иҰҒжӣҙж–°зҡ„з”ЁжҲ·еҜ№иұЎ
* @return жҳҜеҗҰжӣҙж–°жҲҗеҠҹ
*/
Boolean update(UserDO user);
/**
* еҲ йҷӨдёҖдёӘжҢҮе®ҡзҡ„з”ЁжҲ·
*
* @param id иҰҒеҲ йҷӨзҡ„з”ЁжҲ·зҡ„ж ҮиҜҶ
* @return жҳҜеҗҰеҲ йҷӨжҲҗеҠҹ
*/
boolean delete(Long id);
/**
* зІҫзЎ®жҹҘиҜўдёҖдёӘжҢҮе®ҡзҡ„з”ЁжҲ·
*
* @param id иҰҒжҹҘиҜўзҡ„з”ЁжҲ·зҡ„ж ҮиҜҶ
* @return еҰӮжһңиғҪеӨҹжҹҘиҜўеҲ°пјҢиҝ”еӣһз”ЁжҲ·дҝЎжҒҜпјҢеҗҰеҲҷиҝ”еӣһ null
*/
UserDO locate(Long id);
/**
* йҖҡиҝҮеҗҚз§°жЁЎзіҠжҹҘиҜўз”ЁжҲ·
*
* @param name иҰҒжЁЎзіҠжҹҘиҜўзҡ„еҗҚз§°
* @return жҹҘиҜўеҲ°зҡ„з”ЁжҲ·еҲ—иЎЁ
*/
List<UserDO> matchName(String name);
}
з”ЁжҲ·ж•°жҚ®жҢҒд№…еұӮе®һзҺ°
package com.yanggaochao.springboot.learn.springbootjdbclearn.dao.impl;
import com.yanggaochao.springboot.learn.springbootjdbclearn.dao.UserDao;
import com.yanggaochao.springboot.learn.springbootjdbclearn.domain.dao.UserDO;
import org.springframework.beans.factory.annotation.Autowired;
import org.springframework.jdbc.core.JdbcTemplate;
import org.springframework.jdbc.support.rowset.SqlRowSet;
import org.springframework.stereotype.Repository;
import java.util.ArrayList;
import java.util.List;
/**
* з”ЁжҲ·еҜ№иұЎж•°жҚ®еә“и®ҝй—®е®һзҺ°зұ»
*
* @author жқЁй«ҳи¶…
* @since 2018-03-09
*/
@Repository
public class UserDaoJDBCTempletImpl implements UserDao {
private final JdbcTemplate jdbcTemplate;
@Autowired
public UserDaoJDBCTempletImpl(JdbcTemplate jdbcTemplate) {
this.jdbcTemplate = jdbcTemplate;
}
@Override
public Boolean add(UserDO user) {
String sql = "INSERT INTO AUTH_USER(UUID,NAME) VALUES(?,?)";
return jdbcTemplate.update(sql, user.getId(), user.getName()) > 0;
}
@Override
public Boolean update(UserDO user) {
String sql = "UPDATE AUTH_USER SET NAME = ? WHERE UUID = ?";
return jdbcTemplate.update(sql, user.getName(), user.getId()) > 0;
}
@Override
public boolean delete(Long id) {
String sql = "DELETE FROM AUTH_USER WHERE UUID = ?";
return jdbcTemplate.update(sql, id) > 0;
}
@Override
public UserDO locate(Long id) {
String sql = "SELECT * FROM AUTH_USER WHERE UUID=?";
SqlRowSet rs = jdbcTemplate.queryForRowSet(sql, id);
if (rs.next()) {
return generateEntity(rs);
}
return null;
}
@Override
public List<UserDO> matchName(String name) {
String sql = "SELECT * FROM AUTH_USER WHERE NAME LIKE ?";
SqlRowSet rs = jdbcTemplate.queryForRowSet(sql, "%" + name + "%");
List<UserDO> users = new ArrayList<>();
while (rs.next()) {
users.add(generateEntity(rs));
}
return users;
}
private UserDO generateEntity(SqlRowSet rs) {
UserDO weChatPay = new UserDO();
weChatPay.setId(rs.getLong("UUID"));
weChatPay.setName(rs.getString("NAME"));
return weChatPay;
}
}
иҝҷйҮҢйҰ–е…Ҳз”ЁдёҖдёӘжіЁи§Ј @Repository иЎЁзӨәиҝҷжҳҜдёҖдёӘж•°жҚ®жҢҒд№…еұӮзҡ„зұ»пјҢSpringBoot е°ҶиҮӘеҠЁе°ҶиҝҷдёӘзұ»е®һдҫӢеҢ–гҖӮ然еҗҺеңЁжһ„йҖ еҮҪж•°дёҠеўһеҠ дёҖдёӘ @Autowired пјҢSpringBoot еңЁе®һдҫӢеҢ–иҝҷдёӘзұ»зҡ„ж—¶еҖҷпјҢдјҡиҮӘеҠЁе°Ҷ JDBCTemplet е®һдҫӢжіЁе…ҘеҲ°иҝҷдёӘзұ»йҮҢйқўгҖӮиҝҷйҮҢ JDBCTemplet е®һдҫӢжҳҜ SpringBoot ж №жҚ® applications.properties дёӯж•°жҚ®жәҗзӣёе…ізҡ„й…ҚзҪ®иҮӘеҠЁй…ҚзҪ®еҮәжқҘзҡ„гҖӮжҢүз…§ SpringBoot иҮӘеҠЁй…ҚзҪ®ж•°жҚ®жәҗзҡ„з®—жі•пјҢиҝҷйҮҢе°Ҷдјҡй…ҚзҪ®зҡ„ж•°жҚ®жәҗжҳҜ HikariCPгҖӮ
еү©дёӢзҡ„еҲҷе’Ңжҷ®йҖҡзҡ„ Spring JDBCTemplet ејҖеҸ‘дёҖж ·пјҢйҖҡиҝҮзЁӢеәҸе‘ҳжүӢеҠЁеңЁеҜ№иұЎе’Ңж•°жҚ®еә“ SQL д№Ӣй—ҙиҝӣиЎҢиҪ¬жҚўпјҢе®һзҺ°дәҶз”ЁжҲ·зҡ„еўһеҠ гҖҒдҝ®ж”№гҖҒеҲ йҷӨгҖҒжЁЎзіҠеҢ№й…ҚгҖҒзІҫзЎ®жҹҘиҜўзӯүеҠҹиғҪгҖӮ
ж•°жҚ®дёҡеҠЎеұӮејҖеҸ‘
ж•°жҚ®дёҡеҠЎеұӮжҺҘеҸЈе®ҡд№ү
package com.yanggaochao.springboot.learn.springbootjdbclearn.service;
import com.yanggaochao.springboot.learn.springbootjdbclearn.domain.dao.UserDO;
import java.util.List;
/**
* з”ЁжҲ·жңҚеҠЎеұӮжҺҘеҸЈ
*
* @author жқЁй«ҳи¶…
* @since 2018-03-09
*/
public interface UserService {
UserDO add(UserDO user);
UserDO update(UserDO user);
boolean delete(Long id);
UserDO locate(Long id);
List<UserDO> matchName(String name);
}
ж•°жҚ®дёҡеҠЎеұӮе®һзҺ°
package com.yanggaochao.springboot.learn.springbootjdbclearn.service.impl;
import com.yanggaochao.springboot.learn.springbootjdbclearn.dao.UserDao;
import com.yanggaochao.springboot.learn.springbootjdbclearn.domain.dao.UserDO;
import com.yanggaochao.springboot.learn.springbootjdbclearn.service.UserService;
import org.springframework.beans.factory.annotation.Autowired;
import org.springframework.stereotype.Service;
import java.util.Date;
import java.util.List;
/**
* з”ЁжҲ·дёҡеҠЎеұӮе®һзҺ°зұ»
*
* @author жқЁй«ҳи¶…
* @since 2018-03-09
*/
@Service
public class UserServiceImpl implements UserService {
private final UserDao userDao;
@Autowired
public UserServiceImpl(UserDao userDao) {
this.userDao = userDao;
}
@Override
public UserDO add(UserDO user) {
user.setId(new Date().getTime());
if (userDao.add(user)) {
return user;
}
return null;
}
@Override
public UserDO update(UserDO user) {
if (userDao.update(user)) {
return locate(user.getId());
}
return null;
}
@Override
public boolean delete(Long id) {
return userDao.delete(id);
}
@Override
public UserDO locate(Long id) {
return userDao.locate(id);
}
@Override
public List<UserDO> matchName(String name) {
return userDao.matchName(name);
}
}
иҝҷйҮҢйҖҡиҝҮдёҖдёӘ @Service жіЁи§ЈеЈ°жҳҺиҝҷдёӘе®һзҺ°зұ»жҳҜдёҖдёӘдёҡеҠЎеұӮзҡ„зұ»гҖӮжҢҒд№…еұӮзҡ„ UserDao йҖҡиҝҮ @Autowired и®© SpringBoot е®һдҫӢеҢ–иҝҷдёӘдёҡеҠЎеұӮзұ»зҡ„ж—¶еҖҷпјҢиҮӘеҠЁе°ҶеҜ№еә”зҡ„жҢҒд№…еұӮзұ»жіЁе…ҘеҲ°иҝҷдёӘдёҡеҠЎзұ»дёӯгҖӮ
иҝҷйҮҢеңЁеўһеҠ з”ЁжҲ·еҜ№иұЎзҡ„ж—¶еҖҷпјҢз»ҷз”ЁжҲ·и®ҫе®ҡж ҮиҜҶзҡ„ж—¶еҖҷпјҢз®ҖеҚ•зҡ„з”ЁдәҶдёҖдёӘеҪ“еүҚж—¶й—ҙзҡ„жҜ«з§’ж•°дҪңдёәж ҮиҜҶгҖӮе®һйҷ…ејҖеҸ‘зҡ„иҝҮзЁӢдёӯпјҢиҝҷдёӘең°ж–№йңҖиҰҒз”ЁдёҖдёӘдҝқиҜҒе…ЁеұҖе”ҜдёҖзҡ„жңәеҲ¶жқҘдҝқиҜҒиҝҷдёӘж ҮиҜҶдёҚиғҪйҮҚеӨҚгҖӮ
еҜ№еӨ–жңҚеҠЎеұӮејҖеҸ‘
package com.yanggaochao.springboot.learn.springbootjdbclearn.web;
import com.yanggaochao.springboot.learn.springbootjdbclearn.domain.bo.RestCollectionResult;
import com.yanggaochao.springboot.learn.springbootjdbclearn.domain.bo.RestItemResult;
import com.yanggaochao.springboot.learn.springbootjdbclearn.domain.dao.UserDO;
import com.yanggaochao.springboot.learn.springbootjdbclearn.service.UserService;
import org.springframework.beans.factory.annotation.Autowired;
import org.springframework.web.bind.annotation.*;
import java.util.List;
/**
* з”ЁжҲ· Http Rest жҺҘеҸЈ
*
* @author жқЁй«ҳи¶…
* @since 2018-03-09
*/
@RestController
@RequestMapping("api/v1/user")
public class UserApi {
@Autowired
private UserService userService;
@RequestMapping(value = "/add", method = RequestMethod.POST)
public RestItemResult<UserDO> add(@RequestBody UserDO user) {
RestItemResult<UserDO> result = new RestItemResult<>();
user = userService.add(user);
if (user != null) {
result.setItem(user);
result.setResult("success");
} else {
result.setMessage("ж–°еўһз”ЁжҲ·еӨұиҙҘ");
result.setResult("failure");
}
return result;
}
@RequestMapping(value = "/update", method = RequestMethod.POST)
public RestItemResult<UserDO> update(@RequestBody UserDO user) {
RestItemResult<UserDO> result = new RestItemResult<>();
user = userService.update(user);
if (user != null) {
result.setItem(user);
result.setResult("success");
} else {
result.setMessage("дҝ®ж”№з”ЁжҲ·еӨұиҙҘ");
result.setResult("failure");
}
return result;
}
@RequestMapping(value = "/delete/{uuid}", method = RequestMethod.GET)
public RestItemResult<UserDO> delete(@PathVariable Long uuid) {
RestItemResult<UserDO> result = new RestItemResult<>();
if (userService.delete(uuid)) {
result.setResult("success");
} else {
result.setMessage("еҲ йҷӨз”ЁжҲ·еӨұиҙҘ");
result.setResult("failure");
}
return result;
}
@RequestMapping(value = "/locate/{uuid}", method = RequestMethod.GET)
public RestItemResult<UserDO> locate(@PathVariable Long uuid) {
RestItemResult<UserDO> result = new RestItemResult<>();
UserDO user = userService.locate(uuid);
if (user != null) {
result.setItem(user);
result.setResult("success");
} else {
result.setMessage("жҹҘиҜўз”ЁжҲ·еӨұиҙҘ");
result.setResult("failure");
}
return result;
}
@RequestMapping(value = "/match/{name}", method = RequestMethod.GET)
public RestCollectionResult<UserDO> match(@PathVariable String name) {
RestCollectionResult<UserDO> result = new RestCollectionResult<>();
List<UserDO> users = userService.matchName(name);
result.setItems(users);
result.setResult("success");
return result;
}
}
иҝҷйҮҢ @RestController з”ЁжқҘеЈ°жҳҺиҝҷжҳҜдёҖдёӘ Http Rest жҺҘеҸЈзұ»гҖӮйҖҡиҝҮзұ»дёҠзҡ„ @RequestMapping е’Ңж–№жі•дёҠзҡ„ @RequestMappingз»„еҗҲеҪўжҲҗжҜҸдёӘжҺҘеҸЈзҡ„и°ғз”Ёи·Ҝз”ұгҖӮж–№жі•дёҠзҡ„ @RequestMapping дёӯзҡ„ method еұһжҖ§еЈ°жҳҺдәҶ http и°ғз”Ёзҡ„ж–№жі•гҖӮ @RequestBody жіЁи§ЈиҮӘеҠЁе°Ҷ post ж•°жҚ®дёӯзҡ„ json еҜ№иұЎиҪ¬жҲҗ POJO еҜ№иұЎгҖӮ@PathVariable е°Ҷ http url и·Ҝеҫ„дёӯзҡ„ж•°жҚ®иҮӘеҠЁиҪ¬жҚўжҲҗдёәжңҚеҠЎж–№жі•зҡ„еҸӮж•°гҖӮ
Http Rest жҺҘеҸЈжөӢиҜ•
жөӢиҜ•йҖҡиҝҮ Apache commonsзҡ„ HttpClient жқҘи°ғз”Ё Http Rest жңҚеҠЎгҖӮ
Http Resst и°ғз”Ёиҫ…еҠ©зұ»
package com.yanggaochao.springboot.learn.springbootjdbclearn;
import org.apache.commons.httpclient.DefaultHttpMethodRetryHandler;
import org.apache.commons.httpclient.HttpClient;
import org.apache.commons.httpclient.methods.GetMethod;
import org.apache.commons.httpclient.methods.PostMethod;
import org.apache.commons.httpclient.methods.StringRequestEntity;
import org.apache.commons.httpclient.params.HttpMethodParams;
import java.io.BufferedReader;
import java.io.InputStream;
import java.io.InputStreamReader;
import java.io.Reader;
import java.util.Map;
/**
* @author жқЁй«ҳи¶…
* @since 2018-03-09
*/
public class HttpClientHelper {
/**
* з”Ё get ж–№жі•еҸ‘иө·дёҖдёӘhttpиҜ·жұӮ
*
* @param url иҰҒи®ҝй—®зҡ„ http зҡ„ url
* @return и®ҝй—® http еҗҺеҫ—еҲ°зҡ„еӣһеә”ж–Үжң¬
*/
public String httpGetRequest(String url, Map<String, String> headers) {
try {
HttpClient httpclient = new HttpClient();
GetMethod method = new GetMethod(url);
method.setRequestHeader("Content-Type", "application/json; charset=utf-8");
method.getParams().setParameter(HttpMethodParams.RETRY_HANDLER,
new DefaultHttpMethodRetryHandler(3, false));
if (headers != null) {
for (String key : headers.keySet()) {
method.setRequestHeader(key, headers.get(key));
}
}
int statusCode = httpclient.executeMethod(method);
if (statusCode == 200) {
return parseInputStream(method.getResponseBodyAsStream());
} else {
System.out.println(url + " status = " + statusCode);
}
} catch (Exception e) {
e.printStackTrace();
}
return null;
}
/**
* з”Ё post ж–№жі•еҸ‘иө·дёҖдёӘ http иҜ·жұӮ
*
* @param url иҰҒи®ҝй—®зҡ„ http зҡ„ url
* @param data post иҜ·жұӮдёӯзҡ„ data ж•°жҚ®
* @return и®ҝй—® http еҗҺеҫ—еҲ°зҡ„еӣһеә”ж–Үжң¬
*/
public String httpPostRequest(String url, String data, Map<String, String> headers) {
try {
HttpClient httpclient = new HttpClient();
PostMethod method = new PostMethod(url);
method.setRequestHeader("Content-Type",
"application/json;charset=UTF-8");
method.setRequestHeader("User-Agent", "Mozilla/5.0 (Windows NT 6.1; WOW64) AppleWebKit/537.36 (KHTML, like Gecko) Chrome/34.0.1847.131 Safari/537.36");
if (headers != null) {
for (String key : headers.keySet()) {
method.setRequestHeader(key, headers.get(key));
}
}
method.setRequestEntity(new StringRequestEntity(data, "json", "utf-8"));
int statusCode = httpclient.executeMethod(method);
if (statusCode == 200) {
return parseInputStream(method.getResponseBodyAsStream());
} else {
System.out.println(url + " status = " + statusCode + parseInputStream(method.getResponseBodyAsStream()));
}
} catch (Exception e) {
e.printStackTrace();
}
return null;
}
/**
* д»Һ java.io.Reader дёӯи§Јжһҗж–Үжң¬ж•°жҚ®
*
* @param rd java.io.Reader еҜ№иұЎ
* @throws Exception еҸ‘з”ҹй”ҷиҜҜж—¶жҠӣеҮәејӮеёё
*/
private String parseReader(Reader rd) throws Exception {
BufferedReader brd = new BufferedReader(rd);
String line;
StringBuilder respongseContext = new StringBuilder();
while ((line = brd.readLine()) != null) {
respongseContext.append(line).append("\n");
}
//rd.close();
if (respongseContext.length() > 0) {
respongseContext.deleteCharAt(respongseContext.length() - 1);
}
return respongseContext.toString();
}
/**
* д»Һиҫ“е…ҘжөҒдёӯи§Јжһҗж–Үжң¬ж•°жҚ®
*
* @param is иҫ“е…ҘжөҒ
* @throws Exception еҸ‘з”ҹй”ҷиҜҜж—¶жҠӣеҮәејӮеёё
*/
private String parseInputStream(InputStream is) throws Exception {
return parseReader(new BufferedReader(new InputStreamReader(is)));
}
}
иҝҷйҮҢдё»иҰҒжҳҜе®һзҺ°дәҶз”Ё GET е’Ң POST ж–№жі•и°ғз”Ё Http Rest жңҚеҠЎзҡ„ж–№жі•гҖӮ
жөӢиҜ•з”ЁдҫӢ
йҮҮз”Ё JUnit жқҘжү§иЎҢжөӢиҜ•з”ЁдҫӢгҖӮдёәдәҶе®һзҺ°жөӢиҜ•пјҢжҲ‘们йўқеӨ–еўһеҠ дәҶдёӢйқўзҡ„ maven дҫқиө–
<dependency>
 <groupId>commons-httpclient</groupId>
 <artifactId>commons-httpclient</artifactId>
 <version>3.1</version>
 <scope>test</scope>
</dependency>
<dependency>
 <groupId>org.codehaus.jettison</groupId>
 <artifactId>jettison</artifactId>
 <version>1.3.3</version>
 <scope>test</scope>
</dependency>
package com.yanggaochao.springboot.learn.springbootjdbclearn;
import org.codehaus.jettison.json.JSONObject;
import org.junit.After;
import org.junit.Before;
import org.junit.Test;
import java.net.URLEncoder;
import java.util.ArrayList;
import java.util.List;
/**
* Description:
*
* @author жқЁй«ҳи¶…
* @since 2018-03-09
*/
public class UserApiTest {
private String userAddUrl = "http://localhost:3030/security/api/v1/user/add";
private String userLocateUrl = "http://localhost:3030/security/api/v1/user/locate/";
private String userDeleteUrl = "http://localhost:3030/security/api/v1/user/delete/";
private String userUpdateUrl = "http://localhost:3030/security/api/v1/user/update";
private String userMatchUrl = "http://localhost:3030/security/api/v1/user/match/";
JSONObject addUser = new JSONObject();
Long addUserId = null;
List<Long> userIds = new ArrayList<>();
@Before
public void before() throws Exception {
addUser.put("name", "зҫҺзҫҠзҫҠ");
JSONObject addResultJson = new JSONObject(new HttpClientHelper().httpPostRequest(userAddUrl, addUser.toString(), null));
assert ("success".equals(addResultJson.getString("result")));
addUserId = addResultJson.getJSONObject("item").getLong("id");
JSONObject user = new JSONObject();
user.put("name", "е–ңзҫҠзҫҠ");
addResultJson = new JSONObject(new HttpClientHelper().httpPostRequest(userAddUrl, user.toString(), null));
assert ("success".equals(addResultJson.getString("result")));
userIds.add(addResultJson.getJSONObject("item").getLong("id"));
user.put("name", "зҒ°еӨӘзӢј");
addResultJson = new JSONObject(new HttpClientHelper().httpPostRequest(userAddUrl, user.toString(), null));
assert ("success".equals(addResultJson.getString("result")));
userIds.add(addResultJson.getJSONObject("item").getLong("id"));
}
@Test
public void testUpdateUser() throws Exception {
JSONObject user = new JSONObject();
user.put("name", "йңүзҫҠзҫҠ");
user.put("id", addUserId);
new HttpClientHelper().httpPostRequest(userUpdateUrl, user.toString(), null);
JSONObject locateResultJson = new JSONObject(new HttpClientHelper().httpGetRequest(userLocateUrl + addUserId, null));
assert (user.getString("name").equals(locateResultJson.getJSONObject("item").getString("name")));
}
@Test
public void testMatchUser() throws Exception {
JSONObject matchResultJson = new JSONObject(new HttpClientHelper().httpGetRequest(userMatchUrl + URLEncoder.encode("зҫҠ","UTF-8"), null));
assert (matchResultJson.has("items") && matchResultJson.getJSONArray("items").length() == 2);
matchResultJson = new JSONObject(new HttpClientHelper().httpGetRequest(userMatchUrl + URLEncoder.encode("зӢј","UTF-8"), null));
assert (matchResultJson.has("items") && matchResultJson.getJSONArray("items").length() == 1);
}
@After
public void after() throws Exception {
if (addUserId != null) {
JSONObject deleteResultJson = new JSONObject(new HttpClientHelper().httpGetRequest(userDeleteUrl + addUserId, null));
assert ("success".equals(deleteResultJson.getString("result")));
}
for (Long userId : userIds) {
JSONObject deleteResultJson = new JSONObject(new HttpClientHelper().httpGetRequest(userDeleteUrl + userId, null));
assert ("success".equals(deleteResultJson.getString("result")));
}
}
}
иҝҷйҮҢеңЁ @Test еЈ°жҳҺдәҶдёӨдёӘжөӢиҜ•з”ЁдҫӢпјҢдёҖдёӘжөӢиҜ•дәҶз”ЁжҲ·дҝ®ж”№еҠҹиғҪпјҢдёҖдёӘжөӢиҜ•дәҶз”ЁжҲ·жЁЎзіҠжҹҘиҜўеҠҹиғҪгҖӮ @Before еЈ°жҳҺдәҶеңЁжү§иЎҢжҜҸдёӘжөӢиҜ•з”ЁдҫӢд№ӢеүҚиҰҒеҒҡзҡ„еҮҶеӨҮе·ҘдҪңгҖӮиҝҷйҮҢйҰ–е…ҲеҫҖж•°жҚ®еә“дёӯжҸ’е…ҘдёүжқЎж•°жҚ®пјҢеҗҢж—¶д№ҹжөӢиҜ•дәҶж•°жҚ®зҡ„еўһеҠ еҠҹиғҪгҖҒзІҫзЎ®жҹҘиҜўзҡ„еҠҹиғҪгҖӮ@After еЈ°жҳҺдәҶжү§иЎҢжҜҸдёӘжөӢиҜ•з”ЁдҫӢеҗҺзҡ„жё…зҗҶе·ҘдҪңгҖӮиҝҷйҮҢдё»иҰҒжҳҜе°Ҷд№ӢеүҚжҸ’е…Ҙзҡ„ж•°жҚ®з»ҷеҲ йҷӨдәҶгҖӮиҝҷйҮҢеҗҢжӯҘжөӢиҜ•дәҶз”ЁжҲ·еҲ йҷӨзҡ„еҠҹиғҪгҖӮ
еҗҺи®°
иҝҷйҮҢе°ұеұ•зӨәдәҶдёҖдёӘе®Ңж•ҙзҡ„ SpringBoot дҪҝз”Ё JDBC Templet зҡ„е®Ңж•ҙж ·дҫӢгҖӮеҰӮжһңжңүеңЁ Spring дёӢдҪҝз”Ё JDBC Templet зҡ„з»ҸеҺҶпјҢйӮЈд№ҲеңЁ Spring йҮҢйқўдё»иҰҒжҳҜеҮҸе°‘дәҶеҫҲеӨҡй…ҚзҪ®зҡ„е·ҘдҪңгҖӮ
жң¬ж–Үж¶үеҸҠзҡ„д»Јз Ғе·Із»ҸдёҠдј еҲ° GitHUB дёҠпјҢеӨ§е®¶д№ҹеҸҜд»ҘйҖҡиҝҮжң¬ең°дёӢиҪҪ
жҖ»з»“
д»ҘдёҠе°ұжҳҜиҝҷзҜҮж–Үз« зҡ„е…ЁйғЁеҶ…е®№дәҶпјҢеёҢжңӣжң¬ж–Үзҡ„еҶ…е®№еҜ№еӨ§е®¶зҡ„еӯҰд№ жҲ–иҖ…е·ҘдҪңе…·жңүдёҖе®ҡзҡ„еҸӮиҖғеӯҰд№ д»·еҖјпјҢеҰӮжһңжңүз–‘й—®еӨ§е®¶еҸҜд»Ҙз•ҷиЁҖдәӨжөҒпјҢи°ўи°ўеӨ§е®¶еҜ№дәҝйҖҹдә‘зҡ„ж”ҜжҢҒгҖӮ


