小编给大家分享一下Android如何实现一个带粘连效果的LoadingBar,相信大部分人都还不怎么了解,因此分享这篇文章给大家参考一下,希望大家阅读完这篇文章后大有收获,下面让我们一起去了解一下吧!
前言
我们平时在开发的时候,发起网络请求前,会需要显示一个Loading,一般的做法都是在xml布局上添加好Loading,然后在Activity中,setVisibility来控制Loading的显示和隐藏,这样使用起来就很不方便,因为每一个xml都得引入一个Loading布局。
而LoadingBar就更好的解决了这个问题
最近设计师在外国的一个网站上挑了一个Loading的效果图,尝试实现之后,虽然和原图有点不太一样,但是效果还是不错的。难点就是粘连效果的实现,贝塞尔曲线的点点们简直要把我折磨死了。
先上效果图:

实例代码
然后是源码,就是一个简单VIew,可以直接放在xml中使用。
package top.greendami.greendami;
import android.content.Context;
import android.graphics.Canvas;
import android.graphics.Paint;
import android.graphics.Path;
import android.support.annotation.Nullable;
import android.util.AttributeSet;
import android.view.View;
/**
 * Created by GreendaMi on 2017/3/17.
 */
public class PPView extends View {
 String TAG = "PPView";
 //动画开关
 boolean isLoading = true;
 Context mContext;
 private int mWidth = 100;
 private int mheight = 100;
 public int mColor;
 public Paint mPaint = new Paint();
 float time = 0;
 //小球与中间打球的最远距离
 float distance = 100;

 public PPView(Context context) {
  super(context);
  mContext = context;
 }
 public PPView(Context context, @Nullable AttributeSet attrs) {
  super(context, attrs);
  mContext = context;
  mColor = context.getResources().getColor(R.color.colorPrimary);
  init();
 }
 private void init() {
  mPaint.setAntiAlias(true);
  mPaint.setColor(mColor);
 }
 @Override
 protected void onMeasure(int widthMeasureSpec, int heightMeasureSpec) {
  super.onMeasure(widthMeasureSpec, heightMeasureSpec);
  int widthSpecSize = MeasureSpec.getSize(widthMeasureSpec);
  int heightSpecSize = MeasureSpec.getSize(heightMeasureSpec);
  //宽度至少是高度的4倍
  if (widthSpecSize < 4 * heightSpecSize) {
   widthSpecSize = 4 * heightSpecSize;
  }
  mWidth = widthSpecSize;
  mheight = heightSpecSize;
  distance = 1.2f * mheight;
  setMeasuredDimension(widthSpecSize, heightSpecSize);
 }
 @Override
 protected void onDraw(Canvas canvas) {
  super.onDraw(canvas);
  if (isLoading) {
   //大圆半径
   float bigR = mheight * 0.32f + mheight * 0.03f * Math.abs((float) Math.sin(Math.toRadians(time)));
   float smallR = mheight * 0.22f + mheight * 0.03f * Math.abs((float) Math.cos(Math.toRadians(time)));
   float bigx = (getWidth()) / 2;
   //画中间大圆
   canvas.drawCircle(bigx, mheight / 2, bigR, mPaint);
   float smalx = getSmallCenterX();
   //画小圆
   canvas.drawCircle(smalx, mheight / 2, smallR, mPaint);
   //画链接
   //小球在右侧
   if (smalx > bigx) {
    Path path = new Path();
    //上面的贝塞尔曲线的第一个点,在大圆身上
    float x1 = bigx + bigR * (float) Math.cos(Math.toRadians(time));
    float y1 = mheight / 2 - bigR * (float) Math.sin(Math.toRadians(time));
    if (y1 > mheight / 2 - smallR) {
     y1 = mheight / 2 - smallR;
     x1 = bigx + (float) (Math.sqrt(bigR * bigR - smallR * smallR));
    }
    //上面的贝塞尔曲线的第三个点,在小圆身上
    float x2 = smalx - smallR * (float) Math.cos(Math.toRadians(time));
    float y2 = mheight / 2 - smallR * (float) Math.sin(Math.toRadians(time));
    if (y2 > mheight / 2 - smallR * 0.8) {
     y2 = mheight / 2 - smallR * 0.8f;
     x2 = smalx - smallR * (float) (Math.sqrt(1-0.64f));
    }
    //下面的贝塞尔曲线的第三个点,在小圆身上
    float x3 = smalx - smallR * (float) Math.cos(Math.toRadians(time));
    float y3 = mheight / 2 + smallR * (float) Math.sin(Math.toRadians(time));
    if (y3 < mheight / 2 + smallR * 0.8) {
     y3 = mheight / 2 + smallR * 0.8f;
     x3 = smalx - smallR * (float) (Math.sqrt(1-0.64f));
    }
    //下面的贝塞尔曲线的第一个点,在大圆身上
    float x4 = bigx + bigR * (float) Math.cos(Math.toRadians(time));
    float y4 = mheight / 2 + bigR * (float) Math.sin(Math.toRadians(time));
    if (y4 < mheight / 2 + smallR) {
     y4 = mheight / 2 + smallR;
     x4 = bigx + (float) (Math.sqrt(bigR * bigR - smallR * smallR));
    }
    path.moveTo(x1, y1);
    path.quadTo((bigx + smalx) / 2, mheight / 2, x2, y2);
    // 绘制贝赛尔曲线(Path)
    path.lineTo(x3, y3);
    path.quadTo((bigx + smalx) / 2, mheight / 2, x4, y4);
    canvas.drawPath(path, mPaint);
   }
   //小球在左侧
   if (smalx < bigx) {
    Path path = new Path();
    float x1 = bigx + bigR * (float) Math.cos(Math.toRadians(time));
    float y1 = mheight / 2 - bigR * (float) Math.sin(Math.toRadians(time));
    if (y1 > mheight / 2 - smallR) {
     y1 = mheight / 2 - smallR;
     x1 = bigx - (float) (Math.sqrt(bigR * bigR - smallR * smallR));
    }
    float x2 = smalx - smallR * (float) Math.cos(Math.toRadians(time));
    float y2 = mheight / 2 - smallR * (float) Math.sin(Math.toRadians(time));
    if (y2 > mheight / 2 - smallR * 0.8) {
     y2 = mheight / 2 - smallR * 0.8f;
     x2 = smalx + smallR * (float) (Math.sqrt(1-0.64f));
    }
    float x3 = smalx - smallR * (float) Math.cos(Math.toRadians(time));
    float y3 = mheight / 2 + smallR * (float) Math.sin(Math.toRadians(time));
    if (y3 < mheight / 2 + smallR * 0.8) {
     y3 = mheight / 2 + smallR * 0.8f;
     x3 = smalx + smallR * (float) (Math.sqrt(1-0.64f));
    }
    float x4 = bigx + bigR * (float) Math.cos(Math.toRadians(time));
    float y4 = mheight / 2 + bigR * (float) Math.sin(Math.toRadians(time));
    if (y4 < mheight / 2 + smallR) {
     y4 = mheight / 2 + smallR;
     x4 = bigx - (float) (Math.sqrt(bigR * bigR - smallR * smallR));
    }
    path.moveTo(x1, y1);
    path.quadTo((bigx + smalx) / 2, mheight / 2, x2, y2);
    // 绘制贝赛尔曲线(Path)
    path.lineTo(x3, y3);
    path.quadTo((bigx + smalx) / 2, mheight / 2, x4, y4);
    canvas.drawPath(path, mPaint);
   }
   postInvalidate();
  }
 }
 //计算小球的X坐标
 private float getSmallCenterX() {
  //此处控制速度
  time = time + 2.5f;
  return mWidth / 2 + distance * (float) Math.cos(Math.toRadians(time));
 }
}
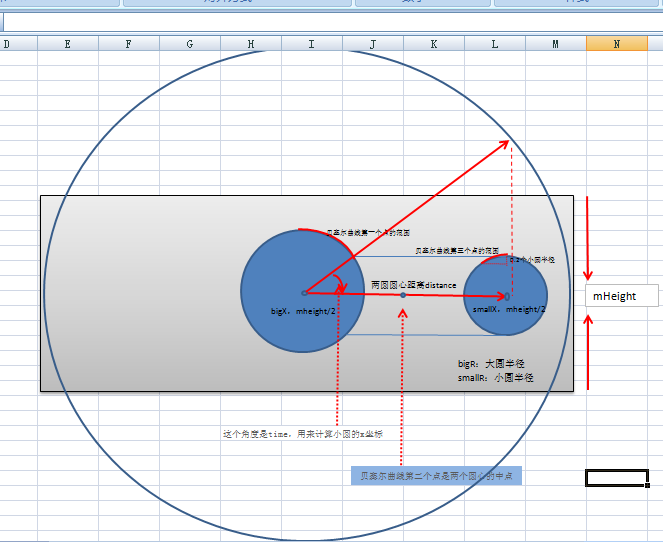
“精心”画了一张图,对代码做了说明。

在代码中使用
<?xml version="1.0" encoding="utf-8"?>
<RelativeLayout xmlns:android="http://schemas.android.com/apk/res/android"
 xmlns:tools="http://schemas.android.com/tools"
 android:layout_width="match_parent"
 android:layout_height="match_parent"
 android:background="@color/white" tools:context="top.greendami.greendami.MainActivity">
 <top.greendami.greendami.PPView
  android:layout_centerInParent="true"
  android:layout_width="400dp"
  android:layout_height="80dp" />
</RelativeLayout>
以上是“Android如何实现一个带粘连效果的LoadingBar”这篇文章的所有内容,感谢各位的阅读!相信大家都有了一定的了解,希望分享的内容对大家有所帮助,如果还想学习更多知识,欢迎关注亿速云行业资讯频道!
免责声明:本站发布的内容(图片、视频和文字)以原创、转载和分享为主,文章观点不代表本网站立场,如果涉及侵权请联系站长邮箱:is@yisu.com进行举报,并提供相关证据,一经查实,将立刻删除涉嫌侵权内容。