内存数据库如何在springboot中进行配置?相信很多没有经验的人对此束手无策,为此本文总结了问题出现的原因和解决方法,通过这篇文章希望你能解决这个问题。
1.springboot的Maven工程结构

2. 首先引入依赖jar包 pom.xml
<!--?xml version="1.0" encoding="UTF-8"?--> <project xmlns="http://maven.apache.org/POM/4.0.0" xmlns:xsi="http://www.w3.org/2001/XMLSchema-instance" xsi:schemalocation="http://maven.apache.org/POM/4.0.0 http://maven.apache.org/xsd/maven-4.0.0.xsd"> <modelversion>4.0.0</modelversion> <groupid>com.zlf</groupid> spring-boot</artifactid> <version>1.0-SNAPSHOT</version> <!-- 增加父pom ,spring-boot-starter-parent包含了大量配置好的依赖管理,他是个特殊的starter,它提供了有用的maven默认设置 --> <parent> <groupid>org.springframework.boot</groupid> spring-boot-starter-parent</artifactid> <version>1.4.3.RELEASE</version> </parent> <!-- Spring默认使用jdk1.6,如果你想使用jdk1.8,你需要在pom.xml的属性里面添加java.version,如下: --> <properties> <project.build.sourceencoding>UTF-8</project.build.sourceencoding> <tomcat.version>7.0.72</tomcat.version> <java.version>1.8</java.version> </properties> <!-- Spring通过添加spring-boot-starter-*这样的依赖就能支持具体的某个功能。 --> <!-- 我们这个示例最终是要实现web功能,所以添加的是这个依赖。 --> <dependencies> <dependency> <!-- 指定为Web应用,并启动一个内嵌的Servlet容器(默认是Tomcat)用于处理HTTP请求 --> <groupid>org.springframework.boot</groupid> spring-boot-starter-web</artifactid> </dependency> <!-- 对Java 持久化API的支持,包括spring-data-jap,spring-orm,Hibernate--> <dependency> <groupid>org.springframework.boot</groupid> spring-boot-starter-data-jpa</artifactid> </dependency> <!-- lombok插件,方便model对象的处理 --> <dependency> <groupid>org.projectlombok</groupid> lombok</artifactid> </dependency> <!-- 内嵌数据库 --> <dependency> <groupid>com.h3database</groupid> h3</artifactid> </dependency> <!-- mysql驱动 --> <!-- <dependency> --> <!-- <groupId>mysql</groupId> --> <!-- mysql-connector-java</artifactId> --> <!-- </dependency> --> <dependency> <groupid>junit</groupid> junit</artifactid> <scope>test</scope> </dependency> <!-- <dependency> --> <!-- <groupId>javax.servlet</groupId> --> <!-- jstl</artifactId> --> <!-- </dependency> --> </dependencies> <build> <!-- 打包后的jar包名称 --> <finalname>example</finalname> <plugins> <plugin> <groupid>org.springframework.boot</groupid> <!-- 必须要的SpringBoot继承的maven插件,缺少了无法打包jar。 --> spring-boot-maven-plugin</artifactid> <dependencies> <!-- 在我们开发过程中,我们需要经常修改,为了避免重复启动项目,我们可以启用热部署。 Spring-Loaded项目提供了强大的热部署功能, 添加/删除/修改 方法/字段/接口/枚举 等代码的时候都可以热部署,速度很快,很方便。 想在Spring Boot中使用该功能非常简单 ,就是在spring-boot-maven-plugin插件下面添加依赖: --> <dependency> <groupid>org.springframework</groupid> springloaded</artifactid> <version>1.2.5.RELEASE</version> </dependency> </dependencies> </plugin> </plugins> </build> </project>
3.在src/main/resource根目录下进行配置h3数据库。
schema.sql中建表。可以见多个表。用分号隔开
CREATE TABLE staff(
id char(20) not null primary key,
name char(20),
age INTEGER
);
data.sql 为新建的表进行初始化数据的操作。可以放入多个表的插入语句。
insert into staff values(
 's01',
 '张三',
 26
);
insert into staff values(
 's02',
 '春天里asdglkj',
 23
);
insert into staff values(
 's03',
 '刘三',
 26
);
insert into staff values(
 's04',
 '万里高空',
 26
);
insert into staff values(
 's05',
 '火影',
 26
);
insert into staff values(
 's06',
 'xiaopang',
 26
);
insert into staff values(
 's07',
 '海贼王',
 26
);
insert into staff values(
 's08',
 '王者荣耀',
 26
)
application.properties db2数据库设置和控制台现实设置等。
#spring.datasource.url = jdbc:mysql://localhost:3306/zhanglfdatabase
#spring.datasource.username = root
#spring.datasource.password =
#spring.datasource.driverClassName = com.mysql.jdbc.Driver
#数据库支持多种连接模式和连接设置,不同的连接模式和连接设置是通过不同的URL来区分的,URL中的设置是不区分大小写。内存数据库(私有)
#jdbc:h3:mem:
#内存数据库(被命名)
#jdbc:h3:mem:<databasename>
#jdbc:h3:mem:test_mem
spring.datasource.url =jdbc:h3:mem:soa_service_api
spring.datasource.username = root
spring.datasource.password = root
spring.datasource.driverClassName = org.h3.Driver
#进行该配置后,每次启动程序,程序都会运行resources/schema.sql文件,对数据库的结构进行操作,相当于新建一个表。
spring.datasource.schema=classpath:schema.sql
#进行该配置后,每次启动程序,程序都会运行resources/data.sql文件,对数据库的数据操作,相当于往表中插入数据。
spring.datasource.data=classpath:data.sql
# 数据库类型声明
spring.jpa.database = H2
# 是否开启查询语句在控制台打印
spring.jpa.show-sql = true
# Hibernate ddl auto (create, create-drop, update)
spring.jpa.hibernate.ddl-auto = update
# Naming strategy
#spring.jpa.hibernate.naming-strategy = org.hibernate.cfg.ImprovedNamingStrategy
#开启h3控制台功能和访问地址。
spring.h3.console.enabled=true
spring.h3.console.path=/h3-console</databasename>
这里有必要强调H2数据库设置的属性:
spring.datasource.url =jdbc:h3:mem:soa_service_api
因为数据库支持多种连接模式和连接设置,不同的连接模式和连接设置是通过不同的URL来区分的,URL中的设置是不区分大小写。其中几种常用的设置如下图

前两种对应的效果是:
1. jdbc:h3:file:E:/data/H2 表示将初始化的数据和H2 Console控制台执行的数据保存到E盘下data/H2文件夹中,即使应用重启,数据不会丢失。
2. jdbc:h3:~/testdatabase这里就需要说明一下”~”这个符号在window操作系统下代表什么意思了,在Window操作系统下,”~”这个符号代表的就是当前登录到操作系统的用户对应的用户目录,所以testdatabase数据库对应的文件存放在登录到操作系统的用户对应的用户目录当中,比如我当前是使用Administrator用户登录操作系统的,所以在”C:\Documents and Settings\Administrator.h3”目录中就可以找到test数据库对应的数据库文件了
持久化本地的问题:由于本地已经存在表,而应用每次启动都会创建表,导致下次启动时会启动报错。除非手动注掉application.properties中新建表的配置,或则删除本地对应目录的文件。
3.jdbc:h3:mem:soa_service_api、jdbc:h3:mem:~/.h3/url类似与这种配置的,表示将初始化和h3 console控制台上操作的数据保存在内存(mem-memory)
保存到内存的问题:由于每次重启应用内存释放掉后,对应的数据也会消失,当然初始化的表+初始化数据就都没了。然后重启会从data.sql中重新初始化数据,启动正常。但是你通过h3
console操作的其他数据则全部丢失。解决办法是把在h3 console新添加的接口地址配置到data.sql中。然后重新启动才行。
4.h3的配置说完,下面开始进行h3的测试代码java文件部分,看看有没有配置成功。我们用到JPA这个持久化的接口工具。
a.映射的pojo实体类-staffBo,注意点和说明都在代码里了。
package com.zlf.bo;
import java.io.Serializable;
import javax.persistence.Column;
import javax.persistence.Entity;
import javax.persistence.Id;
import javax.persistence.Table;
import lombok.Data;
@Data//可以省略get+set方法。
@Entity
@Table(name="staff")//注解的name属性值要和schema.sql定义的表名一致。不然启动虽然不报错,但和表映射不上,就取不到任何值。
public class StaffBo implements Serializable {
 private static final long serialVersionUID = 1L;
 //主键是必须声明的。不然启动会报实体中无定义主键的错: No identifier specified for entity: com.zlf.bo.StaffBo
 @Id
 private String id;
// @Column(name="name") 如果表中字段名称和这里的属性名称一样,可以不同加Column注解。
 private String name;
 @Column(name="age")
 private int age;
}
b.然后是类似与dao层接口的操作数据库的接口,StaffRepository这个接口要继承PagingAndSortingRepository才能实现对数据库的crud操作。
package com.zlf.repository;
import org.springframework.data.repository.PagingAndSortingRepository;
import com.zlf.bo.StaffBo;
public interface StaffRepository extends PagingAndSortingRepository<staffbo,string> {
}
</staffbo,string>
c. 然后就是service层的接口和实现类,在实现类中注入api接口的实例,并用实例操作数据库,这里是h3数据库。
package com.zlf.service;
import java.util.List;
import com.zlf.bo.StaffBo;
public interface IStaffService {
 public List<staffbo> queryAllStaffList();
}
</staffbo>
这里我们只做了个查询所有的操作。然后希望在页面打印出来这些实体信息。
package com.zlf.service.impl;
import java.util.ArrayList;
import java.util.Iterator;
import java.util.List;
import org.springframework.beans.factory.annotation.Autowired;
import org.springframework.stereotype.Service;
import com.zlf.bo.StaffBo;
import com.zlf.repository.StaffRepository;
import com.zlf.service.IStaffService;
@Service
public class StaffServiceImpl implements IStaffService {
 @Autowired
 private StaffRepository staffRepository;
 @Override
 public List<staffbo> queryAllStaffList() {
  Iterable<staffbo> iterable = staffRepository.findAll();
  List<staffbo> list=new ArrayList<staffbo>();
  Iterator<staffbo> iterator = iterable.iterator();
  while(iterator.hasNext()){
   StaffBo next = iterator.next();
   list.add(next);
  }
  return list;
 }
}
</staffbo></staffbo></staffbo></staffbo></staffbo>
d. controller层
package com.zlf.controller;
import java.util.List;
import org.slf4j.Logger;
import org.slf4j.LoggerFactory;
import org.springframework.beans.factory.annotation.Autowired;
import org.springframework.stereotype.Controller;
import org.springframework.web.bind.annotation.RequestMapping;
import org.springframework.web.bind.annotation.ResponseBody;
import com.zlf.bo.StaffBo;
import com.zlf.service.IStaffService;
@Controller
@RequestMapping(path="/staff",produces="application/json;charset=utf-8")
public class StaffController {
 private static final Logger logger=LoggerFactory.getLogger(StaffController.class);
 @Autowired
 private IStaffService staffService;
 @RequestMapping("/getList")
 @ResponseBody
 public List<staffbo> getAllList(){
  List<staffbo> staffList=null;
  try {
   staffList = staffService.queryAllStaffList();
  } catch (Exception e) {
   logger.error("查询失败");
  }
  return staffList;
 }
}
</staffbo></staffbo>
e. 重点来了–应用的启动入口Application.java
这个java类最好放到和其他层级同级的根目录中,这里就是com.zlf下,因为这个类的注解@SpringBootApplication会默认扫描与它同级目录的其他文件。这样才能完成注入等操作。如果你把它放到了和其他层的代码一样的级别中,则要用这种注解才行。
比如mianApplication下的Application.java,就是我说的另一种放到和其他层同级的结构中的情形。

它应该如何配置才能正常启动呢?
package mainApplication;
import org.springframework.boot.SpringApplication;
import org.springframework.boot.autoconfigure.SpringBootApplication;
import org.springframework.context.annotation.ComponentScan;
import org.springframework.stereotype.Controller;
import org.springframework.web.bind.annotation.RequestMapping;
/**
 * Spring Boot建议将我们main方法所在的这个主要的配置类配置在根包名下。
 *
 * @author Administrator
 *
 *
 * @SpringBootApplication是Spring Boot提供的注解,他相当于加上如下注解:
 * @Configuration,表明Application是一个Spring的配置对象,用于配置Spring应用上下文。
 * @EnableAutoConfiguration,Spring Boot会根据类路径(classpath)以及一些属性值来自动完成一些配置行为,例如:开发基于Spring
 *  MVC的Web应用,需要在配置中加上
 * @EnableWebMvc直接来激活一些默认的Web配置, 一旦Spring Boot发现运行时类路径上包含了 spring-webmvc
 *        依赖,它会自动的完成一个Web应用的基本配置
 *        ——例如配置DispatcherServlet等等。
 * @ComponenScan告知Spring应用从什么位置去发现Spring构件(@Component, @Service,
 *              @Configuration)等等
 */
@SpringBootApplication
@Controller
// @RestController因为我们例子是写一个web应用,因此写的这个注解,这个注解相当于同时添加@Controller和@ResponseBody注解
// @EnableAutoConfiguration// Spring Boot会自动根据你jar包的依赖来自动配置项目的数据源依赖
@ComponentScan(basePackages = { "controller", "service", "dao" })
// @ComponentScan路径被默认设置为SampleController的同名package,也就是该package下的所有@Controller
// ,@Service , @Component, @Repository都会被实例化后并加入Spring Context中。这也是为什么要把这个类最好放到与其他包同级目录 的原因了。
public class Application {
 @RequestMapping("")
 public String home() {
  // return "xiaozhang ,Hello World!";
  return "/index";
 }
 public static void main(String[] args) {
  // 启动Spring Boot项目最简单的方法就是执行下面的方法
  SpringApplication.run(Application.class);
 }
}
这样就完成了测试代码的简单开发。在application.java中右键run as java application ,启动程序。效果如下
. ____   _   __ _ _
 /\\ / ___'_ __ _ _(_)_ __ __ _ \ \ \ \
( ( )\___ | '_ | '_| | '_ \/ _` | \ \ \ \
 \\/ ___)| |_)| | | | | || (_| | ) ) ) )
 ' |____| .__|_| |_|_| |_\__, | / / / /
 =========|_|==============|___/=/_/_/_/
 :: Spring Boot ::  (v1.4.3.RELEASE)
2017-07-05 20:50:07.579 INFO 5956 --- [   main] com.zlf.Application      : Starting Application on pc-itwzhanglf02 with PID 5956 (E:\workspace\tsqa_springBoot2_hibernate_jpa\target\classes started by Administrator in E:\workspace\tsqa_springBoot2_hibernate_jpa)
2017-07-05 20:50:07.579 INFO 5956 --- [   main] com.zlf.Application      : No active profile set, falling back to default profiles: default
2017-07-05 20:50:07.657 INFO 5956 --- [   main] ationConfigEmbeddedWebApplicationContext : Refreshing org.springframework.boot.context.embedded.AnnotationConfigEmbeddedWebApplicationContext@50103bfb: startup date [Wed Jul 05 20:50:07 CST 2017]; root of context hierarchy
2017-07-05 20:50:09.655 INFO 5956 --- [   main] trationDelegate$BeanPostProcessorChecker : Bean 'org.springframework.transaction.annotation.ProxyTransactionManagementConfiguration' of type [class org.springframework.transaction.annotation.ProxyTransactionManagementConfiguration$$EnhancerBySpringCGLIB$$c3c549d9] is not eligible for getting processed by all BeanPostProcessors (for example: not eligible for auto-proxying)
2017-07-05 20:50:10.094 INFO 5956 --- [   main] s.b.c.e.t.TomcatEmbeddedServletContainer : Tomcat initialized with port(s): 8080 (http)
2017-07-05 20:50:10.110 INFO 5956 --- [   main] o.apache.catalina.core.StandardService : Starting service Tomcat
2017-07-05 20:50:10.110 INFO 5956 --- [   main] org.apache.catalina.core.StandardEngine : Starting Servlet Engine: Apache Tomcat/7.0.72
2017-07-05 20:50:10.297 INFO 5956 --- [ost-startStop-1] org.apache.catalina.startup.TldConfig : At least one JAR was scanned for TLDs yet contained no TLDs. Enable debug logging for this logger for a complete list of JARs that were scanned but no TLDs were found in them. Skipping unneeded JARs during scanning can improve startup time and JSP compilation time.
2017-07-05 20:50:10.297 INFO 5956 --- [ost-startStop-1] o.a.c.c.C.[Tomcat].[localhost].[/]  : Initializing Spring embedded WebApplicationContext
2017-07-05 20:50:10.297 INFO 5956 --- [ost-startStop-1] o.s.web.context.ContextLoader   : Root WebApplicationContext: initialization completed in 2655 ms
2017-07-05 20:50:10.540 INFO 5956 --- [ost-startStop-1] o.s.b.w.servlet.ServletRegistrationBean : Mapping servlet: 'dispatcherServlet' to [/]
2017-07-05 20:50:10.540 INFO 5956 --- [ost-startStop-1] o.s.b.w.servlet.ServletRegistrationBean : Mapping servlet: 'webServlet' to [/h3-console/*]
2017-07-05 20:50:10.540 INFO 5956 --- [ost-startStop-1] o.s.b.w.servlet.FilterRegistrationBean : Mapping filter: 'characterEncodingFilter' to: [/*]
2017-07-05 20:50:10.540 INFO 5956 --- [ost-startStop-1] o.s.b.w.servlet.FilterRegistrationBean : Mapping filter: 'hiddenHttpMethodFilter' to: [/*]
2017-07-05 20:50:10.540 INFO 5956 --- [ost-startStop-1] o.s.b.w.servlet.FilterRegistrationBean : Mapping filter: 'httpPutFormContentFilter' to: [/*]
2017-07-05 20:50:10.540 INFO 5956 --- [ost-startStop-1] o.s.b.w.servlet.FilterRegistrationBean : Mapping filter: 'requestContextFilter' to: [/*]
2017-07-05 20:50:10.961 INFO 5956 --- [   main] o.s.jdbc.datasource.init.ScriptUtils  : Executing SQL script from class path resource [schema.sql]
2017-07-05 20:50:10.976 INFO 5956 --- [   main] o.s.jdbc.datasource.init.ScriptUtils  : Executed SQL script from class path resource [schema.sql] in 15 ms.
2017-07-05 20:50:10.992 INFO 5956 --- [   main] o.s.jdbc.datasource.init.ScriptUtils  : Executing SQL script from class path resource [data.sql]
2017-07-05 20:50:10.992 INFO 5956 --- [   main] o.s.jdbc.datasource.init.ScriptUtils  : Executed SQL script from class path resource [data.sql] in 0 ms.
2017-07-05 20:50:11.118 INFO 5956 --- [   main] j.LocalContainerEntityManagerFactoryBean : Building JPA container EntityManagerFactory for persistence unit 'default'
2017-07-05 20:50:11.133 INFO 5956 --- [   main] o.hibernate.jpa.internal.util.LogHelper : HHH000204: Processing PersistenceUnitInfo [
 name: default
 ...]
2017-07-05 20:50:11.227 INFO 5956 --- [   main] org.hibernate.Version     : HHH000412: Hibernate Core {5.0.11.Final}
2017-07-05 20:50:11.227 INFO 5956 --- [   main] org.hibernate.cfg.Environment   : HHH000206: hibernate.properties not found
2017-07-05 20:50:11.227 INFO 5956 --- [   main] org.hibernate.cfg.Environment   : HHH000021: Bytecode provider name : javassist
2017-07-05 20:50:11.273 INFO 5956 --- [   main] o.hibernate.annotations.common.Version : HCANN000001: Hibernate Commons Annotations {5.0.1.Final}
2017-07-05 20:50:11.398 INFO 5956 --- [   main] org.hibernate.dialect.Dialect   : HHH000400: Using dialect: org.hibernate.dialect.H2Dialect
2017-07-05 20:50:11.793 INFO 5956 --- [   main] org.hibernate.tool.hbm2ddl.SchemaUpdate : HHH000228: Running hbm2ddl schema update
2017-07-05 20:50:11.840 INFO 5956 --- [   main] j.LocalContainerEntityManagerFactoryBean : Initialized JPA EntityManagerFactory for persistence unit 'default'
2017-07-05 20:50:12.536 INFO 5956 --- [   main] s.w.s.m.m.a.RequestMappingHandlerAdapter : Looking for @ControllerAdvice: org.springframework.boot.context.embedded.AnnotationConfigEmbeddedWebApplicationContext@50103bfb: startup date [Wed Jul 05 20:50:07 CST 2017]; root of context hierarchy
2017-07-05 20:50:12.626 INFO 5956 --- [   main] s.w.s.m.m.a.RequestMappingHandlerMapping : Mapped "{[]}" onto public java.lang.String com.zlf.Application.home()
2017-07-05 20:50:12.629 INFO 5956 --- [   main] s.w.s.m.m.a.RequestMappingHandlerMapping : Mapped "{[/staff/getList],produces=[application/json;charset=utf-8]}" onto public java.util.List<com.zlf.bo.staffbo> com.zlf.controller.StaffController.getAllList()
2017-07-05 20:50:12.631 INFO 5956 --- [   main] s.w.s.m.m.a.RequestMappingHandlerMapping : Mapped "{[/error]}" onto public org.springframework.http.ResponseEntity<java.util.map<java.lang.string, java.lang.object="">> org.springframework.boot.autoconfigure.web.BasicErrorController.error(javax.servlet.http.HttpServletRequest)
2017-07-05 20:50:12.632 INFO 5956 --- [   main] s.w.s.m.m.a.RequestMappingHandlerMapping : Mapped "{[/error],produces=[text/html]}" onto public org.springframework.web.servlet.ModelAndView org.springframework.boot.autoconfigure.web.BasicErrorController.errorHtml(javax.servlet.http.HttpServletRequest,javax.servlet.http.HttpServletResponse)
2017-07-05 20:50:12.670 INFO 5956 --- [   main] o.s.w.s.handler.SimpleUrlHandlerMapping : Mapped URL path [/webjars/**] onto handler of type [class org.springframework.web.servlet.resource.ResourceHttpRequestHandler]
2017-07-05 20:50:12.670 INFO 5956 --- [   main] o.s.w.s.handler.SimpleUrlHandlerMapping : Mapped URL path [/**] onto handler of type [class org.springframework.web.servlet.resource.ResourceHttpRequestHandler]
2017-07-05 20:50:12.733 INFO 5956 --- [   main] o.s.w.s.handler.SimpleUrlHandlerMapping : Mapped URL path [/**/favicon.ico] onto handler of type [class org.springframework.web.servlet.resource.ResourceHttpRequestHandler]
2017-07-05 20:50:13.232 INFO 5956 --- [   main] o.s.j.e.a.AnnotationMBeanExporter  : Registering beans for JMX exposure on startup
2017-07-05 20:50:13.310 INFO 5956 --- [   main] s.b.c.e.t.TomcatEmbeddedServletContainer : Tomcat started on port(s): 8080 (http)
2017-07-05 20:50:13.310 INFO 5956 --- [   main] com.zlf.Application      : Started Application in 6.213 seconds (JVM running for 6.478)
</java.util.map<java.lang.string,></com.zlf.bo.staffbo>
打开浏览器,访问地址:http://localhost:8080/staff/getList,可以看到初始化的数据都出来了。
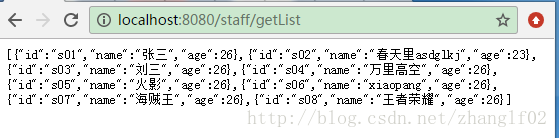
然后访问地址:http://localhost:8080/h3-console出现下面的h3 console界面
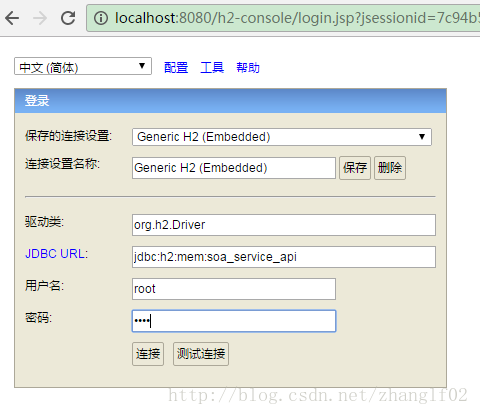
在登陆页面输入在application.properties中配置的h3数据库信息,登陆后可以看到左侧已经有我们初始化的表,查询数据,也能看到数据应初始化进来。则证明成功了!

看完上述内容,你们掌握内存数据库如何在springboot中进行配置的方法了吗?如果还想学到更多技能或想了解更多相关内容,欢迎关注亿速云行业资讯频道,感谢各位的阅读!
免责声明:本站发布的内容(图片、视频和文字)以原创、转载和分享为主,文章观点不代表本网站立场,如果涉及侵权请联系站长邮箱:is@yisu.com进行举报,并提供相关证据,一经查实,将立刻删除涉嫌侵权内容。


