nginx1.10.1增加后端web健康检查upstream_check模塊
因為公司的業務需求,需要將已建好的架構中反向代理和負載均衡做成集群,來應對高幷發量。
但是做成集群的架構后,後端的兩臺web機器,需要靠nginx的upstream_check來做健康檢查。
实验环境:
应用 IP 操作系统 涉及软件
负载均衡层 172.16.22.2 CentOS 7.2 nginx-1.10.1
后端web01 172.16.22.3 CentOS 7.2 Tomcat-7.0.72
后端web02 172.16.22.4 CentOS 7.2 Tomcat-7.0.72
下列的设定只在负载均衡层进行,且至针对单台进行操作,另外一台负载均衡机器集群成员也按照下列步骤操作即可。
下面呈现的是我大致的安装步骤:
1.已源碼安装nginx1.10.1版本
2.首先下載了nginx_upstream_check_module模塊補丁
wget https://github.com/yaoweibin/nginx_upstream_check_module/archive/master.zip
3.把master.zip解壓
[root@z soft]#unzip nginx_upstream_check_module.zip
進入到nginx_upstream_check_module內
[root@z nginx_upstream_check_module]#pwd
/data0/soft/nginx_upstream_check_module
--主要為方便後續打好補丁做準備
4.進入到nginx1.10.1的源碼包目錄里
[root@z ~]#cd /usr/local/nginx-1.10.1
5.因要對nginx打後臺健康檢查的補丁,需要把打補丁的命令安裝完畢
[root@z nginx-1.10.1]#rpm -qa | grep patch
patch-2.7.1-8.el7.x86_64
如果沒有安裝patch,就yum install -y patch
6.打upstream_check補丁進入nginx-1.10.1內
[root@z nginx-1.10.1]#patch -p0 < /data0/soft/nginx_upstream_check_module/check_1.11.1+.patch
7.打完補丁就進行編譯
因為需要添加–add-module=/root/nginx_upstream_check_module-master
如果其他编译参数和之前保持一致,但又不记得之前的编译参数,
可使用 nginx -V 命令查看。
[root@z nginx-1.10.1]# /usr/local/nginx/sbin/nginx -V
nginx version: nginx/1.10.1
built by gcc 4.8.5 20150623 (Red Hat 4.8.5-4) (GCC)
built with OpenSSL 1.0.1e-fips 11 Feb 2013
TLS SNI support enabled
configure arguments:
--prefix=/usr/local/nginx
--pid-path=/var/run/nginx/nginx.pid
--lock-path=/var/lock/nginx.lock
--user=nginx
--group=nginx
--with-http_ssl_module
--with-http_flv_module
--with-http_stub_status_module
--with-http_gzip_static_module
--http-client-body-temp-path=/var/tmp/nginx/client/
--http-proxy-temp-path=/var/tmp/nginx/proxy/
--http-fastcgi-temp-path=/var/tmp/nginx/fcgi/
--http-uwsgi-temp-path=/var/tmp/nginx/uwsgi
--http-scgi-temp-path=/var/tmp/nginx/scgi
--with-pcre
所以就進行編譯,只要在後面添加upstream_check_module-master
即如下:
[root@z nginx-1.10.1]#./configure \
--prefix=/usr/local/nginx \
--pid-path=/var/run/nginx/nginx.pid \
--lock-path=/var/lock/nginx.lock \
--user=nginx \
--group=nginx \
--with-http_ssl_module \
--with-http_flv_module \
--with-http_stub_status_module \
--with-http_gzip_static_module \
--http-client-body-temp-path=/var/tmp/nginx/client/ \
--http-proxy-temp-path=/var/tmp/nginx/proxy/ \
--http-fastcgi-temp-path=/var/tmp/nginx/fcgi/ \
--http-uwsgi-temp-path=/var/tmp/nginx/uwsgi \
--http-scgi-temp-path=/var/tmp/nginx/scgi \
--with-pcre \
--add-module=/data0/soft/nginx_upstream_check_module-master/
[root@z nginx-1.10.1]# make && make install
[root@z nginx-1.10.1]# make clean
#注:因為我是在原來已安装的版本上安插nginx_upstream_check_module模塊,所以nginx.conf是在原來的基礎上生成的,所以不需要另外備份。要是谨慎点還是把原來的配置檔案備份一下,再進行編譯安裝。
8.到了这,就是重點了,配置nginx檢測後端節點健康狀況
vim /etc/nginx.conf
添加upstream模塊
upstream information{
server 172.16.22.3:80 max_fails=2;
server 172.16.22.4:80 max_fails=2;
check interval=3000 rise=2 fall=5 timeout=1000 type=http;
}
--嵌套進http內即可
#注,指令参数的意义
- interval:向后端发送的健康检查包的间隔ms。
- fall(fall_count): 如果连续失败次数达到fall_count,服务器就被认为是down。
- rise(rise_count): 如果连续成功次数达到rise_count,服务器就被认为是up。
- timeout: 后端健康请求的超时时间。
- default_down: 设定初始时服务器的状态,如果是true,就说明默认是down的,如果是false,就是up的。
默认值是true,也就是一开始服务器认为是不可用,要等健康检查包达到一定成功次数以后才会被认为是健康的。
- type:健康检查包的类型,现在支持以下多种类型
- tcp:简单的tcp连接,如果连接成功,就说明后端正常。
- ssl_hello:发送一个初始的SSL hello包并接受服务器的SSL hello包。
- http:发送HTTP请求,通过后端的回复包的状态来判断后端是否存活。
- mysql: 向mysql服务器连接,通过接收服务器的greeting包来判断后端是否存活。
- ajp:向后端发送AJP协议的Cping包,通过接收Cpong包来判断后端是否存活。
- port: 指定后端服务器的检查端口。你可以指定不同于真实服务的后端服务器的端口,
比如后端提供的是443端口的应用,你可以去检查80端口的状态来判断后端健康状况。默认是0,表示跟后端server提供真实服务的端口一样。
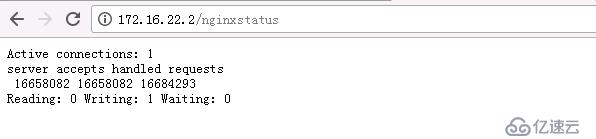
9.通过访问nginxstatus頁面,查看后端机器是否真的連接上了的准备工作
vim /etc/nginx.conf
配置负载均衡层实时连接状态展示页面,在nginx.conf上添加上
location /nginxstatus{
stub_status on;
access_log /usr/local/nginx/logs/status.log;
auth_basic "nginxstatus";
}
查看后端網頁的連接數,查看upstream check status,即后端web健康状况
#添加了nginx_upstream_check_module模块之后,该项生效
#主要为了测试nginx_upstream_check_module模块是否好使
location /zstatus{
check_status;
access_log off;
#allow IP;
#deny all;
}
10.配置完畢,需要重啟nginx服务
先檢查配置信息是否無誤
[root@z nginx-1.10.1]#/usr/local/nginx/sbin/nginx -t
平滑重啟nginx服務
[root@z nginx-1.10.1]#/usr/local/nginx/sbin/nignx -s reload
可以在網頁上瀏覽訪問http://172.16.22.2/nginxstatus ,查看nginx的连接状态
访问http://172.16.22.2/informationstatus,查看后端web健康状况
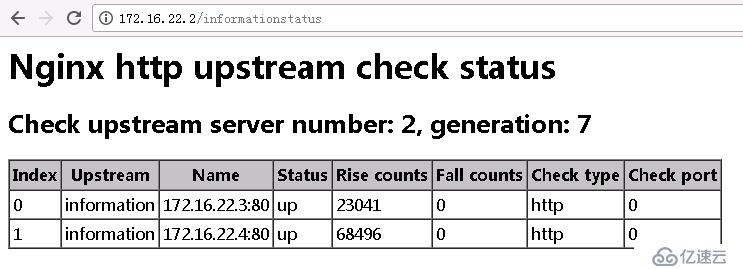
以上说明后端健康检查模块安装成功!
上述内容纯靠记忆写下,可能存在缺漏,如有错误与遗失,欢迎大家指出,谢谢!
免责声明:本站发布的内容(图片、视频和文字)以原创、转载和分享为主,文章观点不代表本网站立场,如果涉及侵权请联系站长邮箱:is@yisu.com进行举报,并提供相关证据,一经查实,将立刻删除涉嫌侵权内容。


