小编给大家分享一下在android上如何使用WebSocket做消息通信功能,希望大家阅读完这篇文章后大所收获,下面让我们一起去探讨吧!
前言
消息推送功能可以说移动APP不可缺少的功能之一,一般简单的推送我们可以使用第三方推送的SDK,比如极光推送、信鸽推送等,但是对于消息聊天这种及时性有要求的或者三方推送不满足业务需求的,我们就需要使用WebSocket实现消息推送功能。
基本流程
WebSocket是什么,这里就不做介绍了,我们这里使用的开源框架是https://github.com/TakahikoKawasaki/nv-websocket-client
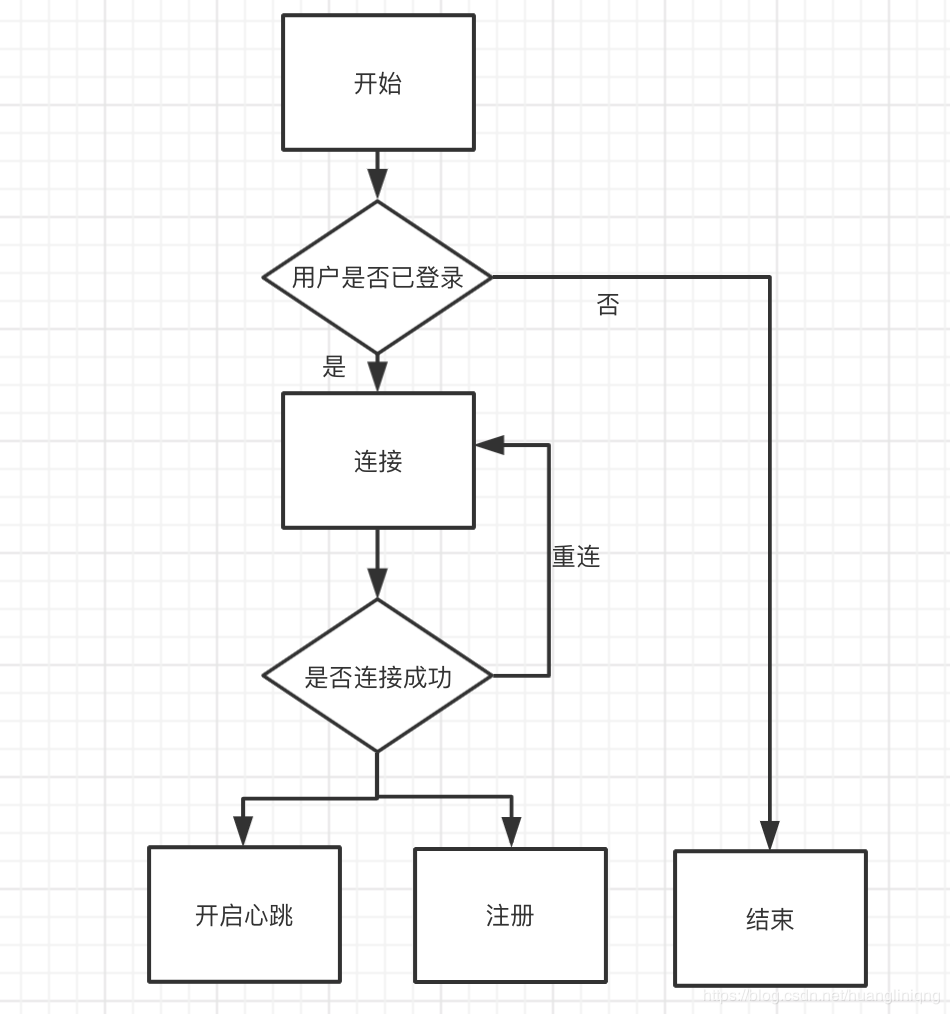
基于开源协议我们封装实现WebSocket的连接、注册、心跳、消息分发、超时任务功能,基本流程如下:
连接功能
首先我们新建一个项目,在build.grade中添加配置
compile 'com.neovisionaries:nv-websocket-client:2.2'
新建websocket管理类WsManger
public class WsManager {

 private volatile static WsManager wsManger;

 private WsManager() {
 }

 public static WsManager getWsManger() {
 if (wsManger == null) {
 synchronized (WsManager.class) {
 if (wsManger == null) {
  wsManger = new WsManager();
 }
 }
 }
 return wsManger;
 }


}
接下来添加连接方法,我们将webSocket的状态分为三种,新建WsStatue枚举类对应起来
public enum WsStatus {

 /**
 * 连接成功
 */
 CONNECT_SUCCESS,
 /**
 * 连接失败
 */
 CONNECT_FAIL,
 /**
 * 正在连接
 */
 CONNECTING;
}
连接方法如下所示:
/**
 * 连接方法 这里要判断是否登录 此处省略
 */
public void connect() {
 //WEB_SOCKET_API 是连接的url地址,
 // CONNECT_TIMEOUT是连接的超时时间 这里是 5秒
 try {
 ws = new WebSocketFactory().createSocket(WEB_SOCKET_API, CONNECT_TIMEOUT)
 //设置帧队列最大值为5
 .setFrameQueueSize(5)
 //设置不允许服务端关闭连接却未发送关闭帧
 .setMissingCloseFrameAllowed(false)
 //添加回调监听
 .addListener(new WsListener())
 //异步连接
 .connectAsynchronously();
 } catch (IOException e) {
 e.printStackTrace();
 }
 setStatus(WsStatus.CONNECTING);
}
调用连接方法后 我们来看连接的回调 也就是WsListener
/**
 * websocket回调事件
 */
private class WsListener extends WebSocketAdapter {


 @Override
 public void onConnected(WebSocket websocket, Map<String, List<String>> headers) throws Exception {
 Log.d(TAG, "onConnected: 连接成功");
 }

 @Override
 public void onConnectError(WebSocket websocket, WebSocketException exception) throws Exception {
 Log.d(TAG, "onConnectError: 连接失败");
 }

 @Override
 public void onDisconnected(WebSocket websocket, WebSocketFrame serverCloseFrame,
  WebSocketFrame clientCloseFrame,
  boolean closedByServer) throws Exception {
 Log.d(TAG, "onDisconnected: 断开连接");

 }

 @Override
 public void onTextMessage(WebSocket websocket, String text) throws Exception {
 Log.d(TAG, "onTextMessage: 收到消息:" + text);
 }
}
下面我们调用连接方法
WsManager.getWsManger().connect();
运行项目我们可以看到如下打印:

此处我们要做的处理是,如果收到连接失败或者断开连接的回调 需要重新连接,我们重新调用一次连接方法即可,并且如果超过三次重连失败,我们在业务中可以通过调用接口来获取数据,避免数据丢失,此处细节省略。
协议封装
此处协议如下所示:
{
 "action":"",
 "requestChild":{
 "clientType":"",
 "id":""
 }
}心跳、发送请求都属于客户端主动发送请求,对于请求结果我们分为成功和失败以及超时,发送超时我们是收不到服务器任何回复的,所以我们需要在发送之后将发送放在超时任务队列中,如果请求成功将任务从超时队列中移除,超时从超时队列中获取任务重新请求。
超时任务队列中回调有成功、失败、超时。
我们按照上述协议,新增对应实体类,采用Builder设计模式
public class Request {

 /**
 * 行为
 */
 private String action;

 /**
 * 请求体
 */
 private RequestChild req;


 /**
 * 请求次数
 */
 private transient int reqCount;

 /**
 * 超时的时间
 */
 private transient int timeOut;


 public Request() {
 }


 public Request(String action, int reqCount, int timeOut, RequestChild req) {
 this.action = action;
 this.req = req;
 this.reqCount = reqCount;
 this.timeOut = timeOut;
 }


 public static class Builder {
 //action 请求类型
 private String action;
 //请求子类数据 按照具体业务划分
 private RequestChild req;
 //请求次数 便于重试
 private int reqCount;
 //超时时间
 private int timeOut;

 public Builder action(String action) {
 this.action = action;
 return this;
 }


 public Builder req(RequestChild req) {
 this.req = req;
 return this;
 }


 public Builder reqCount(int reqCount) {
 this.reqCount = reqCount;
 return this;
 }

 public Builder timeOut(int timeOut) {
 this.timeOut = timeOut;
 return this;
 }

 public Request build() {
 return new Request(action, reqCount, timeOut, req);
 }

 }
}
public class RequestChild {

 /**
 * 设备类型
 */
 private String clientType;


 /**
 * 用于用户注册的id
 */
 private String id;

 public RequestChild(String clientType, String id) {
 this.clientType = clientType;
 this.id = id;
 }

 public RequestChild() {
 }


 public static class Builder {
 private String clientType;
 private String id;

 public RequestChild.Builder setClientType(String clientType) {
 this.clientType = clientType;
 return this;
 }


 public RequestChild.Builder setId(String id) {
 this.id = id;
 return this;
 }


 public RequestChild build() {
 return new RequestChild(clientType, id);
 }

 }


}
我们添加一个发送请求的方法如下:
/**
 * 发送请求
 *
 * @param request 请求体
 * @param reqCount 请求次数
 * @param requestListern 请求回调
 */
private void senRequest(Request request, final int reqCount, final RequestListern requestListern) {
 if (!isNetConnect()) {
 requestListern.requestFailed("网络未连接");
 return;
 }

}
请求回调如下所示
public interface RequestListern {

 /**
 * 请求成功
 */
 void requestSuccess();

 /**
 * 请求失败
 *
 * @param message 请求失败消息提示
 */
 void requestFailed(String message);
}
接着我们要把请求放在超时队列中,新建超时任务类,对应的分别是请求参数、请求回调、任务调度
public class TimeOutTask {


 /**
 * 请求主体
 */
 private Request request;

 /**
 * 通用返回
 */
 private RequestCallBack requestCallBack;

 /**
 * r任务
 */
 private ScheduledFuture scheduledFuture;


 public TimeOutTask(Request request,
  RequestCallBack requestCallBack,
  ScheduledFuture scheduledFuture) {
 this.request = request;
 this.requestCallBack = requestCallBack;
 this.scheduledFuture = scheduledFuture;
 }

 public ScheduledFuture getScheduledFuture() {
 return scheduledFuture;
 }

 public void setScheduledFuture(ScheduledFuture scheduledFuture) {
 this.scheduledFuture = scheduledFuture;
 }

 public Request getRequest() {
 return request;
 }

 public void setRequest(Request request) {
 this.request = request;
 }

 public RequestCallBack getRequestCallBack() {
 return requestCallBack;
 }

 public void setRequestCallBack(RequestCallBack requestCallBack) {
 this.requestCallBack = requestCallBack;
 }

}
RequestCallBack是超时任务的回调,只是比请求回调多了个超时,因为超时的处理机制是一样的,所以这里我们没必要将超时回调到请求中
public interface RequestCallBack {

 /**
 * 请求成功
 */
 void requestSuccess();

 /**
 * 请求失败
 *
 * @param request 请求体
 * @param message 请求失败的消息
 */
 void requestFailed(String message, Request request);

 /**
 * 请求超时
 *
 * @param request 请求体
 */
 void timeOut(Request request);
}
/**
 * 添加超时任务
 */
private ScheduledFuture enqueueTimeout(final Request request, final long timeout) {
 Log.d(TAG, " " + "enqueueTimeout: 添加超时任务类型为:" + request.getAction());
 return executor.schedule(new Runnable() {
 @Override
 public void run() {
 TimeOutTask timeoutTask = callbacks.remove(request.getAction());
 if (timeoutTask != null) {
 timeoutTask.getRequestCallBack().timeOut(timeoutTask.getRequest());
 }
 }
 }, timeout, TimeUnit.MILLISECONDS);
}
超时任务的方法是通过任务调度定时调用,请求成功后我们会把超时任务移除,当到了超时时间时,任务还存在就说明任务超时了。
每次的任务我们以action为键值存在hashMap中
private Map<String, CallbackWrapper> callbacks = new HashMap<>();
将任务放入超时任务代码如下所示:
final ScheduledFuture timeoutTask = enqueueTimeout(request, request.getTimeOut());

final RequestCallBack requestCallBack = new RequestCallBack() {
 @Override
 public void requestSuccess() {
 requestListern.requestSuccess();
 }

 @Override
 public void requestFailed(String message, Request request) {
 requestListern.requestFailed(message);
 }

 @Override
 public void timeOut(Request request) {
 timeOutHanlder(request);
 }
};
callbacks.put(request.getAction(),
 new CallbackWrapper(request, requestCallBack, timeoutTask));
一般而言,任务超时都是由于连接原因导致,所以我们这里可以尝试重试一次,如果还是超时,通过 timeOutHanlder(request);方法 进行重新连接,重连代码和连接代码一样,这里就省略了,做好这步操作,我们就可以发送消息了。
/**
 * 超时任务
 */
private void timeOutHanlder(Request requset) {
 setStatus(WsStatus.CONNECT_FAIL);
 //这里假装有重连
 Log.d(TAG, "timeOutHanlder: 请求超时 准备重连");
}
到这里我们的流程基本可以走通了。
心跳
首先我们要了解下心跳的作用是什么,心跳是在连接成功后,通过固定的间隔时间向服务器发送询问,当前是否还在线,有很多人说心跳失败我们就重连,成功就继续心跳,但是这里要注意的是,我们一般是收不到心跳失败回调的,心跳也是向服务器发送数据,所以我们要将所有的主动请求都放在超时任务队列中,
所以对websocket来说 请求结果有三种:成功、失败、超时,对于用户 只有成功、失败即可。
至于心跳、注册等请求发送的数据是什么,这就得看我们与服务端定的协议是什么样了,通常来说 分为action 和 requestBody,协议格式我们再第二步已经封装好了,这里我们以心跳任务为例验证上面的封装。
/**
 * 心跳
 */
void keepAlive() {

 Request request = new Request.Builder()
 .reqCount(0)
 .timeOut(REQUEST_TIMEOUT)
 .action(ACTION_KEEPALIVE).build();

 WsManager.getWsManger().senRequest(request, request.getReqCount() + 1, new RequestListern() {
 @Override
 public void requestSuccess() {
 Log.d(TAG, "requestSuccess: 心跳发送成功了");
 }

 @Override
 public void requestFailed(String message) {
 }
 });
}
我们每间隔10s中开启一次心跳任务
/**
 * 开始心跳
 */
public void startKeepAlive() {
 mHandler.postDelayed(mKeepAliveTask, HEART_BEAT_RATE);
}
/**
 * 心跳任务
 */
private Runnable mKeepAliveTask = new Runnable() {

 @Override
 public void run() {
 keepAlive();
 mHandler.removeCallbacks(mKeepAliveTask);
 mHandler.postDelayed(mKeepAliveTask, HEART_BEAT_RATE);
 }
};
为了便于操作演示,在主页面上加个按钮 ,点击按钮调用startKeepAlive方法,运行如下所示:

我们可以看到心跳返回的statue是300 不成功,5秒之后走到了请求超时的方法中,所以如果状态返回成功的话,我们需要回调给调用者
/**
 * 处理 任务回调
 *
 * @param action 请求类型
 */
void disPatchCallbackWarp(String action, boolean isSuccess) {
 CallbackWrapper callBackWarp = callbacks.remove(action);
 if (callBackWarp == null) {
 Logger.d(TAG+" "+ "disPatchCallbackWarp: 任务队列为空");
 } else {
 callBackWarp.getScheduledFuture().cancel(true);
 if (isSuccess) {
 callBackWarp.getRequestCallBack().requestSuccess();
 } else {
 callBackWarp.getRequestCallBack().requestFailed("", new Request());
 }

 }
}
这样调用者才知道成功或失败。
发送其他消息与心跳一样,只是请求参数不同而已,修改Request参数即可。这样我们根据协议和业务就实现一个比较规范的webSocket消息推送流程了。
看完了这篇文章,相信你对在android上如何使用WebSocket做消息通信功能有了一定的了解,想了解更多相关知识,欢迎关注亿速云行业资讯频道,感谢各位的阅读!
免责声明:本站发布的内容(图片、视频和文字)以原创、转载和分享为主,文章观点不代表本网站立场,如果涉及侵权请联系站长邮箱:is@yisu.com进行举报,并提供相关证据,一经查实,将立刻删除涉嫌侵权内容。


