这篇文章主要讲解了SpringBoot+Spring Cloud Consul服务注册的方法,内容清晰明了,对此有兴趣的小伙伴可以学习一下,相信大家阅读完之后会有帮助。

什么是Consul
Consul 是 HashiCorp 公司推出的开源工具,用于实现分布式系统的服务发现与配置。与其它分布式服务注册与发现的方案,Consul 的方案更“一站式”,内置了服务注册与发现框架、分布一致性协议实现、健康检查、Key/Value 存储、多数据中心方案,不再需要依赖其它工具(比如 ZooKeeper 等)。使用起来也较为简单。Consul 使用 Go 语言编写,因此具有天然可移植性(支持Linux、windows和Mac OS X);安装包仅包含一个可执行文件,方便部署,与 Docker 等轻量级容器可无缝配合。
Consul安装
官网(consul.io)最新版本1.8.0 提供了MacOS,Windows, Linux, 如果你不知道怎么安装,官方还提供了视频。

我这里使用docker安装,安装过程总结起来为三句话:
docker search consul
docker pull consul
docker run --name consul -d -p 8600:8500 consul
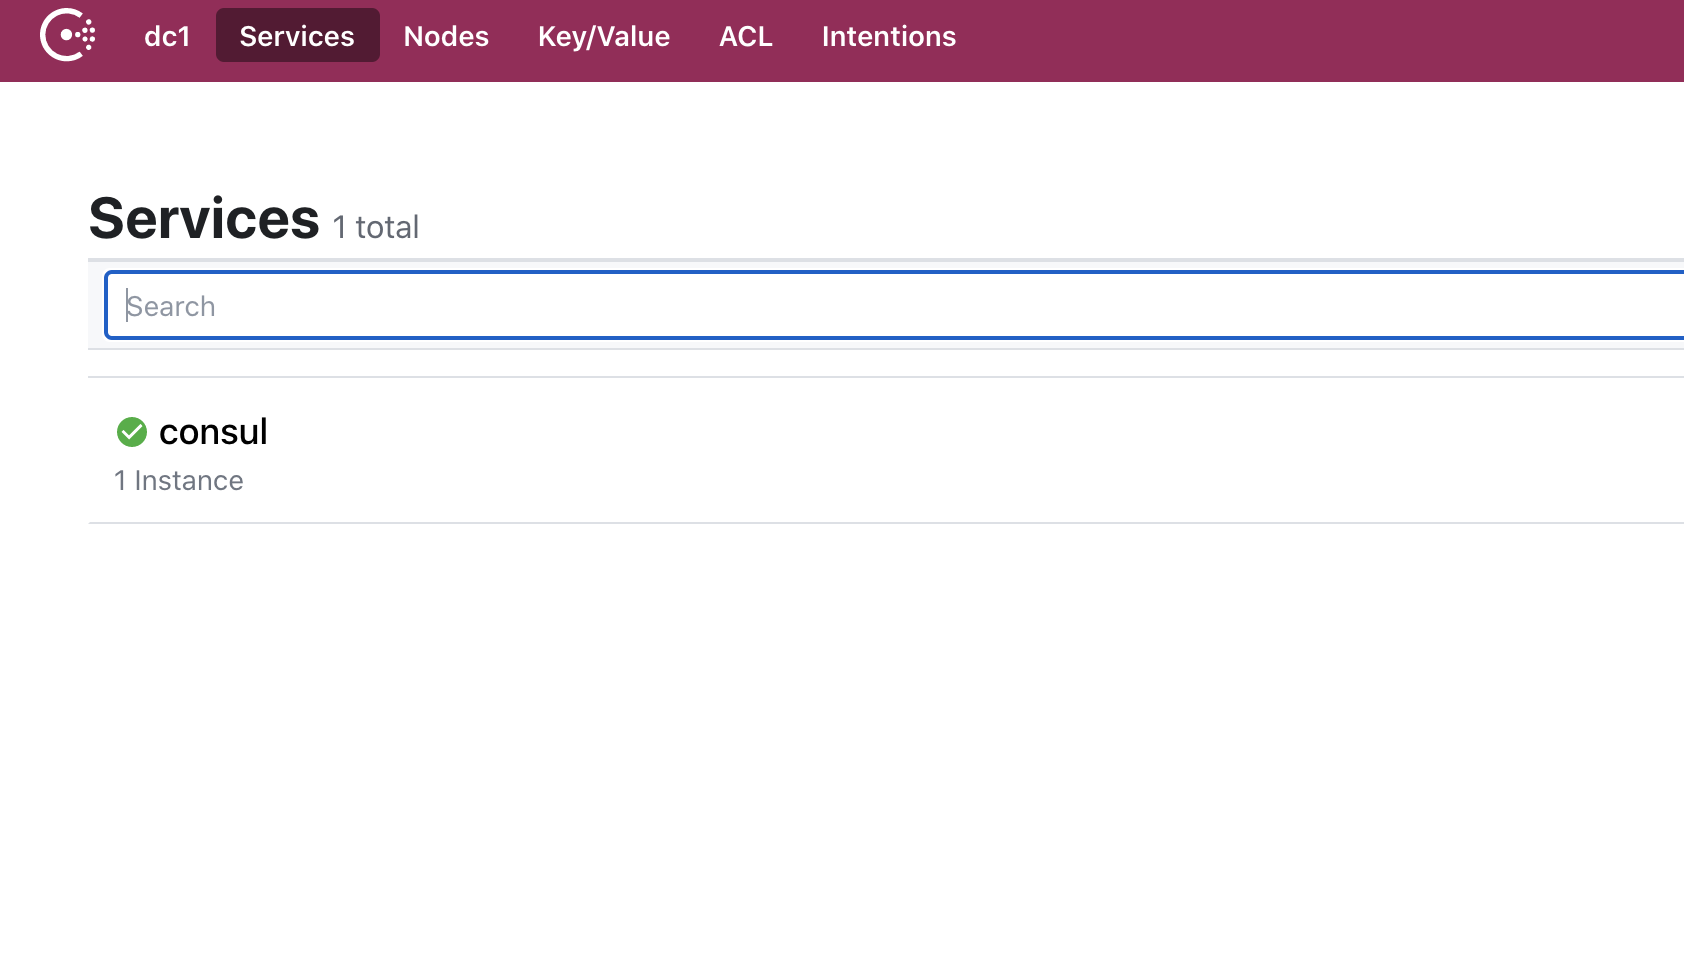
没问题的话,本机访问http://localhost:8600则可以打开consul自带的管理系统,默认情况下没有服务注册进来
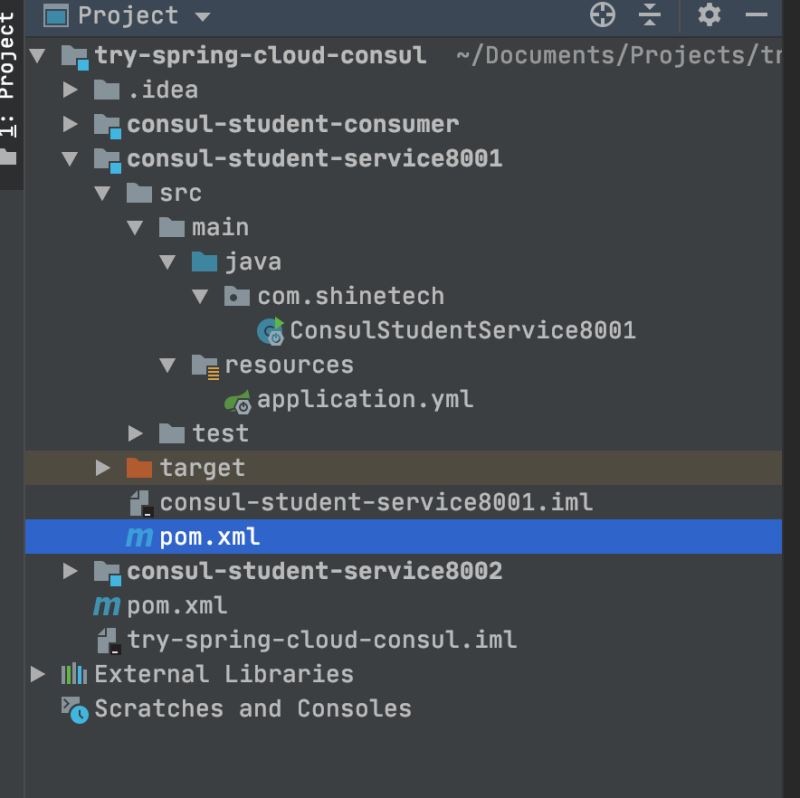
项目结构如下图
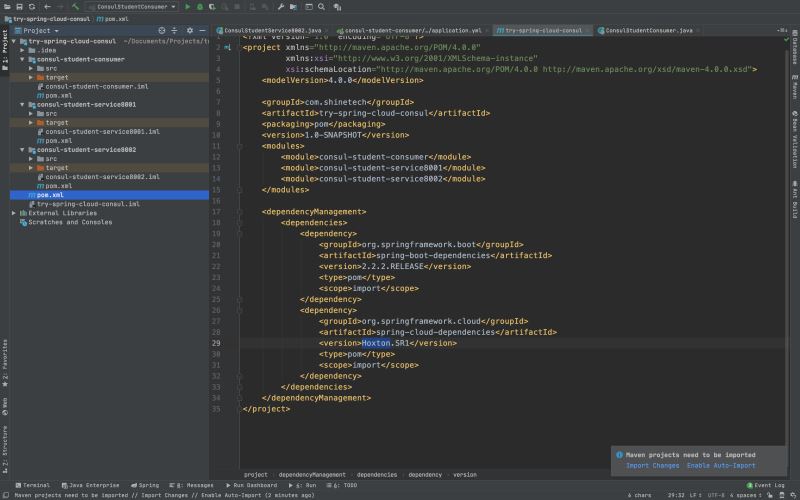
父工程pom.xml
<dependencyManagement>
 <dependencies>
 <dependency>
 <groupId>org.springframework.boot</groupId>
 <artifactId>spring-boot-dependencies</artifactId>
 <version>2.2.2.RELEASE</version>
 <type>pom</type>
 <scope>import</scope>
 </dependency>
 <dependency>
 <groupId>org.springframework.cloud</groupId>
 <artifactId>spring-cloud-dependencies</artifactId>
 <version>Hoxton.SR1</version>
 <type>pom</type>
 <scope>import</scope>
 </dependency>
 </dependencies>
 </dependencyManagement>
服务提供者
服务注册中心有了,那么我们来开发两个服务提供者,这里新建了两个Module,端口8001和8002。两个Module代码相同,主要为了演示负载使用。
新建Module,添加spring-cloud-starter-consul-disconvery依赖
pom.xml
 <dependencies>
 <dependency>
 <groupId>org.springframework.boot</groupId>
 <artifactId>spring-boot-starter-web</artifactId>
 </dependency>
 <dependency>
 <groupId>org.springframework.boot</groupId>
 <artifactId>spring-boot-starter-actuator</artifactId>
 </dependency>
 <dependency>
 <groupId>org.springframework.cloud</groupId>
 <artifactId>spring-cloud-starter-consul-discovery</artifactId>
 </dependency>
 <dependency>
 <groupId>org.springframework.boot</groupId>
 <artifactId>spring-boot-starter-test</artifactId>
 </dependency>
 </dependencies>
添加配置(application.yml)
server:
 port: 8001
spring:
 application:
 name: consul-student-service
 cloud:
 consul:
 port: 8600
 host: 127.0.0.1
 discovery:
 service-name: ${spring.application.name}
修改启动类,添加服务
这里我直接写了一个测试接口放在启动类里。这里我只贴了端口8001的代码,8002代码结构相同,只是端口不同。
@SpringBootApplication
@EnableDiscoveryClient
@RestController
public class ConsulStudentService8001 {
public static void main(String[] args) {
SpringApplication.run(ConsulStudentService8001.class,args);
}
@GetMapping("/student/version")
public String version(){
return "8001,202007222300";
}
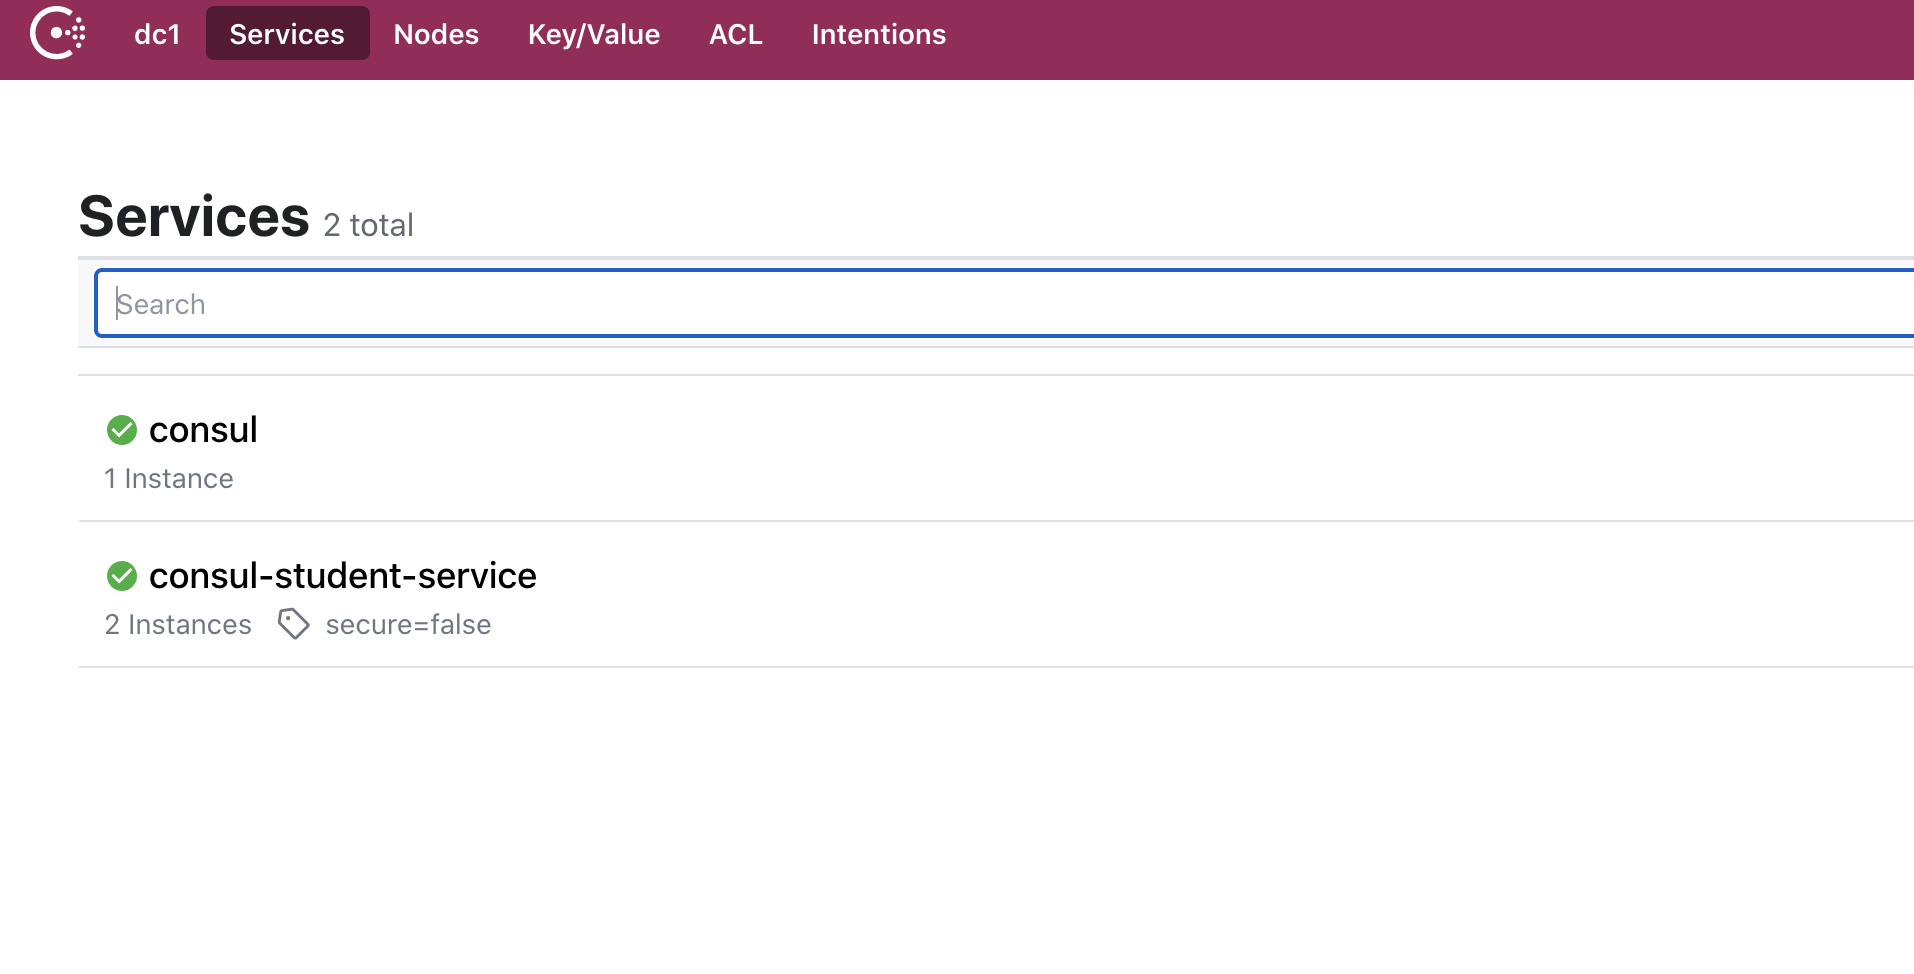
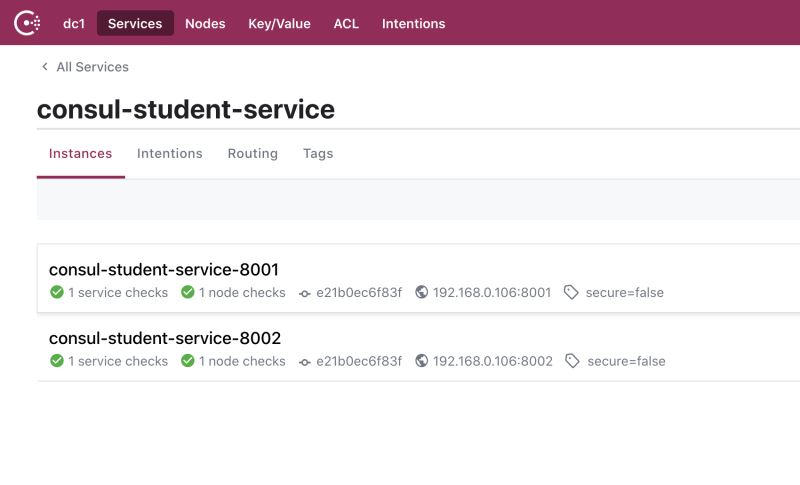
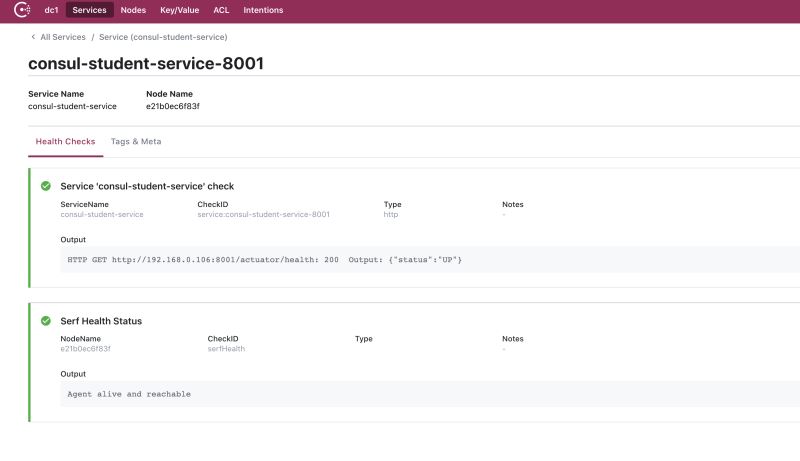
}OK,到这一步,启动两个服务,不出异常的情况下,可在注册中心查看当前的服务实例。
Consul消费者
服务注册中心有了,服务提供者也有了,我们再来开发一个服务消费者。
新建Module,同样添加spring-cloud-starter-consul-disconvery依赖
pom.xml
<dependencies>
 <dependency>
 <groupId>org.springframework.boot</groupId>
 <artifactId>spring-boot-starter-web</artifactId>
 </dependency>
 <dependency>
 <groupId>org.springframework.cloud</groupId>
 <artifactId>spring-cloud-starter-consul-discovery</artifactId>
 </dependency>
 <dependency>
 <groupId>org.springframework.boot</groupId>
 <artifactId>spring-boot-starter-test</artifactId>
 </dependency>
 </dependencies>
添加配置(application.yml)
server:
 port: 8080

spring:
 application:
 name: consul-student-consumer
 cloud:
 consul:
 host: 127.0.0.1
 port: 8600
 discovery:
 service-name: ${spring.application.name}
 # 不需要注册到consul中
 register: false
修改启动类,调用服务
开发RestTemplate配置类,调用REST接口时使用。
@Configuration
public class ApplicationContextConfig {

 @Bean
 @LoadBalanced
 public RestTemplate restTemplate(){
 return new RestTemplate();
 }
}
修改启动类
@SpringBootApplication
@EnableDiscoveryClient
@RestController
public class ConsulStudentConsumer {

 public static void main(String[] args) {
 SpringApplication.run(ConsulStudentConsumer.class,args);
 }

 @Autowired
 RestTemplate restTemplate;

 @GetMapping("/consul/student/version")
 public String version(){
 //这里使用服务实例名调用REST接口
 return restTemplate.getForObject("http://consul-student-service/student/version",String.class);
 }
}
OK, 这一步完成之后,可以启动消费者接口,刷新几次,从返回结果上能看出来是轮训调用服务提供者接口实例。
看完上述内容,是不是对SpringBoot+Spring Cloud Consul服务注册的方法有进一步的了解,如果还想学习更多内容,欢迎关注亿速云行业资讯频道。
免责声明:本站发布的内容(图片、视频和文字)以原创、转载和分享为主,文章观点不代表本网站立场,如果涉及侵权请联系站长邮箱:is@yisu.com进行举报,并提供相关证据,一经查实,将立刻删除涉嫌侵权内容。


