小编给大家分享一下关于springBoot+mybatis+thymeleaf前后端交互的案例分析,相信大部分人都还不怎么了解,因此分享这边文章给大家学习,希望大家阅读完这篇文章后大所收获,下面让我们一起去学习方法吧!
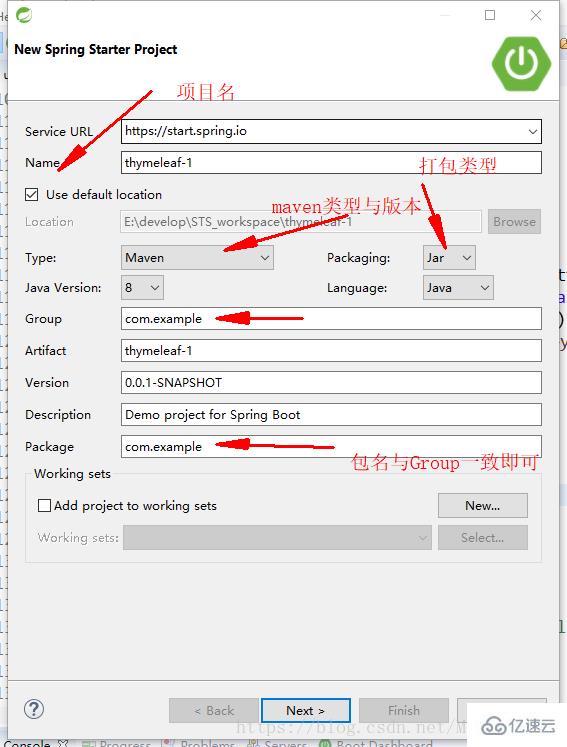
一. 创建新建一个spring-boot项目,如下图:
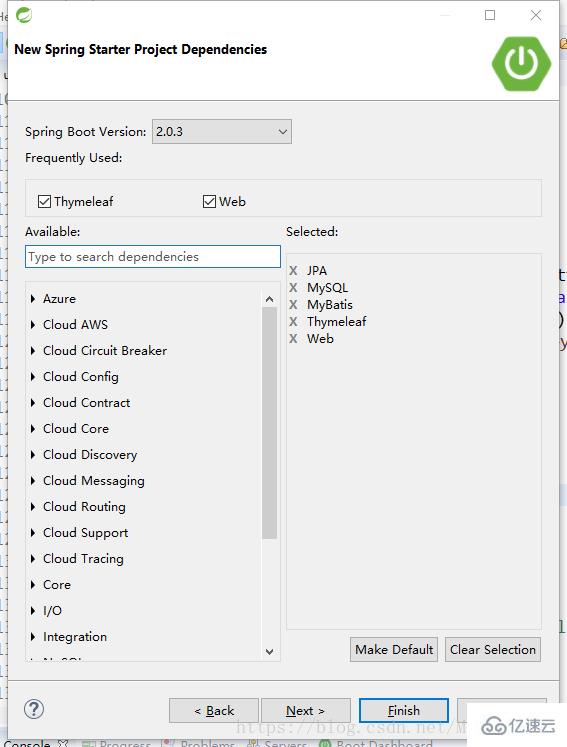
二. 选择依赖
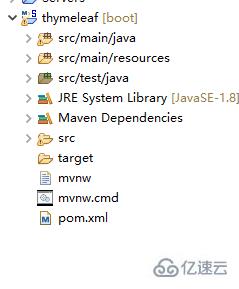
三.点击完成后,项目结构如下图:
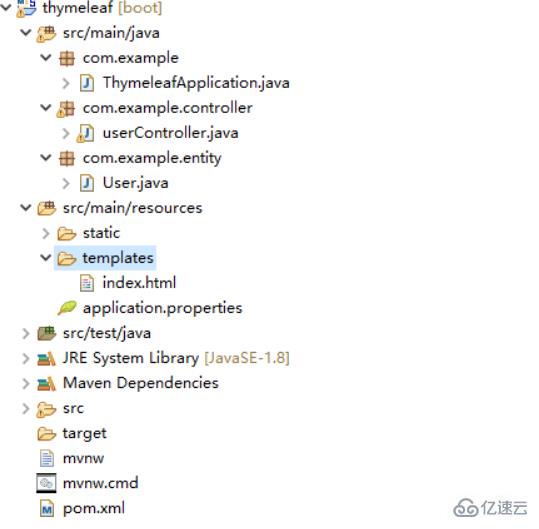
四. 在resources里面新建index.html,再java里面新建实体类包、控制器包,新建相应的类:Entity.java、userController.java如下图:
五.在spring-boot里面有个Application.java,这个东西相当于一个main方法,是整个项目的启动类,所有的代码都应该设置在该文件目录下以便扫描
@SpringBootApplication

public class ThymeleafApplication{

    public static void main(String[]args){

        SpringApplication.run( ThymeleafApplication .class,args );

    }

}
六. 配置thymeleaf模板引擎及mybatis,项目扫描路径等
spring.thymeleaf.prefix=classpath:/static/
spring.mvc.view.prefix=classpath:/static/
spring.thymeleaf.suffix=.html
spring.thymeleaf.servlet.content-type=text/html
spring.thymeleaf.cache=false
spring.thymeleaf.mode=HTML5
七. 修改 pom.xml,添加依赖
<modelVersion>4.0.0</modelVersion>

    <groupId>com.example</groupId>
    <artifactId>thymeleaf</artifactId>
    <version>0.0.1-SNAPSHOT</version>
    <packaging>jar</packaging>

    <name>thymeleaf</name>
    <description>Demo project for Spring Boot</description>

    <parent>
        <groupId>org.springframework.boot</groupId>
        <artifactId>spring-boot-starter-parent</artifactId>
        <version>2.0.3.RELEASE</version>
        <relativePath/> <!-- lookup parent from repository -->
    </parent>

    <properties>
        <project.build.sourceEncoding>UTF-8</project.build.sourceEncoding>
        <project.reporting.outputEncoding>UTF-8</project.reporting.outputEncoding>
        <java.version>1.8</java.version>
    </properties>

    <dependencies>
        <dependency>
            <groupId>org.springframework.boot</groupId>
            <artifactId>spring-boot-starter-thymeleaf</artifactId>
        </dependency>
        <dependency>
            <groupId>org.springframework.boot</groupId>
            <artifactId>spring-boot-starter-web</artifactId>
        </dependency>

        <dependency>
            <groupId>org.springframework.boot</groupId>
            <artifactId>spring-boot-starter-test</artifactId>
            <scope>test</scope>
        </dependency>
    </dependencies>

    <build>
        <plugins>
            <plugin>
                <groupId>org.springframework.boot</groupId>
                <artifactId>spring-boot-maven-plugin</artifactId>
            </plugin>
        </plugins>
    </build>
八. 配置mybatis,打开application.properties,添加数据库连接
spring.datasource.driver-class-name=com.mysql.jdbc.Driver
spring.datasource.url=jdbc:mysql://localhost:3306/car?useUnicode=true&characterEncoding=UTF-8&useSSL=false
spring.datasource.username=root
spring.datasource.password=root
mybatis.type-aliases-package=com.jxjc.domain
九. 实体类User.java
package com.example.entity;

public class User {

    private String name;
    private Integer id;
    private String classname;
    private String school;
    private String interesting;
    private String sex;


    public String getName() {
        return name;
    }
    public void setName(String name) {
        this.name = name;
    }
    public int getId() {
        return id;
    }
    public void setId(int id) {
        this.id = id;
    }
    public String getClassname() {
        return classname;
    }
    public void setClassname(String classname) {
        this.classname = classname;
    }
    public String getSchool() {
        return school;
    }
    public void setSchool(String school) {
        this.school = school;
    }
    public String getInteresting() {
        return interesting;
    }
    public void setInteresting(String interesting) {
        this.interesting = interesting;
    }
    public String getSex() {
        return sex;
    }
    public void setSex(String sex) {
        this.sex = sex;
    }
    @Override
    public String toString() {
        return "User [name=" + name + ", id=" + id + ", classname=" + classname + ", school=" + school
                + ", interesting=" + interesting + ", sex=" + sex + "]";
    }
}
十. 控制器userController.java
package com.example.controller;

import java.util.ArrayList;
import java.util.List;

import org.springframework.stereotype.Controller;
import org.springframework.ui.Model;
import org.springframework.web.bind.annotation.PathVariable;
import org.springframework.web.bind.annotation.RequestMapping;
import org.springframework.web.bind.annotation.RequestMethod;

import com.example.entity.User;

@Controller
@RequestMapping(value = "/user" ,method = RequestMethod.GET)
public class userController {
    @RequestMapping(value = "/list")
    public String listUser(Model model) {
        List<User> userlist = new ArrayList<User>();
        for (int i = 0; i < 10; i++) {
            User user = new User();
            user.setId(i);
            user.setName("张三");
            user.setClassname("计算机一班");
            user.setInteresting("打篮球");
            user.setSchool("武汉生物工程学院");
            user.setSex("男生");
            userlist.add(user);
        }
        model.addAttribute("userList",userlist);
        return "/user/list";
    }

}
十一. 前端HTML
<!DOCTYPE html>
<html xmlns:th="http://www.thymeleaf.org">
<head>
<meta charset="UTF-8">
<title>thymeleaf</title>
</head>
<body>
<h3>用户列表</h3>
<div>
    <ul>
        <li th:each="user:${userList}">
        <span th:text="${user.id}"></span>-
        <span th:text="${user.name}"></span>-
        <span th:text="${user.classname}"></span>-
        <span th:text="${user.school}"></span>-
        <span th:text="${user.interesting}"></span>-
        <span th:text="${user.sex}"></span>
        </li>
    </ul>
</div>
</body>
</html>
以上是关于springBoot+mybatis+thymeleaf前后端交互的案例分析的所有内容,感谢各位的阅读!相信大家都有了一定的了解,希望分享的内容对大家有所帮助,如果还想学习更多知识,欢迎关注亿速云行业资讯频道!
免责声明:本站发布的内容(图片、视频和文字)以原创、转载和分享为主,文章观点不代表本网站立场,如果涉及侵权请联系站长邮箱:is@yisu.com进行举报,并提供相关证据,一经查实,将立刻删除涉嫌侵权内容。


