前言:利用memcached实现CAS单点登录集群部署
参考信息:https://github.com/magro/memcached-session-manager/wiki/SetupAndConfiguration https://code.google.com/archive/p/memcached-session-manager/wikis/SetupAndConfiguration.wiki
| 应用名称 | 端口 | 版本 | 主机IP |
|---|---|---|---|
| Nginx | 8088 | 1.0.1 | 192.168.7.2 |
| CAS-TomcatA | 8089 | 7.0.35 | 192.168.7.3 |
| n1:libevent | 2.1.8 | 192.168.7.3 | |
| n1:memcached | 22322 | 1.5.12 | 192.168.7.3 |
| n1:magent | 12000 | 1.5.12 | 192.168.7.3 |
| CAS-TomcatB | 8089 | 7.0.35 | 192.168.7.4 |
| n2:libevent | 2.1.8 | 192.168.7.4 | |
| n2:memcached | 22322 | 1.5.12 | 192.168.7.4 |
| n2:magent | 12000 | 1.5.12 | 192.168.7.4 |
应用架构图: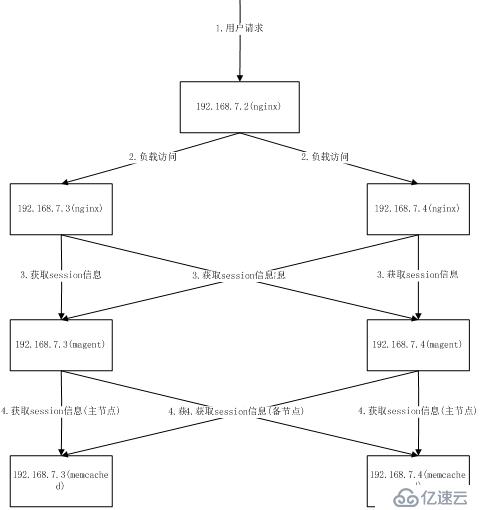
实现思路
CAS(Central Authentication Service)单点登录的实现依赖了spring-webflow和TGT的ST校验,其中spring-webflow使用到了session数据,TGT对ST校验使用到了内存中的数据。将这两个功能的数据和应用剥离,便是我们实现CAS集群化的关键。TGT对ST校验使用了java类:TicketRegistry。
    主要只有三个步骤:
        1.安装memcached并配置magent代理
        2.session共享的配置
3.TicketRegistry内存数据剥离的配置 192.168.7.3和192.168.7.4两个节点下都要安装memcached和magent,安装步骤只用192.168.7.3举例。
#安装libevent-使用root账号。
# tar -zxvf libevent-2.1.8-stable.tar.gz
# cd libevent-2.1.8-stable
#./configure -prefix=/usr && make && make install
#chmod -R 755 /usr/include
#chmod命令对其他用户授权了libevent的使用权限,非root用户也可以使用libevent。libevent的github地址:https://github.com/libevent/libevent
执行结果截图: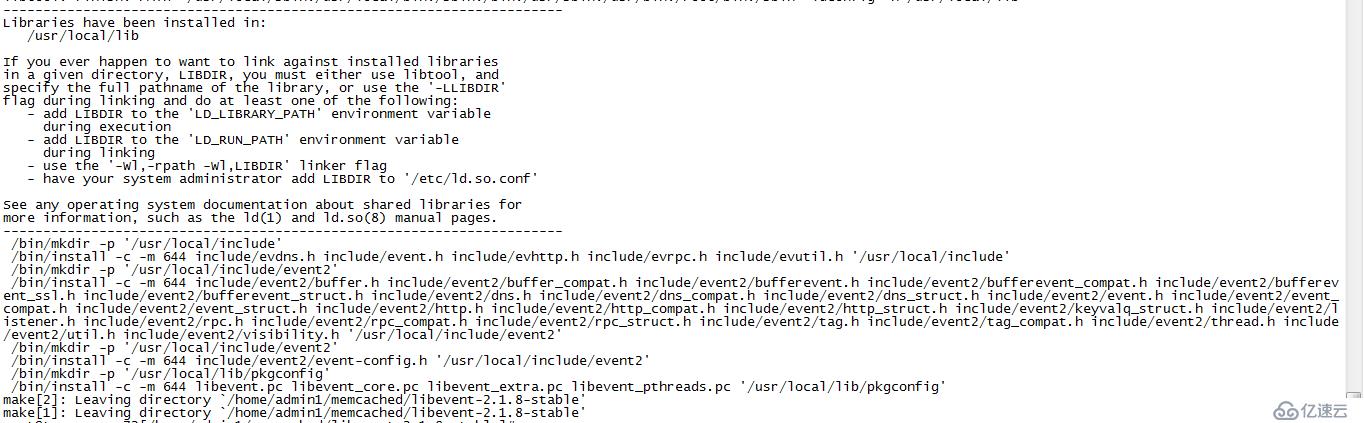
#root用户安装memcached
# tar -zxvf memcached-1.5.12.tar.gz
# cd memcached-1.5.12
# ./configure -with-libevent=/usr --prefix=/usr/local/memcached && make && make install
#chmod -R 755 /usr/local/memcached/
#chmod命令对其他用户授权了memcached的使用权限,非root用户也可以使用memcached。
执行结果截图:
# /usr/local/memcached/bin/memcached -d -m 256 -p 22322 -c 1024 /tmp/memcached.pid
无日志输出,且ps -ef | grep memcached 后出现进程,则为成功。
如果想查看memcached的日志详情,可以追加上-vv >> /tmp/memcached.log 2>&1参数。日志级别有三个,v最低,vv中等,vvv最详细。
启动参数说明:
    -d 选项是启动一个守护进程。
    -m 是分配给Memcache使用的内存数量,单位是MB,默认64MB。
    -p 是设置Memcache的TCP监听的端口,最好是1024以上的端口。
    -c 选项是最大运行的并发连接数,默认是1024。
-P 是设置保存Memcache的pid文件。# kill -9 pid# mkdir magent
#mv magent-0.5.tar.gz magent/
#cd magent/
# tar -zxvf magent-0.5.tar.gz
# /sbin/ldconfig
# sed -i "s#CFLAGS = -Wall -O2 -g#CFLAGS =-lrt -Wall -O2 -g#g" Makefile
# sed -i "s#LIBS = -levent#LIBS = -levent -lm#g" Makefile2.修改ketama.h文件:在第一行加入以下三行代码
#ifndef SSIZE_MAX
#define SSIZE_MAX 32767
#endif
3.执行编译命令
#make
编译成功后会在该目录下生成magent启动脚本。
4.执行启动命令
#./magent -n 51200 -l 192.168.7.3 -p 12000 -s 192.168.7.3:22322 -b 192.168.7.4:22322
192.168.7.4主机上为:./magent -n 51200 -l 192.168.7.4 -p 12000 -s 192.168.7.4:22322 -b 192.168.7.3:22322。让两个memcached互为主备。
启动参数说明:
-n 最大连接数。
-l 代理的IP地址,即magent的访问IP。
-p 代理的端口地址,即magent的访问端口。
-s 代理的主节点,可以使用多个-s参数,代理多个主节点。
-b 代理的备份节点,可以使用多个-b参数,代理多个备份节点。
具体参数介绍可以使用./magent -help命令查询。
5.测试magent代理
使用“telnet 192.168.7.3 12000”连接到magent代理上,执行“set test 0 0 2”的插入数据操作,退出12000连接。再次连接“telnet 192.168.7.3 22322”,执行“get test”命令,看是否可以输出数据;连接“telnet 192.168.7.4 22322”,执行“get test”命令,看结果是否一致。一致则为成功。
如图: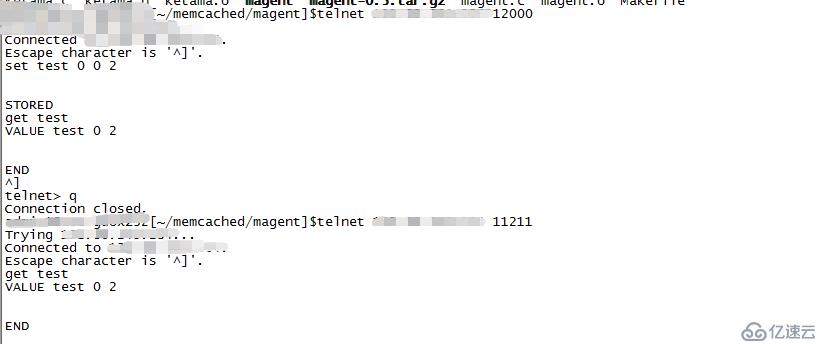
session共享完全由tomcat来实现,不必修改web应用。本文忽略Nginx实现负载的相关配置。 asm-5.0.3.jar
kryo-3.0.3.jar
kryo-serializers-0.37.jar
memcached-session-manager-1.9.5.jar
memcached-session-manager-tc7-1.9.5.jar
minlog-1.3.0.jar
msm-kryo-serializer-1.9.5.jar
objenesis-2.1.jar
reflectasm-1.10.1.jar
spymemcached-2.12.0.jar修改tomcat的配置文件
tomcat的conf目录下的context.xml文件,先把默认的context.xml文件内容清空,再将以下代码复制到context.xml中。其中memcachedNodes是memcached地址,多个memcached使用需","隔开。
            <?xml version='1.0' encoding='utf-8'?>
            <!--
                Licensed to the Apache Software Foundation (ASF) under one or more
                contributor license agreements.  See the NOTICE file distributed with
                this work for additional information regarding copyright ownership.
                The ASF licenses this file to You under the Apache License, Version 2.0
                (the "License"); you may not use this file except in compliance with
                the License.  You may obtain a copy of the License at

                        http://www.apache.org/licenses/LICENSE-2.0

                Unless required by applicable law or agreed to in writing, software
                distributed under the License is distributed on an "AS IS" BASIS,
                WITHOUT WARRANTIES OR CONDITIONS OF ANY KIND, either express or implied.
                See the License for the specific language governing permissions and
                limitations under the License.
            -->
            <!-- The contents of this file will be loaded for each web application -->
            <Context>

                    <!-- Default set of monitored resources -->
                    <WatchedResource>WEB-INF/web.xml</WatchedResource>

                    <!-- Uncomment this to disable session persistence across Tomcat restarts -->
                    <!--
                    <Manager pathname="" />
                    -->

                    <!-- Uncomment this to enable Comet connection tacking (provides events
                             on session expiration as well as webapp lifecycle) -->
                    <!--
                    <Valve className="org.apache.catalina.valves.CometConnectionManagerValve" />
                    -->
            <Manager className="de.javakaffee.web.msm.MemcachedBackupSessionManager"
                memcachedNodes="n1:192.168.7.3:12000,n2:192.168.7.4:12000"
                sticky="false"
                sessionBackupAsync="false"
                requestUriIgnorePattern=".*\.(ico|png|gif|jpg|jpeg|bmp|css|js|html|htm)$"
                transcoderFactoryClass="de.javakaffee.web.msm.serializer.kryo.KryoTranscoderFactory"/>
</Context>检验Session共享
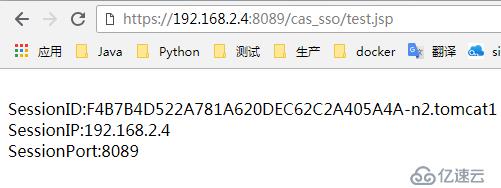
利用如下代码生成test.jsp,并将jsp放入tomcat的webapps中的工程里,可以访问到的地方。
        <%@ page language="java" contentType="text/html; charset=UTF-8"
                pageEncoding="UTF-8"%>
        <BR>
        SessionID:<%=session.getId()%>
        <BR>
        SessionIP:<%=request.getServerName()%>
        <BR>
        SessionPort:<%=request.getServerPort()%>
        <BR>
**分别**访问两个tomcat,只要session的后缀结尾类似于"-n1.tomcat1 "即为成功,sessionid是不一致的也是正确的。如下图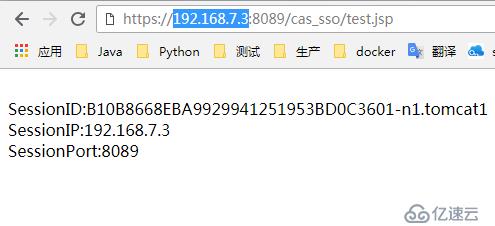
1.在cas的tomcat容器中添加一下jar包
    tomcat的路径:/webapps/cas_sso/WEB-INF/lib/
asm-5.0.3.jar
cas-server-integration-memcached-3.5.1.jar
kryo-3.0.3.jar
minlog-1.3.0.jar
reflectasm-1.10.1.jar
spymemcached-2.12.0.jar2.修改ticketRegistry.xml文件
文件在Tomact中的路径:/webapps/cas_sso/WEB-INF/spring-configuration/ticketRegistry.xml
备份ticketRegistry.xml,并创建新的ticketRegistry.xml文件,内容如下: <?xml version="1.0" encoding="UTF-8"?>
<!--
Licensed to Jasig under one or more contributor license
agreements. See the NOTICE file distributed with this work
for additional information regarding copyright ownership.
Jasig licenses this file to you under the Apache License,
Version 2.0 (the "License"); you may not use this file
except in compliance with the License. You may obtain a
copy of the License at the following location:
http://www.apache.org/licenses/LICENSE-2.0
Unless required by applicable law or agreed to in writing,
software distributed under the License is distributed on an
"AS IS" BASIS, WITHOUT WARRANTIES OR CONDITIONS OF ANY
KIND, either express or implied. See the License for the
specific language governing permissions and limitations
under the License.
-->
<beans xmlns="http://www.springframework.org/schema/beans"
xmlns:xsi="http://www.w3.org/2001/XMLSchema-instance"
xmlns:util="http://www.springframework.org/schema/util"
xmlns:p="http://www.springframework.org/schema/p"
xsi:schemaLocation="http://www.springframework.org/schema/beans
http://www.springframework.org/schema/beans/spring-beans-3.1.xsd
http://www.springframework.org/schema/util
http://www.springframework.org/schema/util/spring-util-3.1.xsd">
<bean id="ticketRegistry" class="org.jasig.cas.ticket.registry.MemCacheTicketRegistry">
<constructor-arg index="0">
<bean class="net.spy.memcached.spring.MemcachedClientFactoryBean"
p:servers="192.168.7.3:12000,192.168.7.4:12000"
p:protocol="BINARY"
p:locatorType="ARRAY_MOD"
p:failureMode="Redistribute"
p:transcoder-ref="serialTranscoder">
<property name="hashAlg">
<util:constant static-field="net.spy.memcached.DefaultHashAlgorithm.FNV1A_64_HASH" />
</property>
</bean>
</constructor-arg>
<constructor-arg index="1" value="36000" />
<constructor-arg index="2" value="2" />
</bean>
<bean id="serialTranscoder" class="net.spy.memcached.transcoders.SerializingTranscoder"
p:compressionThreshold="2048" />
</beans>参数说明:
<constructor-arg index="0">:memcached的地址,多个用逗号隔开。
<constructor-arg index="1">:TGT超时时间(秒)
<constructor-arg index="1">:ST超时时间(秒)3.重启应用测试
使用Nginx做负载,代理两个CAS服务端。
1.通过浏览器访问Nginx单点登录登陆后,通过日志查看访问到哪个CAS节点,将该节点stop。
2.再次通过浏览器访问Nginx,查看是否需要登录,正常情况是不需要登录的。成功后标识session共享成功。
3.通过浏览器进行cas客户端访问,如果没有跳转单点,则TGT数据保存到memcached共享成功。
后续:memcached的安全
使用memcached应用时,只需要能连接上主机端口就能用,如果放到互联网上,这是很不安全的操作。使用memcached时,不要使用默认端口,换个1024以上的端口。针对于这个安全一般有三个解决方案,但每一种都有各自的局限性,可以根据自己的业务来做选择。
1.双网卡:应用服务选择外网的网卡,memcached使用内网的网卡。
2.设置防火墙:使用主机的iptables进行白名单放行,阻止非信任的访问请求。
3.memcached开启SASL认证。1.4.3版本后支持此功能。
附件信息
链接: https://pan.baidu.com/s/1aihl_abcNguh9QVNSAWwNA 提取码: 7r1r
免责声明:本站发布的内容(图片、视频和文字)以原创、转载和分享为主,文章观点不代表本网站立场,如果涉及侵权请联系站长邮箱:is@yisu.com进行举报,并提供相关证据,一经查实,将立刻删除涉嫌侵权内容。


