Python基础教程:Flask进击篇——Flask运行流程
在我们了解Flask运行流程之前,先看一下我们在浏览器一次请求中所经历的过程,下面这张是结合Flask的源码绘制的一张流程图
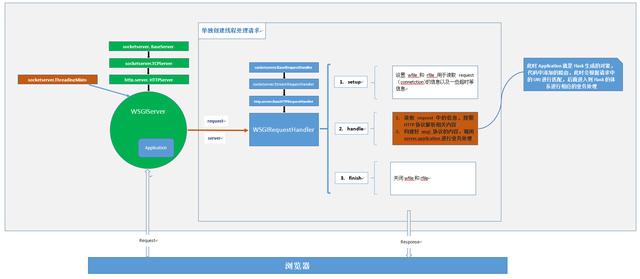
能看到Flask在一次请求中实际上只是做了最后一部分功能,这里没有将Flask的具体处理流程列出来,我们在下面会继续讲解。
在上图中出现WSGIRequestHandler,WSGI协议是在Python Web开发中很核心的部分,如果想继续进击的话,需要对这部分有深刻的理解。
这部分我在前面的 Python基础教程有讲到过!
我所理解Flask要做的事情,是根据请求的HTTP协议中url和method映射相应的处理函数,处理完并返回。这是基础的功能,Flask在这基础上又增加了一些其他功能。下面我们就通过Flask的源码中一些属性来进行分析。

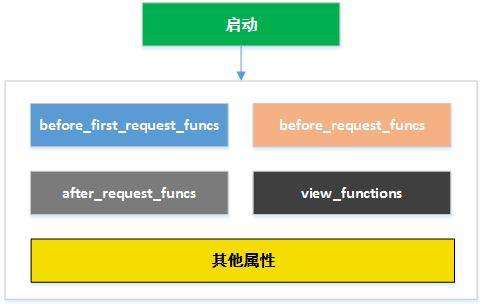
Flask在启动时已将各属性根据需求配置好,但实际映射函数的属性就是view_functions,此属性类型为字典,key是endpoint。
endpoint可自定义,若不指定将会根据函数名生成,若出现重复的endpoint将会提示错误。
endpoint会与url和method统一封装成到rule放入到url_map中,在请求过来时会根据url和和method生成reuqest到url_map中匹配,如果匹配到则根据endpoint获取到相应的函数去执行,并将结果返回。这部分可以看Flask源码部分。
添加到url_map
# flask/app.py
	def add_url_rule(
 self,
 rule,
 endpoint=None,
 view_func=None,
 provide_automatic_options=None,
 **options
 	):
 if endpoint is None:
 endpoint = _endpoint_from_view_func(view_func)
 options["endpoint"] = endpoint
 methods = options.pop("methods", None)
 if methods is None:
 methods = getattr(view_func, "methods", None) or ("GET",)
 if isinstance(methods, string_types):
 raise TypeError(
 "Allowed methods have to be iterables of strings, "
 'for example: @app.route(..., methods=["POST"])'
 )
 methods = set(item.upper() for item in methods)
 # Methods that should always be added
 required_methods = set(getattr(view_func, "required_methods", ()))
 # starting with Flask 0.8 the view_func object can disable and
 # force-enable the automatic options handling.
 if provide_automatic_options is None:
 provide_automatic_options = getattr(
 view_func, "provide_automatic_options", None
 )
 if provide_automatic_options is None:
 if "OPTIONS" not in methods:
 provide_automatic_options = True
 required_methods.add("OPTIONS")
 else:
 provide_automatic_options = False
 # Add the required methods now.
 methods |= required_methods
 rule = self.url_rule_class(rule, methods=methods, **options)
 rule.provide_automatic_options = provide_automatic_options
 self.url_map.add(rule)
 if view_func is not None:
 old_func = self.view_functions.get(endpoint)
 if old_func is not None and old_func != view_func:
 raise AssertionError(
 "View function mapping is overwriting an "
 "existing endpoint function: %s" % endpoint
 )
 self.view_functions[endpoint] = view_func
请求时匹配请求
1.生成请求
	# flask/app.py
 def create_url_adapter(self, request):
 if request is not None:
 subdomain = (
 (self.url_map.default_subdomain or None)
 if not self.subdomain_matching
 else None
 )
 return self.url_map.bind_to_environ(
 request.environ,
 server_name=self.config["SERVER_NAME"],
 subdomain=subdomain,
 )
 if self.config["SERVER_NAME"] is not None:
 return self.url_map.bind(
 self.config["SERVER_NAME"],
 script_name=self.config["APPLICATION_ROOT"],
 url_scheme=self.config["PREFERRED_URL_SCHEME"],
 )
 	# flask/ctx.py
	def match_request(self):
 try:
 result = self.url_adapter.match(return_rule=True)
 self.request.url_rule, self.request.view_args = result
 except HTTPException as e:
 self.request.routing_exception = e
此处是在生成上下文的push中执行会执行match_request,这里没有贴出来。
实质就是请求过来了,根据url和method匹配启动时的url_map,如果没有的话则返回匹配不到
2.匹配请求
	# flask/app.py
	def dispatch_request(self):
 req = _request_ctx_stack.top.request
 if req.routing_exception is not None:
 self.raise_routing_exception(req)
 rule = req.url_rule
 if (
 getattr(rule, "provide_automatic_options", False)
 and req.method == "OPTIONS"
 ):
 return self.make_default_options_response()
 # otherwise dispatch to the handler for that endpoint
 return self.view_functions[rule.endpoint](**req.view_args)
根据上面从url_map得到的rule,然后根据endpoint取得要执行的函数。
Flask另外几个属性,则表示在请求之前和请求之后做一些处理,并且可以针对不同的blueprints来进行处理,关于blueprints我们等几个章节再细分析。
Flask实际的处理流程是什么样子,先看一下Flask的源码
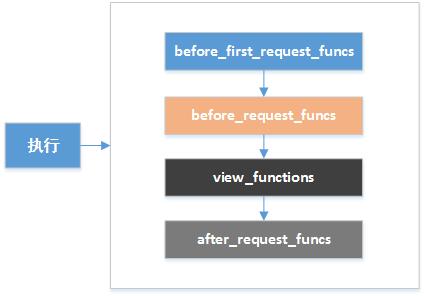
	# flask/app.py
	# 1. 先通过wsgi协议到这个函数
 def __call__(self, environ, start_response):
 return self.wsgi_app(environ, start_response)
	# 2. 然后调用这个函数,处理上下文
 def wsgi_app(self, environ, start_response):
 	# 下文处理!!!
 ctx = self.request_context(environ)
 error = None
 try:
 try:
 ctx.push()
 response = self.full_dispatch_request()
 except Exception as e:
 error = e
 response = self.handle_exception(e)
 except: # noqa: B001
 error = sys.exc_info()[1]
 raise
 return response(environ, start_response)
 finally:
 if self.should_ignore_error(error):
 error = None
 ctx.auto_pop(error)
	# 3. 请求处理流程
 def full_dispatch_request(self):
 self.try_trigger_before_first_request_functions()
 try:
 request_started.send(self)
 rv = self.preprocess_request()
 if rv is None:
 rv = self.dispatch_request()
 except Exception as e:
 rv = self.handle_user_exception(e)
 return self.finalize_request(rv)
基本流程可以看的比较清晰,至于每个函数列表的来源以及作用,我在开始的属性图上已将其标识出来。
至此可以大体知道请求过来之后Flask是如何处理及前期Flask会构建哪些内容。
但Flask还有很多东西。例如我们经常使用request,current_app对象和常用的blueprints是怎么个原理。
更多的 Python基础教程也会继续为大家更新!大家有什么想学的内容也可以留言或者私信我,人多的话,可以考虑出一期!最近也整理了一些Python基础教程学习的视频,有需要的伙伴可以留言私信我回复Python,仅30份!
免责声明:本站发布的内容(图片、视频和文字)以原创、转载和分享为主,文章观点不代表本网站立场,如果涉及侵权请联系站长邮箱:is@yisu.com进行举报,并提供相关证据,一经查实,将立刻删除涉嫌侵权内容。


