如何使用Dockerfile构建一个tomcat镜像?针对这个问题,这篇文章详细介绍了相对应的分析和解答,希望可以帮助更多想解决这个问题的小伙伴找到更简单易行的方法。
dockerfile 是用来构建docker镜像的文件!命令参数脚本!
构建步骤:
# 以contes为例 查看 dockerhub 上 contes 的 dockerfile

FROM scratch
ADD centos-7-x86_64-docker.tar.xz /

LABEL \
  org.label-schema.schema-version="1.0" \
  org.label-schema.name="CentOS Base Image" \
  org.label-schema.vendor="CentOS" \
  org.label-schema.license="GPLv2" \
  org.label-schema.build-date="20200809" \
  org.opencontainers.image.title="CentOS Base Image" \
  org.opencontainers.image.vendor="CentOS" \
  org.opencontainers.image.licenses="GPL-2.0-only" \
  org.opencontainers.image.created="2020-08-09 00:00:00+01:00"

CMD ["/bin/bash"]
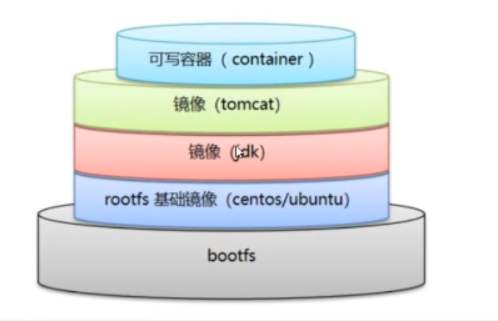
DockerFile构建过程
基础知识:
dockerfile是面向开发的,我们以后要发布项目,做镜像,就需要编写dockerfile文件,这个文件十分简单!
Docker镜像逐渐成为企业交付的标准!
DockerFile:构建镜像,定义了一切的步骤,源代码;
DockerImages:通过DockerFile构建生成的一个镜像,这个镜像就是我们最终发布和运行的产品!
Docker容器:容器就是镜像运行起来提供服务!
DockerFile的指令
FROM			# 基础镜像
MAINTAINER		# 镜像是谁写的	姓名 + 邮箱
RUN				# 镜像构建的时候需要运行的命令
ADD				# 步骤	eg:tomcat镜像---》放入tomcat的压缩包!添加内容
WORKDIR			# 镜像的工作目录
VOLUME			# 挂载的目录位置
EXPOST			# 暴露端口配置
CMD				# 指定这个容器启动的时候要运行的命令,只有最后一个会生效,可被替代
ENTRYPOINT		# 指定这个容器启动的时候要运行的命令,可以追加命令
ONBUILD			# 当构建一个被继承的 DockerFile ,这个时候就会运行 ONBUILD 的指令,触发指令
COPY			# 类似ADD,将我们的文件拷贝到镜像中
ENV 			# 构建的时候设置环境变量
实战测试
Docker Hub 中 99% 的镜像都是从 FROM scratch 这个基础镜像过来的 ,然后配置我们需要的软件和配置来进行构建
创建一个自己的centos
# 1、编写DockerFile的文件
FROM centos
# 作者信息
MAINTAINER yinxiaodong<m15010969094@163.com>
# 配置环境变量
ENV MYPATH /user/local
# 指定镜像的工作目录
WORKDIR $MYPATH

RUN yum install -y vim
RUN yum install -y net-tools
# 暴露80端口
EXPOSE 80

CMD echo $MYPATH
CMD echo "---------end--------"
CMD /bin/bash


# 2、通过文件构建镜像
# 命令 docker build -f dockerfile文件路径	-t 镜像名:版本号 .
[root@localhost dockerfile]# docker build -f mydockerfile-centos -t mycentos:0.1 .
Sending build context to Docker daemon 2.048kB
Step 1/9 : FROM centos
 ---> 0d120b6ccaa8
Step 2/9 : MAINTAINER yinxiaodong<m15010969094@163.com>
 ---> Running in f79b12ffb083
Removing intermediate container f79b12ffb083
 ---> 8ee53d3f7a65
Step 3/9 : ENV MYPATH /user/local
 ---> Running in 659a2c96d5f7
Removing intermediate container 659a2c96d5f7
 ---> 59ab131ef44c
Step 4/9 : WORKDIR $MYPATH
 ---> Running in 0b4b8f9c65bb
Removing intermediate container 0b4b8f9c65bb
 ---> 408b06671488
Step 5/9 : RUN yum install -y net-tools
 ---> Running in 151f81148a87
CentOS-8 - AppStream              118 kB/s | 5.8 MB   00:50
CentOS-8 - Base                 218 kB/s | 2.2 MB   00:10
CentOS-8 - Extras                1.8 kB/s | 7.3 kB   00:04
Dependencies resolved.
================================================================================
 Package     Architecture Version            Repository  Size
================================================================================
Installing:
 net-tools    x86_64    2.0-0.51.20160912git.el8    BaseOS    323 k

Transaction Summary
================================================================================
Install 1 Package

Total download size: 323 k
Installed size: 1.0 M
Downloading Packages:
net-tools-2.0-0.51.20160912git.el8.x86_64.rpm  219 kB/s | 323 kB   00:01
--------------------------------------------------------------------------------
Total                      66 kB/s | 323 kB   00:04
warning: /var/cache/dnf/BaseOS-f6a80ba95cf937f2/packages/net-tools-2.0-0.51.20160912git.el8.x86_64.rpm: Header V3 RSA/SHA256 Signature, key ID 8483c65d: NOKEY
CentOS-8 - Base                 162 kB/s | 1.6 kB   00:00
Importing GPG key 0x8483C65D:
 Userid   : "CentOS (CentOS Official Signing Key) <security@centos.org>"
 Fingerprint: 99DB 70FA E1D7 CE22 7FB6 4882 05B5 55B3 8483 C65D
 From    : /etc/pki/rpm-gpg/RPM-GPG-KEY-centosofficial
Key imported successfully
Running transaction check
Transaction check succeeded.
Running transaction test
Transaction test succeeded.
Running transaction
 Preparing    :                            1/1
 Installing    : net-tools-2.0-0.51.20160912git.el8.x86_64       1/1
 Running scriptlet: net-tools-2.0-0.51.20160912git.el8.x86_64       1/1
 Verifying    : net-tools-2.0-0.51.20160912git.el8.x86_64       1/1

Installed:
 net-tools-2.0-0.51.20160912git.el8.x86_64

Complete!
Removing intermediate container 151f81148a87
 ---> c0a0546c9b2a
Step 6/9 : EXPOSE 80
 ---> Running in 42000936515d
Removing intermediate container 42000936515d
 ---> fe68114ecf3f
Step 7/9 : CMD echo $MYPATH
 ---> Running in c393fc53a354
Removing intermediate container c393fc53a354
 ---> a6924276bf90
Step 8/9 : CMD echo "---------end--------"
 ---> Running in 5994de56f0a1
Removing intermediate container 5994de56f0a1
 ---> a8ba0ebb3770
Step 9/9 : CMD /bin/bash
 ---> Running in d1fa2d436363
Removing intermediate container d1fa2d436363
 ---> 41bb76be4884
Successfully built 41bb76be4884
Successfully tagged mycentos:0.1
[root@localhost dockerfile]# docker images
REPOSITORY      TAG         IMAGE ID      CREATED       SIZE
mycentos       0.1         41bb76be4884    7 seconds ago    246MB
centos        1.0         d840628c30a9    6 hours ago     215MB
centos        latest       0d120b6ccaa8    2 days ago     215MB

# 启动 mycentos 使用 ifconfig 命令查看ip信息
[root@localhost dockerfile]# docker run -it mycentos:0.1
[root@494c2bc72263 local]# ifconfig
eth0: flags=4163<UP,BROADCAST,RUNNING,MULTICAST> mtu 1500
    inet 172.17.0.3 netmask 255.255.0.0 broadcast 172.17.255.255
    ether 02:42:ac:11:00:03 txqueuelen 0 (Ethernet)
    RX packets 6 bytes 516 (516.0 B)
    RX errors 0 dropped 0 overruns 0 frame 0
    TX packets 0 bytes 0 (0.0 B)
    TX errors 0 dropped 0 overruns 0 carrier 0 collisions 0

lo: flags=73<UP,LOOPBACK,RUNNING> mtu 65536
    inet 127.0.0.1 netmask 255.0.0.0
    loop txqueuelen 1000 (Local Loopback)
    RX packets 0 bytes 0 (0.0 B)
    RX errors 0 dropped 0 overruns 0 frame 0
    TX packets 0 bytes 0 (0.0 B)
    TX errors 0 dropped 0 overruns 0 carrier 0 collisions 0
# 查看所在目录    /user/local 正是我们在dockerfile中指定的目录
[root@494c2bc72263 local]# pwd
/user/local
查看镜像的构建历史记录
# 命令 docker history 镜像id

[root@localhost ~]# docker history 41bb76be4884
IMAGE        CREATED       CREATED BY                   SIZE        COMMENT
41bb76be4884    16 minutes ago   /bin/sh -c #(nop) CMD ["/bin/sh" "-c" "/bin…  0B
a8ba0ebb3770    16 minutes ago   /bin/sh -c #(nop) CMD ["/bin/sh" "-c" "echo…  0B
a6924276bf90    16 minutes ago   /bin/sh -c #(nop) CMD ["/bin/sh" "-c" "echo…  0B
fe68114ecf3f    16 minutes ago   /bin/sh -c #(nop) EXPOSE 80          0B
c0a0546c9b2a    16 minutes ago   /bin/sh -c yum install -y net-tools       31.3MB
408b06671488    17 minutes ago   /bin/sh -c #(nop) WORKDIR /user/local      0B
59ab131ef44c    17 minutes ago   /bin/sh -c #(nop) ENV MYPATH=/user/local    0B
8ee53d3f7a65    17 minutes ago   /bin/sh -c #(nop) MAINTAINER yinxiaodong<m1…  0B
0d120b6ccaa8    2 days ago     /bin/sh -c #(nop) CMD ["/bin/bash"]      0B
<missing>      2 days ago     /bin/sh -c #(nop) LABEL org.label-schema.sc…  0B
<missing>      2 days ago     /bin/sh -c #(nop) ADD file:538afc0c5c964ce0d…  215MB
我们平时拿到一个镜像,可以研究一下它是怎么做的---->docker history 镜像id
CMD 和 ENTRYPOINT 的区别
CMD				# 指定这个容器启动的时候要运行的命令,只有最后一个会生效,可被替代
ENTRYPOINT		# 指定这个容器启动的时候要运行的命令,可以追加命令

# 测试 CMD
# 编写DockerFile的文件
[root@localhost dockerfile]# cat dockerfile-cmd-test
FROM centos
CMD ["ls","-a"]
# 根据 DockerFile 构建镜像
[root@localhost dockerfile]# docker build -f dockerfile-cmd-test -t testcmd:0.1 .
Sending build context to Docker daemon 3.072kB
Step 1/2 : FROM centos
 ---> 0d120b6ccaa8
Step 2/2 : CMD ["ls","-a"]
 ---> Running in b3f8ba72222b
Removing intermediate container b3f8ba72222b
 ---> 561e47f88730
Successfully built 561e47f88730
Successfully tagged testcmd:0.1	# 构建成功
# 查看镜像
[root@localhost dockerfile]# docker images
REPOSITORY      TAG         IMAGE ID      CREATED       SIZE
testcmd        0.1         561e47f88730    6 seconds ago    215MB
centos        latest       0d120b6ccaa8    2 days ago     215MB
# 启动镜像 发现ls -a命令生效
[root@localhost dockerfile]# docker run -it testcmd:0.1
.  .dockerenv	dev home lib64    media opt  root sbin	sys usr
.. bin		etc lib  lost+found mnt  proc run  srv	tmp var

# 启动命令中 追加一个 -l, 我们期望的是 ls -a -l,但是 报错,这里将 ls -a 替换成了 -l,最终的命令是 -l 所以报错。
[root@localhost dockerfile]# docker run -it 561e47f88730 -l
docker: Error response from daemon: OCI runtime create failed: container_linux.go:349: starting container process caused "exec: \"-l\": executable file not found in $PATH": unknown.
# 将启动命令替换成 docker run -it testcmd:0.1 ls -al, 成功打印详细信息;
[root@localhost dockerfile]# docker run -it testcmd:0.1 ls -al
total 0
drwxr-xr-x.  1 root root  6 Aug 13 08:20 .
drwxr-xr-x.  1 root root  6 Aug 13 08:20 ..
-rwxr-xr-x.  1 root root  0 Aug 13 08:20 .dockerenv
lrwxrwxrwx.  1 root root  7 May 11 2019 bin -> usr/bin
drwxr-xr-x.  5 root root 360 Aug 13 08:20 dev
drwxr-xr-x.  1 root root 66 Aug 13 08:20 etc
drwxr-xr-x.  2 root root  6 May 11 2019 home
lrwxrwxrwx.  1 root root  7 May 11 2019 lib -> usr/lib
lrwxrwxrwx.  1 root root  9 May 11 2019 lib64 -> usr/lib64
drwx------.  2 root root  6 Aug 9 21:40 lost+found
drwxr-xr-x.  2 root root  6 May 11 2019 media
drwxr-xr-x.  2 root root  6 May 11 2019 mnt
drwxr-xr-x.  2 root root  6 May 11 2019 opt
dr-xr-xr-x. 123 root root  0 Aug 13 08:20 proc
dr-xr-x---.  2 root root 162 Aug 9 21:40 root
drwxr-xr-x. 11 root root 163 Aug 9 21:40 run
lrwxrwxrwx.  1 root root  8 May 11 2019 sbin -> usr/sbin
drwxr-xr-x.  2 root root  6 May 11 2019 srv
dr-xr-xr-x. 13 root root  0 Aug 11 09:58 sys
drwxrwxrwt.  7 root root 145 Aug 9 21:40 tmp
drwxr-xr-x. 12 root root 144 Aug 9 21:40 usr
drwxr-xr-x. 20 root root 262 Aug 9 21:40 var


# 测试二:现在我们把 DockerFile 中 CMD 替换成 ENTRYPOINT 后重新构建,运行 看看结果

[root@localhost dockerfile]# cat dockerfile-cmd-test
FROM centos
ENTRYPOINT ["ls","-a"]
# 重新构建镜像
[root@localhost dockerfile]# docker build -f dockerfile-cmd-test -t testcmd:0.2 .
Sending build context to Docker daemon 3.072kB
Step 1/2 : FROM centos
 ---> 0d120b6ccaa8
Step 2/2 : ENTRYPOINT ["ls","-a"]
 ---> Running in c634ca09fabe
Removing intermediate container c634ca09fabe
 ---> 52d295395f08
Successfully built 52d295395f08
Successfully tagged testcmd:0.2
# 查看镜像
[root@localhost dockerfile]# docker images
REPOSITORY      TAG         IMAGE ID      CREATED       SIZE
testcmd        0.2         52d295395f08    7 seconds ago    215MB
testcmd        0.1         561e47f88730    12 minutes ago   215MB
centos        latest       0d120b6ccaa8    2 days ago     215MB
# 运行testcmd:0.2镜像 并追加 -l ,发现 打印出了详细信息
[root@localhost dockerfile]# docker run -it testcmd:0.2 -l
total 0
drwxr-xr-x.  1 root root  6 Aug 13 08:17 .
drwxr-xr-x.  1 root root  6 Aug 13 08:17 ..
-rwxr-xr-x.  1 root root  0 Aug 13 08:17 .dockerenv
lrwxrwxrwx.  1 root root  7 May 11 2019 bin -> usr/bin
drwxr-xr-x.  5 root root 360 Aug 13 08:17 dev
drwxr-xr-x.  1 root root 66 Aug 13 08:17 etc
drwxr-xr-x.  2 root root  6 May 11 2019 home
lrwxrwxrwx.  1 root root  7 May 11 2019 lib -> usr/lib
lrwxrwxrwx.  1 root root  9 May 11 2019 lib64 -> usr/lib64
drwx------.  2 root root  6 Aug 9 21:40 lost+found
drwxr-xr-x.  2 root root  6 May 11 2019 media
drwxr-xr-x.  2 root root  6 May 11 2019 mnt
drwxr-xr-x.  2 root root  6 May 11 2019 opt
dr-xr-xr-x. 121 root root  0 Aug 13 08:17 proc
dr-xr-x---.  2 root root 162 Aug 9 21:40 root
drwxr-xr-x. 11 root root 163 Aug 9 21:40 run
lrwxrwxrwx.  1 root root  8 May 11 2019 sbin -> usr/sbin
drwxr-xr-x.  2 root root  6 May 11 2019 srv
dr-xr-xr-x. 13 root root  0 Aug 11 09:58 sys
drwxrwxrwt.  7 root root 145 Aug 9 21:40 tmp
drwxr-xr-x. 12 root root 144 Aug 9 21:40 usr
drwxr-xr-x. 20 root root 262 Aug 9 21:40 var
DockerFile中很多命令都十分相似,我们需要了解他的区别,最好的学习就是对比进行测试查看效果!
实战:Tomcat镜像
1、准备镜像文件 tomcat压缩包 jdk压缩包
[root@localhost tomcat]# ls
apache-tomcat-8.5.43.tar.gz Dockerfile jdk-8u211-linux-x64.tar.gz read.txt
2、编写dockerfile文件, 官方命名Dockerfile,build会自动寻找这个文件,不需要 -f 指定!
# 引入基础
FROM centos
# 作者信息
MAINTAINER yinxiaodoong<m15010969094@163.com>

# copy文件read.txt到容器的 /usr/local/read.txt 目录下
COPY read.txt /usr/local/read.txt

# 添加jdk tomcat ---> 自动解压
ADD jdk-8u211-linux-x64.tar.gz /usr/local/
ADD apache-tomcat-8.5.43.tar.gz /usr/local/

# 安装 vim 命令
RUN yum install -y vim


# 配置 MYPATH
ENV MYPATH /usr/local/
# 指定 进入容器默认路径 /user/local/
WORKDIR $MYPATH


# 配置jdk环境变量
ENV JAVA_HOME /usr/local/jdk1.8.0_211
ENV CLASSPATH $JAVA_HOME/lib/dt.jat:$JAVA_HOME/lib/tools.jar

# 配置tomcat环境变量
ENV CATALINA_HOME /usr/local/apache-tomcat-8.5.43
ENV CATALINA_BASH /usr/local/apache-tomcat-8.5.43

ENV PATH $PATH:$JAVA_HOME/bin:$CATALINA_HOME/lib:$CATALINA_HOME/bin


# 暴露8080端口
EXPOSE 8080


# /usr/local/tomcat/webapps#
# 启动容器时 启动tomcat
CMD /usr/local/apache-tomcat-8.5.43/bin/startup.sh && tail -f /usr/local/apache-tomcat-8.5.43/logs/catalina.out

# 构建tomcat镜像
[root@localhost tomcat]# docker build -t mytomcat
[root@localhost tomcat]# docker images
REPOSITORY     TAG         IMAGE ID      CREATED       SIZE
mytomcat      latest       a9707559afa1    8 seconds ago    693MB
centos       latest       0d120b6ccaa8    4 days ago     215MB


[root@localhost tomcat]# docker run -d -p 8081:8080 --name mytomcat--01 -v /home/yinxiaodong/build/tomcat/test:/usr/local/apache-tomcat-8.5.43/webapps/test -v /home/yinxiaodong/build/tomcat/logs:/usr/local/apache-tomcat-8.5.43/logs mytomcat
发布自己的镜像
发布到 dockerHub
地址 https://hub.docker.com/ 注册自己的账号
确定自己的账号可以登录
在我们的服务器上提交
[root@localhost logs]# docker login --help

Usage:	docker login [OPTIONS] [SERVER]

Log in to a Docker registry.
If no server is specified, the default is defined by the daemon.

Options:
 -p, --password string  Password
   --password-stdin  Take the password from stdin
 -u, --username string  Username
[root@localhost logs]#
[root@localhost logs]# docker login -u xxx -p xxx
WARNING! Using --password via the CLI is insecure. Use --password-stdin.
WARNING! Your password will be stored unencrypted in /root/.docker/config.json.
Configure a credential helper to remove this warning. See
https://docs.docker.com/engine/reference/commandline/login/#credentials-store
Login Succeeded
登录完毕后就可以提交镜像了
[root@localhost logs]# docker push xxx/mytomcat:1.0
关于如何使用Dockerfile构建一个tomcat镜像问题的解答就分享到这里了,希望以上内容可以对大家有一定的帮助,如果你还有很多疑惑没有解开,可以关注亿速云行业资讯频道了解更多相关知识。
免责声明:本站发布的内容(图片、视频和文字)以原创、转载和分享为主,文章观点不代表本网站立场,如果涉及侵权请联系站长邮箱:is@yisu.com进行举报,并提供相关证据,一经查实,将立刻删除涉嫌侵权内容。


