如何安装和使用PyTorch?针对这个问题,这篇文章详细介绍了相对应的分析和解答,希望可以帮助更多想解决这个问题的小伙伴找到更简单易行的方法。
什么要学习PyTorch
有的人总是选择,选择的人最多的框架,来作为自己的初学框架,比如Tensorflow,但是大多论文的实现都是基于PyTorch的,如果我们要深入论文的细节,就必须选择学习入门PyTorch
安装PyTorch
一行命令即可 官网
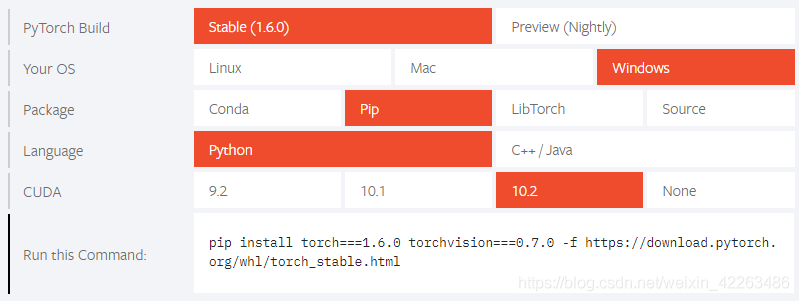
pip install torch===1.6.0 torchvision===0.7.0 - https://download.pytorch.org/whl/torch_stable.html
时间较久,耐心等待
测试自己是否安装成功
运行命令测试
import torch
x = torch.rand(5,3)
print(x)
输出
tensor([[0.5096, 0.1209, 0.7721],
[0.9486, 0.8676, 0.2157],
[0.0586, 0.3467, 0.5015],
[0.9470, 0.5654, 0.9317],
[0.2127, 0.2386, 0.0629]])
开始学习PyTorch
不初始化的创建张量
import torch
x = torch.empty([5,5])
print(x)
输出
tensor([[0., 0., 0.],
[0., 0., 0.],
[0., 0., 0.],
[0., 0., 0.],
[0., 0., 0.]])
随机创建一个0-1的张量
import torch
x = torch.rand(5,5)
print(x)
输出
tensor([[0.3369, 0.5339, 0.8419, 0.6857, 0.6241],
[0.4991, 0.1691, 0.8356, 0.4574, 0.0395],
[0.9714, 0.2975, 0.9322, 0.5213, 0.8509],
[0.3037, 0.8690, 0.3481, 0.2538, 0.9513],
[0.0156, 0.9516, 0.3674, 0.1831, 0.6466]])
创建全为0的张量
import torch
x = torch.zeros(5,5, dtype=torch.float32)
print(x)
创建的时候可以通过dtype指定数据类型
输出
tensor([[0., 0., 0., 0., 0.],
[0., 0., 0., 0., 0.],
[0., 0., 0., 0., 0.],
[0., 0., 0., 0., 0.],
[0., 0., 0., 0., 0.]])
使用数据来直接创建张量
import torch
x = torch.zeros([5,5], dtype=torch.float32)
print(x)
输出
tensor([5., 5.])
使用原有tensor创建新的tensor
import torch
x = torch.tensor([5,5], dtype=torch.float32)
x = x.new_zeros(5, 3)
y = torch.rand_like(x)
print(x)
print(y)
输出
tensor([[0., 0., 0.],
[0., 0., 0.],
[0., 0., 0.],
[0., 0., 0.],
[0., 0., 0.]])
tensor([[0.5552, 0.3333, 0.0426],
[0.3861, 0.3945, 0.6658],
[0.6978, 0.3508, 0.4813],
[0.8193, 0.2274, 0.8384],
[0.9360, 0.9226, 0.1453]])
观察tensor的维度信息
x = torch.rand(3,3)
x.size()
输出
torch.Size([3, 3])
一些简单的运算
x = torch.tensor([1])
y = torch.tensor([3])
'''
方式1
'''
z = x + y
'''
方式2
'''
z = torch.add(x, y)
'''
方式3
'''
result = torch.empty(1)
# 不初始化数据
torch.add(x, y, out=result)
# 将结果返回到result中
'''
方式4
'''
x.add_(y)
输出
tensor([4])
索引操作
x = torch.rand(5,5)
x[:,:]
x[1,:]
x[:,1]
x[1,1]
分别输出
tensor([[0.4012, 0.2604, 0.1720, 0.0996, 0.7806],
[0.8734, 0.9087, 0.4828, 0.3543, 0.2375],
[0.0924, 0.9040, 0.4408, 0.9758, 0.2250],
[0.7179, 0.7244, 0.6165, 0.1142, 0.7363],
[0.8504, 0.0391, 0.0753, 0.4530, 0.7372]])
tensor([0.8734, 0.9087, 0.4828, 0.3543, 0.2375])
tensor([0.2604, 0.9087, 0.9040, 0.7244, 0.0391])
tensor(0.9087)
维度变换
x = torch.rand(4,4)
x.view(16)
x.view(8,2)
x.view(-1,8)
分别输出
tensor([0.9277, 0.9547, 0.9487, 0.9841, 0.4114, 0.1693, 0.8691, 0.3954, 0.4679,
0.7914, 0.7456, 0.0522, 0.0043, 0.2097, 0.5932, 0.9797])
tensor([[0.9277, 0.9547],
[0.9487, 0.9841],
[0.4114, 0.1693],
[0.8691, 0.3954],
[0.4679, 0.7914],
[0.7456, 0.0522],
[0.0043, 0.2097],
[0.5932, 0.9797]])
tensor([[0.9277, 0.9547, 0.9487, 0.9841, 0.4114, 0.1693, 0.8691, 0.3954],
[0.4679, 0.7914, 0.7456, 0.0522, 0.0043, 0.2097, 0.5932, 0.9797]])
关于如何安装和使用PyTorch问题的解答就分享到这里了,希望以上内容可以对大家有一定的帮助,如果你还有很多疑惑没有解开,可以关注亿速云行业资讯频道了解更多相关知识。
免责声明:本站发布的内容(图片、视频和文字)以原创、转载和分享为主,文章观点不代表本网站立场,如果涉及侵权请联系站长邮箱:is@yisu.com进行举报,并提供相关证据,一经查实,将立刻删除涉嫌侵权内容。


