postgresql - дёүз§Қе®үиЈ…ж–№ејҸ
жңҖиҝ‘жҺҘи§ҰдәҶpostgresqlзҡ„е®үиЈ…пјҢе’ҢеӨ§е®¶еҲҶдә«дёҖдёӢгҖӮ
дёҖгҖҒз®Җ д»Ӣ
PostgreSQL жҳҜдёҖз§ҚйқһеёёеӨҚжқӮзҡ„еҜ№иұЎ-е…ізі»еһӢж•°жҚ®еә“з®ЎзҗҶзі»з»ҹпјҲORDBMSпјүпјҢд№ҹжҳҜзӣ®еүҚеҠҹиғҪжңҖејәеӨ§пјҢзү№жҖ§жңҖдё°еҜҢе’ҢжңҖеӨҚжқӮзҡ„иҮӘз”ұиҪҜ件数жҚ®еә“зі»з»ҹгҖӮжңүдәӣзү№жҖ§з”ҡиҮіиҝһе•Ҷдёҡж•°жҚ®еә“йғҪдёҚе…·еӨҮгҖӮиҝҷдёӘиө·жәҗдәҺдјҜе…ӢеҲ©пјҲBSDпјүзҡ„ж•°жҚ®еә“з ”з©¶и®ЎеҲ’зӣ®еүҚе·Із»ҸиЎҚз”ҹжҲҗдёҖйЎ№еӣҪйҷ…ејҖеҸ‘йЎ№зӣ®пјҢ并且жңүйқһеёёе№ҝжіӣзҡ„з”ЁжҲ·гҖӮ
дјҳеҠҝпјҡhttp://www.cnblogs.com/zhangpengme/archive/2011/12/01/2271092.html
е®ҳзҪ‘пјҡhttp://www.postgresql.org/ пјҲе®ҳзҪ‘жңүеҗ„з§ҚеҢ…е’ҢиҜҙжҳҺпјҢеҫҲиҜҰз»Ҷпјү
дәҢгҖҒдёүз§Қе®үиЈ…иҝҮзЁӢ
A. RPMеҢ…е®үиЈ…
1. жЈҖжҹҘPostgreSQL жҳҜеҗҰе·Із»Ҹе®үиЈ…
rpm -qa|grep postgres
иӢҘе·Із»Ҹе®үиЈ…пјҢеҲҷдҪҝз”Ёrpm -e е‘Ҫд»ӨеҚёиҪҪгҖӮ
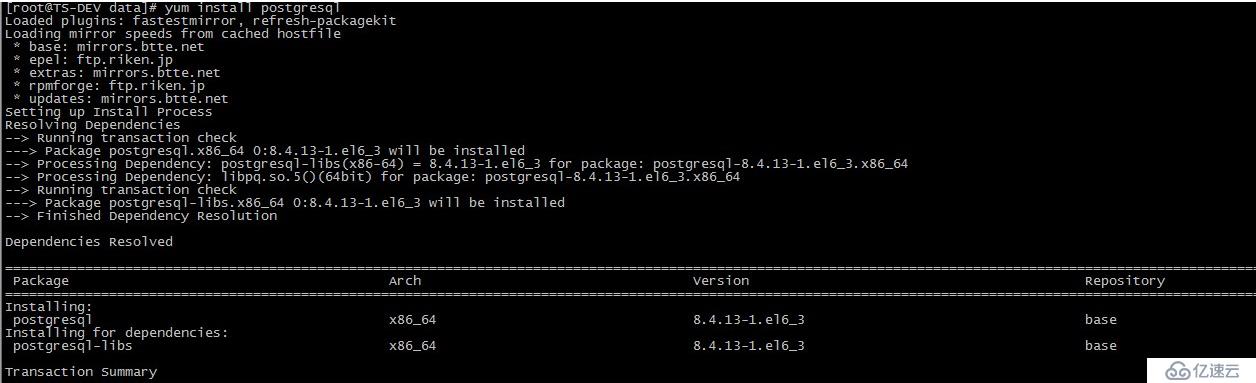
2. дёӢиҪҪRPMеҢ…
#wget http://yum.postgresql.org/9.2/redhat/rhel-6-i386/postgresql92-contrib-9.2.4-1PGDG.rhel6.i686.rpm
#wget http://yum.postgresql.org/9.2/redhat/rhel-6-i386/postgresql92-libs-9.2.4-1PGDG.rhel6.i686.rpm
#wget https://download.postgresql.org/pub/repos/yum/9.6/redhat/rhel-7-x86_64/pgdg-centos96-9.6-3.noarch.rpm
3. е®үиЈ…PostgreSQLпјҢжіЁж„Ҹе®үиЈ…йЎәеәҸ
# rpm -ivh postgresql92-libs-9.2.4-1PGDG.rhel6.i686.rpm
# rpm -ivh postgresql92-9.2.4-1PGDG.rhel6.i686.rpm
# rpm -ivh postgresql92-server-9.2.4-1PGDG.rhel6.i686.rpm
# rpm -ivh postgresql92-contrib-9.2.4-1PGDG.rhel6.i686.rpm
4. еҲқе§ӢеҢ–PostgreSQLеә“
PostgreSQL жңҚеҠЎеҲқж¬ЎеҗҜеҠЁзҡ„ж—¶еҖҷдјҡжҸҗзӨәеҲқе§ӢеҢ–гҖӮ

# service postgresql-9.2 initdb

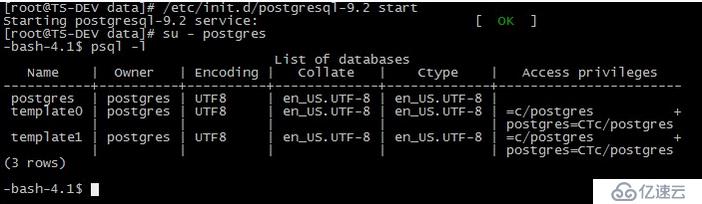
5. еҗҜеҠЁжңҚеҠЎ
# service postgresql-9.2 start

6. жҠҠPostgreSQL жңҚеҠЎеҠ е…ҘеҲ°еҗҜеҠЁеҲ—иЎЁ
# chkconfig postgresql-9.2on
# chkconfig --list|grep postgres
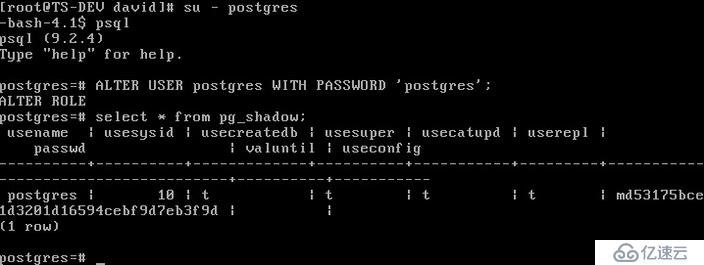
7. дҝ®ж”№PostgreSQLж•°жҚ®еә“з”ЁжҲ·postgresзҡ„еҜҶз Ғ(жіЁж„ҸдёҚжҳҜlinuxзі»з»ҹеёҗеҸ·)
PostgreSQLж•°жҚ®еә“й»ҳи®ӨдјҡеҲӣе»әдёҖдёӘpostgresзҡ„ж•°жҚ®еә“з”ЁжҲ·дҪңдёәж•°жҚ®еә“зҡ„з®ЎзҗҶе‘ҳпјҢй»ҳи®ӨеҜҶз Ғдёәз©әпјҢжҲ‘们йңҖиҰҒдҝ®ж”№дёәжҢҮе®ҡзҡ„еҜҶз ҒпјҢиҝҷйҮҢи®ҫе®ҡдёәвҖҷpostgresвҖҷгҖӮ
# su - postgres
$ psql
# ALTERUSER postgres WITH PASSWORD 'postgres';
# select*from pg_shadow ;
B. yum е®үиЈ…
1. е°ҶеҲҡжүҚе®үиЈ…зҡ„PostgreSQL еҚёиҪҪ
# /etc/init.d/postgresql-9.2 stop //еҒңжӯўPostgreSQLжңҚеҠЎ
//жҹҘзңӢе·Іе®үиЈ…зҡ„еҢ…
# rpm -qa|grep postgres
//еҚёиҪҪ
# rpm -e postgresql92-server-9.2.4-1PGDG.rhel6.i686
# rpm -e postgresql92-contrib-9.2.4-1PGDG.rhel6.i686
# rpm -e postgresql92-9.2.4-1PGDG.rhel6.i686
# rpm -e postgresql92-libs-9.2.4-1PGDG.rhel6.i686
2. yum е®үиЈ…
еҰӮжһңжҳҜй»ҳи®Өyum е®үиЈ…зҡ„иҜқпјҢдјҡе®үиЈ…иҫғдҪҺзүҲжң¬зҡ„PostgreSQL 8.4пјҢиҝҷдёҚз¬ҰеҗҲжҲ‘们зҡ„иҰҒжұӮгҖӮ
жҲ‘们дҪҝз”ЁPostgreSQL Yum Repository жқҘе®үиЈ…жңҖж–°зүҲжң¬зҡ„PostgreSQLгҖӮ
2.1 е®үиЈ…PostgreSQL yum repository
# rpm -i http://yum.postgresql.org/9.2/RedHat/rhel-6-x86_64/pgdg-redhat92-9.2-7.noarch.rpm
2.2 е®үиЈ…ж–°зүҲжң¬PostgreSQL
# yum install postgresql92-server postgresql92-contrib
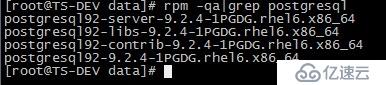
2.3 жҹҘзңӢе®үиЈ…
3. еҲқе§ӢеҢ–并еҗҜеҠЁж•°жҚ®еә“

й…ҚзҪ®ж–Ү件пјҡ/var/lib/pgsql/data/pg_hba.conf
4. жөӢиҜ•
е…¶д»–жӯҘйӘӨеҰӮAж–№ејҸгҖӮ
C. жәҗз ҒеҢ…е®үиЈ…
1гҖҒдёӢиҪҪPostgresqlжәҗд»Јз Ғ
wget http://ftp.postgresql.org/pub/source/v9.0.3/postgresql-9.0.3.tar.bz2
wget https://ftp.postgresql.org/pub/source/v9.6.2/postgresql-9.6.2.tar.bz2
2гҖҒи§ЈеҺӢиҜҘж–Ү件
tar xjvf postgresql-9.0.3.tar.bz2
3гҖҒиҝӣе…Ҙи§ЈеҺӢеҗҺзҡ„зӣ®еҪ•
cd postgresql-9.0.3/
4гҖҒжҹҘзңӢINSTALL
INSTALLж–Ү件дёӯShort VersionйғЁеҲҶи§ЈйҮҠдәҶеҰӮдҪ•е®үиЈ…postgresqlзҡ„е‘Ҫд»ӨпјҢRequirementsйғЁеҲҶжҸҸиҝ°дәҶе®үиЈ…postgresqlжүҖдҫқиө–зҡ„libпјҢжҜ”иҫғй•ҝпјҢе…Ҳ configureиҜ•дёҖдёӢпјҢеҰӮжһңеҮәзҺ°errorпјҢйӮЈд№ҲйңҖиҰҒжЈҖжҹҘжҳҜеҗҰж»Ўи¶ідәҶRequirementsзҡ„иҰҒжұӮгҖӮ
Short Version
./configure
gmake
su
gmake install
adduser postgres
mkdir /usr/local/pgsql/data
chown postgres /usr/local/pgsql/data
su - postgres
/usr/local/pgsql/bin/initdb -D /usr/local/pgsql/data
/usr/local/pgsql/bin/postgres -D /usr/local/pgsql/data >logfile 2>&1 &
/usr/local/pgsql/bin/createdb test
/usr/local/pgsql/bin/psql test
5гҖҒжү§иЎҢINSTALLж–Ү件дёӯShort Versionзҡ„е‘Ҫд»ӨпјҢејҖе§Ӣзј–иҜ‘е®үиЈ…postgrepsqlж•°жҚ®еә“гҖӮ
./configure --prefix=/usr/local/pgsql --with-perl --with-python --with-libxml --with-libxslt
configure: error: readline library not found
If you have readline already installed, see config.log for details on the
failure. It is possible the compiler isnt looking in the proper directory.
yum install -y readline-devel
пјҲsudo apt-get install libreadline5-dev && sudo apt-get install zlib1g-devпјү
configure: error: library 'xslt' is required for XSLT support
yum install libxslt libxslt-devel
configure: error: header file <Python.h> is required for Python
yum install python python-devel
configure: error: could not determine flags for linking embedded Perl.
yum install perl-ExtUtils-Embed
е®үиЈ…readlineеҢ…д№ӢеҗҺпјҢйҮҚж–°configureпјҢжҲҗеҠҹгҖӮ
6гҖҒmake
7гҖҒmake install
8гҖҒж·»еҠ з”ЁжҲ·postgres
useradd postgres
9гҖҒеҲӣе»әж•°жҚ®еә“ж–Ү件еӯҳеӮЁж–Ү件еӨ№
mkdir /usr/local/pgsql/data
#mkdir /data/pgsql
10гҖҒж”№еҸҳе…ҲеүҚеҲӣе»әзҡ„dataзӣ®еҪ•зҡ„ж–Ү件еӨ№зҡ„жқғйҷҗ
chown postgres /usr/local/pgsql/data
#chown postgres /data/pgsql
11гҖҒеҲҮжҚўз”ЁжҲ·
su - postgres
12гҖҒз»‘е®ҡж•°жҚ®еә“ж–Ү件еӯҳеӮЁзӣ®еҪ•
/usr/local/pgsql/bin/initdb -D /usr/local/pgsql/data
#export PATH=$PATH:/usr/local/pgsql/bin/
#/usr/local/pgsql/bin/initdb -D /data/pgsql
13гҖҒеҗҜеҠЁж•°жҚ®еә“
/usr/local/pgsql/bin/postgres -D /usr/local/pgsql/data >logfile 2>&1
[1] 18635
#/usr/local/pgsql/bin/postgres -D /data/pgsql >logfile 2>&1
[1] 18635
14гҖҒеҲӣе»әж•°жҚ®еә“test
/usr/local/pgsql/bin/createdb test
15гҖҒиҝһжҺҘеҲ°testж•°жҚ®еә“
/usr/local/pgsql/bin/psql test
psql (9.0.3)
Type "help" for help.
test=#
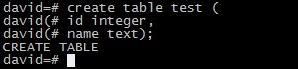
16гҖҒеҲӣе»әиЎЁtable1
test=# create table table1 (
test(# id integer
test(# );
CREATE TABLE
test=#
17гҖҒеҗ‘table1иЎЁдёӯжҸ’е…ҘдёҖжқЎи®°еҪ•
test=# insert into table1 values(1);
INSERT 0 1
18гҖҒжҹҘиҜўеҲҡеҲҡжҸ’е…Ҙзҡ„и®°еҪ•
test=# select * from table1;
id
----
1
дёүгҖҒе®ўжҲ·з«Ҝе®үиЈ…
еӣ дёәеҜ№дәҺжҲ‘们жқҘиҜҙpostgreеә”з”ЁиҢғеӣҙеҫҲе°ҸпјҢеҚ•зәҜеҺ»еӯҰд»–зҡ„е‘Ҫд»ӨиЎҢпјҢеҜ№дәҺжҲ‘们зҡ„ж—¶й—ҙз®ЎзҗҶдёҚжҳҜеӨӘеҗҲйҖӮгҖӮ
жүҖд»ҘжҲ‘们еҸҜд»ҘеҺ»дёӢиҪҪдёҖдёӘе®ўжҲ·з«ҜпјҢиҝӣиЎҢдёҖдәӣз®ҖеҚ•зҡ„ж“ҚдҪңпјҢжҺЁиҚҗnavicatе®ҳзҪ‘еҺ»дёӢиҪҪpostgresqlе®ўжҲ·з«Ҝпјӣ
https://www.navicat.com.cn/download
----------------------------------------------------------------------------------------


