жҖҺд№Ҳеҝ«йҖҹжҗӯе»әдёҖдёӘSpringCloud2020зүҲзҺҜеўғ
жҖҺд№Ҳеҝ«йҖҹжҗӯе»әдёҖдёӘSpringCloud2020зүҲзҺҜеўғпјҹеҫҲеӨҡж–°жүӢеҜ№жӯӨдёҚжҳҜеҫҲжё…жҘҡпјҢдёәдәҶеё®еҠ©еӨ§е®¶и§ЈеҶіиҝҷдёӘйҡҫйўҳпјҢдёӢйқўе°Ҹзј–е°ҶдёәеӨ§е®¶иҜҰз»Ҷи®Іи§ЈпјҢжңүиҝҷж–№йқўйңҖжұӮзҡ„дәәеҸҜд»ҘжқҘеӯҰд№ дёӢпјҢеёҢжңӣдҪ иғҪжңүжүҖ收иҺ·гҖӮ
1гҖҒmavenзҲ¶еӯҗе·ҘзЁӢжҗӯе»ә
йЎ№зӣ®дҪҝз”Ёmavenе·ҘзЁӢжҗӯе»әпјҢдёӢйқўжҳҜе·ҘзЁӢзҡ„з»“жһ„еӣҫгҖӮSpringCloud2020жҳҜзҲ¶е·ҘзЁӢпјҢд»…иҙҹиҙЈдҫқиө–зҡ„з®ЎзҗҶпјҢeurekaжҳҜжіЁеҶҢдёӯеҝғзҡ„жңҚеҠЎз«ҜпјҢtestclientжҳҜжөӢиҜ•зҡ„е®ўжҲ·з«ҜгҖӮ

1.1 зҲ¶е·ҘзЁӢpom
<?xml version="1.0" encoding="UTF-8"?>
<project xmlns="http://maven.apache.org/POM/4.0.0"
   xmlns:xsi="http://www.w3.org/2001/XMLSchema-instance"
   xsi:schemaLocation="http://maven.apache.org/POM/4.0.0 http://maven.apache.org/xsd/maven-4.0.0.xsd">
 <modelVersion>4.0.0</modelVersion>

 <groupId>org.example</groupId>
 <artifactId>SpringCloud2020</artifactId>
 <packaging>pom</packaging>
 <version>1.0-SNAPSHOT</version>
 <modules>
  <module>eureka</module>
  <module>testclient</module>
 </modules>
 <parent>
  <groupId>org.springframework.boot</groupId>
  <artifactId>spring-boot-starter-parent</artifactId>
  <version>2.4.1</version>
  <relativePath/> <!-- lookup parent from repository -->
 </parent>
 <properties>
  <project.build.sourceEncoding>UTF-8</project.build.sourceEncoding>
  <project.reporting.outputEncoding>UTF-8</project.reporting.outputEncoding>
  <java.version>1.8</java.version>
 </properties>

 <dependencyManagement>
  <dependencies>
   <dependency>
    <groupId>org.springframework.cloud</groupId>
    <artifactId>spring-cloud-dependencies</artifactId>
    <!-- Provide the latest stable Spring Cloud release train version (e.g. 2020.0.0) -->
    <version>2020.0.0</version>
    <type>pom</type>
    <scope>import</scope>
   </dependency>
  </dependencies>
 </dependencyManagement>
 <build>
  <plugins>
   <plugin>
    <groupId>org.springframework.boot</groupId>
    <artifactId>spring-boot-maven-plugin</artifactId>
   </plugin>
  </plugins>
 </build>
</project>
1.2 eurekaеӯҗе·ҘзЁӢpom
<?xml version="1.0" encoding="UTF-8"?>
<project xmlns="http://maven.apache.org/POM/4.0.0"
   xmlns:xsi="http://www.w3.org/2001/XMLSchema-instance"
   xsi:schemaLocation="http://maven.apache.org/POM/4.0.0 http://maven.apache.org/xsd/maven-4.0.0.xsd">
 <parent>
  <artifactId>SpringCloud2020</artifactId>
  <groupId>org.example</groupId>
  <version>1.0-SNAPSHOT</version>
 </parent>
 <modelVersion>4.0.0</modelVersion>

 <artifactId>eureka</artifactId>

 <dependencies>
  <dependency>
   <groupId>org.springframework.cloud</groupId>
   <artifactId>spring-cloud-starter-netflix-eureka-server</artifactId>
  </dependency>
 </dependencies>
</project>
1.3 testclientеӯҗе·ҘзЁӢpom
<?xml version="1.0" encoding="UTF-8"?>
<project xmlns="http://maven.apache.org/POM/4.0.0"
xmlns:xsi="http://www.w3.org/2001/XMLSchema-instance"
xsi:schemaLocation="http://maven.apache.org/POM/4.0.0 http://maven.apache.org/xsd/maven-4.0.0.xsd">
<parent>
<artifactId>SpringCloud2020</artifactId>
<groupId>org.example</groupId>
<version>1.0-SNAPSHOT</version>
</parent>
<modelVersion>4.0.0</modelVersion>
<artifactId>testclient</artifactId>
<dependencies>
<dependency>
<groupId>org.springframework.cloud</groupId>
<artifactId>spring-cloud-starter-netflix-eureka-client</artifactId>
</dependency>
<!--еј•е…ҘWebStart-->
<dependency>
<groupId>org.springframework.boot</groupId>
<artifactId>spring-boot-starter-web</artifactId>
</dependency>
</dependencies>
</project>
2гҖҒй…ҚзҪ®application
2.1 eureka й…ҚзҪ®
server:
port: 20001 #eurekaиҝҗиЎҢзҡ„з«ҜеҸЈеҸ·
address: 127.0.0.1 #жіЁеҶҢдёӯеҝғиҝҗиЎҢең°еқҖ
servlet:
context-path: /server #eurekaжіЁеҶҢдёӯеҝғз®ЎзҗҶз•Ңйқўең°еқҖ
eureka:
client:
register-with-eureka: false #жҳҜеҗҰеҠ е…ҘeurekaжіЁеҶҢиЎЁ
fetch-registry: false #иҝҳжҳҜеҗ‘eurekaиҜ·жұӮжіЁеҶҢдҝЎжҒҜиЎЁ
service-url:
defaultZone: http://${server.address}:${server.port}/eureka #жіЁеҶҢдёӯеҝғең°еқҖпјҢе…¶е®ғжңҚеҠЎйңҖиҰҒжіЁеҶҢеҲ°иҜҘең°еқҖ2.1 testclient й…ҚзҪ®
server:
port: 20002
# Spring
spring:
application:
name: test_service
# Eureka
eureka:
client:
service-url:
defaultZone: http://127.0.0.1:20001/eureka #иҝҷйҮҢзҡ„portдёҺeurekaзҡ„з«ҜеҸЈеҜ№еә”
instance:
lease-renewal-interval-in-seconds: 5 # жҜҸйҡ”5з§’еҸ‘йҖҒдёҖж¬Ўеҝғи·і
lease-expiration-duration-in-seconds: 10 # 10з§’дёҚеҸ‘йҖҒе°ұиҝҮжңҹ
prefer-ip-address: true
instance-id: ${spring.application.name}:${server.port}3гҖҒеҗҜеҠЁзұ»
3.1 EurekaеҗҜеҠЁзұ»EurekaApplication
package org.example.demo;

import org.springframework.boot.SpringApplication;
import org.springframework.boot.autoconfigure.SpringBootApplication;
import org.springframework.cloud.netflix.eureka.server.EnableEurekaServer;

@SpringBootApplication
@EnableEurekaServer
public class DemoApplication {

	public static void main(String[] args) {
		SpringApplication.run(DemoApplication.class, args);
	}

}
3.2 TestClientеҗҜеҠЁзұ»TestClientApplication
package org.example.demo;

import org.springframework.boot.SpringApplication;
import org.springframework.boot.autoconfigure.SpringBootApplication;
import org.springframework.cloud.netflix.eureka.EnableEurekaClient;

@SpringBootApplication
@EnableEurekaClient
public class TestClientApplication {

	public static void main(String[] args) {
		SpringApplication.run(TestClientApplication.class, args);
	}
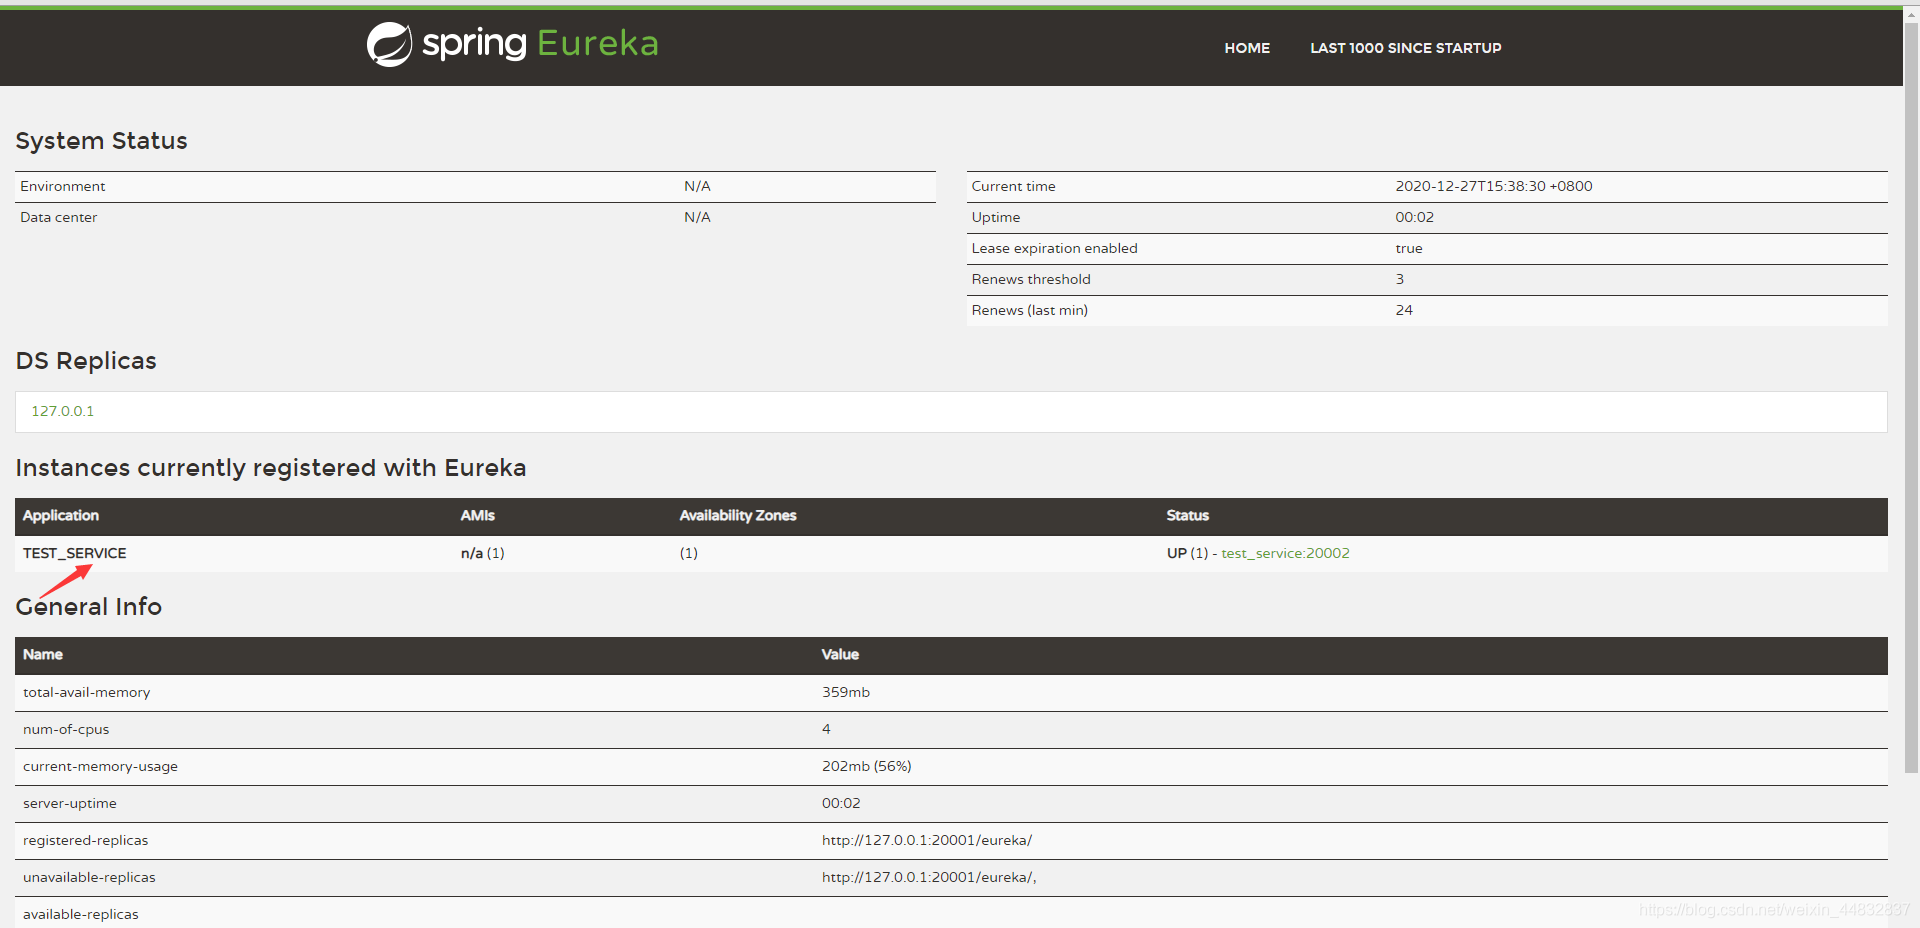
}4гҖҒиҝҗиЎҢз»“жһң
еҰӮжһңжІЎжңүж„ҸеӨ–пјҢйӮЈд№ҲдҪ е°ҶзңӢеҲ°
еҰӮжһңеҗҜеҠЁtestclientж—¶жҠҘй”ҷ

иҜ·жЈҖжҹҘtestclientе·ҘзЁӢзҡ„дҫқиө–дёӯжҳҜеҗҰеӯҳеңЁдёӢйқўзҡ„дҫқиө–йЎ№пјҢеҰӮжһңжІЎжңүпјҢиҜ·ж·»еҠ гҖӮеҺҹеӣ еҸҜиғҪжҳҜeureka-clientдҫқиө–spring-boot-starter-web
 <dependency>
   <groupId>org.springframework.boot</groupId>
   <artifactId>spring-boot-starter-web</artifactId>
  </dependency>
еҰӮжһңжІЎжңүеҮәзҺ°TEST_SERVICEпјҢ并且testclientеҮәзҺ°д»ҘдёӢжҠҘй”ҷ
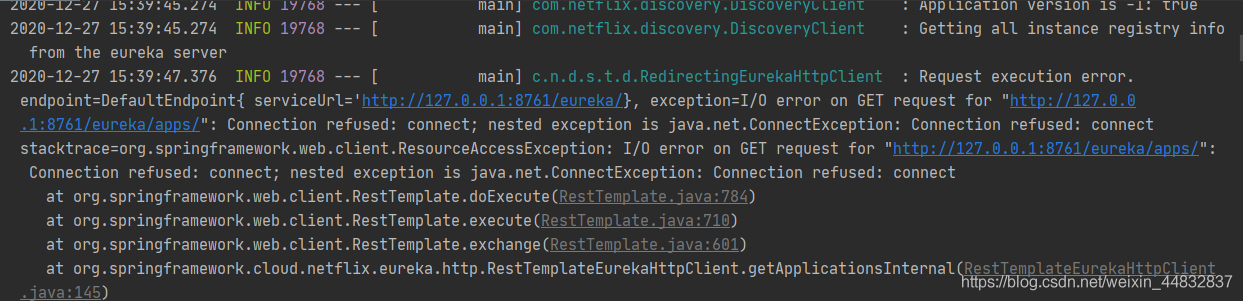
иҜ·жЈҖжҹҘtestclientй…ҚзҪ®зҡ„defaultZoneжҳҜеҗҰдёҺeurekaй…ҚзҪ®еҜ№еә”пјҢ并清з©әе·Із»Ҹжһ„е»әзҡ„еҶ…е®№пјҢеҶҚйҮҚж–°еҗҜеҠЁeurekaпјҢtestclientгҖӮ
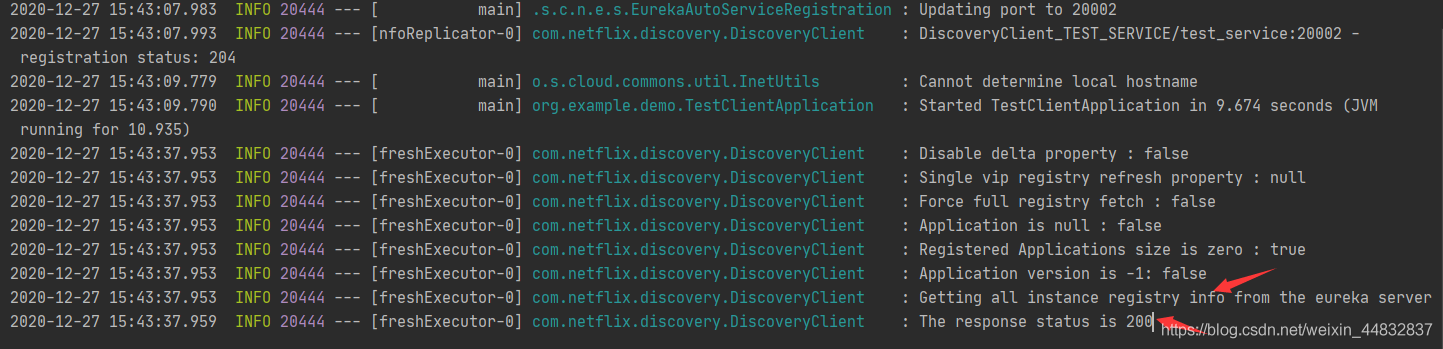
еңЁtestclientжҺ§еҲ¶еҸ°зңӢеҲ°д»ҘдёӢж—Ҙеҝ—дҝЎжҒҜпјҢиҜҙжҳҺжіЁеҶҢжҲҗеҠҹгҖӮ
и®ҝй—®з®ЎзҗҶз•Ңйқўй»ҳи®ӨдҪҝз”Ё127.0.0.1:portпјҢеҰӮжһңиҰҒж”№еҸҳе®ғпјҢиҜ·жҢүз…§дёӢйқўзҡ„жҸҗзӨәй…ҚзҪ®
server:
port: 20001 #eurekaиҝҗиЎҢзҡ„з«ҜеҸЈеҸ·
address: 127.0.0.1 #з®ЎзҗҶз•Ңйқўзҡ„ең°еқҖ
servlet:
context-path: /eureka-ui#з®ЎзҗҶз•Ңйқўзҡ„context-path
eureka:
client:
register-with-eureka: false #жҳҜеҗҰеҠ е…ҘeurekaжіЁеҶҢиЎЁ
fetch-registry: false #жҳҜеҗҰеҗ‘eurekaиҜ·жұӮжіЁеҶҢдҝЎжҒҜиЎЁ
service-url:
defaultZone: http://127.0.0.1:${server.port}/eureka # й…ҚзҪ®жіЁеҶҢдёӯеҝғзҡ„ең°еқҖпјҢе…¶е®ғжңҚеҠЎжіЁеҶҢзҡ„ж—¶еҖҷдҪҝз”ЁгҖӮзңӢе®ҢдёҠиҝ°еҶ…е®№жҳҜеҗҰеҜ№жӮЁжңүеё®еҠ©е‘ўпјҹеҰӮжһңиҝҳжғіеҜ№зӣёе…ізҹҘиҜҶжңүиҝӣдёҖжӯҘзҡ„дәҶи§ЈжҲ–йҳ…иҜ»жӣҙеӨҡзӣёе…іж–Үз« пјҢиҜ·е…іжіЁдәҝйҖҹдә‘иЎҢдёҡиө„и®Ҝйў‘йҒ“пјҢж„ҹи°ўжӮЁеҜ№дәҝйҖҹдә‘зҡ„ж”ҜжҢҒгҖӮ


