这篇文章将为大家详细讲解有关安装Pytorch1.5.1的方法,文章内容质量较高,因此小编分享给大家做个参考,希望大家阅读完这篇文章后对相关知识有一定的了解。
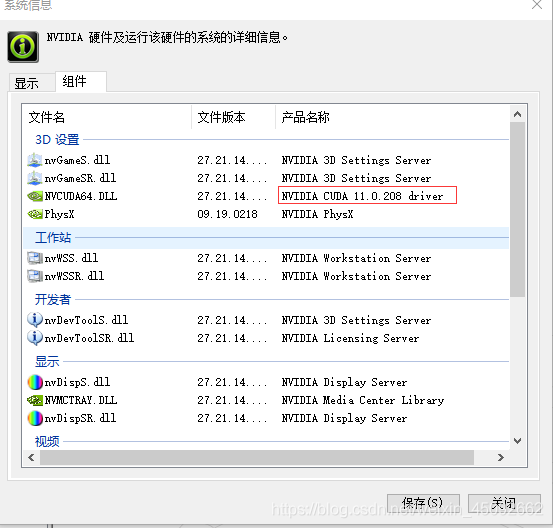
我的cuda是11版本了,所以可以安装11版本以下的任何版本。
官网网址:https://pytorch.org/
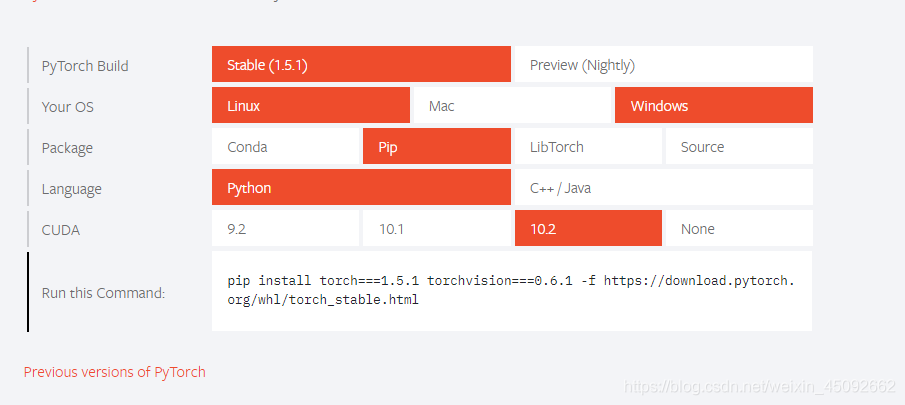
最简单的是直接按官网给的Run this Command命令,直接安装,如下:
conda install pytorch torchvision torchaudio cudatoolkit=10.2 -c pytorch
解释:-c pytorch,意思是从pytorch网站下载,速度感人,有办法的那就方便多了。
按照上面图这样选择,安装pytorch有GPU加速的版本,安装命令可以改下,后面加个豆瓣源,这样下载速度快些。
pip install torch===1.5.1 torchvision===0.6.1 -f https://download.pytorch.org/whl/torch_stable.html -i https://pypi.douban.com/simple
或者直接用conda安装,去掉后面的 -c pytorch
conda install pytorch torchvision cudatoolkit=10.2
如果上面方法都下载慢,那就按下面方法来。(适用于win版本,Linux的可以返回上一层寻找对应的版本)
先进清华源https://mirrors.tuna.tsinghua.edu.cn/anaconda/cloud/pytorch/win-64/?C=M&O=D
下载对应pytorch版本,我的是Python3.7,需要PyTorch-gpu版本,cuda需要10.2,找到对应的bz2文件下载,如图

还要下载对应的torchvision===0.6.1,如图

下载好就在命令行进入你下载的路径目录里面安装,并输入下面代码进行离线安装。
conda install --offline 对应的安装包文件名字
安装完后还要安装cudatoolkit=10.2
conda install cudatoolkit=10.2
然后运行测试代码:
# TEST
import torch
from torch.backends import cudnn

x = torch.Tensor([1.0])
xx = x.cuda()
print(torch.__version__)
print(torch.version.cuda)
print(torch.cuda.is_available())
print(xx)
print(cudnn.is_acceptable(xx))
结果:
1.5.1
10.2
True
tensor([1.], device='cuda:0')
True
安装成功!
import torch
import time

print(torch.__version__)
print(torch.cuda.is_available())

a = torch.randn(10000, 1000)
b = torch.randn(1000, 2000)

t0 = time.time()
c = torch.matmul(a, b) # 矩阵乘法
t1 = time.time()
print(a.device, t1 - t0, c.norm(2))

t0 = time.time()
c = torch.matmul(a, b) # 矩阵乘法
t1 = time.time()
print(a.device, t1 - t0, c.norm(2))

device = torch.device('cuda')
a = a.to(device)
b = b.to(device)

t0 = time.time()
c = torch.matmul(a, b) # 矩阵乘法
t2 = time.time()
print(a.device, t2 - t0, c.norm(2))

t0 = time.time()
c = torch.matmul(a, b)
t2 = time.time()
print(a.device, t2 - t0, c.norm(2))
结果:
1.5.1
True
cpu 0.13901472091674805 tensor(140929.9688)
cpu 0.16696977615356445 tensor(140929.9688)
cuda:0 0.22500324249267578 tensor(141330.6875, device='cuda:0')
cuda:0 0.003974437713623047 tensor(141330.6875, device='cuda:0')
运行两次是cuda有个预热的过程,第二次的时间明显减少了。和CPU相比,更快。
代码:
import torch
from torch import autograd

x = torch.tensor(1.)
a = torch.tensor(1., requires_grad=True)
b = torch.tensor(2., requires_grad=True)
c = torch.tensor(3., requires_grad=True)

y = a ** 2 * x + b * x + c

print('before:', a.grad, b.grad, c.grad)
grads = autograd.grad(y, [a, b, c])
print('after :', grads[0], grads[1], grads[2])
结果:
before: None None None
after : tensor(2.) tensor(1.) tensor(1.)
可以看出pytorch比TensorFlow1.X好理解,适合人类思维,功能也都全。
关于安装Pytorch1.5.1的方法就分享到这里了,希望以上内容可以对大家有一定的帮助,可以学到更多知识。如果觉得文章不错,可以把它分享出去让更多的人看到。
免责声明:本站发布的内容(图片、视频和文字)以原创、转载和分享为主,文章观点不代表本网站立场,如果涉及侵权请联系站长邮箱:is@yisu.com进行举报,并提供相关证据,一经查实,将立刻删除涉嫌侵权内容。


