最近几个项目上线前都要经过服务器的安全检测,问题最大的就是oracle数据库,一开始都是找相关部门的DBA帮忙,今年又上新项目,服务器到位部署完毕还是扫描出数据库一堆漏洞。决定自己学学打补丁吧,对于数据库入门级的我来说轻易真的不敢操作生产系统的数据库,但是总要迈出这一步,先在虚拟机上练习,经过3天的查阅资源和阅读官方的文档,终于成功了。
在这里记录下来,以备后用。
在这里首先感谢风哥提供的补丁和在安装过程中给予的支持 目前正在学习风哥的RAC+DG的课程,风哥很多实战中的经验很值得我们新手借鉴。51CTO学院风哥介绍:http://edu.51cto.com/lecturer/index/user_id-8020378.html
操作系统:Linux redhat enterprise 6.4
数据库:oracle 11gr2 11.2.0.4
补丁版本:2016年第一季度发布的 p22378146_112040_Linux-x86-64
opatch版本:p6880880_112000_Linux-x86-64
环境检查:
SQL>  select * from v$version;
BANNER
--------------------------------------------------------------------------------
Oracle Database 11g Enterprise Edition Release 11.2.0.4.0 - 64bit Production
PL/SQL Release 11.2.0.4.0 - Production
CORE11.2.0.4.0Production
TNS for Linux: Version 11.2.0.4.0 - Production
NLSRTL Version 11.2.0.4.0 - Production
有些补丁必须要特定版本的opatch才能进行升级,我在第一次升级时就是报了opatch版本不能针对本次升级补丁包进行升级操作的错误信息,以下是我未升级前的opatch版本。如果你的opatch版本符合当前补丁要求可以略过opatch升级步骤。
[oracle@localhost ~]$ opatch version
OPatch Version: 11.2.0.3.4
OPatch succeeded.
OPatch升级
1.我们需要首先升级OPatch。第一步是进行原有OPatch备份。
使用tar zcvf opatch_bk.tar OPatch 或者zip -r Opatch.zip OPatc/ 都可以
2.从官网支持网站下载最新的opatch包p6880880_112000_Linux-x86-64 解压缩到$ORACLE_HOME下
3.执行opatch version查看最新版本
[oracle@localhost ~]$ opatch version
OPatch Version: 11.2.0.3.6
OPatch succeeded.
数据库升级
关闭监听和停掉数据库
将驱动上传至oracle用户目录下
解压缩后进入该补丁目录
执行opatch apply进行安装
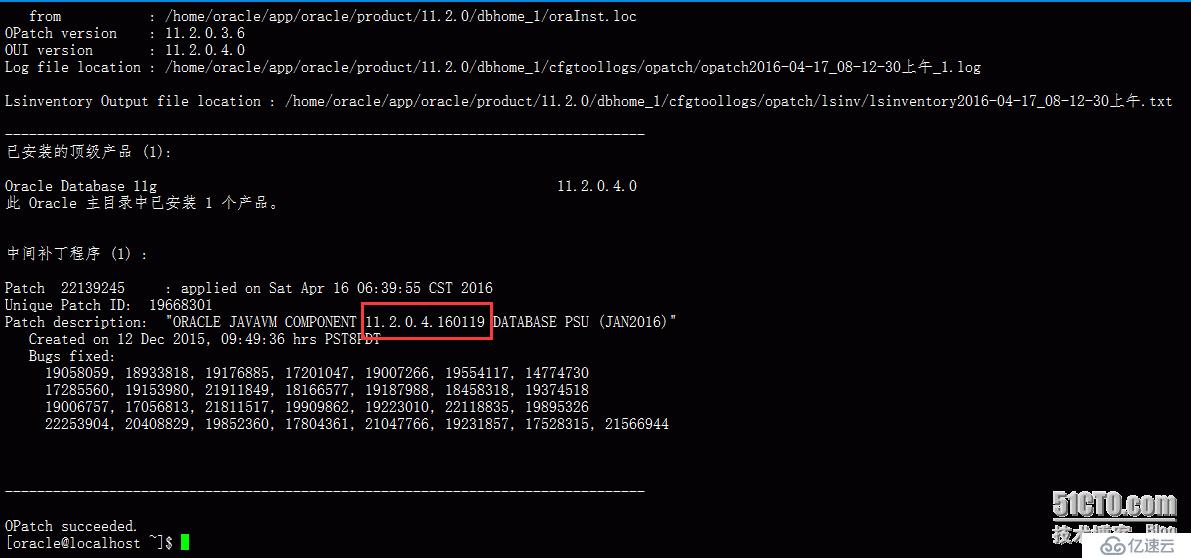
成功后启动监听、启动数据库,查看是否能正常启动
登陆数据库执行@$ORACLE_HOME/rdbms/admin/catbundle.sql psu apply
在dba_registry_history中,我们也可以看到记录。

自2016年起,oracle的小版本号不再是以前那样单个数字累加形式了,而是以日期的形式
下面是官方文档我用有道翻译的一些,也仍在这里算是备忘吧。最后打个广告,胖哥也卖杂粮小米,有需要的加微信:aohanxiaomi
如果升级完毕,用PLSQL无法登陆,提示ORA-12526 所有适用例程都处于受限模式:请执行下面操作步骤
正常启动。但是PL/SQL DEVELOPER 连不上。没执行升级脚本。通过以下步骤升级成功。
SQL>@/home/oracle/app/oracle/product/11.2.0/dbhome_1/rdbms/admin/catupgrd.sql
待catupgrd.sql脚本执行完成,大概花了半个多小时;脚本执行完会自动关闭库,退出到oracle用户下。
sqlplus /nolog
SQL>startup
启动后用plsql链接成功,后面的步骤我就没继续操作,如果大家在升级中,到这步还是无法登陆可以继续尝试以下步骤。
执行脚本D:/oracle/product/10.2.0/db_1/RDBMS/ADMIN/utlrp.sql;
执行完毕后执行查询所有重新编译错误
SQL> select * from utl_recomp_errors;
未选定行(这里说明没有错误)
执行检查:
SQL> select name from v$database(确认ORACLE_SID正确,为orcl)
SQL> show user(确认当前使用者为SYS)
SQL> select tablespace_name, bytes from dba_data_files(对系统表空间大小进行确认)。
SQL> @d:/oracle/product/10.2.0/db_1/rdbms/admin/catalog.sql(重建SYS用户视图 )
(注:这步在我升级的时候语句全部报错,应该可以忽略)
SQL>shutdown immediate
SQL>startup
数据库启动成功
To install the patch, follow these steps.
安装补丁,遵循这些步骤。
Set your current directory to the directory where the patch is located and then run the OPatch utility by entering the following commands:
当前目录设置为补丁所在的目录,然后运行OPatch实用程序通过输入以下命令:
$ cd <PATCH_TOP_DIR>/22139245
cd < PATCH_TOP_DIR > / 22139245美元
Install the patch by running the following command:
通过运行下面的命令安装补丁:
$ opatch apply
美元opatch应用
Verify whether the patch has been successfully installed by running the following command:
验证是否已成功安装补丁通过运行下面的命令:
$ opatch lsinventory
美元opatch lsinventory
If apply fails for make target jox_refresh_knlopt when applying the patch to the database home, see Issue #1 in Section 8, "Known Issues" for more information.
如果不能申请目标jox_refresh_knlopt数据库应用补丁时,看到问题# 1 8节,“已知问题”获得更多信息。
Start the services from the Oracle home after all the nodes are patched.
启动服务后从Oracle回家的所有节点是修补。
If there are errors, see Section 8, "Known Issues".
如果有错误,参见“已知的问题”。
4 Postinstallation
4 Postinstallation
The following steps load modified SQL files into the database. For an Oracle RAC environment, perform these steps on only one node.
以下步骤修改SQL文件加载到数据库。在Oracle RAC环境中,只有一个节点上执行这些步骤。
Install the SQL portion of the patch by running the following command for a single instance environment.
安装补丁的SQL部分通过运行下面的命令为单个实例的环境。
cd $ORACLE_HOME/sqlpatch/22139245
cd $ ORACLE_HOME / sqlpatch / 22139245
sqlplus /nolog
sqlplus / nolog
SQL> CONNECT / AS SYSDBA
SQL >连接/ SYSDBA
SQL> startup upgrade
SQL >启动升级
SQL> @postinstall.sql
SQL > @postinstall.sql
SQL> shutdown
SQL >关闭
SQL> startup
SQL >启动
For an Oracle RAC environment, reload the packages on one of the nodes using the following commands. Make sure no other instance of the database is up on the remote nodes.
对于一个Oracle RAC环境中,重载节点的包在一个使用以下命令。确保没有其他实例数据库的远程节点上。
cd $ORACLE_HOME/sqlpatch/22139245
cd $ ORACLE_HOME / sqlpatch / 22139245
sqlplus /nolog
sqlplus / nolog
SQL> CONNECT / AS SYSDBA
SQL >连接/ SYSDBA
SQL> STARTUP
SQL >启动
SQL> alter system set cluster_database=false scope=spfile;
SQL >改变系统设置cluster_database = false范围= spfile;
SQL> SHUTDOWN
SQL >关闭
SQL> STARTUP UPGRADE
SQL >启动升级
SQL> @postinstall.sql
SQL > @postinstall.sql
SQL> alter system set cluster_database=true scope=spfile;
SQL >改变系统集cluster_database = true范围= spfile;
SQL> SHUTDOWN
SQL >关闭
SQL> STARTUP
SQL >启动
After installing the SQL portion of the patch, some packages could become INVALID. This will get recompiled upon access or you can run utlrp. sql to get them back into a VALID state.
安装补丁的SQL部分之后,一些包可能成为无效。这将会在访问或您可以运行utlrp重新编译。sql来让他们回一个有效的状态。
cd $ORACLE_HOME/rdbms/admin
cd $ ORACLE_HOME / rdbms / admin
sqlplus /nolog
sqlplus / nolog
SQL> CONNECT / AS SYSDBA
SQL >连接/ SYSDBA
SQL> @utlrp.sql
SQL > @utlrp.sql
If there are errors, see Section 8, "Known Issues".
如果有错误,参见“已知的问题”。
免责声明:本站发布的内容(图片、视频和文字)以原创、转载和分享为主,文章观点不代表本网站立场,如果涉及侵权请联系站长邮箱:is@yisu.com进行举报,并提供相关证据,一经查实,将立刻删除涉嫌侵权内容。


