目录:
1. Django集成Redis
2. 封装服务redis_service.py
3. 单元测试test_redis_serivce.py
4. Redis读写功能调用
5. 常见问题和解决方法
Redis是一个高性能的key-value数据库,常用于搭建缓存系统,提高并发响应速度。Django集成Redis只需1步配置,秒定。为了增加代码的兼容和容错能力,将Redis功能调用封装为redis_service.py服务。
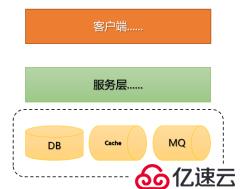
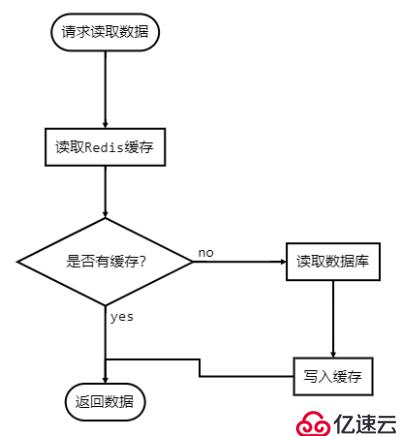
典型系统架构的数据层和缓存数据读取流程:
示例代码:https://github.com/rickding/HelloPython/tree/master/hello_redis
├── settings.py
├── service
│ └── redis_service.py
├── test
│ └── test_redis_service.py
一,Django集成Redis
代码文件 | 功能要点 | |
Django集成Redis | requirements.txt | 安装Redis包: django-redis >= 4.10.0 |
settings.py | 配置Redis缓存系统 | |
封装redis_service服务 | redis_serivce.py | 封装Redis调用:get, set, delete, incr |
单元测试 | test_redis_serivce.py | 测试封装的Redis功能函数 |
Redis读写功能调用 | views.py | 增加REST接口/chk/cache,调用Redis读写功能 |
1. 新建Django项目,运行:django-admin startproject hello_redis
2. 进到目录hello_redis,增加应用,运行:python manage.py startapp app
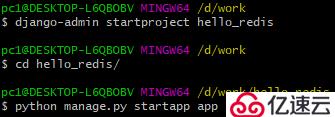
项目的目录文件结构如下:
3. 安装Redis包,pip install django-redis >= 4.10.0,如果不是新建项目,注意版本兼容问题。
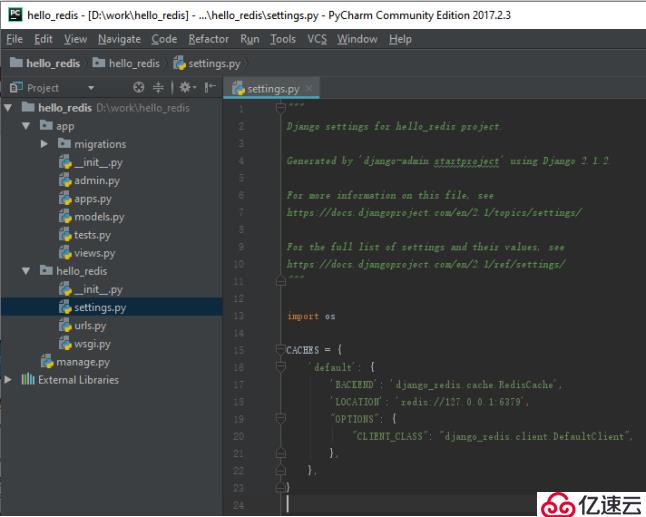
4. 打开settings.py,配置Redis缓存,1步完成:
CACHES = {
'default': {
'BACKEND': 'django_redis.cache.RedisCache',
'LOCATION': 'redis://127.0.0.1:6379',
"OPTIONS": {
"CLIENT_CLASS": "django_redis.client.DefaultClient",
},
},
}
注意Redis服务的IP地址和端口。
5. 代码中调用缓存功能非常方便:
a) 导入包:from django.core.cache import cache
b) 调用cache.get(key), cache.set(key, value)等函数。
二,封装服务redis_service.py,调用Redis功能函数
为了增加代码的兼容和容错能力,将Redis功能调用封装在redis_service.py服务中:
1. 对String操作
a) get(key)
b) set(key, str_value)
2. 对dict操作
a) get_dict(key)
b) set_dict(key, dict_value)
import json
from django.core.cache import cache
def get(key):
return cache.get(key)
def set(key, value):
return cache.set(key, value)
# cache dict: json.dumps and loads, not hash
def get_dict(key):
value = cache.get(key)
if value is None:
return None
return json.loads(value)
def set_dict(key, value_dict):
return cache.set(key, json.dumps(value_dict))
还有对列表、集合、哈希表等操作。
三,单元测试test_redis_service.py
运行python manage.py test:

四,Redis读写功能调用
1. 在views.py中增加请求处理函数,调用Redis读写功能
from django.http import HttpResponse
from hello_redis.service import redis_service as cache
def chk_cache(req):
key = 'chk_cache: %s, %s, %s' % (req.get_raw_uri(), req.get_full_path(), req.get_host())
value = cache.incr(key)
cache.set(key, value * 2)
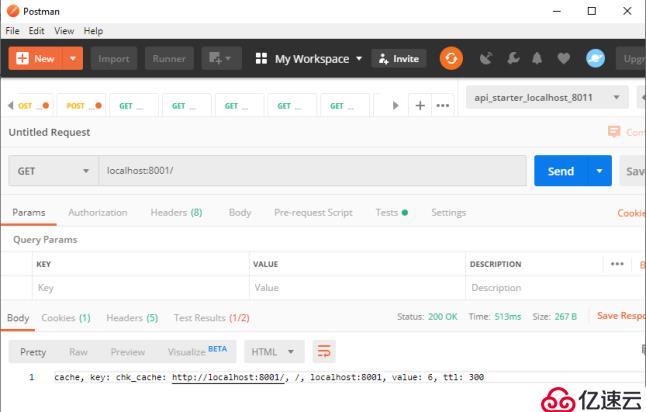
return HttpResponse('cache, key: {}, value: {}, ttl: {}'.format(key, cache.get(key), cache.ttl(key)))
2. 在urls.py中配置路由
from django.urls import path
from app.views import chk_cache
urlpatterns = [
path('', chk_cache, name='chk'),
]
3. 运行命令启动服务:python manage.py runserver 0.0.0.0:8001

4. REST接口调用redis_service示例
五,常见问题和解决方法
1. 集成Redis,配置settings.py,检查无误,运行依然出错:
InvalidCacheBackendError: Could not find backend 'django_redis.cache.RedisCache': cannot import name get_cache
解决:将django-redis版本从3.8.3升级到4.10.0
原因:Redis版本兼容问题。
2. 调用incr(key, amount),运行出错:key not found
解决:先调用has_key(key)判断是否存在,不存在时调用set(key, amount)
原因:Redis版本兼容问题。
免责声明:本站发布的内容(图片、视频和文字)以原创、转载和分享为主,文章观点不代表本网站立场,如果涉及侵权请联系站长邮箱:is@yisu.com进行举报,并提供相关证据,一经查实,将立刻删除涉嫌侵权内容。


