本篇文章为大家展示了使用CSS怎么实现自适应分隔线,内容简明扼要并且容易理解,绝对能使你眼前一亮,通过这篇文章的详细介绍希望你能有所收获。
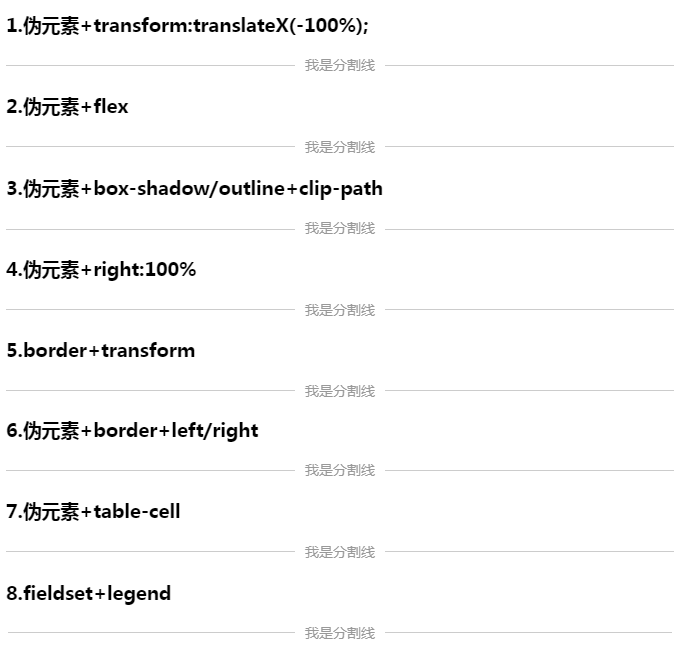
1.伪元素+transform:translateX(-100%);
主要原理是设置文本居中text-align: center;,然后给定两个伪元素,分别绝对定位,那么此时伪元素也是跟随着水平居中的,设置足够的宽度,然后把左边的往左位移100%就可以了,父级记得超出隐藏。
具体实现如下
html结构为
<div class="title">我是分割线</div>
css样式为
.title{
    position: relative;
    text-align: center;
    overflow: hidden;
    font-size: 14px;
    color: #999;
}
.title::before,.title::after{
    content: '';
    display: inline-block;
    width: 100%;
    height: 1px;
    position: absolute;
    background: #ccc;
    top: 50%;
}
.title::before{
    margin-left: -10px;
    transform: translateX(-100%);
}
.title::after{
    margin-left: 10px;
}
CSS分隔线 (伪元素+transform)
2.伪元素+flex
这个比较好理解了,设置display:flex,然后两个伪元素分别铺满剩余空间。
具体实现如下
html结构为
<div class="title">我是分割线</div>
css样式为
.title{
    display: flex;
    align-items: center;
    font-size: 14px;
    color: #999;
}
.title::before,.title::after{
    content: '';
    flex: 1;
    height: 1px;
    background: #ccc;
}
.title::before{
    margin-right: 10px;
}
.title::after{
    margin-left: 10px;
}
CSS分隔线 (伪元素+flex)
3.伪元素+box-shadow/outline+clip-path
同样利用text-align: center使文本和伪元素居中,然后生成足够大的box-shadow或者outline,由于不支持单个方向,所以用clip-path或者clip裁剪掉
具体实现如下
html结构为
<div class="title">我是分割线</div>
css样式为
.title{
    text-align: center;
    font-size: 14px;
    color: #999;
    overflow: hidden;
}
.title::before,.title::after{
    content: '';
    display: inline-block;
    width: 0;
    height: 1px;
    box-shadow: 0 0 0 9999px #ccc;
    vertical-align: middle;
}
.title::before{
    margin-right: 10px;
    clip-path: polygon(0 0, -9999px 0, -9999px 100%, 0 100%);
}
.title::after{
    margin-left: 10px;
    clip-path: polygon(0 0, 9999px 0, 9999px 100%, 0 100%);
}
CSS分隔线 (伪元素+box-shadow/outline+clip-path)
4.伪元素+right:100%
这个实现需要多一层标签,外部仍然是text-align: center,内部文本里添加两个伪元素绝对定位,其中左边的设置距离右边100%(相对于文本标签)即可
具体实现如下
html结构为
<div class="title">
    <span class="inner">我是分割线</span>
</div>
css样式为
.title{
    text-align: center;
    font-size: 14px;
    color: #999;
    overflow: hidden;
}
.inner{
    position: relative;
}
.inner::before,.inner::after{
    position: absolute;
    content: '';
    width: 9999px;
    height: 1px;
    background: #ccc;
    top: 50%;
}
.inner::before{
    right: 100%;
    margin-right: 10px;
}
.inner::after{
    margin-left: 10px;
}
CSS分隔线 (伪元素+right:100%)
5. border+transform
这个思路可以不用到伪元素,不过需要额外的标签,给内部文本左右足够大的1px边框,此时需要设置line-height:1px,由于内部整体以及足够大了(超过父级),可以使用绝对定位和transform: translateX(-50%)居中
具体实现如下
html结构为
<div class="title">
    <span class="inner">我是分割线</span>
</div>
css样式为
.title{
    position: relative;
    text-align: center;
    font-size: 14px;
    color: #999;
    overflow: hidden;
    padding: .6em 0;/**把高度撑起来**/
}
.inner{
    position: absolute;
    left: 50%;
    transform: translateX(-50%);
    white-space: nowrap;
    line-height: 1px;
    border-left: 9999px solid #ccc;
    border-right: 9999px solid #ccc;
    padding: 0 10px;
}
CSS分隔线 (border+transform)
6.伪元素+border+left/right
这个思路只需要一个伪元素,在文本内部生成一个伪元素,利用足够大的border和相同的负值(绝对定位+left/right)还原位置
具体实现如下
html结构为
<div class="title">
    <span class="inner">我是分割线</span>
</div>
css样式为
.title{
    text-align: center;
    font-size: 14px;
    color: #999;
    overflow: hidden;
}
.inner{
    position: relative;
    padding: 0 10px;
}
.inner::before{
    content: '';
    position: absolute;
    height: 1px;
    top: 50%;
    border-left: 9999px solid #ccc;
    border-right: 9999px solid #ccc;
    right: -9999px;
    left: -9999px;
}
CSS分隔线 (伪元素+border+left/right)
7.伪元素+table-cell
主要思路为父级设置display:table,伪元素设置display:table-cell,并设置足够大的宽度即可
具体实现如下
html结构为
<div class="title">
    <span class="inner">我是分割线</span>
</div>
css样式为
.title{
    display: table;
    font-size: 14px;
    color: #999;
}
.inner{
    display: table-cell;
    white-space: nowrap;
    padding: 0 10px;
}
.title::before,.title::after{
    content: '';
    display: table-cell;
    width: 9999px;
    overflow: hidden;
    background: linear-gradient(#ccc 0,#ccc) center no-repeat;/**这里用线性渐变生成的,也可以用其他方式**/
    background-size: 100% 1px;
}
CSS分隔线 (伪元素+table-cell)
8.fieldset+legend
利用fieldset和legend标签组合,可以天然实现分隔线效果,参考至张鑫旭的这篇文章
具体实现如下
html结构为
<fieldset class="title">
    <legend class="inner">我是分割线</legend>
</fieldset>
css样式为
.title{
    font-size: 14px;
    color: #999;
    border: 0;
    border-top: 1px solid #ccc;
    padding: 0;
}
.inner{
    margin: 0 auto;;
    padding: 0 10px;
}
CSS分隔线 (fieldset+legend)
小结
上面一共列举了8中方式来实现分隔线的效果,每种方法思路各不相同,重要的是可以发散自己的想象力,可能这才是CSS与其他语言所不同的吧~
这里整理了一下,整体效果如下,可访问这里查看,大家在实际项目中可自行选取所需要的方式
css是一种用来表现HTML或XML等文件样式的计算机语言,主要是用来设计网页的样式,使网页更加美化。它也是一种定义样式结构如字体、颜色、位置等的语言,并且css样式可以直接存储于HTML网页或者单独的样式单文件中,而样式规则的优先级由css根据这个层次结构决定,从而实现级联效果,发展至今,css不仅能装饰网页,也可以配合各种脚本对于网页进行格式化。
上述内容就是使用CSS怎么实现自适应分隔线,你们学到知识或技能了吗?如果还想学到更多技能或者丰富自己的知识储备,欢迎关注亿速云行业资讯频道。
免责声明:本站发布的内容(图片、视频和文字)以原创、转载和分享为主,文章观点不代表本网站立场,如果涉及侵权请联系站长邮箱:is@yisu.com进行举报,并提供相关证据,一经查实,将立刻删除涉嫌侵权内容。


