иҝҳеҺҹжҒўеӨҚCentOS 6иҜҜеҲ йҷӨзҡ„bootеҲҶеҢәзҡ„ж–№жі•
жң¬зҜҮеҶ…е®№дё»иҰҒи®Іи§ЈвҖңиҝҳеҺҹжҒўеӨҚCentOS 6иҜҜеҲ йҷӨзҡ„bootеҲҶеҢәзҡ„ж–№жі•вҖқпјҢж„ҹе…ҙи¶Јзҡ„жңӢеҸӢдёҚеҰЁжқҘзңӢзңӢгҖӮжң¬ж–Үд»Ӣз»Қзҡ„ж–№жі•ж“ҚдҪңз®ҖеҚ•еҝ«жҚ·пјҢе®һз”ЁжҖ§ејәгҖӮдёӢйқўе°ұи®©е°Ҹзј–жқҘеёҰеӨ§е®¶еӯҰд№ вҖңиҝҳеҺҹжҒўеӨҚCentOS 6иҜҜеҲ йҷӨзҡ„bootеҲҶеҢәзҡ„ж–№жі•вҖқеҗ§!
гҖҖгҖҖ1.йҰ–е…ҲеҲ©з”Ёcentos6й•ңеғҸиҝӣе…Ҙlinux rescueж•‘жҸҙжЁЎејҸгҖӮ
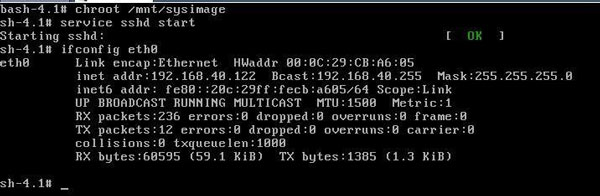
гҖҖгҖҖ2.еҗҜеҠЁsshdжңҚеҠЎпјҢжҹҘзңӢeth0иҺ·еҸ–зҡ„ipең°еқҖпјҢ然еҗҺз”Ёssh secure shell иҝһжҺҘгҖӮ
гҖҖгҖҖSSH Secure Shell 3.2.9 пјҲBuild 283пјү
гҖҖгҖҖCopyright пјҲcпјү 2000-2003 SSH Communications Security Corp - http://www.ssh.com/
гҖҖгҖҖThis copy of SSH Secure Shell is a non-commercial version.
гҖҖгҖҖThis version does not include PKI and PKCS #11 functionality.
гҖҖгҖҖпј»root@localhost ~пјҪ# cd /boot //иҝӣе…Ҙ/bootеҲҶеҢә
гҖҖгҖҖпј»root@localhost bootпјҪ# ls //жҹҘзңӢbootеҲҶеҢәзҡ„еҶ…е®№
гҖҖгҖҖconfig-2.6.32-71.el6.i686 symvers-2.6.32-71.el6.i686.gz
гҖҖгҖҖgrub System.map-2.6.32-71.el6.i686
гҖҖгҖҖinitramfs-2.6.32-71.el6.i686.img vmlinuz-2.6.32-71.el6.i686
гҖҖгҖҖпј»root@localhost bootпјҪ# cd гҖӮгҖӮ//иҝ”еӣһдёҠеұӮзӣ®еҪ•
гҖҖгҖҖпј»root@localhost /пјҪ# rm -rf /boot/*//еҲ йҷӨ/bootеҲҶеҢәжүҖжңүеҶ…е®№
гҖҖгҖҖпј»root@localhost /пјҪ# ls /boot//жҹҘзңӢ/bootеҲҶеҢәеҶ…е®№дёәз©ә
гҖҖгҖҖпј»root@localhost /пјҪ# mount /dev/sr0 /mnt//жҢӮиҪҪcdromи®ҫеӨҮеҲ°/mntзӣ®еҪ•дёӢ
гҖҖгҖҖmountпјҡ block device /dev/sr0 is write-protectedпјҢ mounting read-only
гҖҖгҖҖпј»root@localhost /пјҪ# rpm -ivh /mnt/Packages/kernel-2.6.32-71.el6.i686.rpm --root=/ --force //е®үиЈ…е…үзӣҳзҡ„kernelиҪҜ件еҢ…
гҖҖгҖҖPreparing.гҖӮгҖӮ ########################################### пј»100%пјҪ
гҖҖгҖҖ1:kernel ########################################### пј»100%пјҪ
гҖҖгҖҖпј»root@localhost /пјҪ# ls /boot //жҹҘзңӢ/bootеҲҶеҢәеҶ…е®№
гҖҖгҖҖconfig-2.6.32-71.el6.i686 System.map-2.6.32-71.el6.i686
гҖҖгҖҖinitramfs-2.6.32-71.el6.i686.img vmlinuz-2.6.32-71.el6.i686
гҖҖгҖҖsymvers-2.6.32-71.el6.i686.gz
гҖҖгҖҖпј»root@localhost /пјҪ# mkdir /boot/grub//еңЁ/bootзӣ®еҪ•ж–°е»әдёҖдёӘgrubзӣ®еҪ•
гҖҖгҖҖпј»root@localhost /пјҪ# touch /boot/grub/grub.conf//ж–°е»әдёҖдёӘgrub.confй…ҚзҪ®ж–Ү件
гҖҖгҖҖпј»root@localhost /пјҪ# cp -rf /usr/share/grub/i386-pc/* /boot/grub/ //жҠҠ/usr/share/grub/i386-pcзҡ„жүҖжңүеҶ…е®№жӢ·иҙқеҲ°/boot/grubдёӯгҖӮ
гҖҖгҖҖпј»root@localhost /пјҪ# ls /boot//жҹҘзңӢ/bootеҲҶеҢәеҶ…е®№
гҖҖгҖҖconfig-2.6.32-71.el6.i686 symvers-2.6.32-71.el6.i686.gz
гҖҖгҖҖgrub System.map-2.6.32-71.el6.i686
гҖҖгҖҖinitramfs-2.6.32-71.el6.i686.img vmlinuz-2.6.32-71.el6.i686
гҖҖгҖҖпј»root@localhost /пјҪ# ls /boot/grub/ //жҹҘзңӢ/boot/grubзӣ®еҪ•еҶ…е®№
гҖҖгҖҖe2fs_stage1_5 iso9660_stage1_5 stage1 vstafs_stage1_5
гҖҖгҖҖfat_stage1_5 jfs_stage1_5 stage2 xfs_stage1_5
гҖҖгҖҖffs_stage1_5 minix_stage1_5 stage2_eltorito
гҖҖгҖҖgrub.conf reiserfs_stage1_5 ufs2_stage1_5
гҖҖгҖҖпј»root@localhost /пјҪ# fdisk -l //жҹҘзңӢеҲҶеҢә
гҖҖгҖҖDisk /dev/sdaпјҡ 21.5 GBпјҢ 21474836480 bytes
гҖҖгҖҖ255 headsпјҢ 63 sectors/trackпјҢ 2610 cylinders
гҖҖгҖҖUnits = cylinders of 16065 * 512 = 8225280 bytes
гҖҖгҖҖSector size пјҲlogical/physicalпјүпјҡ 512 bytes / 512 bytes
гҖҖгҖҖI/O size пјҲminimum/optimalпјүпјҡ 512 bytes / 512 bytes
гҖҖгҖҖDisk identifierпјҡ 0x000b1db4
гҖҖгҖҖDevice Boot Start End Blocks Id System
гҖҖгҖҖ/dev/sda1 * 1 13 102400 83 Linux//иҝҷдёӘдёә/bootеҗҜеҠЁеҲҶеҢә
гҖҖгҖҖPartition 1 does not end on cylinder boundary.
гҖҖгҖҖ/dev/sda2 13 144 1048576 82 Linux swap / Solaris
гҖҖгҖҖPartition 2 does not end on cylinder boundary.
гҖҖгҖҖ/dev/sda3 144 2611 19819520 83 Linux //иҝҷдёӘдёә/ж №еҲҶеҢә
гҖҖгҖҖпј»root@localhost /пјҪ# mount//жҹҘзңӢжүҖжңүжҢӮиҪҪеҲҶеҢә
гҖҖгҖҖ/dev/sda3 on / type ext4 пјҲrwпјү//ж №еҲҶеҢә
гҖҖгҖҖ/dev/sda1 on /boot type ext4 пјҲrwпјү//bootеҲҶеҢәдёәsda1
гҖҖгҖҖdevpts on /dev/pts type devpts пјҲrwпјү
гҖҖгҖҖtmpfs on /dev/shm type tmpfs пјҲrwпјү
гҖҖгҖҖproc on /proc type proc пјҲrwпјү
гҖҖгҖҖsysfs on /sys type sysfs пјҲrwпјү
гҖҖгҖҖ/dev/sr0 on /mnt type iso9660 пјҲroпјү
гҖҖгҖҖпј»root@localhost /пјҪ# grub//еҗҜеҠЁgrub
гҖҖгҖҖProbing devices to guess BIOS drives. This may take a long time.
гҖҖгҖҖGNU GRUB version 0.97 пјҲ640K lower / 3072K upper memoryпјү
гҖҖгҖҖпј» Minimal BASH-like line editing is supported. For the first wordпјҢ TAB
гҖҖгҖҖlists possible command completions. Anywhere else TAB lists the possible
гҖҖгҖҖcompletions of a device/filename.пјҪ
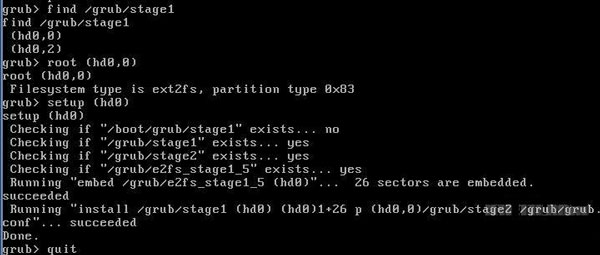
гҖҖгҖҖgrubгҖӢ root пјҲhd0пјҢ0пјү //йҰ–е…Ҳfind /grub/stage1жҹҘзңӢ/bootеҲҶеҢәдёәпјҲhd0пјҢ0пјү
гҖҖгҖҖroot пјҲhd0пјҢ0пјү//и®ҫзҪ®/bootеҲҶеҢәдёә/dev/sda1
гҖҖгҖҖFilesystem type is ext2fsпјҢ partition type 0x83
гҖҖгҖҖgrubгҖӢ setup пјҲhd0пјү//йҮҚж–°е®үиЈ…grub
гҖҖгҖҖsetup пјҲhd0пјү
гҖҖгҖҖChecking if вҖң/boot/grub/stage1вҖқ exists.гҖӮгҖӮ no
гҖҖгҖҖChecking if вҖң/grub/stage1вҖқ exists.гҖӮгҖӮ yes
гҖҖгҖҖChecking if вҖң/grub/stage2вҖқ exists.гҖӮгҖӮ yes
гҖҖгҖҖChecking if вҖң/grub/e2fs_stage1_5вҖқ exists.гҖӮгҖӮ yes
гҖҖгҖҖRunning вҖңembed /grub/e2fs_stage1_5 пјҲhd0пјүвҖқгҖӮгҖӮгҖӮ 26 sectors are embedded.
гҖҖгҖҖsucceeded
гҖҖгҖҖRunning вҖңinstall /grub/stage1 пјҲhd0пјү пјҲhd0пјү1+26 p пјҲhd0пјҢ0пјү/grub/stage2 /grub/grub.confвҖқгҖӮгҖӮгҖӮ succeeded
гҖҖгҖҖDone.
гҖҖгҖҖgrubгҖӢ quit//йҖҖеҮә
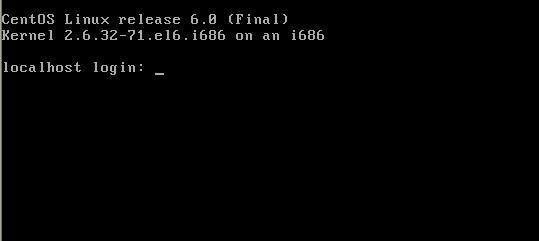
гҖҖгҖҖ3.йҮҚж–°rebootеҗҜеҠЁзі»з»ҹиҝӣе…Ҙgrubз•ҢйқўжөӢиҜ•

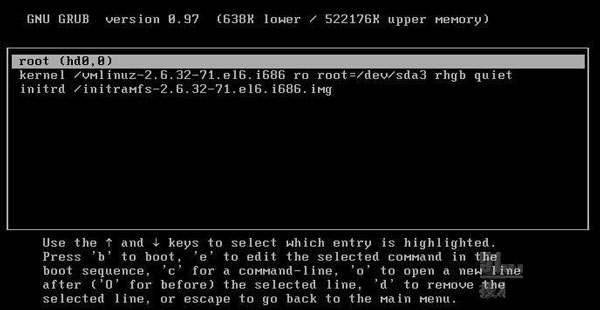
гҖҖгҖҖ4.жҹҘжүҫfind /grub/stage1然еҗҺжүҫеҲ°/bootеҲҶеҢәдёәпјҲhd0пјҢ0пјүпјҢжҢҮе®ҡkernelпјҢinitrdпјҢ bootеҗҜеҠЁзі»з»ҹжҲҗеҠҹгҖӮ

гҖҖгҖҖ5.зі»з»ҹеҗҜеҠЁжҲҗеҠҹпјҢ然еҗҺиҝӣе…Ҙзі»з»ҹйҮҚж–°еҶҷ/boot/grub/grub.confж–Ү件гҖӮ
гҖҖгҖҖ6.пј»root@localhost /пјҪ# vi /boot/grub/grub.confй…ҚзҪ®ж–Ү件еҰӮдёӢпјҡ
гҖҖгҖҖжңҖеҗҺеЎ«еҶҷgrub.confж–Ү件еҶ…е®№
гҖҖгҖҖdefault=0 //й»ҳи®ӨиҸңеҚ•дёә第дёҖдёӘ
гҖҖгҖҖtimeout=6//зӯүеҫ…ж—¶й—ҙдёә6з§’
гҖҖгҖҖtitle mylinux //еҗҜеҠЁж Үйўҳдёәmylinux
гҖҖгҖҖroot пјҲhd0пјҢ0пјү //bootжүҖеңЁеҲҶеҢәдёә/dev/sda1
гҖҖгҖҖkernel /vmlinuz-2.6.32-71.el6.i686 ro root=/dev/sda3 rhgb quiet//kernelжүҖеңЁдҪҚзҪ®д»ҘеҸӘиҜ»жЁЎејҸжҢӮиҪҪ/dev/sda3ж №еҲҶеҢәrhgb quietдёәе®үйқҷжЁЎејҸдёҚжҳҫзӨәеҶ…ж ёдҝЎжҒҜгҖӮ
гҖҖгҖҖinitrd /initramfs-2.6.32-71.el6.i686.img//еҠ иҪҪinitrdй•ңеғҸгҖӮ
гҖҖгҖҖ7.жңҖеҗҺиҝӣе…Ҙlinux rescueйҮҚе»әдёҖдёӘgrub
гҖҖгҖҖ8.жңҖеҗҺеҗҜеҠЁз•ҢйқўеҰӮдёӢ
еҲ°жӯӨпјҢзӣёдҝЎеӨ§е®¶еҜ№вҖңиҝҳеҺҹжҒўеӨҚCentOS 6иҜҜеҲ йҷӨзҡ„bootеҲҶеҢәзҡ„ж–№жі•вҖқжңүдәҶжӣҙж·ұзҡ„дәҶи§ЈпјҢдёҚеҰЁжқҘе®һйҷ…ж“ҚдҪңдёҖз•Әеҗ§пјҒиҝҷйҮҢжҳҜдәҝйҖҹдә‘зҪ‘з«ҷпјҢжӣҙеӨҡзӣёе…іеҶ…е®№еҸҜд»Ҙиҝӣе…Ҙзӣёе…ійў‘йҒ“иҝӣиЎҢжҹҘиҜўпјҢе…іжіЁжҲ‘们пјҢ继з»ӯеӯҰд№ пјҒ


