本篇文章为大家展示了使用Python怎么删除列表重复元素,内容简明扼要并且容易理解,绝对能使你眼前一亮,通过这篇文章的详细介绍希望你能有所收获。
python常用的库:1.requesuts;2.scrapy;3.pillow;4.twisted;5.numpy;6.matplotlib;7.pygama;8.ipyhton等。
一.如果已经有了一个列表l,令h=l,对l操作时同时会影响h,貌似原因是内存共享的,正确的方法是h=l.copy()
二.测试时,发现一个问题,如下面代码和结果:
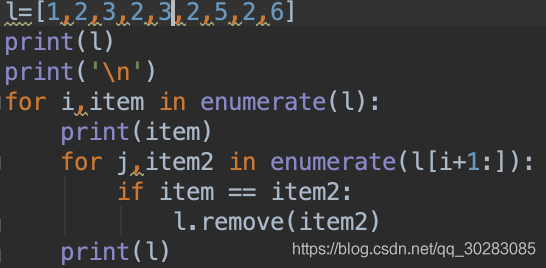
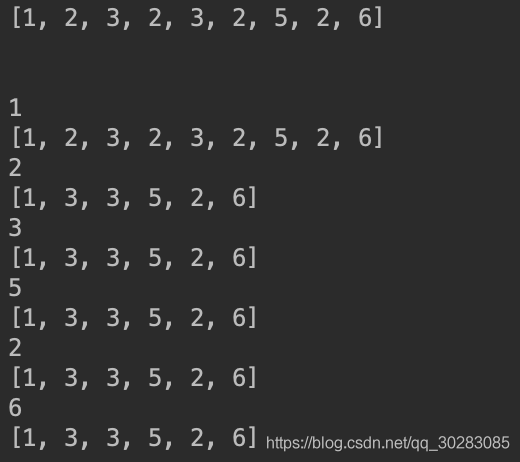
item=2时,并没有把2全部删掉,后面重复的3也没有删去。
**查阅一些资料后发现:list的遍历是基于下标的不是基于元素,你删掉一个元素后,列表就发生了变化,所有的元素都往前移动了一个位置,假设要删除重的2,一个列表中索引为4,对应的值为2,索引为5,对应的值为2,索引为6,对应的值为3,当前循环删掉索引4时对应的值2之后,索引4的值为2,索引5,值为3,下一次循环,本来要再删一个2,但此时索引为5对应的为3,就漏掉了一个2。
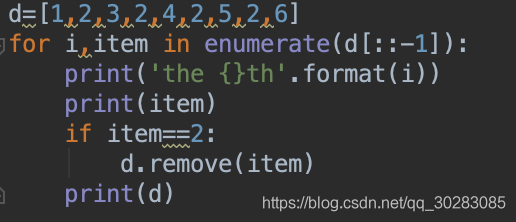
(1)倒序循环遍历:

(2)实际用的方法,判断到重复元素后,将那个item复制为0或‘0',相当于用一个标识符占住重复元素的位置,循环时先判断是否为‘0',最后通过
list = list(set(list))
list.remove('0')
即可
附图像去冗余算法,判断图像相似通过,感知哈希算法和三通道直方图,及图像尺寸
from img_similarity import runtwoImageSimilaryFun
import os
from PIL import Image
import shutil
import time
import numpy as np

def similar(path2, path3):
    img1 = Image.open(path2)
    img2 = Image.open(path3)
    w1 = img1.size[0] # 图片的宽
    h2 = img2.size[1]  # 图片的高
    w2 = img2.size[0] # 图片的宽
    h3 = img2.size[1]  # 图片的高
    w_err = abs(w1 - w2)/w1
    h_err = abs(h2 - h3)/h2
    if w_err > 0.1 or h_err >0.1:
        return 0
    else:
        phash, color_hist = runtwoImageSimilaryFun(path2, path3)
        if phash <=8 or color_hist >=0.9:
            return 1
        else:
            return 0


path = './crop_img'
result_imgdirs_path = './removed_repeat_img'
folderlist = os.listdir(path)
folderlist.sort()
for item in folderlist:
    folder_path = path + '/' + item
    new_folder_path = result_imgdirs_path + '/' + item
    os.makedirs(new_folder_path)

    imglist = os.listdir(folder_path)
    imglist.sort()

    time_start = time.time()

    for i,item1 in enumerate(imglist):
        if item1 == '0':
            continue
        path2 = folder_path + '/' + item1
        for j, item2 in enumerate(imglist[i + 1:]):
            if item2 == '0':
                continue
            path3 = folder_path + '/' + item2
            t = similar(path2, path3)
            if t:
                #将判断为相似的图片在trans_list中的名字置‘0',代表不需要复制
                imglist[i+j+1] = '0'

    imglist = list(set(imglist))
    imglist.remove('0')

    time_end = time.time()
    time_c = time_end - time_start
    print('{} similarity judgement list time cost {}s'.format(item, time_c))


    time_start = time.time()
    #移动图片
    for item3 in imglist:
        ori_img_path = folder_path + '/' + item3
        new_img_path = new_folder_path + '/' + item3
        shutil.copy(ori_img_path, new_img_path)

    time_end = time.time()
    time_c = time_end - time_start # 运行所花时间
    print('{} move image time cost {}s'.format(item, time_c))
img_similarity.py
import cv2
import numpy as np
from PIL import Image
import requests
from io import BytesIO
import matplotlib

matplotlib.use('TkAgg')
import matplotlib.pyplot as plt


def aHash(img):
    # 均值哈希算法
    # 缩放为8*8
    img = cv2.resize(img, (8, 8))
    # 转换为灰度图
    gray = cv2.cvtColor(img, cv2.COLOR_BGR2GRAY)
    # s为像素和初值为0,hash_str为hash值初值为''
    s = 0
    hash_str = ''
    # 遍历累加求像素和
    for i in range(8):
        for j in range(8):
            s = s + gray[i, j]
    # 求平均灰度
    avg = s / 64
    # 灰度大于平均值为1相反为0生成图片的hash值
    for i in range(8):
        for j in range(8):
            if gray[i, j] > avg:
                hash_str = hash_str + '1'
            else:
                hash_str = hash_str + '0'
    return hash_str


def dHash(img):
    # 差值哈希算法
    # 缩放8*8
    img = cv2.resize(img, (9, 8))
    # 转换灰度图
    gray = cv2.cvtColor(img, cv2.COLOR_BGR2GRAY)
    hash_str = ''
    # 每行前一个像素大于后一个像素为1,相反为0,生成哈希
    for i in range(8):
        for j in range(8):
            if gray[i, j] > gray[i, j + 1]:
                hash_str = hash_str + '1'
            else:
                hash_str = hash_str + '0'
    return hash_str


def pHash(img):
    # 感知哈希算法
    # 缩放32*32
    img = cv2.resize(img, (32, 32))  # , interpolation=cv2.INTER_CUBIC
    # 转换为灰度图
    gray = cv2.cvtColor(img, cv2.COLOR_BGR2GRAY)
    # 将灰度图转为浮点型,再进行dct变换
    dct = cv2.dct(np.float32(gray))
    # opencv实现的掩码操作
    dct_roi = dct[0:8, 0:8]

    hash = []
    avreage = np.mean(dct_roi)
    for i in range(dct_roi.shape[0]):
        for j in range(dct_roi.shape[1]):
            if dct_roi[i, j] > avreage:
                hash.append(1)
            else:
                hash.append(0)
    return hash


def calculate(image1, image2):
    # 灰度直方图算法
    # 计算单通道的直方图的相似值
    hist1 = cv2.calcHist([image1], [0], None, [256], [0.0, 255.0])
    hist2 = cv2.calcHist([image2], [0], None, [256], [0.0, 255.0])
    # 计算直方图的重合度
    degree = 0
    for i in range(len(hist1)):
        if hist1[i] != hist2[i]:
            degree = degree + \
                     (1 - abs(hist1[i] - hist2[i]) / max(hist1[i], hist2[i]))
        else:
            degree = degree + 1
    degree = degree / len(hist1)
    return degree


def classify_hist_with_split(image1, image2, size=(256, 256)):
    # RGB每个通道的直方图相似度
    # 将图像resize后,分离为RGB三个通道,再计算每个通道的相似值
    image1 = cv2.resize(image1, size)
    image2 = cv2.resize(image2, size)
    sub_image1 = cv2.split(image1)
    sub_image2 = cv2.split(image2)
    sub_data = 0
    for im1, im2 in zip(sub_image1, sub_image2):
        sub_data += calculate(im1, im2)
    sub_data = sub_data / 3
    return sub_data


def cmpHash(hash2, hash3):
    # Hash值对比
    # 算法中1和0顺序组合起来的即是图片的指纹hash。顺序不固定,但是比较的时候必须是相同的顺序。
    # 对比两幅图的指纹,计算汉明距离,即两个64位的hash值有多少是不一样的,不同的位数越小,图片越相似
    # 汉明距离:一组二进制数据变成另一组数据所需要的步骤,可以衡量两图的差异,汉明距离越小,则相似度越高。汉明距离为0,即两张图片完全一样
    n = 0
    # hash长度不同则返回-1代表传参出错
    if len(hash2) != len(hash3):
        return -1
    # 遍历判断
    for i in range(len(hash2)):
        # 不相等则n计数+1,n最终为相似度
        if hash2[i] != hash3[i]:
            n = n + 1
    return n


def getImageByUrl(url):
    # 根据图片url 获取图片对象
    html = requests.get(url, verify=False)
    image = Image.open(BytesIO(html.content))
    return image


def PILImageToCV():
    # PIL Image转换成OpenCV格式
    path = "/Users/waldenz/Documents/Work/doc/TestImages/t3.png"
    img = Image.open(path)
    plt.subplot(121)
    plt.imshow(img)
    print(isinstance(img, np.ndarray))
    img = cv2.cvtColor(np.asarray(img), cv2.COLOR_RGB2BGR)
    print(isinstance(img, np.ndarray))
    plt.subplot(122)
    plt.imshow(img)
    plt.show()


def CVImageToPIL():
    # OpenCV图片转换为PIL image
    path = "/Users/waldenz/Documents/Work/doc/TestImages/t3.png"
    img = cv2.imread(path)
    # cv2.imshow("OpenCV",img)
    plt.subplot(121)
    plt.imshow(img)

    img2 = Image.fromarray(cv2.cvtColor(img, cv2.COLOR_BGR2RGB))
    plt.subplot(122)
    plt.imshow(img2)
    plt.show()


def bytes_to_cvimage(filebytes):
    # 图片字节流转换为cv image
    image = Image.open(filebytes)
    img = cv2.cvtColor(np.asarray(image), cv2.COLOR_RGB2BGR)
    return img


def runAllImageSimilaryFun(para1, para2):
    # 均值、差值、感知哈希算法三种算法值越小,则越相似,相同图片值为0
    # 三直方图算法和单通道的直方图 0-1之间,值越大,越相似。 相同图片为1
    # t1,t2   14;19;10;  0.70;0.75
    # t1,t3   39 33 18   0.58 0.49
    # s1,s2  7 23 11     0.83 0.86  挺相似的图片
    # c1,c2  11 29 17    0.30 0.31

    if para1.startswith("http"):
        # 根据链接下载图片,并转换为opencv格式
        img1 = getImageByUrl(para1)
        img1 = cv2.cvtColor(np.asarray(img1), cv2.COLOR_RGB2BGR)

        img2 = getImageByUrl(para2)
        img2 = cv2.cvtColor(np.asarray(img2), cv2.COLOR_RGB2BGR)
    else:
        # 通过imread方法直接读取物理路径
        img1 = cv2.imread(para1)
        img2 = cv2.imread(para2)

    hash2 = aHash(img1)
    hash3 = aHash(img2)
    n1 = cmpHash(hash2, hash3)
    print('均值哈希算法相似度aHash:', n1)

    hash2 = dHash(img1)
    hash3 = dHash(img2)
    n2 = cmpHash(hash2, hash3)
    print('差值哈希算法相似度dHash:', n2)

    hash2 = pHash(img1)
    hash3 = pHash(img2)
    n3 = cmpHash(hash2, hash3)
    print('感知哈希算法相似度pHash:', n3)

    n4 = classify_hist_with_split(img1, img2)
    print('三直方图算法相似度:', n4)

    n5 = calculate(img1, img2)
    print("单通道的直方图", n5)
    print("%d %d %d %.2f %.2f " % (n1, n2, n3, round(n4[0], 2), n5[0]))
    print("%.2f %.2f %.2f %.2f %.2f " % (1 - float(n1 / 64), 1 -
                                         float(n2 / 64), 1 - float(n3 / 64), round(n4[0], 2), n5[0]))

    plt.subplot(121)
    plt.imshow(Image.fromarray(cv2.cvtColor(img1, cv2.COLOR_BGR2RGB)))
    plt.subplot(122)
    plt.imshow(Image.fromarray(cv2.cvtColor(img2, cv2.COLOR_BGR2RGB)))
    plt.show()


def runtwoImageSimilaryFun(para1, para2):
    # 均值、差值、感知哈希算法三种算法值越小,则越相似,相同图片值为0
    # 三直方图算法和单通道的直方图 0-1之间,值越大,越相似。 相同图片为1
    # t1,t2   14;19;10;  0.70;0.75
    # t1,t3   39 33 18   0.58 0.49
    # s1,s2  7 23 11     0.83 0.86  挺相似的图片
    # c1,c2  11 29 17    0.30 0.31

    if para1.startswith("http"):
        # 根据链接下载图片,并转换为opencv格式
        img1 = getImageByUrl(para1)
        img1 = cv2.cvtColor(np.asarray(img1), cv2.COLOR_RGB2BGR)

        img2 = getImageByUrl(para2)
        img2 = cv2.cvtColor(np.asarray(img2), cv2.COLOR_RGB2BGR)
    else:
        # 通过imread方法直接读取物理路径
        img1 = cv2.imread(para1)
        img2 = cv2.imread(para2)


    hash2 = pHash(img1)
    hash3 = pHash(img2)
    n3 = cmpHash(hash2, hash3)

    n4 = classify_hist_with_split(img1, img2)

    return n3, n4


if __name__ == "__main__":
    p1 = '/Users/Desktop/11/24.jpeg'
    p2 = '/Users/Desktop/11/25.jpeg'
    runAllImageSimilaryFun(p1, p2)
上述内容就是使用Python怎么删除列表重复元素,你们学到知识或技能了吗?如果还想学到更多技能或者丰富自己的知识储备,欢迎关注亿速云行业资讯频道。
免责声明:本站发布的内容(图片、视频和文字)以原创、转载和分享为主,文章观点不代表本网站立场,如果涉及侵权请联系站长邮箱:is@yisu.com进行举报,并提供相关证据,一经查实,将立刻删除涉嫌侵权内容。


