这篇文章给大家介绍怎么在springboot中使用shardingjdbc实现分库分表,内容非常详细,感兴趣的小伙伴们可以参考借鉴,希望对大家能有所帮助。
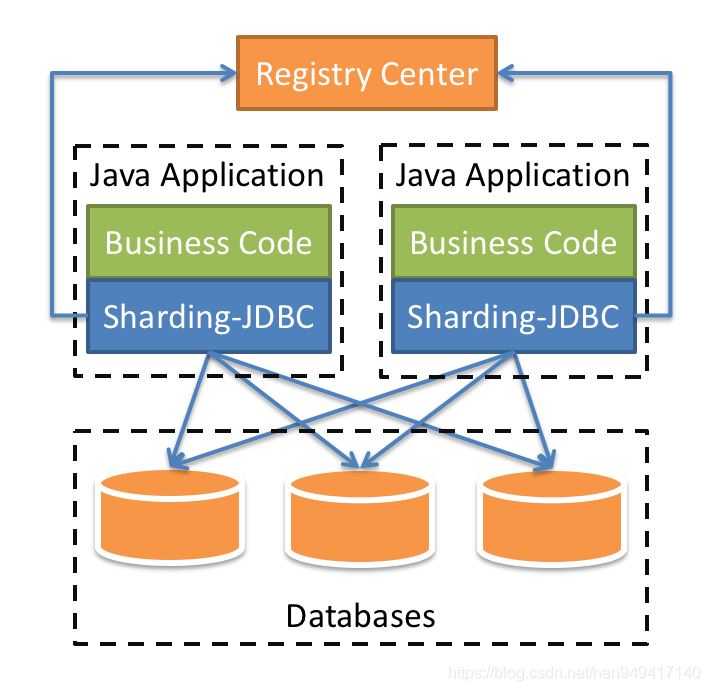
ShardingSphere-JDBC定位为轻量级 Java 框架,在 Java 的 JDBC 层提供的额外服务。 它使用客户端直连数据库,以 jar 包形式提供服务,无需额外部署和依赖,可理解为增强版的 JDBC 驱动,完全兼容 JDBC 和各种 ORM 框架。
适用于任何基于 JDBC 的 ORM 框架,如:JPA, Hibernate, Mybatis, Spring JDBC Template 或直接使用 JDBC。
支持任何第三方的数据库连接池,如:DBCP, C3P0, BoneCP, Druid, HikariCP 等。
支持任意实现 JDBC 规范的数据库,目前支持 MySQL,Oracle,SQLServer,PostgreSQL 以及任何遵循 SQL92 标准的数据库。

| 名称 | ShardingSphere-JDBC | ShardingSphere-Proxy | ShardingSphere-Sidecar |
|---|---|---|---|
| 数据库 | 任意 | MySQL/PostgreSQL | MySQL/PostgreSQL |
| 连接消耗数 | 高 | 低 | 高 |
| 异构语言 | 仅 Java | 任意 | 任意 |
| 性能 | 损耗低 | 损耗略高 | 损耗低 |
| 无中心化 | 是 | 否 | 是 |
| 静态入口 | 无 | 有 | 无 |
随着时间和业务的发展,造成表里面的数据越来越多,如果再去对数据库表curd操作,很容易造成性能问题。为了解决由于数据量过大而造成数据库性能降低的问题,常见的解决方案如下:
从硬件上增加数据库服务器的存储,
分库分表处理
分库分表又可以分为水平分表、水平分库、垂直分表、垂直分库
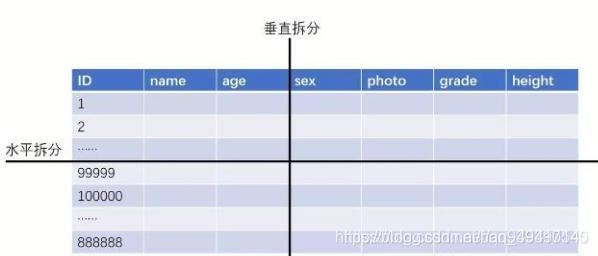
水平分表
特点:
每个表的结构都一样;
每个表的数据都不一样,没有交集;
所有表的并集是该表的全量数据;场景:单表的数据量过大或增长速度很快,已经影响或即将会影响SQL查询效率,加重了CPU负担,提前到达瓶颈。
水平分库
特点:
每个库的结构都一样;
每个库的数据都不一样,没有交集;
所有库的并集是全量数据;场景:系统绝对并发量上来了,CPU内存压力大。分表难以根本上解决量的问题,并且还没有明显的业务归属来垂直分库,主库磁盘接近饱和。
垂直分表
特点:
每个表的结构都不一样;
每个表的数据也不一样,
有一个关联字段,一般是主键或外键,用于关联兄弟表数据;
所有兄弟表的并集是该表的全量数据;场景:
有几个字段属于热点字段,更新频率很高,要把这些字段单独切到一张表里,不然innodb行锁很恶心的
有大字段,如text,存储压力很大,毕竟innodb数据和索引是同一个文件;同时,我又喜欢用SELECT *,你懂得,这磁盘IO消耗的,跟玩儿似的,谁都扛不住的。
垂直分库
纵向切库基于表进行切分,类似多数据源,通常是把新的业务模块或集成公共模块拆分出去,比如我们最熟悉的单点登录、鉴权模块。
我们知道分库分表是针对某些数据量持续大幅增长的表,比如用户表、订单表等,而不是一刀切将全部表都做分片。那么不分片的表和分片的表如何划分,一般有两种解决方案。
严格划分功能库,分片的库与不分片的库剥离开,业务代码中按需切换数据源访问
默认数据源,以 Sharding-JDBC 为例,不给未分片表设置分片规则,它们就不会执行,因为找不到路由规则,如果我们设置一个默认数据源,在找不到规则时一律访问默认库。
# 配置数据源 m1
spring.shardingsphere.datasource.name=m1
spring.shardingsphere.datasource.m1.type=com.alibaba.druid.pool.DruidDataSource
spring.shardingsphere.datasource.m1.driverClassName=com.mysql.jdbc.Driver
spring.shardingsphere.datasource.m1.url=jdbc:mysql://xxxx:3306/sharding_db-1?useUnicode=true&characterEncoding=utf8&tinyInt1isBit=false&useSSL=false&serverTimezone=GMT
spring.shardingsphere.datasource.m1.username=root
spring.shardingsphere.datasource.m1.password=xxxx
# 默认数据源,未分片的表默认执行库
spring.shardingsphere.sharding.default-data-source-name=m1
SpringBoot2.3.8.RELEASE
MyBatis-Plus3.4.0
Sharding-JDBC
Druid连接池
<!-- shardingjdbc依赖包 --> <dependency> <groupId>org.apache.shardingsphere</groupId> <artifactId>sharding-jdbc-spring-boot-starter</artifactId> <version>4.1.1</version> </dependency> <!-- 连接池 --> <dependency> <groupId>com.alibaba</groupId> <artifactId>druid</artifactId> <version>1.2.5</version> </dependency> <!-- 分布式事务所需包 --> <!-- 使用 XA 事务时,需要引入此模块 --> <dependency> <groupId>org.apache.shardingsphere</groupId> <artifactId>sharding-transaction-xa-core</artifactId> <version>4.1.1</version> </dependency> <!-- <!– 使用 BASE 事务时,需要引入此模块 –>--> <!-- <dependency>--> <!-- <groupId>org.apache.shardingsphere</groupId>--> <!-- <artifactId>sharding-transaction-base-seata-at</artifactId>--> <!-- <version>4.1.1</version>--> <!-- </dependency>--> <!-- <!– https://mvnrepository.com/artifact/io.seata/seata-core –>--> <!-- <dependency>--> <!-- <groupId>io.seata</groupId>--> <!-- <artifactId>seata-core</artifactId>--> <!-- <version>1.4.2</version>--> <!-- </dependency>-->
注意:如果原有项目引入了 druid包 以及多数据源包dynamic-datasource-spring-boot-starter,需要注释掉相关引用
  <!-- https://mvnrepository.com/artifact/com.baomidou/dynamic-datasource-spring-boot-starter -->
<!--        <dependency>-->
<!--            <groupId>com.baomidou</groupId>-->
<!--            <artifactId>dynamic-datasource-spring-boot-starter</artifactId>-->
<!--            <version>3.1.0</version>-->
<!--        </dependency>-->
<!--        <dependency>-->
<!--            <groupId>com.alibaba</groupId>-->
<!--            <artifactId>druid-spring-boot-starter</artifactId>-->
<!--        </dependency>-->
@SpringBootApplication(exclude = {DruidDataSourceAutoConfigure.class})分片表ORM映射实体类注释表名映射
数据库链接账号赋予分布式事务XA权限
GRANT XA_RECOVER_ADMIN ON *.* TO root@'%'
配置springboot数据源健康检查sql(可选)
package com.yss.datamiddle.config;

import org.springframework.beans.factory.ObjectProvider;
import org.springframework.boot.actuate.autoconfigure.jdbc.DataSourceHealthContributorAutoConfiguration;
import org.springframework.boot.actuate.health.AbstractHealthIndicator;
import org.springframework.boot.actuate.jdbc.DataSourceHealthIndicator;
import org.springframework.boot.jdbc.metadata.DataSourcePoolMetadataProvider;
import org.springframework.context.annotation.Configuration;
import org.springframework.jdbc.datasource.lookup.AbstractRoutingDataSource;
import org.springframework.util.StringUtils;

import javax.sql.DataSource;
import java.util.Map;

/**
 * @description: 重写健康检查sql,解决项目启动健康检查异常
 * @author: Han LiDong
 * @create: 2021/5/28 14:40
 * @update: 2021/5/28 14:40
 */
@Configuration
public class DataSourceHealthConfig extends DataSourceHealthContributorAutoConfiguration {

    private static final String defaultQuery = "select 1";

    public DataSourceHealthConfig(Map<String, DataSource> dataSources, ObjectProvider<DataSourcePoolMetadataProvider> metadataProviders) {
        super(dataSources, metadataProviders);
    }

    @Override
    protected AbstractHealthIndicator createIndicator(DataSource source) {
        DataSourceHealthIndicator indicator = (DataSourceHealthIndicator) super.createIndicator(source);
        if (!StringUtils.hasText(indicator.getQuery())) {
            indicator.setQuery(defaultQuery);
        }
        return indicator;
    }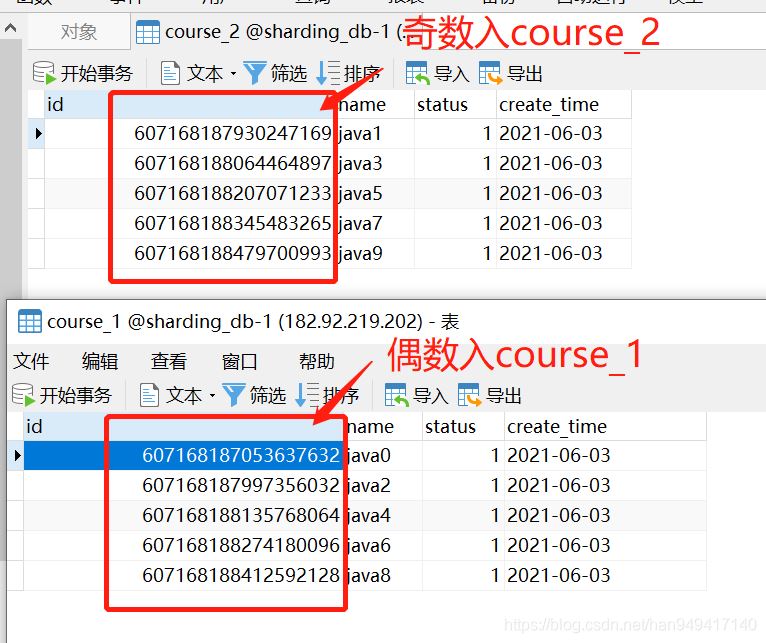
}创建表单course_1,course_2
约定规则:如果添加的主键ID是偶数把数据添加进course_1表,如果是奇数添加进course_2表
-- ----------------------------
-- Table structure for course_1
-- ----------------------------
DROP TABLE IF EXISTS `course_1`;
CREATE TABLE `course_1`  (
  `id` bigint(20) NOT NULL,
  `name` varchar(255) CHARACTER SET utf8 COLLATE utf8_general_ci DEFAULT NULL COMMENT '课程名称',
  `status` int(255) DEFAULT NULL COMMENT '状态',
  `create_time` date DEFAULT NULL COMMENT '创建日期',
  PRIMARY KEY (`id`) USING BTREE
) ENGINE = InnoDB CHARACTER SET = utf8 COLLATE = utf8_general_ci ROW_FORMAT = Dynamic;

-- ----------------------------
-- Table structure for course_2
-- ----------------------------
DROP TABLE IF EXISTS `course_2`;
CREATE TABLE `course_2`  (
  `id` bigint(20) NOT NULL,
  `name` varchar(255) CHARACTER SET utf8 COLLATE utf8_general_ci DEFAULT NULL COMMENT '课程名称',
  `status` int(255) DEFAULT NULL COMMENT '状态',
  `create_time` date DEFAULT NULL COMMENT '创建日期',
  PRIMARY KEY (`id`) USING BTREE
) ENGINE = InnoDB CHARACTER SET = utf8 COLLATE = utf8_general_ci ROW_FORMAT = Dynamic;
application-table-horizontal.yml配置分表规则
#水平分表配置
spring:
main:
#允许名称相同的bean的覆盖(一个实体类对应多张表)
allow-bean-definition-overriding: true
shardingsphere:
props:
sql:
show: true
datasource:
# 数据源名称,多数据源以逗号分隔(m1,m2)
names: m1
#names定义的数据源名称作为key(key不能包含下划线,否则无法识别配置)
m1:
url: jdbc:mysql://182.92.219.202:3306/sharding_db-1?useUnicode=true&characterEncoding=utf8&zeroDateTimeBehavior=convertToNull&useSSL=true&serverTimezone=GMT%2B8
username: root
password: xxxx
driver-class-name: com.mysql.cj.jdbc.Driver
# 数据库连接池类名称 com.alibaba.druid.pool.DruidDataSource com.zaxxer.hikari.HikariDataSource
type: com.alibaba.druid.pool.DruidDataSource
# rules:
sharding:
tables:
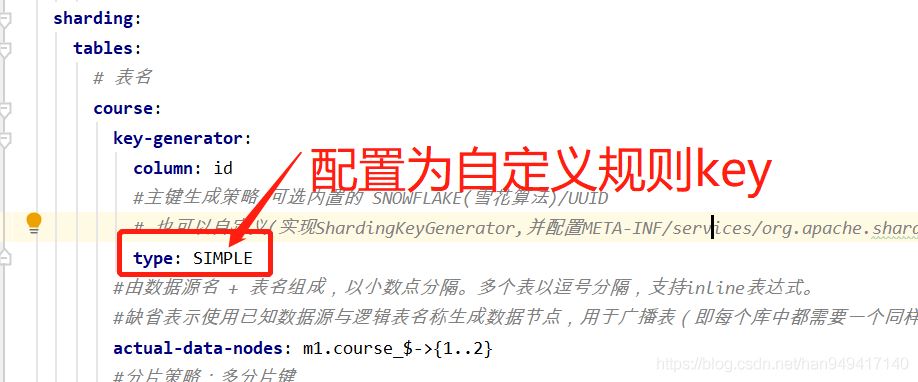
course:
key-generator:
column: id
#主键生成策略 可选内置的 SNOWFLAKE(雪花算法)/UUID
# 也可以自定义(实现ShardingKeyGenerator,并配置META-INF/services/org.apache.shardingsphere.spi.keygen.ShardingKeyGenerator) SIMPLE
type: SNOWFLAKE
# 由数据源名 + 表名组成,以小数点分隔。多个表以逗号分隔,支持inline表达式。缺省表示使用已知数据源与逻辑表名称生成数据节点,用于广播表(即每个库中都需要一个同样的表用于关联查询,多为字典表)或只分库不分表且所有库的表结构完全一致的情况
actual-data-nodes: m1.course_$->{1..2}
#分库策略:单分片键
table-strategy:
inline:
#分片键
sharding-column: id
#数据分片规则(ID是偶数把数据添加入course_1,奇数入course_2)
algorithm-expression: course_$->{id % 2 + 1}测试-分表-新增
 /**
     * 测试分表-新增
     */
    @Test
    public void addCourse() {
        for (int i = 0; i < 10; i++) {
            Course course = new Course();
            course.setName("java" + i);
            course.setStatus(1);
            course.setCreateTime(new Date());
            courseMapper.insert(course);
        }
    }
测试-分表-查询
/**
     * 查询分表数据
     */
    @Test
    public void findCourse() {
		//分区字段查询数据:精准匹配分片表,不会去别的表中扫描数据
       Course course = courseMapper.selectById(Long.valueOf("607168187053637632"));
        log.info(course.toString());

      //非分区字段查询:全表匹配,汇总结果
        QueryWrapper<Course> queryWrapper2 = new QueryWrapper<Course>();
        queryWrapper2.between("create_time",
                DateUtil.stringToDate("2021-01-26 11:39:05"),
                DateUtil.stringToDate("2021-07-26 11:39:05"));
        List<Course> list2 = courseMapper.selectList(queryWrapper2);
        log.info("数据量{}",list2.size());

    }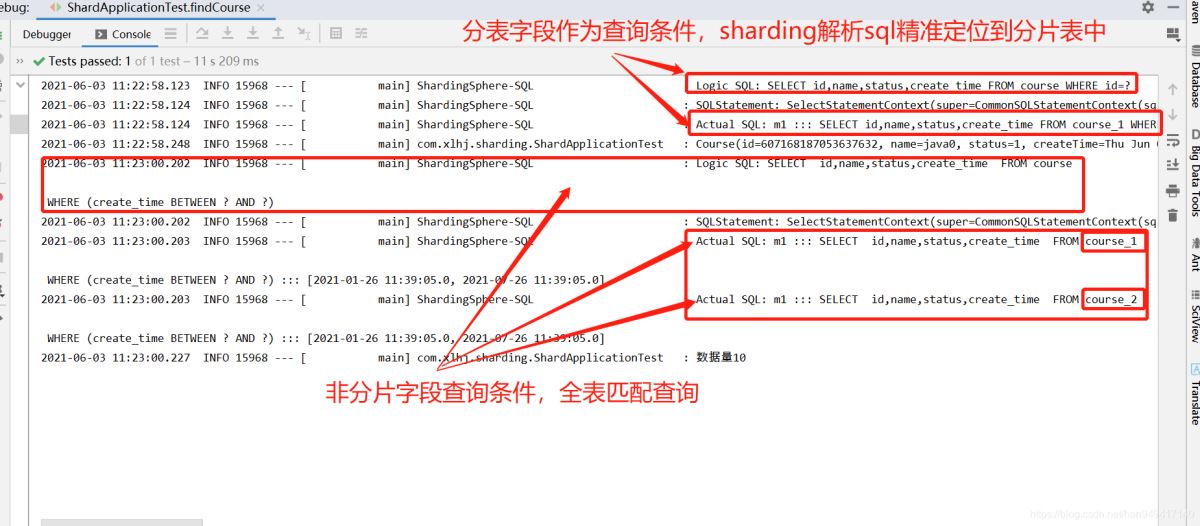
由上可以看出分片字段作为查询条件时,请准定位分片数据所在分片表。非分片字段查询时,全表匹配,汇总结果
自定义分布式主键生成算法
实现ShardingKeyGenerator接口,自定义分布式主键生成算法
import lombok.Data;
import lombok.Getter;
import lombok.Setter;
import org.apache.shardingsphere.spi.keygen.ShardingKeyGenerator;
import org.springframework.stereotype.Component;

import java.util.Properties;
import java.util.concurrent.atomic.AtomicLong;

/**
 * @description: 自定义sharding-jdbc主键生成算法
 * @author: Han LiDong
 * @create: 2021/5/25 09:36
 * @update: 2021/5/25 09:36
 */
@Component
public class SimpleShardingKeyGenerator implements ShardingKeyGenerator {

    private AtomicLong atomic = new AtomicLong(0);

    @Getter
    @Setter
    private Properties properties = new Properties();

	/**
	 * 分布式主键实现算法。
	 */
    @Override
    public Comparable<?> generateKey() {
        return atomic.incrementAndGet();
    }

    @Override
    public String getType() {
        //声明类型,需要在配置文件中配置此key
        return "SIMPLE";
    }
}
resources下配置META-INF/services/org.apache.shardingsphere.spi.keygen.ShardingKeyGenerator
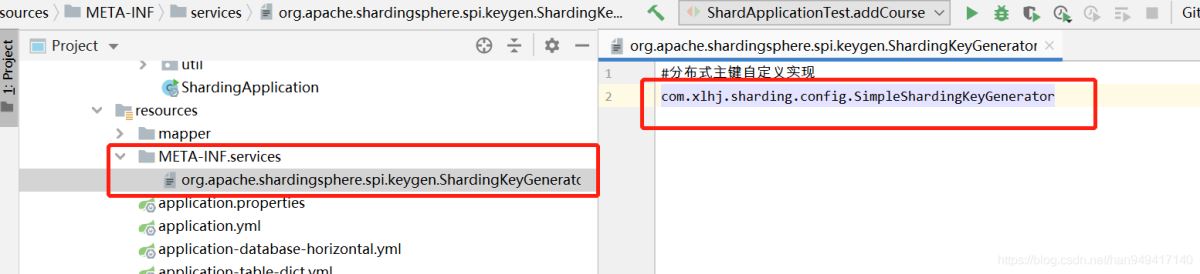
配置主键生成策略为自定义key
创建course_202101到course_202108表单
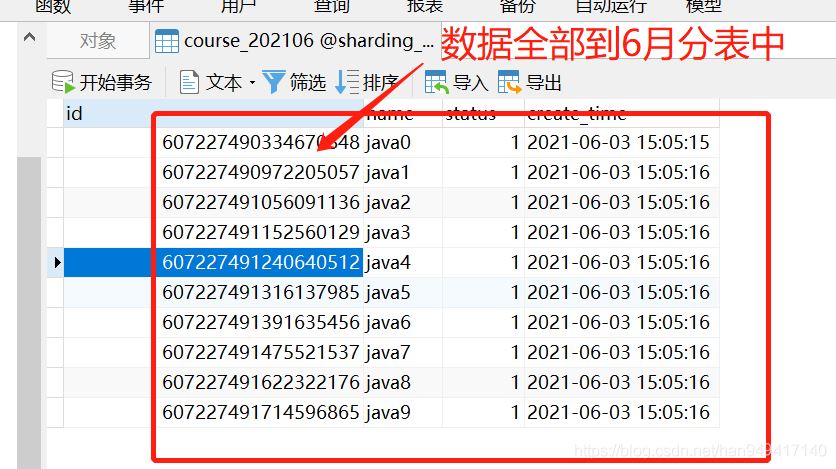
约定规则:按照创建时间对应的yyyyMM将数据分片到不同的表中
-- ----------------------------
-- 表名自己调整,创建202101-202112的表单
-- ----------------------------
DROP TABLE IF EXISTS `course_202101`;
CREATE TABLE `course_202101`  (
  `id` bigint(20) NOT NULL,
  `name` varchar(255) CHARACTER SET utf8 COLLATE utf8_general_ci DEFAULT NULL COMMENT '课程名称',
  `status` int(255) DEFAULT NULL COMMENT '状态',
  `create_time` datetime(0) DEFAULT NULL COMMENT '创建日期',
  PRIMARY KEY (`id`) USING BTREE
) ENGINE = InnoDB CHARACTER SET = utf8 COLLATE = utf8_general_ci ROW_FORMAT = Dynamic;
application-table-time-horizontal.yml配置月份分表规则
#按照月份自定义水平分表策略配置
spring:
  main:
    allow-bean-definition-overriding: true
  shardingsphere:
    props:
      sql:
        show: true
    datasource:
      # 数据源名称,多数据源以逗号分隔
      names: m1
      m1:
        password: xxxx
        url: jdbc:mysql://182.92.219.202:3306/sharding_db-1?useUnicode=true&characterEncoding=utf8&zeroDateTimeBehavior=convertToNull&useSSL=true&serverTimezone=GMT%2B8
        username: root
        driver-class-name: com.mysql.cj.jdbc.Driver
        # 数据库连接池类名称  com.alibaba.druid.pool.DruidDataSource  com.zaxxer.hikari.HikariDataSource
        type: com.alibaba.druid.pool.DruidDataSource
#    rules:
    sharding:
      tables:
        course:
          key-generator:
            column: id
            #主键生成策略 可选内置的 SNOWFLAKE(雪花算法)/UUID
            type: SNOWFLAKE
          ##配置 t_order 表规则  ->{a..b}  a必须存在,否则分布式主键无法获取
          actual-data-nodes: m1.course_$->{2021..2200}0$->{1..9},m1.course_$->{2021..2200}$->{10..12}
          table-strategy:
            standard:
              #精确分片算法类名称,用于 = 和 IN。该类需实现PreciseShardingAlgorithm 接口并提供无参数的构造器
              precise-algorithm-class-name: com.xlhj.sharding.config.CoursePreciseShardingAlgorithm
              # 范围分片算法类名称,用于 BETWEEN,可选。该类需实现RangeShardingAlgorithm 接口并提供无参数的构造器
              range-algorithm-class-name: com.xlhj.sharding.config.TableRangeShardAlgorithm
              # 分片字段
              sharding-column: create_time
精准分片算法实现
package com.xlhj.sharding.config;

import com.xlhj.sharding.util.DateUtil;
import org.apache.shardingsphere.api.sharding.standard.PreciseShardingAlgorithm;
import org.apache.shardingsphere.api.sharding.standard.PreciseShardingValue;
import org.springframework.stereotype.Component;

import java.util.Collection;
import java.util.Date;

/**
 * @description: 精准分片算法类
 * @author: Han LiDong
 * @create: 2021/5/25 10:32
 * @update: 2021/5/25 10:32
 */
@Component
public class CoursePreciseShardingAlgorithm implements PreciseShardingAlgorithm<Date> {

    /**
     * 按照 tablename_yyyyMM进行分表 用于 = in等
     * @param collection
     * @param preciseShardingValue
     * @return
     */
    @Override
    public String doSharding(Collection<String> collection, PreciseShardingValue<Date> preciseShardingValue) {
        StringBuffer tableName = new StringBuffer();
        tableName.append(preciseShardingValue.getLogicTableName())
                .append("_").append(DateUtil.dateToString(preciseShardingValue.getValue(),"yyyyMM");
        return tableName.toString();
    }
}
范围分片算法实现
package com.xlhj.sharding.config;

import com.google.common.collect.Range;
import com.xlhj.sharding.util.DateUtil;
import org.apache.shardingsphere.api.sharding.standard.RangeShardingAlgorithm;
import org.apache.shardingsphere.api.sharding.standard.RangeShardingValue;
import org.springframework.stereotype.Component;

import java.text.ParseException;
import java.text.SimpleDateFormat;
import java.util.*;
import java.util.stream.Collectors;

/**
 * @description: 范围分片算法类 用于 BETWEEN等
 * @author: Han LiDong
 * @create: 2021/5/25 10:32
 * @update: 2021/5/25 10:32
 */
@Component
public class TableRangeShardAlgorithm implements RangeShardingAlgorithm<Date> {


    private static SimpleDateFormat sf = new SimpleDateFormat("yyyy-MM-dd HH:mm:ss");

    /**
     * 分片键日期范围包含分片表名称集合
     * @param availableTargetNames
     * @param rangeShardingValue
     * @return
     */
    public Collection<String> doSharding(Collection<String> availableTargetNames, RangeShardingValue<Date> rangeShardingValue) {
        System.out.println("范围-*-*-*-*-*-*-*-*-*-*-*---------------" + availableTargetNames);
        System.out.println("范围-*-*-*-*-*-*-*-*-*-*-*---------------" + rangeShardingValue);
        //物理表名集合
        //Collection<String> tables = new LinkedHashSet<>();
        //逻辑表名
        String logicTableName = rangeShardingValue.getLogicTableName();
        //分片键的值
        Range<Date> valueRange = rangeShardingValue.getValueRange();
        Date lowerEndpoint = valueRange.lowerEndpoint();

        Date upperEndpoint = valueRange.upperEndpoint();
        List<String> YMList = DateUtil.getYMBetweenDate(lowerEndpoint,upperEndpoint);
        List<String> tables = YMList.stream().map( ym ->{
            return logicTableName + "_" + ym;
        }).collect(Collectors.toList());
        return tables;
    }

}
测试-日期分表-新增
/**
     * 测试分表
     */
    @Test
    public void addCourse() {
        for (int i = 0; i < 10; i++) {
            Course course = new Course();
            course.setName("java" + i);
            course.setStatus(1);
            course.setCreateTime(new Date());
            courseMapper.insert(course);
        }
    }
继续使用course_1、course_2表单
约定规则:如果添加的主键ID是偶数把数据添加进course_1表,如果是奇数添加进course_2表
application-table-horizontal-columns.yml配置多分片键分表规则
#水平分表配置
spring:
  main:
    #允许名称相同的bean的覆盖(一个实体类对应多张表)
    allow-bean-definition-overriding: true
  shardingsphere:
    props:
      sql:
        show: true
    datasource:
      # 数据源名称,多数据源以逗号分隔
      names: m1
      # names定义的数据源名称作为key(key不能包含下划线,否则无法识别配置)
      m1:
        url: jdbc:mysql://182.92.219.202:3306/sharding_db-1?useUnicode=true&characterEncoding=utf8&zeroDateTimeBehavior=convertToNull&useSSL=true&serverTimezone=GMT%2B8
        username: root
        password: xxxx
        driver-class-name: com.mysql.cj.jdbc.Driver
        # 数据库连接池类名称  com.alibaba.druid.pool.DruidDataSource  com.zaxxer.hikari.HikariDataSource
        type: com.alibaba.druid.pool.DruidDataSource
    sharding:
      tables:
        # 表名
        course:
          key-generator:
            column: id
            #主键生成策略 可选内置的 SNOWFLAKE(雪花算法)/UUID
            # 也可以自定义(实现ShardingKeyGenerator,并配置META-INF/services/org.apache.shardingsphere.spi.keygen.ShardingKeyGenerator) SIMPLE
            type: SIMPLE
          #由数据源名 + 表名组成,以小数点分隔。多个表以逗号分隔,支持inline表达式。
          #缺省表示使用已知数据源与逻辑表名称生成数据节点,用于广播表(即每个库中都需要一个同样的表用于关联查询,多为字典表)或只分库不分表且所有库的表结构完全一致的情况
          actual-data-nodes: m1.course_$->{1..2}
          #分片策略:多分片键
          table-strategy:
            complex:
              # 分片键
              sharding-columns: id,status
              # 自定义分片算法
              algorithm-class-name: com.xlhj.sharding.config.CourseShardingAlgorithmColumns
自定义分片算法实现
package com.xlhj.sharding.config;

import org.apache.shardingsphere.api.sharding.complex.ComplexKeysShardingAlgorithm;
import org.apache.shardingsphere.api.sharding.complex.ComplexKeysShardingValue;
import org.springframework.stereotype.Component;

import java.util.*;

/**
 * @description: 分表算法类-多分片键
 * @author: Han LiDong
 * @create: 2021/5/25 10:32
 * @update: 2021/5/25 10:32
 */
@Component
public class CourseShardingAlgorithmColumns implements ComplexKeysShardingAlgorithm  {


    /**
     *
     * @param collection        分片表名
     * @param shardingValues    分片字段值
     * @return
     */
    @Override
    public Collection<String> doSharding(Collection collection, ComplexKeysShardingValue shardingValues) {
        System.out.println("collection:" + collection + ",shardingValues:" + shardingValues);
        Map<String, Collection> map = shardingValues.getColumnNameAndShardingValuesMap();
        Collection<Long> idValues = map.get("id");
        Collection<Integer> statusValues = map.get("status");
        List<String> shardingSuffix = new ArrayList<>();
        //逻辑还是按照 id%2 + 1进行数据分片
        for (Long id : idValues) {
            Long suf = id % 2 + 1;
            for (Object s : collection) {
                String tableName = (String) s;
                // 分片表名后缀匹配
                if (tableName.endsWith(String.valueOf(suf))) {
                    shardingSuffix.add(tableName);
                }
            }
        }
        return shardingSuffix;
    }
}
测试-多分片键-新增
/**
     * 测试分表-新增
     */
    @Test
    public void addCourse() {
        for (int i = 0; i < 10; i++) {
            Course course = new Course();
            course.setName("java" + i);
            course.setStatus(1);
            course.setCreateTime(new Date());
            courseMapper.insert(course);
        }
    }
另找一个数据库创建表单course_1,course_2
约定规则:根据status=0数据到库1,status=1数据到库2. id为奇数到course_2表,偶数到course_1表
-- ----------------------------
--  在库2中创建如下表单
-- ----------------------------
DROP TABLE IF EXISTS `course_1`;
CREATE TABLE `course_1`  (
  `id` bigint(20) NOT NULL,
  `name` varchar(255) CHARACTER SET utf8 COLLATE utf8_general_ci DEFAULT NULL COMMENT '课程名称',
  `status` int(255) DEFAULT NULL COMMENT '状态 0:失效  1:有效',
  `create_time` date DEFAULT NULL COMMENT '创建日期',
  PRIMARY KEY (`id`) USING BTREE
) ENGINE = InnoDB CHARACTER SET = utf8 COLLATE = utf8_general_ci ROW_FORMAT = Dynamic;


DROP TABLE IF EXISTS `course_2`;
CREATE TABLE `course_2`  (
  `id` bigint(20) NOT NULL,
  `name` varchar(255) CHARACTER SET utf8 COLLATE utf8_general_ci DEFAULT NULL COMMENT '课程名称',
  `status` int(255) DEFAULT NULL COMMENT '状态',
  `create_time` date DEFAULT NULL COMMENT '创建日期',
  PRIMARY KEY (`id`) USING BTREE
) ENGINE = InnoDB CHARACTER SET = utf8 COLLATE = utf8_general_ci ROW_FORMAT = Dynamic;
application-database-horizontal.yml配置分库分表规则
#水平分库、分表配置
spring:
  main:
    #允许名称相同的bean的覆盖
    allow-bean-definition-overriding: true
  shardingsphere:
    props:
      sql:
        show: true
    datasource:
      # 数据源名称,多数据源以逗号分隔
      names: m1,m2
      m1:
        url: jdbc:mysql://182.92.219.202:3306/sharding_db-1?useUnicode=true&characterEncoding=utf8&zeroDateTimeBehavior=convertToNull&useSSL=true&serverTimezone=GMT%2B8
        username: root
        password: xxxx
        driver-class-name: com.mysql.cj.jdbc.Driver
        # 数据库连接池类名称  com.alibaba.druid.pool.DruidDataSource  com.zaxxer.hikari.HikariDataSource
        type: com.alibaba.druid.pool.DruidDataSource
      m2:
        url: jdbc:mysql://182.92.219.202:3306/sharding_db-2?useUnicode=true&characterEncoding=utf8&zeroDateTimeBehavior=convertToNull&useSSL=true&serverTimezone=GMT%2B8
        username: root
        password: xxxx
        driver-class-name: com.mysql.cj.jdbc.Driver
        # 数据库连接池类名称  com.alibaba.druid.pool.DruidDataSource  com.zaxxer.hikari.HikariDataSource
        type: com.alibaba.druid.pool.DruidDataSource
#    rules:
    sharding:
      tables:
        # 表名
        course:
          key-generator:
            column: id
            #主键生成策略 可选内置的 SNOWFLAKE(雪花算法)/UUID
            # 也可以自定义(实现ShardingKeyGenerator,并配置META-INF/services/org.apache.shardingsphere.spi.keygen.ShardingKeyGenerator) SIMPLE
            type: SNOWFLAKE
          #配置 course 表规则groovy语法  $->{a..b}
          actual-data-nodes: m$->{1..2}.course_$->{1..2}
          #分库规则
          database-strategy:
            inline:
              #分库字段
              sharding-column: status
              #数据分库规则
              algorithm-expression: m$->{status + 1}
          #分表规则
          table-strategy:
            inline:
              #分表字段
              sharding-column: id
              #数据分表规则
              algorithm-expression: course_$->{id % 2 + 1}
测试-分库分表-新增
 /**
     * 测试水平分库+分表
     */
    @Test
    public void addCourseDB() {
        for (int i = 0; i < 10; i++) {
            Course course = new Course();
            course.setName("java");
            int rand = (int)(Math.random() * 10);
            course.setStatus(rand % 2);
            course.setCreateTime(new Date());
            courseMapper.insert(course);
        }
    }
库2 创建course_yyyyMM相关表单
约定规则:查询/新增数据的时候指定分片路由,强制路由到某张表
-- ----------------------------
-- 库2创建表单,表名自己调整,创建202101-202112的表单
-- ----------------------------
DROP TABLE IF EXISTS `course_202101`;
CREATE TABLE `course_202101`  (
  `id` bigint(20) NOT NULL,
  `name` varchar(255) CHARACTER SET utf8 COLLATE utf8_general_ci DEFAULT NULL COMMENT '课程名称',
  `status` int(255) DEFAULT NULL COMMENT '状态',
  `create_time` datetime(0) DEFAULT NULL COMMENT '创建日期',
  PRIMARY KEY (`id`) USING BTREE
) ENGINE = InnoDB CHARACTER SET = utf8 COLLATE = utf8_general_ci ROW_FORMAT = Dynamic;
application-table-hint-horizontal.yml配置强制路由规则
#强制分片路由hint配置
spring:
  main:
    allow-bean-definition-overriding: true
  shardingsphere:
    props:
      sql:
        show: true
    datasource:
      # 数据源名称,多数据源以逗号分隔
      names: m1,m2
      m1:
        url: jdbc:mysql://182.92.219.202:3306/sharding_db-1?useUnicode=true&characterEncoding=utf8&zeroDateTimeBehavior=convertToNull&useSSL=true&serverTimezone=GMT%2B8
        username: root
        password: xxxx
        driver-class-name: com.mysql.cj.jdbc.Driver
        # 数据库连接池类名称  com.alibaba.druid.pool.DruidDataSource  com.zaxxer.hikari.HikariDataSource
        type: com.alibaba.druid.pool.DruidDataSource
      m2:
        password: xxxx
        url: jdbc:mysql://182.92.219.202:3306/sharding_db-2?useUnicode=true&characterEncoding=utf8&zeroDateTimeBehavior=convertToNull&useSSL=true&serverTimezone=GMT%2B8
        username: root
        driver-class-name: com.mysql.cj.jdbc.Driver
        # 数据库连接池类名称  com.alibaba.druid.pool.DruidDataSource  com.zaxxer.hikari.HikariDataSource
        type: com.alibaba.druid.pool.DruidDataSource
#    rules:
    sharding:
      tables:
        course:
          key-generator:
            column: id
            #主键生成策略 可选内置的 SNOWFLAKE(雪花算法)/UUID
            # 也可以自定义(实现ShardingKeyGenerator,并配置META-INF/services/org.apache.shardingsphere.spi.keygen.ShardingKeyGenerator) SIMPLE
            type: SNOWFLAKE
          #配置 t_order 表规则  ->{a..b}  a必须存在,否则分布式主键无法获取
          actual-data-nodes: m1.course_$->{2021..2200}0$->{1..9},m1.course_$->{2021..2200}$->{10..12}
          database-strategy:
            hint:
              # 自定义分库hit分片算法
              algorithm-class-name: com.xlhj.sharding.config.DatabaseHintShardingKeyAlgorithm
          table-strategy:
            hint:
              # 自定义分表hit分片算法
              algorithm-class-name: com.xlhj.sharding.config.TableHintShardingKeyAlgorithm
自定义强制分库路由算法实现
package com.xlhj.sharding.config;

import com.alibaba.druid.util.StringUtils;
import org.apache.shardingsphere.api.sharding.ShardingValue;
import org.apache.shardingsphere.api.sharding.hint.HintShardingAlgorithm;
import org.apache.shardingsphere.api.sharding.hint.HintShardingValue;
import org.springframework.stereotype.Component;

import java.util.ArrayList;
import java.util.Collection;
import java.util.Iterator;
import java.util.List;

/**
 * @description:
 * @author: Han LiDong
 * @create: 2021/5/27 09:53
 * @update: 2021/5/27 09:53
 */
@Component
public class DatabaseHintShardingKeyAlgorithm implements HintShardingAlgorithm {

    /**
     * 自定义Hint 实现算法
     * 能够保证绕过Sharding-JDBC SQL解析过程
     * @param availableTargetNames
     * @param hintShardingValue 不再从SQL 解析中获取值,而是直接通过hintManager.addTableShardingValue("t_order", 1)参数指定
     * @return
     */
    @Override
    public Collection<String> doSharding(Collection availableTargetNames, HintShardingValue hintShardingValue) {
        System.out.println("shardingValue=" + hintShardingValue);
        System.out.println("availableTargetNames=" + availableTargetNames);

        List<String> shardingResult = new ArrayList<>();

        Iterator i = availableTargetNames.iterator();
        while (i.hasNext()){
            String targetName = (String) i.next();
            String suffix = targetName.substring(targetName.length() - 1);
            if (StringUtils.isNumber(suffix)) {
                // hint分片算法的ShardingValue有两种具体类型:
                // ListShardingValue和RangeShardingValue
                // 使用哪种取决于HintManager.addDatabaseShardingValue(String, String, ShardingOperator,...),ShardingOperator的类型
                Iterator j = hintShardingValue.getValues().iterator();
                while (j.hasNext()){
                    Integer value = (Integer) j.next();
                    if (value % 2 + 1 == Integer.parseInt(suffix)) {
                        shardingResult.add(targetName);
                    }
                }
            }
        }
        return shardingResult;
    }

}
自定义强制分表路由算法实现
package com.xlhj.sharding.config;

import com.alibaba.druid.util.StringUtils;
import org.apache.shardingsphere.api.sharding.hint.HintShardingAlgorithm;
import org.apache.shardingsphere.api.sharding.hint.HintShardingValue;
import org.springframework.stereotype.Component;

import java.util.ArrayList;
import java.util.Collection;
import java.util.Iterator;
import java.util.List;

/**
 * @description:
 * @author: Han LiDong
 * @create: 2021/5/27 09:53
 * @update: 2021/5/27 09:53
 */
@Component
public class TableHintShardingKeyAlgorithm implements HintShardingAlgorithm {

    /**
     * 自定义Hint 实现算法
     * 能够保证绕过Sharding-JDBC SQL解析过程
     * @param availableTargetNames
     * @param hintShardingValue 不再从SQL 解析中获取值,而是直接通过hintManager.addTableShardingValue("t_order", 1)参数指定
     * @return
     */
    @Override
    public Collection<String> doSharding(Collection availableTargetNames, HintShardingValue hintShardingValue) {
        System.out.println("shardingValue=" + hintShardingValue);
        System.out.println("availableTargetNames=" + availableTargetNames);

        List<String> shardingResult = new ArrayList<>();

        Iterator i = availableTargetNames.iterator();
        while (i.hasNext()){
            String targetName = (String) i.next();
            String suffix = targetName.substring(targetName.length() - 1);
            if (StringUtils.isNumber(suffix)) {
                // hint分片算法的ShardingValue有两种具体类型:
                // ListShardingValue和RangeShardingValue
                // 使用哪种取决于HintManager.addDatabaseShardingValue(String, String, ShardingOperator,...),ShardingOperator的类型
                Iterator j = hintShardingValue.getValues().iterator();
                while (j.hasNext()){
                    Integer value = (Integer) j.next();
                    // 匹配月份
                    Integer month = value % 12 == 0 ? 12 : value;
                    if (month == Integer.parseInt(suffix)) {
                        shardingResult.add(targetName);
                    }
                }
            }
        }

        return shardingResult;
    }

}
测试-强制路由
/**
* hint分片算法测试
* @throws Exception
*/
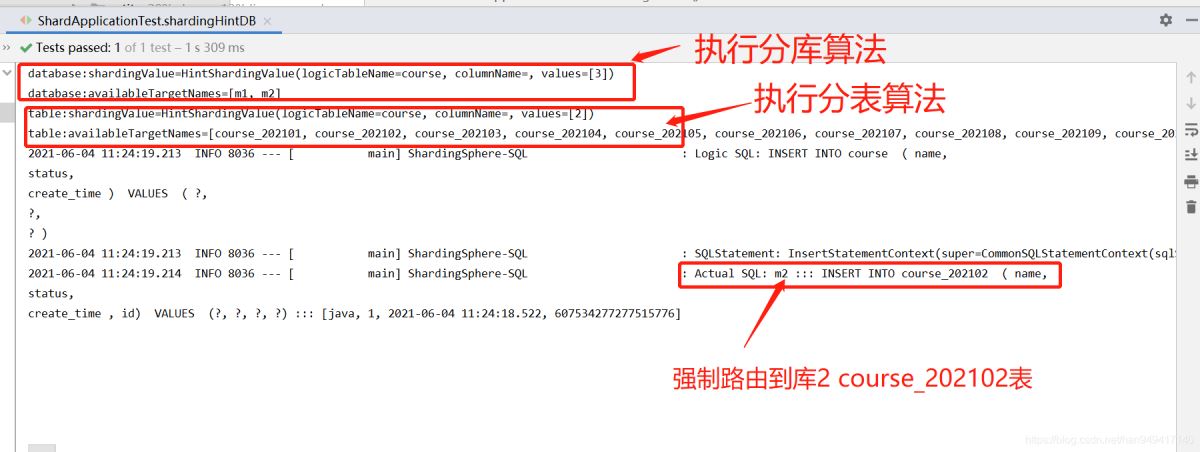
@Test
public void shardingHintDB() throws Exception {
HintManager.clear();
HintManager hintManager = HintManager.getInstance();
// 方式1:
// 下面2句话的意思时: 向3号库中的1号 course 表执行sql
// 选择具体的数据库, 3 可以简单理解为: 3号库,如果只有2个库, 那么可以根据2取模+1,落到 2号库上面
hintManager.addDatabaseShardingValue("course", 3);
// 同理:一个数据库中可以有多张courser表, 2 可以理解为: 2月份相关表.
hintManager.addTableShardingValue("course", 2);
// 方式2
// 直接指定对应具体的数据库,会想此库里所有分片表添加数据
//hintManager.setDatabaseShardingValue(0);
Course course = new Course();
course.setName("java");
int rand = (int)(Math.random() * 10);
course.setStatus(rand % 2);
course.setCreateTime(new Date());
courseMapper.insert(course);
HintManager.clear();
}
单库垂直分表相当于 同一个库的多张表单 通过外键关联。
分库垂直分表相当于多数据源。
这几介绍下单库垂直分表配置:
主要规则:
#垂直分库需要直接指定到库和表
spring.shardingsphere.sharding.tables.sys_user.actual-data-nodes: m2.sys_user
详细配置:
#垂直分表策略配置
spring:
  main:
    allow-bean-definition-overriding: true
  shardingsphere:
    props:
      sql:
        show: true
    datasource:
      # 数据源名称,多数据源以逗号分隔
      names: m1,m2
      m1:
        password: xxxx
        url: jdbc:mysql://182.92.219.202:3306/sharding_db-1?useUnicode=true&characterEncoding=utf8&zeroDateTimeBehavior=convertToNull&useSSL=true&serverTimezone=GMT%2B8
        username: root
        driver-class-name: com.mysql.cj.jdbc.Driver
        # 数据库连接池类名称  com.alibaba.druid.pool.DruidDataSource  com.zaxxer.hikari.HikariDataSource
        type: com.alibaba.druid.pool.DruidDataSource
      m2:
        password: xxxx
        url: jdbc:mysql://182.92.219.202:3306/sharding_db-2?useUnicode=true&characterEncoding=utf8&zeroDateTimeBehavior=convertToNull&useSSL=true&serverTimezone=GMT%2B8
        username: root
        driver-class-name: com.mysql.cj.jdbc.Driver
        # 数据库连接池类名称  com.alibaba.druid.pool.DruidDataSource  com.zaxxer.hikari.HikariDataSource
        type: com.alibaba.druid.pool.DruidDataSource
    sharding:
      tables:
        sys_user:
          key-generator:
            column: id
            #主键生成策略 可选内置的 SNOWFLAKE(雪花算法)/UUID
            # 也可以自定义(实现ShardingKeyGenerator,并配置META-INF/services/org.apache.shardingsphere.spi.keygen.ShardingKeyGenerator) SIMPLE
            type: SNOWFLAKE
          #垂直分库 做到专库专表  指定到具体库.具体表
          actual-data-nodes: m2.sys_user
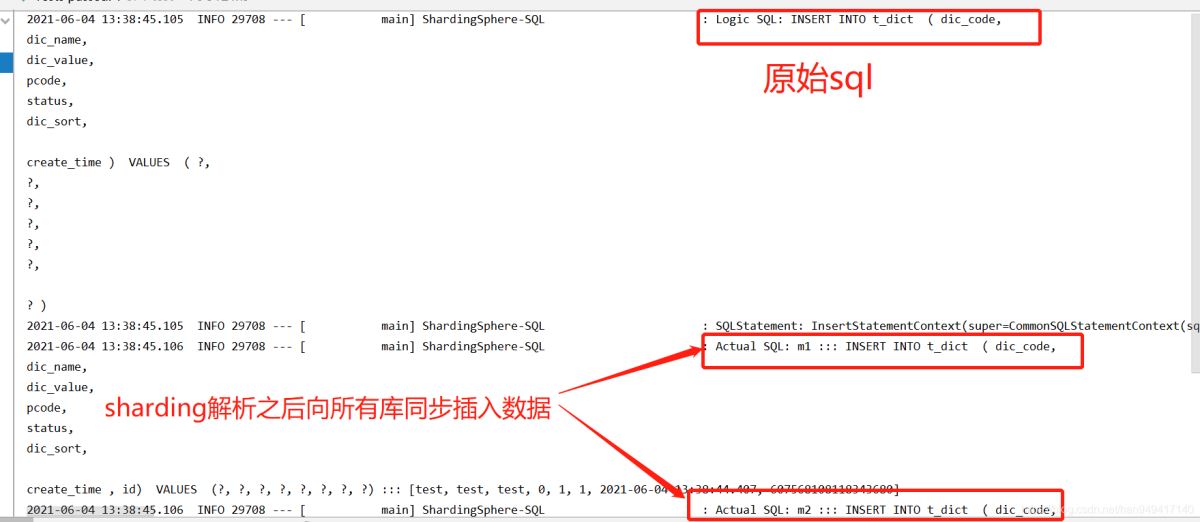
指所有的分片数据源中都存在的表,表结构和表中的数据在每个数据库中均完全一致。适用于数据量不大且需要与海量数据的表进行关联查询的场景,例如:字典表。
库1和库2创建字典表t_dict
-- ----------------------------
-- Table structure for t_dict
-- ----------------------------
DROP TABLE IF EXISTS `t_dict`;
CREATE TABLE `t_dict`  (
  `id` bigint(20) NOT NULL AUTO_INCREMENT,
  `dic_code` varchar(255) CHARACTER SET utf8mb4 COLLATE utf8mb4_general_ci NOT NULL COMMENT '编码',
  `dic_name` varchar(255) CHARACTER SET utf8mb4 COLLATE utf8mb4_general_ci NOT NULL COMMENT '字典名',
  `dic_value` varchar(255) CHARACTER SET utf8mb4 COLLATE utf8mb4_general_ci NOT NULL COMMENT '字典值',
  `pcode` varchar(255) CHARACTER SET utf8mb4 COLLATE utf8mb4_general_ci NOT NULL COMMENT '父编码',
  `status` varchar(1) CHARACTER SET utf8mb4 COLLATE utf8mb4_general_ci DEFAULT NULL COMMENT '0:失效 1:生效',
  `dic_sort` varchar(10) CHARACTER SET utf8mb4 COLLATE utf8mb4_general_ci DEFAULT NULL COMMENT '排序',
  `remarks` varchar(255) CHARACTER SET utf8mb4 COLLATE utf8mb4_general_ci DEFAULT NULL COMMENT '备注',
  `create_time` datetime(0) DEFAULT NULL COMMENT '创建时间',
  PRIMARY KEY (`id`) USING BTREE
) ENGINE = InnoDB AUTO_INCREMENT = 604343147190812673 CHARACTER SET = utf8mb4 COLLATE = utf8mb4_general_ci ROW_FORMAT = Dynamic;
配置广播表规则
主要规则:
# 配置广播表表名
spring.shardingsphere.sharding.broadcast-tables: t_dict
详细配置:
#广播表配置
spring:
  main:
    allow-bean-definition-overriding: true
  shardingsphere:
    props:
      sql:
        show: true
    datasource:
      # 数据源名称,多数据源以逗号分隔
      names: m1,m2
      m1:
        url: jdbc:mysql://182.92.219.202:3306/sharding_db-1?useUnicode=true&characterEncoding=utf8&zeroDateTimeBehavior=convertToNull&useSSL=true&serverTimezone=GMT%2B8
        username: root
        password: xxxx
        driver-class-name: com.mysql.cj.jdbc.Driver
        # 数据库连接池类名称  com.alibaba.druid.pool.DruidDataSource  com.zaxxer.hikari.HikariDataSource
        type: com.alibaba.druid.pool.DruidDataSource
      m2:
        url: jdbc:mysql://182.92.219.202:3306/sharding_db-2?useUnicode=true&characterEncoding=utf8&zeroDateTimeBehavior=convertToNull&useSSL=true&serverTimezone=GMT%2B8
        username: root
        driver-class-name: com.mysql.cj.jdbc.Driver
        password: xxxx
        # 数据库连接池类名称  com.alibaba.druid.pool.DruidDataSource  com.zaxxer.hikari.HikariDataSource
        type: com.alibaba.druid.pool.DruidDataSource
    sharding:
      tables:
        t_dict:
          key-generator:
            column: id
            #主键生成策略 可选内置的 SNOWFLAKE(雪花算法)/UUID
            # 也可以自定义(实现ShardingKeyGenerator,并配置META-INF/services/org.apache.shardingsphere.spi.keygen.ShardingKeyGenerator) SIMPLE
            type: SNOWFLAKE
      # 配置广播表
      broadcast-tables: t_dict
测试-广播表
 /**
     * 测试公共表
     */
    @Test
    public void addDict() {
        TDict dict = new TDict();
        dict.setCreateTime(new Date());
        dict.setDicCode("test");
        dict.setDicName("test");
        dict.setDicSort("1");
        dict.setDicValue("test");
        dict.setPcode("0");
        dict.setStatus("1");
        dictMapper.insert(dict);
    }
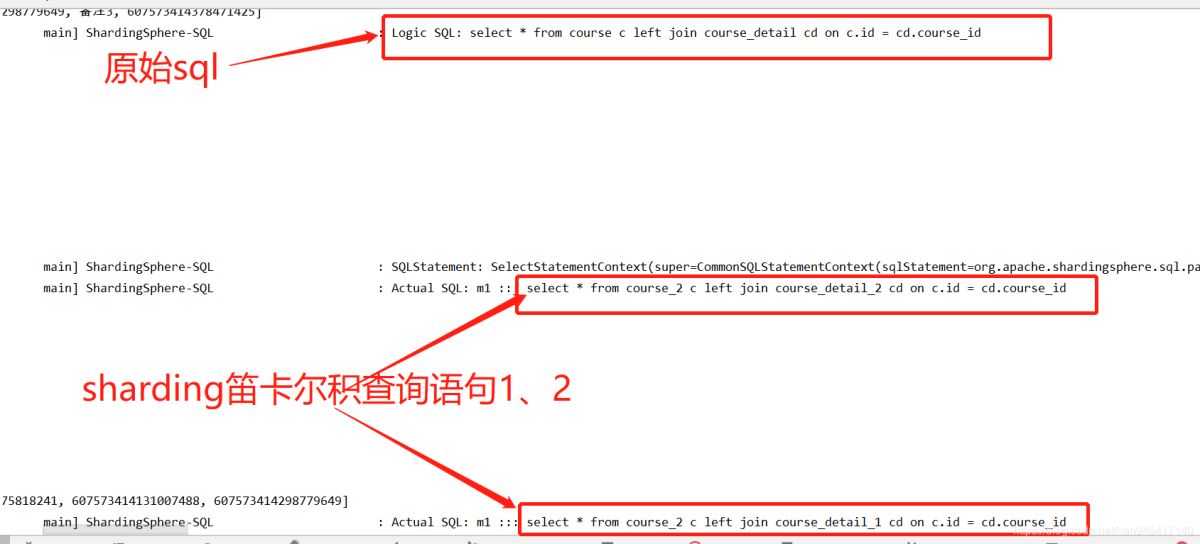
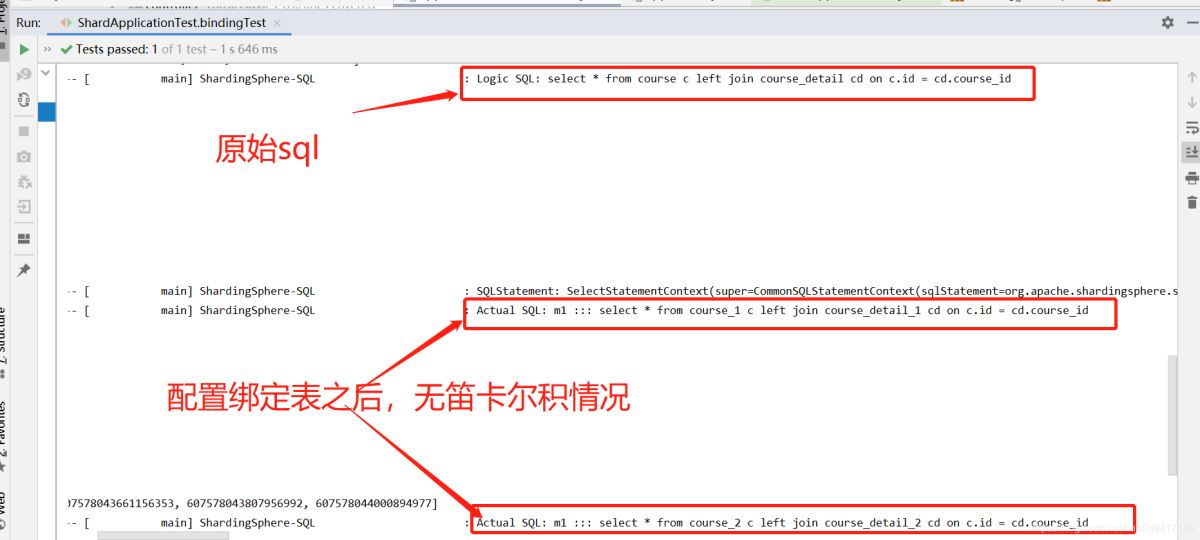
概念:指分片规则一致的主表和子表。例如:course表和 course_detail表,均按照 course_id分片,则此两张表互为绑定表关系。绑定表之间的多表关联查询不会出现笛卡尔积关联,关联查询效率将大大提升。
举例说明,如果 SQL 为:
select * from course c left join course_detail cd on c.id = cd.course_id where c.id in (10, 11);
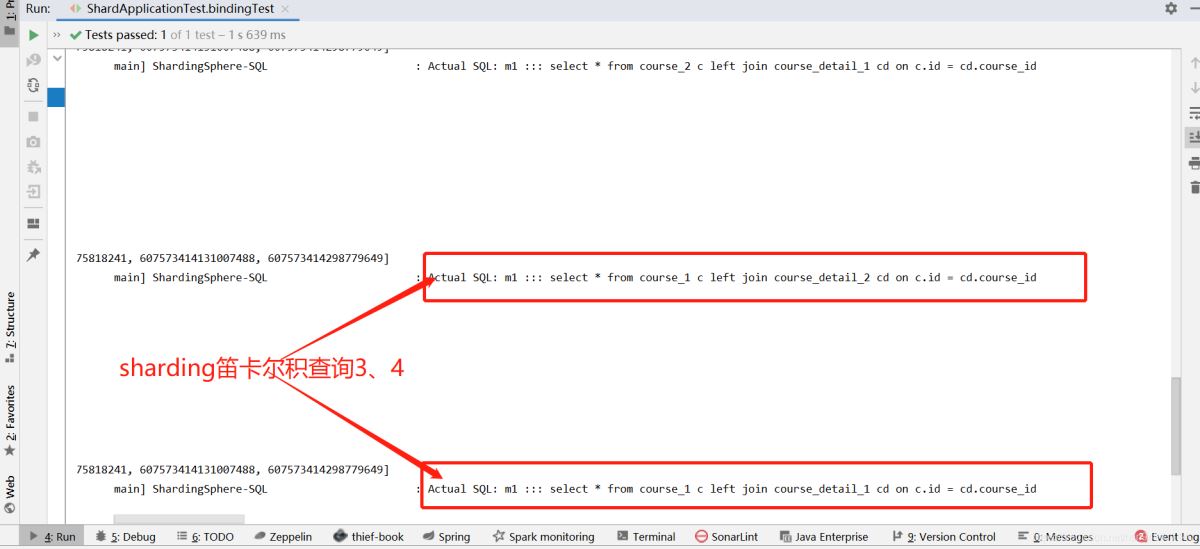
在不配置绑定表关系时,假设分片键 course_id将数值 10 路由至第 0 片,将数值 11 路由至第 1 片,那么路由后的 SQL 应该为 4 条,它们呈现为笛卡尔积:
 select * from course_1 c left join course_detail_1 cd on c.id = cd.course_id where c.id in (10, 11);

 select * from course_1 c left join course_detail_2 cd on c.id = cd.course_id where c.id in (10, 11);

 select * from course_2 c left join course_detail_1 cd on c.id = cd.course_id where c.id in (10, 11);

 select * from course_2 c left join course_detail_2 cd on c.id = cd.course_id where c.id in (10, 11);
在配置绑定表关系后,路由的 SQL 应该为 2 条:
 select * from course_1 c left join course_detail_1 cd on c.id = cd.course_id where c.id in (10, 11);

 select * from course_2 c left join course_detail_2 cd on c.id = cd.course_id where c.id in (10, 11);
其中 course 在 FROM 的最左侧,ShardingSphere 将会以它作为整个绑定表的主表。 所有路由计算将会只使用主表的策略,那么 course_detail表的分片计算将会使用 course 的条件。故绑定表之间的分区键要完全相同。
库1创建course_detail_1、course_detail_2表单
-- ----------------------------
-- Table structure for course_detail_1
-- ----------------------------
DROP TABLE IF EXISTS `course_detail_1`;
CREATE TABLE `course_detail_1`  (
  `id` bigint(20) NOT NULL,
  `course_id` bigint(20) DEFAULT NULL COMMENT '课程id',
  `remark` varchar(255) CHARACTER SET utf8 COLLATE utf8_general_ci DEFAULT NULL COMMENT '备注',
  PRIMARY KEY (`id`) USING BTREE
) ENGINE = InnoDB CHARACTER SET = utf8 COLLATE = utf8_general_ci ROW_FORMAT = Dynamic;

-- ----------------------------
-- Table structure for course_detail_2
-- ----------------------------
DROP TABLE IF EXISTS `course_detail_2`;
CREATE TABLE `course_detail_2`  (
  `id` bigint(20) NOT NULL,
  `course_id` bigint(20) DEFAULT NULL COMMENT '课程id',
  `remark` varchar(255) CHARACTER SET utf8 COLLATE utf8_general_ci DEFAULT NULL COMMENT '备注',
  PRIMARY KEY (`id`) USING BTREE
) ENGINE = InnoDB CHARACTER SET = utf8 COLLATE = utf8_general_ci ROW_FORMAT = Dynamic;
配置广播表规则
#水平分表配置
spring:
  main:
    #允许名称相同的bean的覆盖(一个实体类对应多张表)
    allow-bean-definition-overriding: true
  shardingsphere:
    props:
      sql:
        show: true
    datasource:
      # 数据源名称,多数据源以逗号分隔
      names: m1
      # names定义的数据源名称作为key(key不能包含下划线,否则无法识别配置)
      m1:
        url: jdbc:mysql://182.92.219.202:3306/sharding_db-1?useUnicode=true&characterEncoding=utf8&zeroDateTimeBehavior=convertToNull&useSSL=true&serverTimezone=GMT%2B8
        username: root
        password: xxxx
        driver-class-name: com.mysql.cj.jdbc.Driver
        # 数据库连接池类名称  com.alibaba.druid.pool.DruidDataSource  com.zaxxer.hikari.HikariDataSource
        type: com.alibaba.druid.pool.DruidDataSource
    sharding:
      tables:
        # 表名
        course:
          key-generator:
            column: id
            #主键生成策略 可选内置的 SNOWFLAKE(雪花算法)/UUID
            # 也可以自定义(实现ShardingKeyGenerator,并配置META-INF/services/org.apache.shardingsphere.spi.keygen.ShardingKeyGenerator) SIMPLE
            type: SNOWFLAKE
          #由数据源名 + 表名组成,以小数点分隔。多个表以逗号分隔,支持inline表达式。
          #缺省表示使用已知数据源与逻辑表名称生成数据节点,用于广播表(即每个库中都需要一个同样的表用于关联查询,多为字典表)或只分库不分表且所有库的表结构完全一致的情况
          actual-data-nodes: m1.course_$->{1..2}
          #分片策略:单分片键
          table-strategy:
            inline:
              #分片键
              sharding-column: id
              #数据分片规则
              algorithm-expression: course_$->{id % 2 + 1}
        course_detail:
          key-generator:
            column: id
            #主键生成策略 可选内置的 SNOWFLAKE(雪花算法)/UUID
            # 也可以自定义(实现ShardingKeyGenerator,并配置META-INF/services/org.apache.shardingsphere.spi.keygen.ShardingKeyGenerator) SIMPLE
            type: SNOWFLAKE
          #配置 t_order 表规则  ->{a..b}  a必须存在,否则分布式主键无法获取
          actual-data-nodes: m1.course_detail_$->{1..2}
          table-strategy:
            inline:
              # 绑定表分片字段要一致(外键字段)
              sharding-column: course_id
              algorithm-expression: course_detail_$->{course_id % 2 + 1}
      # 绑定表规则列表(避免查询笛卡尔积),多套规则使用binding-tables[0],binding-tables[1]...
      binding-tables: course_detail,course
注意:绑定表的分区键要一致
测试-绑定表查询(笛卡尔积)
	/**
     * 绑定表测试(查询笛卡尔积)
     */
    @Test
    public void bindingTest(){
        List<Long> ids = new ArrayList<>();
        for (int i = 0; i < 4; i++) {
            Course course = new Course();
            course.setName("java" + i);
            course.setStatus(1);
            course.setCreateTime(new Date());
            courseMapper.insert(course);
            CourseDetail courseDetail = new CourseDetail();
            courseDetail.setCourseId(course.getId());
            courseDetail.setRemark("备注" + i);
            courseDetailMapper.insert(courseDetail);
            ids.add(course.getId());
        }
        List<Course> res = courseMapper.binding(ids);
        log.info("查询结果:{}",res.size());
    }
首先注释掉绑定表配置,查看关联查询笛卡尔积
 # 绑定表规则列表(避免查询笛卡尔积),多套规则使用binding-tables[0],binding-tables[1]...
      #binding-tables: course_detail,course
然后打开绑定表配置,查看关联查询是否还有笛卡尔积
# 绑定表规则列表(避免查询笛卡尔积),多套规则使用binding-tables[0],binding-tables[1]...
      binding-tables: course_detail,course
默认的 XA 事务管理器为 Atomikos
BASE事务管理器为Seata
配置事务管理器
package com.yss.datamiddle.config;

import org.springframework.context.annotation.Bean;
import org.springframework.context.annotation.Configuration;
import org.springframework.jdbc.core.JdbcTemplate;
import org.springframework.jdbc.datasource.DataSourceTransactionManager;
import org.springframework.transaction.PlatformTransactionManager;
import org.springframework.transaction.annotation.EnableTransactionManagement;

import javax.sql.DataSource;

/**
 * @description:
 * @author: Han LiDong
 * @create: 2021/5/27 11:16
 * @update: 2021/5/27 11:16
 */
@Configuration
@EnableTransactionManagement
public class TransactionConfiguration {

    @Bean
    public PlatformTransactionManager txManager(final DataSource dataSource) {
        return new DataSourceTransactionManager(dataSource);
    }

    @Bean
    public JdbcTemplate jdbcTemplate(final DataSource dataSource) {
        return new JdbcTemplate(dataSource);
    }
}
使用分布式事务
   @Test
//    @Rollback(value = false)
    @Transactional
    @ShardingTransactionType(TransactionType.XA)  // 支持TransactionType.LOCAL, TransactionType.XA, TransactionType.BASE
    public void transactionTest() {
        Course course = new Course();
        course.setName("java");
        int rand = (int)(Math.random() * 10);
        course.setStatus(rand % 2);
        course.setCreateTime(new Date());
        courseMapper.insert(course);
        Course course1 = new Course();
        course1.setName("java");
        int rand1 = (int)(Math.random() * 10);
        course1.setStatus(rand1 % 2 + 1);
        course1.setCreateTime(new Date());
        courseMapper.insert(course1);
        int a = 1/0;
    }
解决方案:
注释pom中durid、dynamic-datasource-spring-boot-starter引用
<!-- https://mvnrepository.com/artifact/com.baomidou/dynamic-datasource-spring-boot-starter -->
<!--        <dependency>-->
<!--            <groupId>com.baomidou</groupId>-->
<!--            <artifactId>dynamic-datasource-spring-boot-starter</artifactId>-->
<!--            <version>3.1.0</version>-->
<!--        </dependency>-->
<!--        <dependency>-->
<!--            <groupId>com.alibaba</groupId>-->
<!--            <artifactId>druid-spring-boot-starter</artifactId>-->
<!--        </dependency>-->
Failed to configure a DataSource: ‘url' attribute is not specified and no embedded datasource could be configured.
问题描述:项目引入shardingjdbc包、配置好分片规则之后启动项目报错找不到数据库配置,但是配置文件中明明按照sharding数据源配置规则配置了数据库链接信息。
问题原因:DruidDataSourceAutoConfigure在DynamciDataSourceAutoConfiguration之前,其会注入一个DataSourceWrapper,会在原生的spring.datasource下找url,username,password等。而我们动态数据源的配置路径是变化的。
解决方案二选一
springboot启动类增加如下配置
@SpringBootApplication(exclude = {DruidDataSourceAutoConfigure.class})项目配置文件新增:
# 使用多数据源时要有这个配置,要不然会启动失败。单数据源的时候不要加这个配置。
 spring.autoconfigure.exclude = com.alibaba.druid.spring.boot.autoconfigure.DruidDataSourceAutoConfigure
org.springframework.dao.InvalidDataAccessApiUsageException: ConnectionCallback; isValid; nested exception is java.sql.SQLFeatureNotSupportedException: isValid
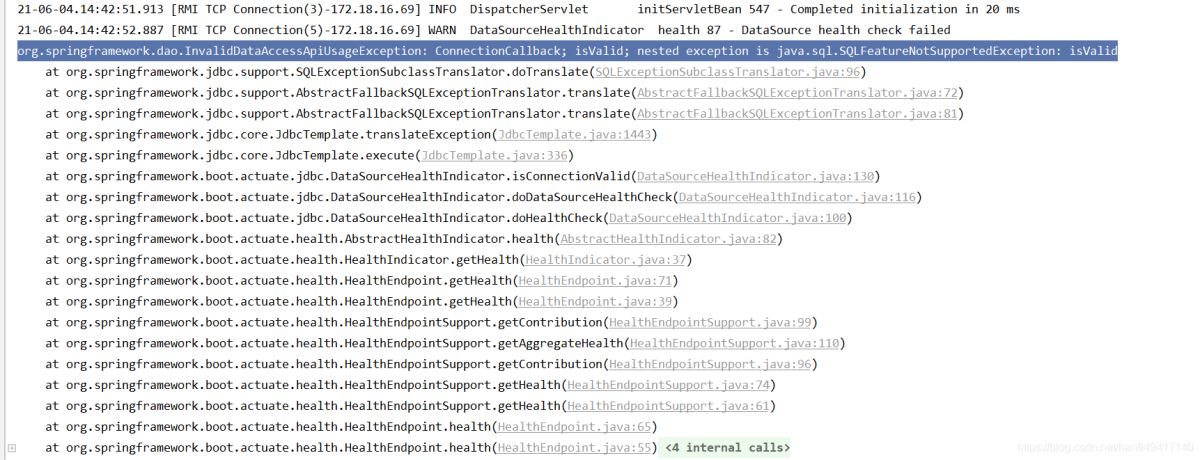
解决方案:
此问题是Spring Boot 2.3.8数据源健康检查sql为null引起。
解决办法是继承 DataSourceHealthContributorAutoConfiguration 重写 createIndicator 方法
package com.yss.datamiddle.config;

import org.springframework.beans.factory.ObjectProvider;
import org.springframework.boot.actuate.autoconfigure.jdbc.DataSourceHealthContributorAutoConfiguration;
import org.springframework.boot.actuate.health.AbstractHealthIndicator;
import org.springframework.boot.actuate.jdbc.DataSourceHealthIndicator;
import org.springframework.boot.jdbc.metadata.DataSourcePoolMetadataProvider;
import org.springframework.context.annotation.Configuration;
import org.springframework.jdbc.datasource.lookup.AbstractRoutingDataSource;
import org.springframework.util.StringUtils;

import javax.sql.DataSource;
import java.util.Map;

/**
 * @description: 重写健康检查sql,解决项目启动健康检查异常
 * @author: Han LiDong
 * @create: 2021/5/28 14:40
 * @update: 2021/5/28 14:40
 */
@Configuration
public class DataSourceHealthConfig extends DataSourceHealthContributorAutoConfiguration {

    private static final String defaultQuery = "select 1";

    public DataSourceHealthConfig(Map<String, DataSource> dataSources, ObjectProvider<DataSourcePoolMetadataProvider> metadataProviders) {
        super(dataSources, metadataProviders);
    }

    @Override
    protected AbstractHealthIndicator createIndicator(DataSource source) {
        DataSourceHealthIndicator indicator = (DataSourceHealthIndicator) super.createIndicator(source);
        if (!StringUtils.hasText(indicator.getQuery())) {
            indicator.setQuery(defaultQuery);
        }
        return indicator;
    }
}解决方法:分片键必须为非空,否则会全表新增数据。
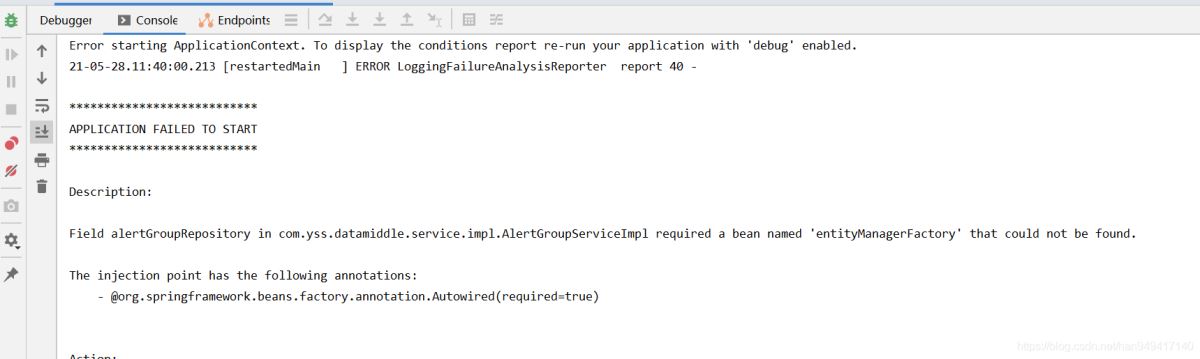
Caused by: org.hibernate.AnnotationException: No identifier specified for entity: com.yss.datamiddle.po.PrometheusAlertRecordSummaryPo
解决方法:ORM实体类必须有主键注解 @Id

解决方案:分表字段主键生成策略改为:
  @Id
    @GeneratedValue(strategy = GenerationType.IDENTITY)
    @Column(name = "id")
    private Long id;
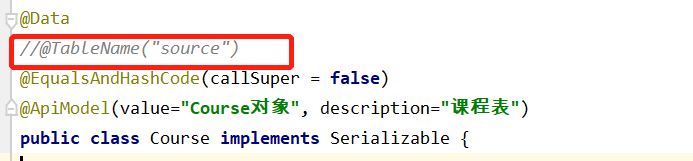
分片表对应ORM映射实体类 去掉表名映射:@TableName(“source”)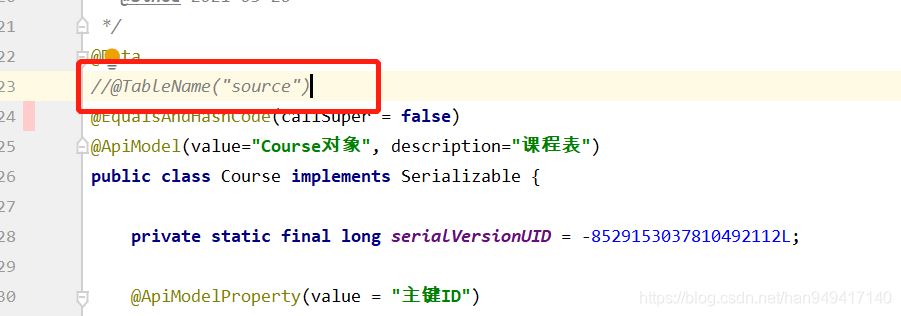
4.8 org.springframework.boot.context.properties.source.InvalidConfigurationPropertyNameException: Configuration property name ‘spring.shardingsphere.datasource.monitor_1' is not valid
解决方案:yml配置key不能包含下划线,调整monitor_1为monitor-1
Caused by: java.lang.NullPointerException: please config application id within seata.conf file.
原因:使用XA分布式事务,但同时又引入了Base事务相关包
解决方案:注释掉Base事务包
<!-- 使用 BASE 事务时,需要引入此模块 --> <!-- <dependency>--> <!-- <groupId>org.apache.shardingsphere</groupId>--> <!-- <artifactId>sharding-transaction-base-seata-at</artifactId>--> <!-- <version>4.1.1</version>--> <!-- </dependency>--> <!-- <!– https://mvnrepository.com/artifact/io.seata/seata-core –>--> <!-- <dependency>--> <!-- <groupId>io.seata</groupId>--> <!-- <artifactId>seata-core</artifactId>--> <!-- <version>1.4.2</version>--> <!-- </dependency>-->
关于怎么在springboot中使用shardingjdbc实现分库分表就分享到这里了,希望以上内容可以对大家有一定的帮助,可以学到更多知识。如果觉得文章不错,可以把它分享出去让更多的人看到。
免责声明:本站发布的内容(图片、视频和文字)以原创、转载和分享为主,文章观点不代表本网站立场,如果涉及侵权请联系站长邮箱:is@yisu.com进行举报,并提供相关证据,一经查实,将立刻删除涉嫌侵权内容。


