这篇文章给大家分享的是有关Linux如何进行网络管理、软件安装、进程管理操作的内容。小编觉得挺实用的,因此分享给大家做个参考,一起跟随小编过来看看吧。
1、网络管理
1.1 网络状态查看
在Linux中经常使用ifconfig,route和netstat查看网络状态,它们就是. net-tools工具,下面我来使用下。
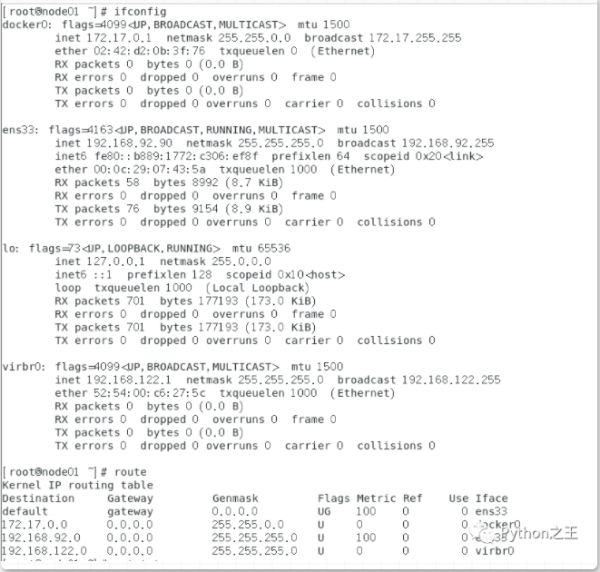
我就说下ifconfig和route
在我们的linux中有很多网卡接口,比如eth0第一块网卡网络接口,eno1板载⽹网卡, ens33 PCI-E⽹网卡 。CentOS 7 使⽤用了⼀致性⽹络设备命名,以上都不匹配,则使⽤ eth0
[root@node01 ~]# ifconfig eth0 eth0: error fetching interface information: Device not found [root@node01 ~]# ifconfig ens33 ens33: flags=4163<UP,BROADCAST,RUNNING,MULTICAST> mtu 1500 inet 192.168.92.90 netmask 255.255.255.0 broadcast 192.168.92.255 inet6 fe80::b889:1772:c306:ef8f prefixlen 64 scopeid 0x20<link> ether 00:0c:29:07:43:5A txqueuelen 1000 (Ethernet) RX packets 910 bytes 954985 (932.6 KiB) RX errors 0 dropped 0 overruns 0 frame 0 TX packets 450 bytes 38942 (38.0 KiB) TX errors 0 dropped 0 overruns 0 carrier 0 collisions 0
1.2 网络配置文件
vim /etc/hosts网络配置文件
在配置hadoop,elasticsearch集群的时候需要在/etc/hosts配置集群IP和主机名,有时候你ping不了百度,可能域名解析不了,需要在/etc/sysconfig/network-scripts/ifcfg-eth0配置
[root@node01 ~]# vim /etc/sysconfig/network ######### HOSTNAME=node01 [root@node01 ~]# vim /etc/hosts ######### 192.168.92.90 node01 192.168.92.91 node02 192.168.92.92 node03 [root@node01 ~]# 配置DNS,域名解析服务 [root@node01 ~]# vim /etc/sysconfig/network-scripts/ifcfg-eth0 DNS1=202.106.0.20 DNS2=8.8.8.8
1.3 网络故障排除命令
第一,ping百度:查看目标机器的网络是否可通
maoli@ubuntu:~$ ping baidu.com PING baidu.com (220.181.38.148) 56(84) bytes of data. 64 bytes from 220.181.38.148: icmp_seq=1 ttl=128 time=49.6 ms 64 bytes from 220.181.38.148: icmp_seq=2 ttl=128 time=48.2 ms ^C --- baidu.com ping statistics --- 2 packets transmitted, 2 received, 0% packet loss, time 1001ms rtt min/avg/max/mdev = 48.223/48.948/49.673/0.725 ms
nslookup 工具就可以对域名解析, 格式是nslookup空格+域名
比如nslookup www.baidu.com 。Server即为域名对应的ip
maoli@ubuntu:~$ nslookup www.baidu.com Server: 127.0.1.1 Address: 127.0.1.1#53 Non-authoritative answer: www.baidu.com canonical name = www.a.shifen.com. Name: www.a.shifen.com Address: 182.61.200.6 Name: www.a.shifen.com Address: 182.61.200.7
tcpdump是一个用于截取网络分组,并输出分组内容的工具。凭借强大的功能和灵活的截取策略,使其成为类UNIX系统下用于网络分析和问题排查的首选工具
比如tcpdump -i any -n port 80 抓取所有网卡(any)80端口数据包,并且以ip形式显示(-n)
maoli@ubuntu:~$ sudo tcpdump -i any -n port 80 -n tcpdump: verbose output suppressed, use -v or -vv for full protocol decode listening on any, link-type LINUX_SLL (Linux cooked), capture size 262144 bytes 10:28:11.003675 IP 192.168.92.1.53951 > 192.168.92.135.80: Flags [S], seq 185886164, win 64240, options [mss 1460,nop,wscale 8,nop,nop,sackOK], length 0 10:28:11.003875 IP 192.168.92.135.80 > 192.168.92.1.53951: Flags [S.], seq 2863640054, ack 185886165, win 64240, options [mss 1460,nop,nop,sackOK,nop,wscale 7], length 0 10:28:11.004114 IP 192.168.92.1.53951 > 192.168.92.135.80: Flags [.], ack 1, win 4106, length 0 10:28:11.010472 IP 192.168.92.1.53951 > 192.168.92.135.80: Flags [P.], seq 1:476, ack 1, win 4106, length 475: HTTP: GET /sqli-labs/ HTTP/1.1
比如tcpdump -i any -n host 10.0.0.1 and port 80 抓取所有网卡的80端口和10.0.0.1之间的数据包,并且以ip形式显示
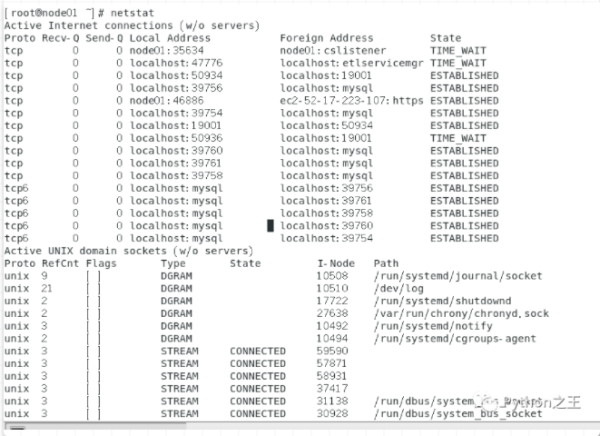
netstat命令用于显示与IP、TCP、UDP和ICMP协议相关的统计数据,一般用于检验本机各端口的网络连接情况。netstat是在内核中访问网络及相关信息的程序,它能提供TCP连接,TCP和UDP监听,进程内存管理的相关报告。
netstat 查看服务监听端口状态是否正确
-n 显示ip地址-t tcp协议-p 显示端口对应的进程-l tcp的监听状态(listen)-ntpl 查看端口开放情况
maoli@ubuntu:~$ sudo netstat -ntlp 激活Internet连接 (仅服务器) Proto Recv-Q Send-Q Local Address Foreign Address State PID/Program name tcp 0 0 0.0.0.0:22 0.0.0.0:* LISTEN 1111/sshd tcp 0 0 127.0.0.1:631 0.0.0.0:* LISTEN 14200/cupsd tcp 0 0 127.0.0.1:3306 0.0.0.0:* LISTEN 1148/mysqld tcp 0 0 127.0.0.1:6379 0.0.0.0:* LISTEN 1165/redis-server 1 tcp 0 0 127.0.1.1:53 0.0.0.0:* LISTEN 1285/dnsmasq tcp6 0 0 :::22 :::* LISTEN 1111/sshd tcp6 0 0 ::1:631 :::* LISTEN 14200/cupsd tcp6 0 0 :::9000 :::* LISTEN 2234/docker-proxy tcp6 0 0 :::80 :::* LISTEN 1842/apache2
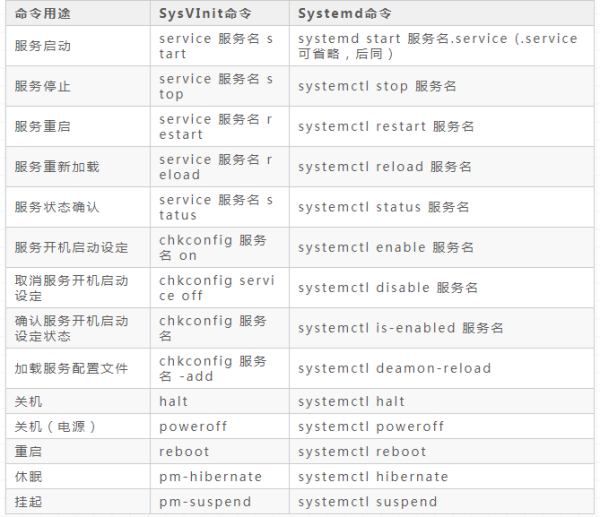
1.4 网络服务管理
网络服务管理程序分为两种,分别为SysV和systemd。现在Systemd已经基本取代了SysV的Init。
1.5 设置静态ip
在搭建任何集群,都是要设置静态ip的。
[root@node01]# vim /etc/sysconfig/network-scripts/ifcfg-ens33 ################ BOOTPROTO=static ONBOOT="yes" # 网关地址根据系统的网络而定 GATEWAY=192.168.92.2 # 设置的静态ip IPADDR=192.168.92.92 NETMASK=255.255.255.0 # 配置DNS服务器 DNS1=8.8.8.8 DNS2=8.8.4.4
2. 软件安装
2.1 rpm安装
在 Linux 操作系统下,几乎所有的软件均通过RPM 进行安装、卸载及管理等操作。RPM 的全称为Redhat Package Manager ,是由Redhat 公司提出的,用于管理Linux 下软件包的软件,主要用于CentOS、RedHat等linux系统,软件安装包格式为 rpm。
比如一个vim的rpm叫:vim-common-7.4.10-5.el7.x86_64.rpm 。vim-common是软件名称,7.4.10-5软件版本,el7是Red Hat Enterprise Linux 指的是centos7系统版本,x86_64指的是系统平台x86
rpm 命令常⽤参数,-q 查询软件包,-i 安装软件包和-e 卸载软件包
2.2 yum 包管理器
yum(全称 Yellow dog Updater, Modified)是一个前端软件包管理器,基于RPM包管理,能够从指定的服务器自动下载RPM包并且安装,可以自动处理依赖性关系。
下载阿里云的yum源到了/etc/yum.repos.d中
备份yum源
mv /etc/yum.repos.d/CentOS-Base.repo /etc/yum.repos.d/CentOS-Base.repo.backup
下载新的CentOS-Base.repo 到/etc/yum.repos.d/,这里指的是centos7
wget -O /etc/yum.repos.d/CentOS-Base.repo http://mirrors.aliyun.com/repo/Centos-7.repo # 运行yum makecache生成缓存 yum clean all yum makecache
这时候可以查看yum的base
[root@node01 ~]# vim /etc/yum.repos.d/CentOS-Base.repo [base] name=CentOS-$releasever - Base - mirrors.aliyun.com failovermethod=priority baseurl=http://mirrors.aliyun.com/centos/$releasever/os/$basearch/ http://mirrors.aliyuncs.com/centos/$releasever/os/$basearch/ http://mirrors.cloud.aliyuncs.com/centos/$releasever/os/$basearch/ gpgcheck=1 gpgkey=http://mirrors.aliyun.com/centos/RPM-GPG-KEY-CentOS-7
由于yum中有的mirror速度是非常慢的。对此,我可以下载fastestmirror插件。
[root@node01 ~]# yum install yum-fastestmirror -y [root@node01 ~]# cat /etc/yum/pluginconf.d/fastestmirror.conf [main] enabled=1 verbose=0 always_print_best_host = true socket_timeout=3 # Relative paths are relative to the cachedir (and so works for users as well # as root). hostfilepath=timedhosts.txt maxhostfileage=10 maxthreads=15 #exclude=.gov, facebook #include_only=.nl,.de,.uk,.ie
yum常用命令install 安装软件包,remove 卸载软件包,list| grouplist 查看软件包,update 升级软件包
2.3 apt安装
Ubuntu的高级打包工具(APT,Advanced Packaging Tool ),Debian、Ubuntu 使⽤ apt 包管理器,软件安装包格式为 deb。
apt安装一个nginx
maoli@ubuntu:~$ sudo apt-get install nginx /usr/sbin/nginx:主程序 /etc/nginx:存放配置文件 /usr/share/nginx:存放静态文件 /var/log/nginx:存放日志
2.4 make install编译源码安装源码的安装
一般由3个步骤组成:配置(configure)、编译(make)、安装(make install)。
configure文件是一个可执行的脚本文件,它有很多选项,在待安装的源码目录下使用命令./configure –help可以输出详细的选项列表。
其中--prefix选项是配置安装目录,如果不配置该选项,安装后可执行文件默认放在/usr /local/bin,库文件默认放在/usr/local/lib,配置文件默认放在/usr/local/etc,其它的资源文件放在/usr /local/share,比较凌乱。
如果配置了--prefix,如:./configure --prefix=/usr/local/python3安装后的所有资源文件都会被放在/usr/local/python3目录中,不会分散到其他目录。如果删除直接删除这个文件就可以了。
比如centos7安装Python3.6
[root@node01 ~]# yum install yum-utils [root@node01 ~]# yum install openssl-devel -y [root@node01 ~]# mkdir -p /usr/local/python3 [root@node01 ~]# cd /usr/local/python3/ [root@node01 python3]# wget https://www.python.org/ftp/python/3.6.7/Python-3.6.7.tgz [root@node01 python3]# tar -zxvf Python-3.6.7.tgz [root@node01 python3]# cd Python-3.6.7 [root@node01 python3.6.7]# ./configure --prefix=/usr/local/python3 --with-ssl [root@node01 python3.6.7]# make && make install Installing collected packages: setuptools, pip Successfully installed pip-10.0.1 setuptools-39.0. [root@node01 python3.6.7]# cd .. [root@node01 Python3]# ln -s /usr/local/python3/bin/python3 /usr/bin/python3 [root@node01 Python3]# ln -s /usr/local/python3/bin/pip3 /usr/bin/pip3 [root@node01 Python3]# python3 -V Python 3.6.7 [root@node01 Python3]# python3 Python 3.6.7 (default, Mar 5 2020, 11:00:15) [GCC 4.8.5 20150623 (Red Hat 4.8.5-39)] on linux Type "help", "copyright", "credits" or "license" for more information. >>> exit()
3. 进程管理
进程 是 Unix 和 Linux 系统中对正在运行中的应用程序的抽象,通过它可以管理和监视程序对内存、处理器时间和 I / O 资源的使用。
3.1 杀进程
很多时候需要杀进程,ps -ef可以查看所有的进程,ps -ef|grep 查看具体的任务的进程,
比如查看Mysql进程
[root@node01 ~]# ps -ef|grep mysql clouder+ 1726 1 38 15:16 ? 00:04:34 /usr/java/jdk1.8.0_241/bin/java -cp .:/usr/share/java/mysql-connector-java.jar:/usr/share/java/oracle-connector-java.jar:/usr/share/java/postgresql-connector-java.jar:lib/* -server -Dlog4j.configuration=file:/etc/cloudera-scm-server/log4j.properties -Dfile.encoding=UTF-8 -Dcmf.root.logger=INFO,LOGFILE -Dcmf.log.dir=/var/log/cloudera-scm-server -Dcmf.log.file=cloudera-scm-server.log -Dcmf.jetty.threshhold=WARN -Dcmf.schema.dir=/opt/cloudera/cm/schema -Djava.awt.headless=true -Djava.net.preferIPv4Stack=true -Dpython.home=/opt/cloudera/cm/python -XX:+UseConcMarkSweepGC -XX:+UseParNewGC -XX:+HeapDumpOnOutOfMemoryError -Xmx2G -XX:MaxPermSize=256m -XX:+HeapDumpOnOutOfMemoryError -XX:HeapDumpPath=/tmp -XX:OnOutOfMemoryError=kill -9 %p com.cloudera.server.cmf.Main mysql 2745 1 0 15:16 ? 00:00:04 /usr/sbin/mysqld --daemonize --pid-file=/var/run/mysqld/mysqld.pid root 9864 4959 0 15:28 pts/0 00:00:00 grep --color=auto mysql
查找与指定条件匹配的进程 - 「pgrep」,,就是ps -ef|grep缩写
[root ~]$ pgrep mysqld 3584
查看端口的进程,比如mysql的端口是3306
[root@node01 ~]# lsof -i:3306 COMMAND PID USER FD TYPE DEVICE SIZE/OFF NODE NAME java 1726 cloudera-scm 285u IPv4 50625 0t0 TCP localhost:58292->localhost:mysql (ESTABLISHED) mysqld 2745 mysql 27u IPv6 47164 0t0 TCP *:mysql (LISTEN) mysqld 2745 mysql 40u IPv6 54060 0t0 TCP localhost:mysql->localhost:58296 (E
杀进程使用kill -9命令,比如 kill -9 1726,就是杀Mysql进程
3.2 守护进程
守护进程就是通常说的daemon进程,是linux后台执行的一种进程,不会随着终端的关闭而停止运行,开Linux系统的会自动打开。
不挂断地运行命令。no hangup的缩写,意即“不挂断”。和&联用
[root@node01 ~]# tail -f /var/log/messages May 1 16:01:10 node01 kubelet: I0501 16:01:10.344757 26130 server.go:837] Client rotation is on, will bootstrap in background [root@node01 ~]# ps -ef|grep tail root 26210 25353 0 16:01 pts/1 00:00:00 tail -f /var/log/messages root 26555 25310 0 16:01 pts/0 00:00:00 grep --color=auto tail 关闭上面的tail -f /var/log/messages [root@node01 ~]# ps -ef|grep tail [root@node01 ~]# ps -ef|grep tail root 27353 25310 0 16:03 pts/0 00:00:00 grep --color=auto tail
一般需要nohup和 &连用
[root@node01 ~]# nohup tail -f /var/log/messages & [1] 27718 nohup: 忽略输入并把输出追加到"nohup.out" [root@node01 ~]# ps -ef|grep tail root 27718 25353 0 16:04 pts/1 00:00:00 tail -f /var/log/messages root 29444 25310 0 16:07 pts/0 00:00:00 grep --color=auto tail 关闭上面的nohup tail -f /var/log/messages & [root@node01 ~]# ps -ef|grep tail root 27718 1 0 16:04 ? 00:00:00 tail -f /var/log/messages root 29946 25310 0 16:08 pts/0 00:00:00 grep --color=auto tail
3.3 查看进程
ps -ef查看进程
[root ~]# ps -ef UID PID PPID C STIME TTY TIME CMD root 1 0 0 Jun23 ? 00:00:05 /usr/lib/systemd/systemd --switched-root --system --deserialize 21 root 2 0 0 Jun23 ? 00:00:00 [kthreadd] ... [root ~]# ps -ef | grep mysqld root 4943 4581 0 22:45 pts/0 00:00:00 grep --color=auto mysqld mysql 25257 1 0 Jun25 ? 00:00:39 /usr/sbin/mysqld --daemonize --pid-file=/var/run/mysqld/mysqld.pid
感谢各位的阅读!关于“Linux如何进行网络管理、软件安装、进程管理操作”这篇文章就分享到这里了,希望以上内容可以对大家有一定的帮助,让大家可以学到更多知识,如果觉得文章不错,可以把它分享出去让更多的人看到吧!
免责声明:本站发布的内容(图片、视频和文字)以原创、转载和分享为主,文章观点不代表本网站立场,如果涉及侵权请联系站长邮箱:is@yisu.com进行举报,并提供相关证据,一经查实,将立刻删除涉嫌侵权内容。


