今天就跟大家聊聊有关Vue 中异步更新的原理是什么,可能很多人都不太了解,为了让大家更加了解,小编给大家总结了以下内容,希望大家根据这篇文章可以有所收获。
Vue 异步更新 DOM 原理
很多同学都知道,Vue 中的数据更新是异步的,意味着我们在修改完 Data 之后,并不能立刻获取修改后的 DOM 元素。
例如:
<template> <div> <span id="text">{{ message }}</span> <button @click="changeData"> changeData </button> </div> </template> <script> export default { data() { return { message: "hello", }; }, methods: { changeData() { this.message = "hello world"; const textContent = document.getElementById("text").textContent; // 直接获取,不是最新的 console.log(textContent === "hello world"); // false // $nextTick 回调中,是最新的 this.$nextTick(() => { const textContent = document.getElementById("text").textContent; console.warn(textContent === "hello world"); // true }); }, }, }; </script>什么时候我们才能获取到真正的 DOM 元素?
答:在 Vue 的 nextTick 回调中。
这一点在 Vue 官网有详细的介绍,但你是否有想过,为什么 Vue 需要通过 nextTick 方法才能获取最新的 DOM?
带着这个疑问,我们直接看一下源码。
// 当一个 Data 更新时,会依次执行以下代码 // 1. 触发 Data.set // 2. 调用 dep.notify // 3. Dep 会遍历所有相关的 Watcher 执行 update 方法 class Watcher { // 4. 执行更新操作 update() { queueWatcher(this); } } const queue = []; function queueWatcher(watcher: Watcher) { // 5. 将当前 Watcher 添加到异步队列 queue.push(watcher); // 6. 执行异步队列,并传入回调 nextTick(flushSchedulerQueue); } // 更新视图的具体方法 function flushSchedulerQueue() { let watcher, id; // 排序,先渲染父节点,再渲染子节点 // 这样可以避免不必要的子节点渲染,如:父节点中 v-if 为 false 的子节点,就不用渲染了 queue.sort((a, b) => a.id - b.id); // 遍历所有 Watcher 进行批量更新。 for (index = 0; index < queue.length; index++) { watcher = queue[index]; // 更新 DOM watcher.run(); } }根据上面的代码,我们可以得出这样一个流程图:
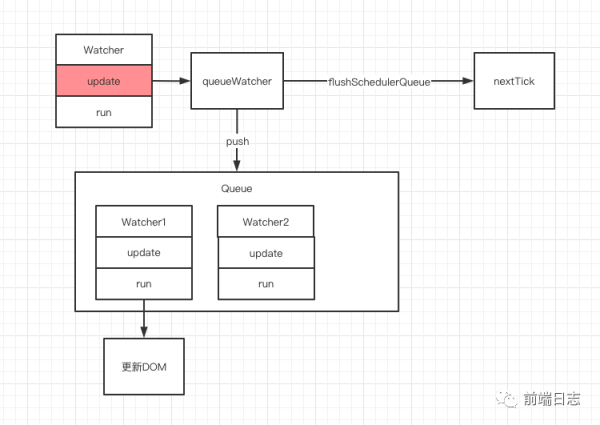
图中可以看到,Vue 在调用 Watcher 更新视图时,并不会直接进行更新,而是把需要更新的 Watcher 加入到 Queue 队列里,然后把具体的更新方法 flushSchedulerQueue 传给 nextTick 进行调用。
接下来,我们分析一下 nextTick。
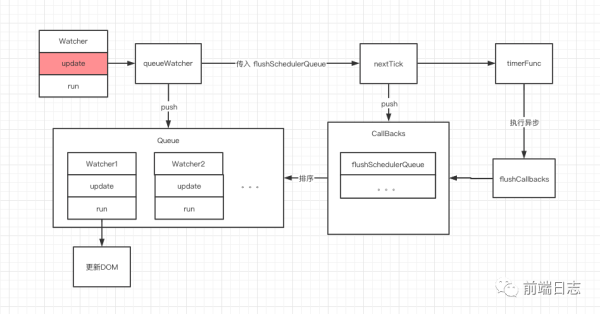
const callbacks = []; let timerFunc; function nextTick(cb?: Function, ctx?: Object) { let _resolve; // 1.将传入的 flushSchedulerQueue 方法添加到回调数组 callbacks.push(() => { cb.call(ctx); }); // 2.执行异步任务 // 此方法会根据浏览器兼容性,选用不同的异步策略 timerFunc(); }可以看到,nextTick 函数非常简单,它只是将传入的 flushSchedulerQueue 添加到 callbacks 数组中,然后执行了 timerFunc 方法。
接下来,我们分析一下 timerFunc 方法。
let timerFunc; // 判断是否兼容 Promise if (typeof Promise !== "undefined") { timerFunc = () => { Promise.resolve().then(flushCallbacks); }; // 判断是否兼容 MutationObserver // https://developer.mozilla.org/zh-CN/docs/Web/API/MutationObserver } else if (typeof MutationObserver !== "undefined") { let counter = 1; const observer = new MutationObserver(flushCallbacks); const textNode = document.createTextNode(String(counter)); observer.observe(textNode, { characterData: true, }); timerFunc = () => { counter = (counter + 1) % 2; textNode.data = String(counter); }; // 判断是否兼容 setImmediate // 该方法存在一些 IE 浏览器中 } else if (typeof setImmediate !== "undefined") { // 这是一个宏任务,但相比 setTimeout 要更好 timerFunc = () => { setImmediate(flushCallbacks); }; } else { // 如果以上方法都不知道,使用 setTimeout 0 timerFunc = () => { setTimeout(flushCallbacks, 0); }; } // 异步执行完后,执行所有的回调方法,也就是执行 flushSchedulerQueue function flushCallbacks() { for (let i = 0; i < copies.length; i++) { callbacks[i](); } }可以看到,timerFunc 是根据浏览器兼容性创建的一个异步方法,它执行完成之后,会调用 flushSchedulerQueue 方法进行具体的 DOM 更新。
分析到这里,我们就可以得到一张整体的流程图了。
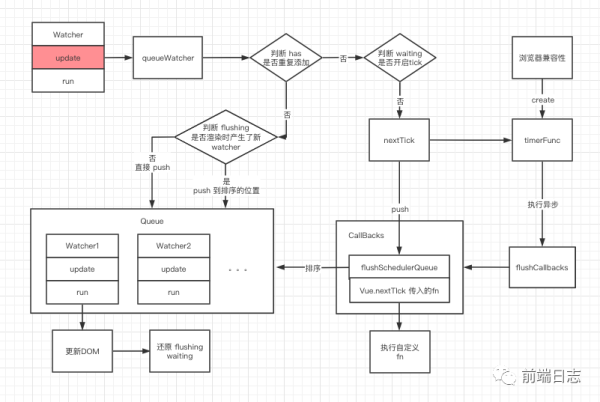
接下来,我们来完善一些判断逻辑。
判断 has 标识,避免在一个 Queue 中添加相同的 Watcher。
判断 waiting 标识,让所有的 Watcher 都在一个 tick 内进行更新。
判断 flushing 标识,处理 Watcher 渲染时,可能产生的新 Watcher。
如:触发了 v-if 的条件,新增的 Watcher 渲染。
结合以上判断,最终的流程图如下:
最后,我们分析一下,为什么 this.$nextTick 能够获取更新后的 DOM?
// 我们使用 this.$nextTick 其实就是调用 nextTick 方法 Vue.prototype.$nextTick = function (fn: Function) { return nextTick(fn, this); };可以看到,调用 this.$nextTick 其实就是调用了图中的 nextTick 方法,在异步队列中执行回调函数。根据先来后到原则,修改 Data 触发的更新异步队列会先得到执行,执行完成后就生成了新的 DOM ,接下来执行 this.$nextTick 的回调函数时,能获取到更新后的 DOM 元素了。
由于 nextTick 只是单纯通过 Promise 、SetTimeout 等方法模拟的异步任务,所以也可以手动执行一个异步任务,来实现和 this.$nextTick 相同的效果。
this.message = "hello world"; // 手动执行一个异步任务,也能获取最新的 DOM Promise.resolve().then(() => { const textContent = document.getElementById("text").textContent; console.log(textContent === "hello world"); // true }); setTimeout(() => { const textContent = document.getElementById("text").textContent; console.log(textContent === "hello world"); // true });看完上述内容,你们对Vue 中异步更新的原理是什么有进一步的了解吗?如果还想了解更多知识或者相关内容,请关注亿速云行业资讯频道,感谢大家的支持。
免责声明:本站发布的内容(图片、视频和文字)以原创、转载和分享为主,文章观点不代表本网站立场,如果涉及侵权请联系站长邮箱:is@yisu.com进行举报,并提供相关证据,一经查实,将立刻删除涉嫌侵权内容。


