(1)高数据量和吞吐量的数据库应用会对单机的性能造成较大压力;
(2)大的查询量会将单机的CPU耗尽;
(3)大的数据量对单机的存储压力较大,最终会耗尽系统的内存而将压力转移到键盘IO上
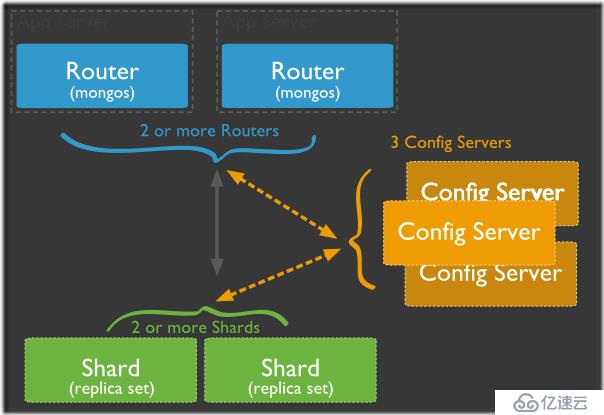
MongoDB分片技术是使用多个服务器存储数据的方法,以支持巨大的数据存储和对数据的操作。当MongoDB存储海量的数据时,一台机器可能不足以存储数据,也可能不足以提供可接受的读写吞吐量。这时,我们就可以通过在多台机器上分割数据,使得数据库系统能存储和处理更多的数据。
用于存储实际的数据块,实际生产环境中一个shard server角色可由几台机器组个一个replica set承担,防止主机单点故障
mongod实例,存储了整个 分片群集的配置信息,其中包括 chunk信息。
客户端由此接入,且让整个集群看上去像单一数据库,前端应用可以透明使用
比如,当插入一条数据时,应用只需要访问存储这条数据的分片
当MongoDB单点数据库服务器存储和性能成为瓶颈,或者需要部署大型应用以充分利用内存时,可以使用分片技术
下面介绍如何在一台CentOS7系统的物理服务器上部署一个简单结构的MongoDB分片集群 。
1台路由实例(端口 27017)
1台配置实例(端口 37017)
2台分片实例(端口 47017, 47018)
https://pan.baidu.com/s/1bZXJDBrn9qxBF6r6IF_aLQ
yum install openssl-devel -y
tar zxvf mongodb-linux-x86_64-3.2.1.tgz -C /opt/
mv mongodb-linux-x86_64-3.2.1/ /usr/local/mongodb
mkdir -p /data/mongodb/mongodb{1,2,3,4}
mkdir /data/logs
touch /data/logs/mongodb{1,2,3,4}.log
chmod -R 777 /data/logs/*.log
ulimit -n 25000 #最大文件 数
ulimit -u 25000 #最大进程数
sysctl -w vm.zone_reclaim_mode=0 #永久设置
echo never > /sys/kernel/mm/transparent_hugepage/enabled
echo never > /sys/kernel/mm/transparent_hugepage/defragln -s /usr/local/mongodb/bin/* /usr/bin/ #方便服务管理
cd /usr/local/mongodb/bin/
vim mongodb1.conf
port=37017 #指定服务端口
dbpath=/data/mongodb/mongodb1 #数据存储目录
logpath=/data/logs/mongodb1.log #日志文件
logappend=true #使用追加方式写日志
fork=true #后台运行
maxConns=5000 #设定最大同时连接数,默认为2000
storageEngine=mmapv1 #指定存储引擎为内存映射文件
configsvr=true #配置服务
[root@localhost bin]# mongod -f mongodb1.conf #启动配置服务器
about to fork child process, waiting until server is ready for connections.
forked process: 12594
child process started successfully, parent exiting
[root@localhost bin]# mongo --port 37017 #进入服务
MongoDB shell version: 3.2.1
connecting to: 127.0.0.1:37017/test
Server has startup warnings:
2018-09-15T04:39:24.967+0800 I STORAGE [initandlisten]
2018-09-15T04:39:24.967+0800 I STORAGE [initandlisten] ** WARNING: Readahead for /data/mongodb1 is set to 4096KB
2018-09-15T04:39:24.967+0800 I STORAGE [initandlisten] ** We suggest setting it to 256KB (512 sectors) or less
2018-09-15T04:39:24.967+0800 I STORAGE [initandlisten] ** http://dochub.mongodb.org/core/readahead
2018-09-15T04:39:25.828+0800 I CONTROL [initandlisten] ** WARNING: You are running this process as the root user, which is not recommended.
2018-09-15T04:39:25.828+0800 I CONTROL [initandlisten]
2018-09-15T04:39:25.829+0800 I CONTROL [initandlisten]
2018-09-15T04:39:25.829+0800 I CONTROL [initandlisten] ** WARNING: /sys/kernel/mm/transparent_hugepage/enabled is 'always'.
2018-09-15T04:39:25.829+0800 I CONTROL [initandlisten] ** We suggest setting it to 'never'
2018-09-15T04:39:25.829+0800 I CONTROL [initandlisten]
2018-09-15T04:39:25.829+0800 I CONTROL [initandlisten] ** WARNING: /sys/kernel/mm/transparent_hugepage/defrag is 'always'.
2018-09-15T04:39:25.829+0800 I CONTROL [initandlisten] ** We suggest setting it to 'never'
2018-09-15T04:39:25.829+0800 I CONTROL [initandlisten]
configsvr>
vim mongodb2.conf
port=47017
dbpath=/data/mongodb/mongodb2
logpath=/data/logs/mongodb2.log
logappend=true
fork=true
maxConns=5000
storageEngine=mmapv1
shardsvr=true
vim mongodb3.conf
port=47018
dbpath=/data/mongodb/mongodb3
logpath=/data/logs/mongodb3.log
logappend=true
fork=true
maxConns=5000
storageEngine=mmapv1
shardsvr=true
[root@localhost bin]# mongod -f mongodb2.conf
about to fork child process, waiting until server is ready for connections.
forked process: 12810
child process started successfully, parent exiting
[root@localhost bin]# mongod -f mongodb3.conf
about to fork child process, waiting until server is ready for connections.
forked process: 12825
child process started successfully, parent exiting
[root@localhost bin]# ./mongos --port 27017 --fork --logpath=/usr/local/mongodb/bin/route.log --configdb 192.168.30.55:37017 --chunkSize 1
2018-09-15T05:03:06.217+0800 W SHARDING [main] Running a sharded cluster with fewer than 3 config servers should only be done for testing purposes and is not recommended for production.
about to fork child process, waiting until server is ready for connections.
forked process: 12934
child process started successfully, parent exiting
[root@localhost bin]# mongo #进入路由实例
MongoDB shell version: 3.2.1
connecting to: test
Server has startup warnings:
2018-09-15T16:00:19.746+0800 I CONTROL [main] ** WARNING: You are running this process as the root user, which is not recommended.
2018-09-15T16:00:19.746+0800 I CONTROL [main]
mongos> sh.status()
--- Sharding Status ---
sharding version: {
"_id" : 1,
"minCompatibleVersion" : 5,
"currentVersion" : 6,
"clusterId" : ObjectId("5b9cbc14b4c77895df796bac")
}
shards: #shards下为空,没有分片服务器
active mongoses:
"3.2.1" : 1
balancer:
Currently enabled: yes
Currently running: no
Failed balancer rounds in last 5 attempts: 0
Migration Results for the last 24 hours:
No recent migrations
databases:
mongos> sh.addShard("192.168.30.55:47017")
{ "shardAdded" : "shard0000", "ok" : 1 }
mongos> sh.addShard("192.168.30.55:47018")
{ "shardAdded" : "shard0001", "ok" : 1 }
mongos> sh.status()
--- Sharding Status ---
sharding version: {
"_id" : 1,
"minCompatibleVersion" : 5,
"currentVersion" : 6,
"clusterId" : ObjectId("5b9cbc14b4c77895df796bac")
}
shards:
{ "_id" : "shard0000", "host" : "192.168.30.55:47017" }
{ "_id" : "shard0001", "host" : "192.168.30.55:47018" }
active mongoses:
"3.2.1" : 1
balancer:
Currently enabled: yes
Currently running: no
Failed balancer rounds in last 5 attempts: 0
Migration Results for the last 24 hours:
No recent migrations
databases:
mongos> show dbs
config 0.031GB
mongos> use school #进入并创建数据库school
switched to db school
mongos> for (var i=1;i<=50000;i++)db.info.insert({"id":i,"name":"tom"+i}) #创建集合info,并使用循环插入50000条数据WriteResult({ "nInserted" : 1 })
mongos> sh.enableSharding("school")
{ "ok" : 1 }
mongos> db.info.createIndex({"id":1})
{
"raw" : {
"192.168.30.55:47017" : {
"createdCollectionAutomatically" : false,
"numIndexesBefore" : 1,
"numIndexesAfter" : 2,
"ok" : 1
}
},
"ok" : 1
}
使用sh.shardCollection("school.info",{"id":1})命令对集合info进行分片
mongos> sh.shardCollection("school.info",{"id":1})
{ "collectionsharded" : "school.info", "ok" : 1 }
mongos> sh.status()
--- Sharding Status ---
sharding version: {
"_id" : 1,
"minCompatibleVersion" : 5,
"currentVersion" : 6,
"clusterId" : ObjectId("5b9cbc14b4c77895df796bac")
}
shards:
{ "_id" : "shard0000", "host" : "192.168.30.55:47017" } #两个分片服务器信息
{ "_id" : "shard0001", "host" : "192.168.30.55:47018" }
active mongoses:
"3.2.1" : 1
balancer:
Currently enabled: yes
Currently running: no
Failed balancer rounds in last 5 attempts: 0
Migration Results for the last 24 hours:
5 : Success
databases:
{ "_id" : "school", "primary" : "shard0000", "partitioned" : true } #数据库school的分片信息
school.info
shard key: { "id" : 1 }
unique: false
balancing: true
chunks: #可以看到chunks均匀分布到两个分片上
shard0000 6
shard0001 5
{ "id" : { "$minKey" : 1 } } -->> { "id" : 4682 } on : shard0001 Timestamp(2, 0)
{ "id" : 4682 } -->> { "id" : 9364 } on : shard0001 Timestamp(3, 0)
{ "id" : 9364 } -->> { "id" : 14046 } on : shard0001 Timestamp(4, 0)
{ "id" : 14046 } -->> { "id" : 18728 } on : shard0001 Timestamp(5, 0)
{ "id" : 18728 } -->> { "id" : 23410 } on : shard0001 Timestamp(6, 0)
{ "id" : 23410 } -->> { "id" : 28092 } on : shard0000 Timestamp(6, 1)
{ "id" : 28092 } -->> { "id" : 32774 } on : shard0000 Timestamp(1, 6)
{ "id" : 32774 } -->> { "id" : 37456 } on : shard0000 Timestamp(1, 7)
{ "id" : 37456 } -->> { "id" : 42138 } on : shard0000 Timestamp(1, 8)
{ "id" : 42138 } -->> { "id" : 46820 } on : shard0000 Timestamp(1, 9)
{ "id" : 46820 } -->> { "id" : { "$maxKey" : 1 } } on : shard0000 Timestamp(1, 10)
mongos> sh.addShardTag("shard0000","abc01")
mongos> sh.addShardTag("shard0001","abc02")mongos> sh.status()
--- Sharding Status ---
sharding version: {
"_id" : 1,
"minCompatibleVersion" : 5,
"currentVersion" : 6,
"clusterId" : ObjectId("5b9cbc14b4c77895df796bac")
}
shards:
{ "_id" : "shard0000", "host" : "192.168.30.55:47017", "tags" : [ "abc01" ] }
{ "_id" : "shard0001", "host" : "192.168.30.55:47018", "tags" : [ "abc02" ] }
[root@localhost bin]# cp mongodb3.conf mongodb4.conf
[root@localhost bin]# vim mongodb4.conf
port=47019
logpath=/data/logs/mongodb4.log
dbpath=/data/mongodb4
fork=true
logappend=true
maxConns=5000
storageEngine=mmapv1
shardsvr=true
[root@localhost bin]# mongod -f mongodb4.conf
about to fork child process, waiting until server is ready for connections.
forked process: 52634
child process started successfully, parent exiting
[root@localhost bin]# mongo
MongoDB shell version: 3.2.1
connecting to: test
Server has startup warnings:
2018-09-15T16:00:19.746+0800 I CONTROL [main] ** WARNING: You are running this process as the root user, which is not recommended.
2018-09-15T16:00:19.746+0800 I CONTROL [main]
mongos> sh.addShard("192.168.30.55:47019") #添加分片服务器
{ "shardAdded" : "shard0002", "ok" : 1 }
mongos> sh.status() #查看分片服务信息
--- Sharding Status ---
sharding version: {
"_id" : 1,
"minCompatibleVersion" : 5,
"currentVersion" : 6,
"clusterId" : ObjectId("5b9cbc14b4c77895df796bac")
}
shards:
{ "_id" : "shard0000", "host" : "192.168.30.55:47017" }
{ "_id" : "shard0001", "host" : "192.168.30.55:47018" }
{ "_id" : "shard0002", "host" : "192.168.30.55:47019" }
active mongoses:
"3.2.1" : 1
balancer:
Currently enabled: yes
Currently running: no
Failed balancer rounds in last 5 attempts: 0
Migration Results for the last 24 hours:
8 : Success
databases:
{ "_id" : "school", "primary" : "shard0000", "partitioned" : true }
school.info
shard key: { "id" : 1 }
unique: false
balancing: true
chunks:
shard0000 4
shard0001 4
shard0002 3
{ "id" : { "$minKey" : 1 } } -->> { "id" : 4682 } on : shard0002 Timestamp(9, 0)
{ "id" : 4682 } -->> { "id" : 9364 } on : shard0001 Timestamp(9, 1)
{ "id" : 9364 } -->> { "id" : 14046 } on : shard0001 Timestamp(4, 0)
{ "id" : 14046 } -->> { "id" : 18728 } on : shard0001 Timestamp(5, 0)
{ "id" : 18728 } -->> { "id" : 23410 } on : shard0001 Timestamp(6, 0)
{ "id" : 23410 } -->> { "id" : 28092 } on : shard0002 Timestamp(7, 0)
{ "id" : 28092 } -->> { "id" : 32774 } on : shard0002 Timestamp(8, 0)
{ "id" : 32774 } -->> { "id" : 37456 } on : shard0000 Timestamp(8, 1)
{ "id" : 37456 } -->> { "id" : 42138 } on : shard0000 Timestamp(1, 8)
{ "id" : 42138 } -->> { "id" : 46820 } on : shard0000 Timestamp(1, 9)
{ "id" : 46820 } -->> { "id" : { "$maxKey" : 1 } } on : shard0000 Timestamp(1, 10)
mongos> use admin # 注:在admin db下执行命令。
switched to db admin
mongos> db.runCommand({"removeshard":"192.168.30.55:47019"})
{
"msg" : "draining started successfully",
"state" : "started",
"shard" : "shard0002",
"note" : "you need to drop or movePrimary these databases",
"dbsToMove" : [ ],
"ok" : 1
}
mongos> db.runCommand({"removeshard":"192.168.30.55:47019"})
{
"msg" : "removeshard completed successfully",
"state" : "completed",
"shard" : "shard0002",
"ok" : 1
}
“注意:该命令至少执行两次才能成功删除,执行到state为completed才真正删除,否则就是没有删除成功,该分片处于"draining" : true状态,该状态下不但该分片没有删除成功,而且还影响接下来删除其他分片操作,遇到该状态再执行一次removeshard即可,最好就是删除分片时一直重复执行删除命令,直到state为completed
mongos> sh.status()
--- Sharding Status ---
sharding version: {
"_id" : 1,
"minCompatibleVersion" : 5,
"currentVersion" : 6,
"clusterId" : ObjectId("5b9cbc14b4c77895df796bac")
}
shards:
{ "_id" : "shard0000", "host" : "192.168.30.55:47017" }
{ "_id" : "shard0001", "host" : "192.168.30.55:47018" }
active mongoses:
"3.2.1" : 1
balancer:
Currently enabled: yes
Currently running: no
Failed balancer rounds in last 5 attempts: 0
Migration Results for the last 24 hours:
11 : Success
databases:
{ "_id" : "school", "primary" : "shard0000", "partitioned" : true }
school.info
shard key: { "id" : 1 }
unique: false
balancing: true
chunks:
shard0000 6
shard0001 5
{ "id" : { "$minKey" : 1 } } -->> { "id" : 4682 } on : shard0000 Timestamp(10, 0)
{ "id" : 4682 } -->> { "id" : 9364 } on : shard0001 Timestamp(9, 1)
{ "id" : 9364 } -->> { "id" : 14046 } on : shard0001 Timestamp(4, 0)
{ "id" : 14046 } -->> { "id" : 18728 } on : shard0001 Timestamp(5, 0)
{ "id" : 18728 } -->> { "id" : 23410 } on : shard0001 Timestamp(6, 0)
{ "id" : 23410 } -->> { "id" : 28092 } on : shard0001 Timestamp(11, 0)
{ "id" : 28092 } -->> { "id" : 32774 } on : shard0000 Timestamp(12, 0)
{ "id" : 32774 } -->> { "id" : 37456 } on : shard0000 Timestamp(8, 1)
{ "id" : 37456 } -->> { "id" : 42138 } on : shard0000 Timestamp(1, 8)
{ "id" : 42138 } -->> { "id" : 46820 } on : shard0000 Timestamp(1, 9)
{ "id" : 46820 } -->> { "id" : { "$maxKey" : 1 } } on : shard0000 Timestamp(1, 10)
mongo --port 37017
configsvr> use config
configsvr> show collections
....
collections
chunks
databases
....configsvr> db.chunks.findOne()
configsvr> db.collections.find()
configsvr> db.databases.find()
免责声明:本站发布的内容(图片、视频和文字)以原创、转载和分享为主,文章观点不代表本网站立场,如果涉及侵权请联系站长邮箱:is@yisu.com进行举报,并提供相关证据,一经查实,将立刻删除涉嫌侵权内容。