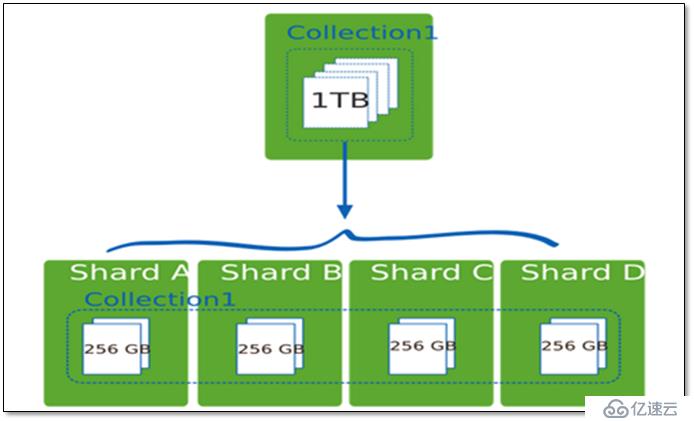
在Mongodb里面存在另一种集群,就是分片技术,可以满足MongoDB数据量大量增长的需求。
高数据量和吞吐量的数据库应用会对单机的性能造成较大压力,大的查询量会将单机的CPU耗尽,大的数据量对单机的存储压力较大,最终会耗尽系统的内存而将压力转移到磁盘IO上。
垂直扩展:增加更多的CPU和存储资源来扩展容量。
Shard:
用于存储实际的数据块,实际生产环境中一个shard server角色可由几台机器组个一个replica set承担,防止主机单点故障
Config Server:
mongod实例,存储了整个 ClusterMetadata,其中包括 chunk信息。
Query Routers:
前端路由,客户端由此接入,且让整个集群看上去像单一数据库,前端应用可以透明使用。

vim mongodb1.conf

port=37017
dbpath=/data/mongodb/mongodb1
logpath=/data/logs/mongodb1.log
logappend=true
fork=true
maxConns=5000
storageEngine=mmapv1
configsvr=true        #开启配置服务
mongod -f /usr/local/mongodb/bin/mongodb1.conf #开启配置实例vim mongodb2.conf
port=47017
dbpath=/data/mongodb/mongodb2
logpath=/data/logs/mongodb2.log
logappend=true
fork=true
maxConns=5000
storageEngine=mmapv1
shardsvr=true #开启分片服务
vim mongodb3.conf
port=47018
dbpath=/data/mongodb/mongodb3
logpath=/data/logs/mongodb3.log
logappend=true
fork=true
maxConns=5000
storageEngine=mmapv1
shardsvr=true #开启分片服务
mongod -f /usr/local/mongodb/bin/mongodb2.conf #开启分片实例
mongod -f /usr/local/mongodb/bin/mongodb3.conf[root@localhost bin]# ./mongos --port 27017 --fork --logpath=/usr/local/mongodb/bin/route.log --configdb 192.168.217.134:37017 --chunkSize 1
2018-07-23T14:15:28.185+0800 W SHARDING [main] Running a sharded cluster with fewer than 3 config servers should only be done for testing purposes and is not recommended for production.
about to fork child process, waiting until server is ready for connections.
forked process: 15337
child process started successfully, parent exiting[root@localhost bin]# mongo
MongoDB shell version: 3.2.1
......
mongos> show dbs
config 0.031GB
mongos> sh.status() #查看分片状态
--- Sharding Status ---
sharding version: {
"_id" : 1,
"minCompatibleVersion" : 5,
"currentVersion" : 6,
"clusterId" : ObjectId("5b557280f9effb757fd31cdb")
}
shards: #分片为空
active mongoses:
"3.2.1" : 1
balancer:
Currently enabled: yes
Currently running: no
Failed balancer rounds in last 5 attempts: 0
Migration Results for the last 24 hours:
No recent migrations
databases:
mongos> sh.addShard("192.168.217.134:47017") #添加分片
{ "shardAdded" : "shard0000", "ok" : 1 }
mongos> sh.addShard("192.168.217.134:47018")
{ "shardAdded" : "shard0001", "ok" : 1 }
mongos> sh.status() #查看分片状态
--- Sharding Status ---
sharding version: {
"_id" : 1,
"minCompatibleVersion" : 5,
"currentVersion" : 6,
"clusterId" : ObjectId("5b557280f9effb757fd31cdb")
}
shards: #分片信息
{ "_id" : "shard0000", "host" : "192.168.217.134:47017" }
{ "_id" : "shard0001", "host" : "192.168.217.134:47018" }
active mongoses:
"3.2.1" : 1
balancer:
Currently enabled: yes
Currently running: no
Failed balancer rounds in last 5 attempts: 0
Migration Results for the last 24 hours:
No recent migrations
databases:
mongos> use test
switched to db test
mongos> for(var i=1;i<=10000;i++)db.users.insert({"id":i,"name":"tom"+i})  #添加数据
WriteResult({ "nInserted" : 1 })
mongos> sh.status()
.......
  databases:
    {  "_id" : "test",  "primary" : "shard0000",  "partitioned" : false }
    #partitioned 值为false 表示数据库尚未分片。

mongos> sh.enableSharding("test")   #启用数据库分片

mongos> db.users.createIndex({"id":1})   #创建索引

mongos> sh.shardCollection("test.users",{"id":1})  #表分片
{ "collectionsharded" : "test.users", "ok" : 1 }
mongos> sh.status()
......
            { "id" : { "$minKey" : 1 } } -->> { "id" : 2341 } on : shard0001 Timestamp(5, 1)
            { "id" : 2341 } -->> { "id" : 4682 } on : shard0001 Timestamp(3, 0)
            { "id" : 4682 } -->> { "id" : 7023 } on : shard0000 Timestamp(6, 1)
            { "id" : 7023 } -->> { "id" : 9364 } on : shard0000 Timestamp(1, 3)
            { "id" : 9364 } -->> { "id" : 13407 } on : shard0000 Timestamp(3, 2)
            { "id" : 13407 } -->> { "id" : 21295 } on : shard0000 Timestamp(3, 3)
            { "id" : 21295 } -->> { "id" : 25976 } on : shard0001 Timestamp(4, 2)
            { "id" : 25976 } -->> { "id" : 33545 } on : shard0001 Timestamp(4, 3)
            { "id" : 33545 } -->> { "id" : 38226 } on : shard0000 Timestamp(5, 2)
            { "id" : 38226 } -->> { "id" : 45910 } on : shard0000 Timestamp(5, 3)
            { "id" : 45910 } -->> { "id" : { "$maxKey" : 1 } } on : shard0001 Timestamp(6, 0)
#数据存放在两个分片服务器上即:shard0000、shard0001中。mongos> sh.status()
......
shards:
{ "_id" : "shard0000", "host" : "192.168.217.134:47017" }
{ "_id" : "shard0001", "host" : "192.168.217.134:47018" }
mongos> sh.addShardTag("shard0000","sales00") #添加标签
mongos> sh.addShardTag("shard0001","sales01")
mongos> sh.status()
......
shards:
{ "_id" : "shard0000", "host" : "192.168.217.134:47017", "tags" : [ "sales00" ] }
{ "_id" : "shard0001", "host" : "192.168.217.134:47018", "tags" : [ "sales01" ] }
mongos> use admin

mongos> db.runCommand({"removeshard":"192.168.217.134:47018"})   #删除分片节点
ps:MongoDB 4以上的版本做分片,需要先把实例做成复制集。
免责声明:本站发布的内容(图片、视频和文字)以原创、转载和分享为主,文章观点不代表本网站立场,如果涉及侵权请联系站长邮箱:is@yisu.com进行举报,并提供相关证据,一经查实,将立刻删除涉嫌侵权内容。


