目录
1. HTML5 Media-Video
2. HTML5 Media-Audio
3. 拖拽操作
4. 获取位置信息
5. 使用Google 地图获取位置信息
多媒体是互联网中的最重要的一部分,无论访问的是哪种类型的网页,视频或音频***,在之前实现这些功能对开发人员来说可能非常痛苦,必须依赖Object 标签,调用第三方软件来加载,如Flash等,如果有些设备不支持Flash,我们对此就束手无策了。但是HTML5的出现让多媒体网页开发变得异常简单,也形成了新的标准。
在本节中学习如何在HTML5中使用Video 元素
1.准备视频资源
2. 创建HTML 页面
新建HTML ,并命名为“Media.html”,输入以下内容:
<video controls width="500px" id="vid">
<source src="vid.mp4" />
</video>
可以观察到的是video 标签中包含“Controls”,添加该标签可以使得播放器工具栏可见。Control bar 和我们平常所见到的一样,非常简单,包含暂停,播放,停止等按钮。
注意:
要确保video 和html 文件存放到同一目录下。如果想放置在不同的目录下,需要设置src 属性。
HTML5 Video 元素只支持MP4,webm,3gpp,m4v mpeg,ogg ,quicktime,x-ms-wmvright格式。
输出:
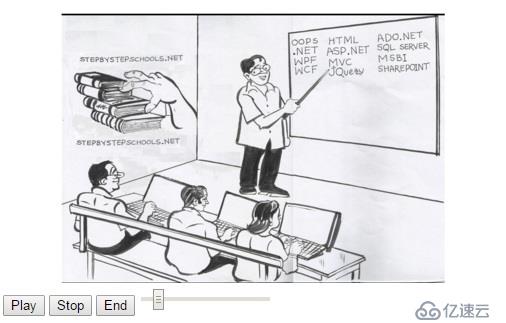
1. 创建HTML 页面
新建HTML 页面“Media01.html”设置Video 资源 src属性。在本节中不使用Controls 属性来设置,使用JS代码来实现。
<video width="500px" id="vid">
<source src="vid.mp4" />
</video>
2. 添加播放,暂停,和声音调节按钮。
<input type="button" name="name" value="Play" id="BtnPlay" />
<input type="button" name="name" value="Stop" id="btnStop" />
<input type="button" name="name" value="End" id="btnEnd" />
<input type="range" name="name" value="0.1" min="0" max="1" step="0.1" id="slideVolume" />
3. 创建JS 函数来控制Video播放。
function PlayOrPause()
{
var v = document.getElementById('vid');if (v.paused || v.ended)
{
  v.play();
  document.getElementById('BtnPlay').value = "Pause";
}else{
  v.pause();
  document.getElementById('BtnPlay').value = "Play";
}
}
设置CurrentTime为6,则表示在第六秒时视频停止播放。
function Stop()
{
  var v = document.getElementById('vid');
  v.pause();
  v.currentTime = 6;
  document.getElementById('BtnPlay').value = "Play";
}
如下是设置当视频播放完成之后停止播放:
function End()
{
  var v = document.getElementById('vid');
  v.pause();
  v.currentTime = v.duration;
  document.getElementById('BtnPlay').value = "Play";
}
以下代码是将声音调节控制到0-1之间:
function ChangeVolume(element)
{
  var v = document.getElementById('vid');
  v.volume = element.value;//For mute set it to 0}
输出:
HTML5使得在页面中加载音频元素变得非常简单。
1. 准备音频资源
2. 新建HTML页面,输入以下内容:
<audio id="audctrl" controls>
<source src="aud.mp3" type="audio/mp3" />
</audio>
3. 输出:

1.新建HTML页面
<audio id="audctrl">
        <source src="aud.mp3" type="audio/mp3" />
</audio>
2. 添加播放,暂停及音量键
<innput type="button" name="name" value="Play" id="BtnPlay" />
<input type="button" name="name" value="Stop" id="btnStop" />
<input type="button" name="name" value="End" id="btnEnd" />
<input type="range" name="name" value="0.1" min="0" max="1" step="0.1" id="slideVolume" />
3. 创建JS 函数来控制音频播放。代码如下:
function PlayOrPause()
{
  var v = document.getElementById('audctrl');  if (v.paused || v.ended)
  {
    v.play();
    document.getElementById('BtnPlay').value = "Pause";
   }   else
   {
     v.pause();
     document.getElementById('BtnPlay').value = "Play";
   }
}
同上,设置在第6秒停止播放:
function Stop()
{
  var v = document.getElementById('audctrl');
  v.pause();
  v.currentTime = 6;
  document.getElementById('BtnPlay').value = "Play";
}
在之前,实现拖拽操作都是开发人员自定义逻辑来实现,但是HTML5提供了拖拽API ,使得拖拽操作的实现变得如此简单。
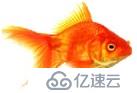
1. 准备资源(图片资源)
2. 设置draggable 属性
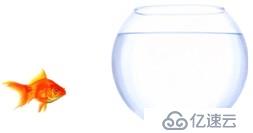
<img src="fish.png" draggable="true" id="img11" ondragstart="drag(event)" />
3. 输出
4. 实现drag 事件
function drag(ev) {
ev.dataTransfer.setData("text", ev.target.id);
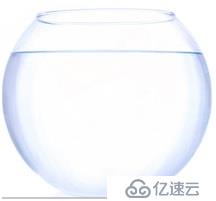
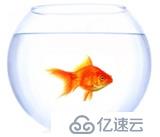
}5. drog 操作
<div id="div1" class="bowl" ondrop="drop(event)" ondragover="allowDrop(event)">
</div>
输出:
ondragover 事件制定被拖拽的数据。
function allowDrop(ev) {
ev.preventDefault();
}
当拖拽的元素被鼠标释放时,自动调用ondrop 事件
function drop(ev) {
  ev.preventDefault();
  var data = ev.dataTransfer.getData("text");
  ev.target.appendChild(document.getElementById(data));
}
输出:
新建HTML页面,HTML & Css 代码如下:
<style>
        body {
            cursor: pointer;
            text-align: center;
        }
        .divdrag {
            position: relative;
            border: 0px solid rgba(0, 0, 0, .25);
            width: 300px;
            height: 300px;
            padding: 10px 10px10px10px;            float: left;
        }
        .face {
            background-p_w_picpath: url('face.jpg');
            background-repeat: no-repeat;
            width: 424px;
            height: 510px;
            border: 1px dotted grey;
            padding: 0 0 0 0;
        }
.facetr td {
            text-align: center;
            border: 1px dotted #f7ecec;
        }
</style>
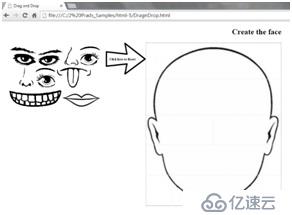
<h3>Create the face</h3> <div class="divdrag"> <img src="eye1.png" alt="eye" draggable="true" id="eye1" ondragstart="drag(event)" /> <img src="eye2.png" alt="eye" draggable="true" id="eye2" ondragstart="drag(event)" /> <img src="nose2.png" alt="nose" draggable="true" id="nose2" ondragstart="drag(event)" /> <img src="eye4.png" alt="eye" draggable="true" id="eye4" ondragstart="drag(event)" /> <img src="nose1.png" alt="nose" draggable="true" id="nose1" ondragstart="drag(event)" /> <img src="eye3.png" alt="eye" draggable="true" id="eye3" ondragstart="drag(event)" /> <img src="smile1.png" alt="smile" draggable="true" id="smile1" ondragstart="drag(event)" /> <img src="smile3.png" alt="smile" draggable="true" id="smile2" ondragstart="drag(event)" /> <img src="smile2.png" alt="smile" draggable="true" id="smile3" ondragstart="drag(event)" /> </div> <div > <a href="DragnDrop.html" title="Click here to reset" > <img src="direction.png" width="125" height="100" onclick="" /> </a> </div> <div id="div1" > <table class="face"> <tr> <td colspan="2" > </td> </tr> <tr> <td colspan="2" > </td> </tr> <tr> <td id="eye" ondrop="drop(event)" ondragover="allowDrop(event)"></td> <td id="eye" ondrop="drop(event)" ondragover="allowDrop(event)"></td> </tr> <tr> <td id="nose" ondrop="drop(event)" ondragover="allowDrop(event)" colspan="2"></td> </tr> <tr> <td id="smile" ondrop="drop(event)" ondragover="allowDrop(event)" colspan="2"></td> </tr> </table> </div>
输出:
JS 代码:
function allowDrop(ev) {
ev.preventDefault();
}
function drag(ev) {
ev.dataTransfer.effectAllowed = 'copy';
ev.dataTransfer.setData("text", ev.target.id);
}
function drop(ev) {
ev.preventDefault();
var data = ev.dataTransfer.getData("text"); if (data.indexOf(ev.target.id) == -1) {
ev.dataTransfer.clearData();
} else {
ev.target.appendChild(document.getElementById(data));
}
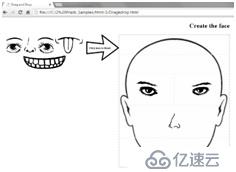
}运行:
7. 地理位置信息的获取
HTML5 可以共享位置信息,精度和维度都可以通过JS事件来捕捉并返回给服务器来在google 地图中定位。
初始化:
1. 创建html 页面 Geolocation.html;
2. 添加页面元素:
<input type="button" value="Get My Location" />
JS 代码:
<script type=”text/Javascript”>
var x = document.getElementById("lblDisplay");
function getLocation() {
document.getElementById("header").value = "Static Location"; if (navigator.geolocation) {
var opt = {
timeout: 6000,
maximumAge: 60000,
enableHighAccuracy: true
};
navigator.geolocation.getCurrentPosition(showPosition, errorCallBack, opt);
}
else {
alert('No support for geolocation');
}
}
function showPosition(position) {
x.innerHTML = "Latitude: " + position.coords.latitude + "Longitude: " + position.coords.longitude;
}
function errorCallBack(e) { switch (e)
{ case e.PERMISSION_DENIED:
x.innerHTML = "User denied geolocation request"; break; case e.POSITION_UNAVAILABLE:
x.innerHTML = "No position information available"; break; case e.TIMEOUT:
x.innerHTML = "Timeout occured"; break; case e.UNKNOWN_ERROR:
x.innerHTML = "Unknown error"; break;
}
}
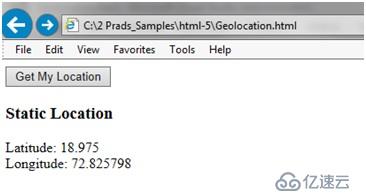
</script>执行:
如何实现自定更新位置信息呢?
1. 初始化
<input type="button" value="Get My Location Updated" />
2. JS代码
varwatchid;
function getUpdatedLocation() {
  document.getElementById("header").value = "Dynamic Location";  if (navigator.geolocation) {
    var opt = {
                timeout: 500,
                maximumAge: 1000,
                enableHighAccuracy: true
              };
   watchid = navigator.geolocation.watchPosition(showPosition, errorCallBack, opt);
  }
  else {                // no native support; maybe try a fallback?
  }
}
持续更新位置信息
JS代码:
function stopUpdatingLocation() {
if (navigator.geolocation) {
navigator.geolocation.clearWatch(watchid);
}
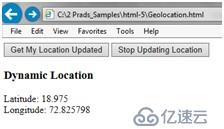
}输出:
1. 创建HTML 页面
2. 添加GOOGLE 地图的引用
<script src="http://maps.google.se/maps/api/js?sensor=false"></script>
3. 添加div 元素,并加载地图
<div id="divmap" ></div>
4. 添加点击按钮来加载地图并输入目的地
5. js 代码:
<script type="text/javascript">
function GetMyDirection() { if (navigator.geolocation) {
var opt = {
timeout: 500,
maximumAge: 1000,
enableHighAccuracy: true
};
navigator.geolocation.getCurrentPosition(showPosition, errorCallBack, opt);
}
else {
alert('No support for geolocation');
}
}
function showPosition(position) {
showInMap(position.coords.latitude, position.coords.longitude);
}
function showInMap(lat, lang) {
vardirectionsService = new google.maps.DirectionsService();
vardirectionsRenderer = new google.maps.DirectionsRenderer();
var route = {
origin: new google.maps.LatLng(lat, lang),
destination: document.getElementById('txtDestination').value, travelMode: google.maps.DirectionsTravelMode.DRIVING
};
varmapOptions = {
zoom: 10,
center: new google.maps.LatLng(50.8504500, 4.3487800),mapTypeId: google.maps.MapTypeId.ROADMAP
};
var map = new google.maps.Map(document.getElementById("divmap"), mapOptions);
directionsRenderer.setMap(map);
directionsRenderer.setPanel(document.getElementById("divDriveDirection"));
directionsService.route(route, function (result, status) { if (status === google.maps.DirectionsStatus.OK) {
directionsRenderer.setDirections(result);
}
});
}
function errorCallBack(e) { switch (e) { case e.PERMISSION_DENIED:
x.innerHTML = "User denied geolocation request"; break; case e.POSITION_UNAVAILABLE:
x.innerHTML = "No position information available"; break; case e.TIMEOUT:
x.innerHTML = "Timeout occured"; break; case e.UNKNOWN_ERROR:
x.innerHTML = "Unknown error"; break;
}
}
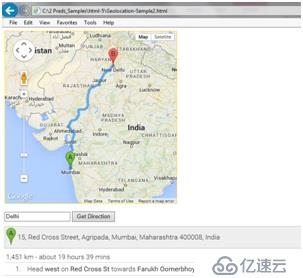
</script>运行:
免责声明:本站发布的内容(图片、视频和文字)以原创、转载和分享为主,文章观点不代表本网站立场,如果涉及侵权请联系站长邮箱:is@yisu.com进行举报,并提供相关证据,一经查实,将立刻删除涉嫌侵权内容。


