今天就跟大家聊聊有关如何解析client-go中workqueue,可能很多人都不太了解,为了让大家更加了解,小编给大家总结了以下内容,希望大家根据这篇文章可以有所收获。
下面主要讲述下client-go中workqueue, 看一下client-go的一个整体数据走向.如下图:
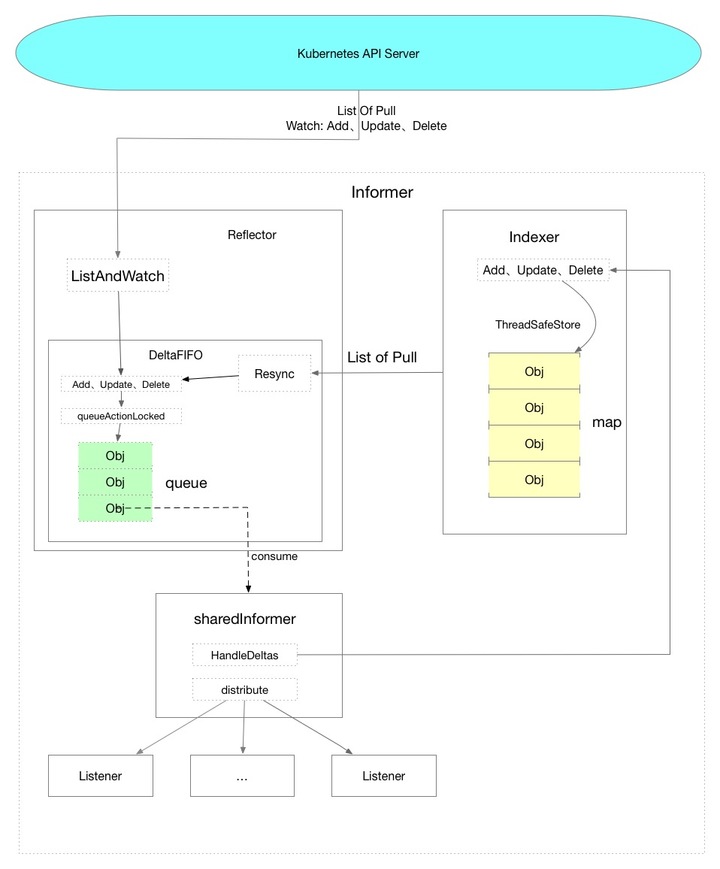
而workqueue主要是在listener这里引用,listener使用chan获取到数据之后将数据放入到工作队列进行处理。主要是由于chan过于简单,已经无法满足K8S的场景,所以衍生出了workqueue,
特性
有序
去重
并发
延迟处理
限速
当前有三种workqueue
基本队列
延迟队列
限速队列
其中延迟队列是基于基本队列实现的,而限流队列基于延迟队列实现
基本队列
看一下基本队列的接口
// client-go源码路径util/workqueue/queue.go
type Interface interface {
    //新增元素 可以是任意对象
    Add(item interface{})
    //获取当前队列的长度
    Len() int
    // 阻塞获取头部元素(先入先出)  返回元素以及队列是否关闭
    Get() (item interface{}, shutdown bool)
    // 显示标记完成元素的处理
    Done(item interface{})
    //关闭队列
    ShutDown()
    //队列是否处于关闭状态
    ShuttingDown() bool
}
看一下基本队列的数据结构,只看三个重点处理的,其他的没有展示出来
type Type struct {
    //含有所有元素的元素的队列 保证有序
    queue []t
    //所有需要处理的元素 set是基于map以value为空struct实现的结构,保证去重
    dirty set
    //当前正在处理中的元素
    processing set
    ...
}

type empty struct{}
type t interface{}
type set map[t]empty
基本队列的hello world也很简单
 wq := workqueue.New()
    wq.Add("hello")
    v, _ := wq.Get()
基本队列Add
func (q *Type) Add(item interface{}) {
    q.cond.L.Lock()
    defer q.cond.L.Unlock()
    //如果当前处于关闭状态,则不再新增元素
    if q.shuttingDown {
        return
    }
    //如果元素已经在等待处理中,则不再新增
    if q.dirty.has(item) {
        return
    }
    //添加到metrics
    q.metrics.add(item)
    //加入等待处理中
    q.dirty.insert(item)
    //如果目前正在处理该元素 就不将元素添加到队列
    if q.processing.has(item) {
        return
    }
    q.queue = append(q.queue, item)
    q.cond.Signal()
}
基本队列Get
func (q *Type) Get() (item interface{}, shutdown bool) {
    q.cond.L.Lock()
    defer q.cond.L.Unlock()
    //如果当前没有元素并且不处于关闭状态,则阻塞
    for len(q.queue) == 0 && !q.shuttingDown {
        q.cond.Wait()
    }
    ...
    item, q.queue = q.queue[0], q.queue[1:]
    q.metrics.get(item)
    //把元素添加到正在处理队列中
    q.processing.insert(item)
    //把队列从等待处理队列中删除
    q.dirty.delete(item)
    return item, false
}
基本队列实例化
func newQueue(c clock.Clock, metrics queueMetrics, updatePeriod time.Duration) *Type {
    t := &Type{
        clock:                      c,
        dirty:                      set{},
        processing:                 set{},
        cond:                       sync.NewCond(&sync.Mutex{}),
        metrics:                    metrics,
        unfinishedWorkUpdatePeriod: updatePeriod,
    }
        //启动一个协程 定时更新metrics
    go t.updateUnfinishedWorkLoop()
    return t
}

func (q *Type) updateUnfinishedWorkLoop() {
    t := q.clock.NewTicker(q.unfinishedWorkUpdatePeriod)
    defer t.Stop()
    for range t.C() {
        if !func() bool {
            q.cond.L.Lock()
            defer q.cond.L.Unlock()
            if !q.shuttingDown {
                q.metrics.updateUnfinishedWork()
                return true
            }
            return false

        }() {
            return
        }
    }
}
延迟队列
延迟队列的实现思路主要是使用优先队列存放需要延迟添加的元素,每次判断最小延迟的元素书否已经达到了加入队列的要求(延迟的时间到了),如果是则判断下一个元素,直到没有元素或者元素还需要延迟为止。
看一下延迟队列的数据结构
type delayingType struct {
    Interface
        ...
    //放置延迟添加的元素
    waitingForAddCh chan *waitFor
       ...
}
主要是使用chan来保存延迟添加的元素,而具体实现是通过一个实现了一个AddAfter方法,看一下具体的内容
//延迟队列的接口
type DelayingInterface interface {
    Interface
    // AddAfter adds an item to the workqueue after the indicated duration has passed
    AddAfter(item interface{}, duration time.Duration)
}

func (q *delayingType) AddAfter(item interface{}, duration time.Duration) {
    ...
    //如果延迟实现小于等于0 直接添加到队列
    if duration <= 0 {
        q.Add(item)
        return
    }
    select {
    case <-q.stopCh:
    //添加到chan,下面会讲一下这个chan的处理
    case q.waitingForAddCh <- &waitFor{data: item, readyAt: q.clock.Now().Add(duration)}:
    }
}
延迟元素的处理
func (q *delayingType) waitingLoop() {

    defer utilruntime.HandleCrash()

    never := make(<-chan time.Time)

    var nextReadyAtTimer clock.Timer

    waitingForQueue := &waitForPriorityQueue{}
    //这里是初始化一个优先队列 具体实现有兴趣的同学可以研究下
    heap.Init(waitingForQueue)

    waitingEntryByData := map[t]*waitFor{}

    for {
        if q.Interface.ShuttingDown() {
            return
        }

        now := q.clock.Now()

        // Add ready entries
        for waitingForQueue.Len() > 0 {
            entry := waitingForQueue.Peek().(*waitFor)
            //看一下第一个元素是否已经到达延迟的时间了
            if entry.readyAt.After(now) {
                break
            }

            //时间到了,将元素添加到工作的队列,并且从延迟的元素中移除
            entry = heap.Pop(waitingForQueue).(*waitFor)
            q.Add(entry.data)
            delete(waitingEntryByData, entry.data)
        }

        // Set up a wait for the first item's readyAt (if one exists)
        nextReadyAt := never
        if waitingForQueue.Len() > 0 {
            if nextReadyAtTimer != nil {
                nextReadyAtTimer.Stop()
            }
            //如果还有需要延迟的元素,计算第一个元素的延迟时间(最小延迟的元素)
            entry := waitingForQueue.Peek().(*waitFor)
            nextReadyAtTimer = q.clock.NewTimer(entry.readyAt.Sub(now))
            nextReadyAt = nextReadyAtTimer.C()
        }

        select {
        case <-q.stopCh:
            return
        case <-q.heartbeat.C():
            //定时检查下是否有元素达到延迟的时间
        case <-nextReadyAt:
            //这里是上面计算出来的时间,时间到了,处理到达延迟时间的元素
        case waitEntry := <-q.waitingForAddCh:
            //检查是否需要延迟,如果需要延迟就加入到延迟等待
            if waitEntry.readyAt.After(q.clock.Now()) {
                insert(waitingForQueue, waitingEntryByData, waitEntry)
            } else {
                //如果不需要延迟就直接添加到队列
                q.Add(waitEntry.data)
            }

            drained := false
            for !drained {
                select {
                case waitEntry := <-q.waitingForAddCh:
上面waitingLoop 是在实例化延迟队列的时候调用的,看一下实例化时候的逻辑
func NewDelayingQueueWithCustomClock(clock clock.Clock, name string) DelayingInterface {
    //实例化一个数据结构
    ret := &delayingType{
        Interface:       NewNamed(name),
        clock:           clock,
        heartbeat:       clock.NewTicker(maxWait),
        stopCh:          make(chan struct{}),
        waitingForAddCh: make(chan *waitFor, 1000),
        metrics:         newRetryMetrics(name),
    }

    //放到一个协程中处理延迟元素
    go ret.waitingLoop()

    return ret
}
限速队列
当前限速队列支持4中限速模式
令牌桶算法限速
排队指数限速
计数器模式
混合模式(多种限速算法同时使用)
限速队列的底层实际上还是通过延迟队列来进行限速,通过计算出元素的限速时间作为延迟时间
来看一下限速接口
type RateLimiter interface {
    //
    When(item interface{}) time.Duration
    // Forget indicates that an item is finished being retried.  Doesn't matter whether its for perm failing
    // or for success, we'll stop tracking it
    Forget(item interface{})
    // NumRequeues returns back how many failures the item has had
    NumRequeues(item interface{}) int
}
看一下限速队列的数据结构
// RateLimitingInterface is an interface that rate limits items being added to the queue.
type RateLimitingInterface interface {
    DelayingInterface

    //实际上底层还是调用的延迟队列,通过计算出元素的延迟时间 进行限速
    AddRateLimited(item interface{})

    // Forget indicates that an item is finished being retried.  Doesn't matter whether it's for perm failing
    // or for success, we'll stop the rate limiter from tracking it.  This only clears the `rateLimiter`, you
    // still have to call `Done` on the queue.
    Forget(item interface{})

    // NumRequeues returns back how many times the item was requeued
    NumRequeues(item interface{}) int
}

func (q *rateLimitingType) AddRateLimited(item interface{}) {
         //通过when方法计算延迟加入队列的时间
    q.DelayingInterface.AddAfter(item, q.rateLimiter.When(item))
}
令牌桶算法
client-go中的令牌桶限速是通过 golang.org/x/time/rat包来实现的
可以通过 flowcontrol.NewTokenBucketRateLimiter(qps float32, burst int) 来使用令牌桶限速算法,其中第一个参数qps表示每秒补充多少token,burst表示总token上限为多少。
排队指数算法
排队指数可以通过 workqueue.NewItemExponentialFailureRateLimiter(baseDelay time.Duration, maxDelay time.Duration) 来使用。
这个算法有两个参数:
baseDelay 基础限速时间
maxDelay 最大限速时间
举个例子来理解一下这个算法,例如快速插入5个相同元素,baseDelay设置为1秒,maxDelay设置为10秒,都在同一个限速期内。第一个元素会在1秒后加入到队列,第二个元素会在2秒后加入到队列,第三个元素会在4秒后加入到队列,第四个元素会在8秒后加入到队列,第五个元素会在10秒后加入到队列(指数计算的结果为16,但是最大值设置了10秒)。
来看一下源码的计算
func (r *ItemExponentialFailureRateLimiter) When(item interface{}) time.Duration {
    r.failuresLock.Lock()
    defer r.failuresLock.Unlock()

    //第一次为0
    exp := r.failures[item]
    //累加1
    r.failures[item] = r.failures[item] + 1

    //通过当前计数和baseDelay计算指数结果  baseDelay*(2的exp次方)
    backoff := float64(r.baseDelay.Nanoseconds()) * math.Pow(2, float64(exp))
    if backoff > math.MaxInt64 {
        return r.maxDelay
    }

    calculated := time.Duration(backoff)
    if calculated > r.maxDelay {
        return r.maxDelay
    }

    return calculated
}
计数器模式
计数器模式可以通过 workqueue.NewItemFastSlowRateLimiter(fastDelay, slowDelay time.Duration, maxFastAttempts int)来使用,有三个参数
fastDelay 快限速时间
slowDelay 慢限速时间
maxFastAttempts 快限速元素个数
原理是这样的,假设fastDelay设置为1秒,slowDelay设置为10秒,maxFastAttempts设置为3,同样在一个限速周期内快速插入5个相同的元素。前三个元素都是以1秒的限速时间加入到队列,添加第四个元素时开始使用slowDelay限速时间,也就是10秒后加入到队列,后面的元素都将以10秒的限速时间加入到队列,直到限速周期结束。
来看一下源码
func (r *ItemFastSlowRateLimiter) When(item interface{}) time.Duration {
    r.failuresLock.Lock()
    defer r.failuresLock.Unlock()
    //添加一次就计数一次
    r.failures[item] = r.failures[item] + 1
    //计数小于maxFastAttempts都以fastDelay为限速时间,否则以slowDelay为限速时间
    if r.failures[item] <= r.maxFastAttempts {
        return r.fastDelay
    }
    return r.slowDelay
}
混合模式
最后一种是混合模式,可以组合使用不同的限速算法实例化限速队列
func NewMaxOfRateLimiter(limiters ...RateLimiter) RateLimiter {
    return &MaxOfRateLimiter{limiters: limiters}
}
在k8s-client-go的源码中可以看到,大量的接口组合运用,将各种功能拆分成各个细小的库,是一种非常值得学习的代码风格以及思路。
看完上述内容,你们对如何解析client-go中workqueue有进一步的了解吗?如果还想了解更多知识或者相关内容,请关注亿速云行业资讯频道,感谢大家的支持。
免责声明:本站发布的内容(图片、视频和文字)以原创、转载和分享为主,文章观点不代表本网站立场,如果涉及侵权请联系站长邮箱:is@yisu.com进行举报,并提供相关证据,一经查实,将立刻删除涉嫌侵权内容。


